Pixey Posted August 3, 2018 Share Posted August 3, 2018 The Poll for the OOTF#126 Hourglass is now open until Saturday August 11th 2018, 2 pm EST (7 pm UK) Clock Good Luck Everyone! Amazing entries this time round. How I made Jennifer & Halle in Paint.net My Gallery | My Deviant Art "Rescuing one animal may not change the world, but for that animal their world is changed forever!" anon. Link to comment Share on other sites More sharing options...
Pixey Posted August 11, 2018 Author Share Posted August 11, 2018 And the Winners are: In 1st place is @MJW with 8 votes In 2nd place is @Pixey with 5 votes In 3rd place is @welshblue with 4 votes Congratulations to the Winners What an amazing entry from @MJW - quite eye-opening. Thank you everyone for entering. I will PM @MJW for his next choice of theme. 2 How I made Jennifer & Halle in Paint.net My Gallery | My Deviant Art "Rescuing one animal may not change the world, but for that animal their world is changed forever!" anon. Link to comment Share on other sites More sharing options...
lynxster4 Posted August 11, 2018 Share Posted August 11, 2018 Congrats to the winners: @MJW , @Pixey and @welshblue !! I agree MJW's entry was superb! ? ? My Art Gallery | My Shape Packs | ShapeMaker Mini Tut | Air Bubble Stained Glass Chrome Text with Reflections | Porcelain Text w/ Variegated Coloring | Realistic Knit PatternOpalescent Stained Glass | Frosted Snowman Cookie | Leather Texture | Plastic Text | Silk Embroidery Visit my Personal Website "Never, ever lose your sense of humor - you'll live longer" Link to comment Share on other sites More sharing options...
doughty Posted August 11, 2018 Share Posted August 11, 2018 Congrats winners. Good job to all that entered. Link to comment Share on other sites More sharing options...
Djisves Posted August 12, 2018 Share Posted August 12, 2018 I think I've learned from this competition. Congratulations to well deserved winner @MJW, @Pixey and @welshblue for their placements and everyone who entered for their quality entries. Link to comment Share on other sites More sharing options...
Seerose Posted August 12, 2018 Share Posted August 12, 2018 Congratulations to @MJW, @Pixey, and @welshblue! All those beautiful hourglasses. ? @Pixey! Thank you so much for the hosting. Live as if you were to die tomorrow. Learn as if you were to live forever. Gandhi Link to comment Share on other sites More sharing options...
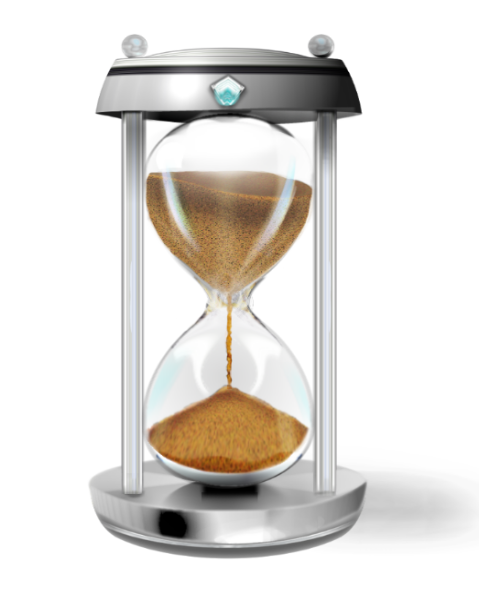
MJW Posted August 12, 2018 Share Posted August 12, 2018 Congratulations to @Pixey and @welshblue, and thanks to all who entered what I think was a very difficult (much more so than I intended) theme. In her PM, Pixey asked whether I used Shape3D or the texture plugins, so I thought I'd provide a brief explanation of what I did, since some of the techniques might be useful. First I created a "model" of the hourglass with Shape3D, as a guide. For the top and base: For the top and base horizontal surfaces (I'll describe the bottom surface; the top is the same.): I used the Shape tool to draw a filled ellipse, based on the Shape3D model. In another layer, I used Layer>Rotate/Zoom to tilt a wood texture backwards an appropriate amount. I then used BoltBait's Paste Alpha to copy the alpha of the ellipse into a layer containing the wood texture. For the top and base sides: I made a side-view profile of a leg using the Line/Cure too, then filled it with the Paint Bucket. I applied the Texture Rounder, along with the Texture Smoother, to make a rounded version. I produced a shaded version (but kept the height map for the next step -- not that I wouldn't keep it anyway). Now the trick: I used the (beta-released) Texture View Skewer to change the viewpoints (once for the top, and once for the bottom), using the horizontal-surface ellipses to determine the amount of skew. (It was something of a trial and error process.). Because of some weirdness in the Texture View Skewer, I needed to adjust the transparency of the skewed views. I used Red ochres' AlphaThreshold. The edges of the skewed versions were uneven, because the skewed versions only represent the front halves of cylindrical objects. I touched them up by sampling the edge colors with the Color Picker, then drawing in the missing parts of the edges with the Line/Curve tool. For the legs: I made a side-view profile, then applied the Texture Object Rounder and Texture Smoother. I then shaded them. Now the trick: I selected the shaded leg and copied it to the clipboard. I then selected the (cylindrical) legs from the Shape3D model and used Paste Warp+ to paste the shaded legs into the selection. That's how I got the rounded perspecive-ish shape at the top and bottom of the leg. It also appropriately scales the size. (The selection of both the shaded leg and the Shape3D leg were accomplished by selecting the outside region, then inverting the selection.) I didn't bother shading three separate legs. I used the same one for each, but then adjusted the Brightness/Contrast and Hue/Saturation of each leg. (I also liberally applied AA's assistant to make the profiles smooth.) The hourglass glass: The outside glass was first drawn with the Line/Curve tool, then filled with the Paint Bucket to produce an object. The symmetry came for using various horizontal and vertical flips. The object was then rounded using the Texture Object Rounder and the Texture Smoother. I used various methods (I tried a lot of ideas) to produce the shape of the inner region, which is basically a slightly shrunk-down version of the outer shape. In the end I think it was mostly a combination of BoltBait's Bevel Object, and Line/Curve. For the inner glass, I once again produced a rounded height map from the shape using the Texture Object Rounder and Texture Smoother. The glass shading combined Texture Shader lighting and equirectangular shading with ad-hoc tricks, mostly using BoltBaits's Bevel Object and perhaps Inner Shadow (there was a lot of experimentation). I combined shaded versions of both the inner and outer glass. The sand The sand height maps were produced by combining "sand-shaped" height maps with the inner-glass height maps using the Texture Merger's Minimum Height Merge Method. For example, I combined a slightly distorted cone HM with the bottom inner glass HM to make the lower pile of sand. Disclaimer: This is a somewhat simplified explanation. I actually originally had the legs in a different orientation, and moved them using Paste From Clipboard. To get the proper locations, I used ochre's Gears plugin to make a three-pointed shape, which I tilted with Rotate/Zoom to fit the bottom horizontal surface. That worked really well. Much better than my original approach of just eyeing it. Also, the top and base were originally only one layer thick (two ridges, with the curved indentation in between), instead of two. They looked too thin and insubstantial, so I copied them to a lower layer then moved them up and down. Voila! twice as thick. It also had the major advantage of having three ridges, which carried on the theme of three ridges in the middle of the legs. One more thing: I would very much like to release a more functional version of the Texture Skewer, but I can't figure out how to improve the functionality to the point I want it to be while still supporting antialiasing. 3 1 Link to comment Share on other sites More sharing options...
lynxster4 Posted August 12, 2018 Share Posted August 12, 2018 Holy cow @MJW! ? You put a lot of work into your entry. It is very impressive. My Art Gallery | My Shape Packs | ShapeMaker Mini Tut | Air Bubble Stained Glass Chrome Text with Reflections | Porcelain Text w/ Variegated Coloring | Realistic Knit PatternOpalescent Stained Glass | Frosted Snowman Cookie | Leather Texture | Plastic Text | Silk Embroidery Visit my Personal Website "Never, ever lose your sense of humor - you'll live longer" Link to comment Share on other sites More sharing options...
MJW Posted August 12, 2018 Share Posted August 12, 2018 5 minutes ago, lynxster4 said: Holy cow @MJW! ? You put a lot of work into your entry. Yes. I think it might have been quicker to build an actual hourglass, including blowing the glass. Link to comment Share on other sites More sharing options...
lynxster4 Posted August 12, 2018 Share Posted August 12, 2018 7 minutes ago, MJW said: including blowing the glass. My Art Gallery | My Shape Packs | ShapeMaker Mini Tut | Air Bubble Stained Glass Chrome Text with Reflections | Porcelain Text w/ Variegated Coloring | Realistic Knit PatternOpalescent Stained Glass | Frosted Snowman Cookie | Leather Texture | Plastic Text | Silk Embroidery Visit my Personal Website "Never, ever lose your sense of humor - you'll live longer" Link to comment Share on other sites More sharing options...
MJW Posted August 14, 2018 Share Posted August 14, 2018 Thank you very much for your kind praise, @welshblue! Also, thanks for lobbying for the Galleria selection. Appreciation of my entry from someone as talented as you means a lot. Link to comment Share on other sites More sharing options...


Recommended Posts