


Ego Eram Reputo
-
Posts
14,589 -
Joined
-
Last visited
-
Days Won
267
Posts posted by Ego Eram Reputo
-
-
18 hours ago, Lemonade said:
Hide background layer (uncheck in layers panel if it is present there)
select all (CTRL+A)copy flattened (CTRL+SHIFT+C)
paste (CTRL+V) into another program.^ This.
Pro-Tip: You don't need to Select All as Ctrl + Shift + C copies the entire layer if there is no active selection.
-
12 hours ago, Adam870 said:
they need to be clicks.
Edit > Copy Merged
Edit > Paste into New Image
File > Save As
= six clicks
")
-
Not when you Feather it afterwards.....
-
What if the value boxes accepted simple calculations?
Width: =800x2
Height: =0.5x600
I think this would be simpler as far as the UI is concerned. I recall another app I use does this (damned if I can remember what it is though...).
-
Solid background? Magic wand the background then invert with Ctrl + I. Press Backspace to fill with the Primary color.
-
There are at least two alternative Black and White+ plugins. Both have a number of options for the recoloring algorithm.
If these don't do what you want, post a sample so we can see what you're working with.
-
Hello @JackHalland - welcome to the forum.
I get this a lot in my work too. What I do is zoom in on the PDF until it just fits into the available screen area. Then I take a screenshot & paste it into PDN.
The theory is that the extra image size will be converted into higher resolution when you print (assuming you select a print size roughly the same as the original).
-
Yes Paint.NET can do this. No plugins required
Check out this image from the website:
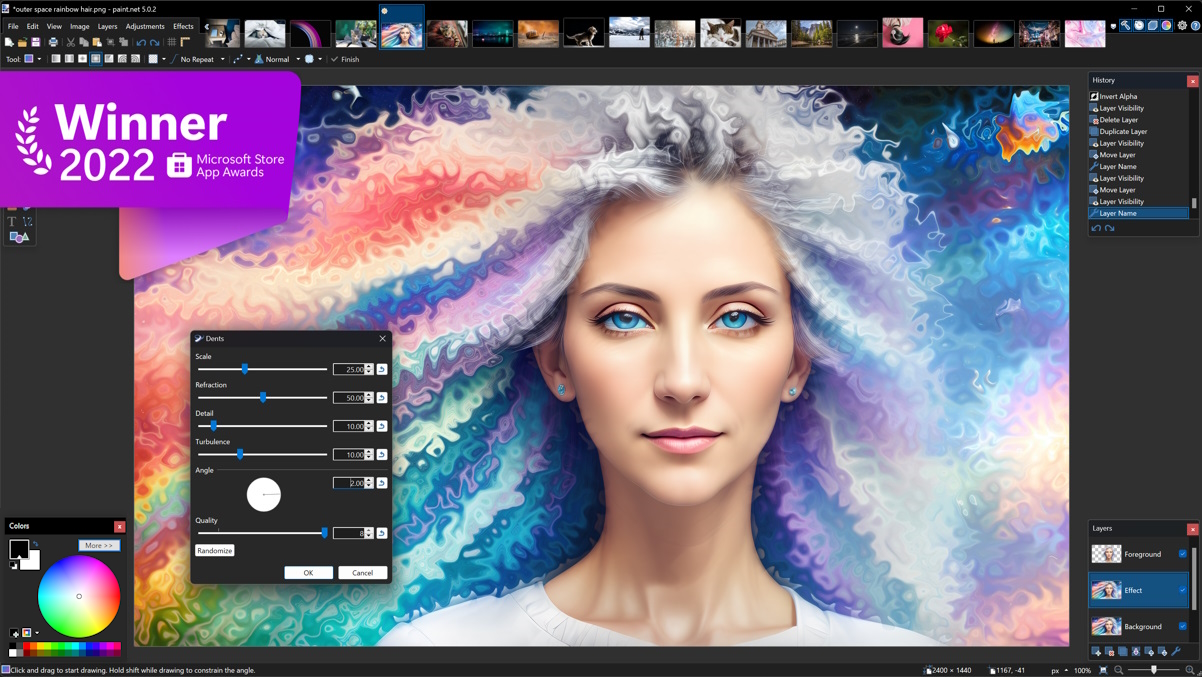
There 20 images opened in this instance of PDN (their thumbnails are across the top of the screenshot). To activate a different image, you just need to click on the thumbnail.
We call this image-strip the Image List. You can find out more about it here: https://www.getpaint.net/doc/latest/ImageList.html
-
 2
2
-
-
Ctrl + Alt + ↓ flips your screen upside-down (the mouse is reversed too). No, I'm not being mischevious, try it in combination with Ctrl + H + H
Brilliant, no?

-
How about this:
- Draw a new hexagon on a new layer above (Shape Tool has a hexagon - but you need to rotate it 90 degrees).
- Make the new hexagon a contrasting color and the thickness you require.
- Center it over the existing hexagon.
- Select the new hexagon with the magic wand tool
- Invert the selection with Ctrl + I
- Activate the big-hex layer
- Press Delete.
-
On 3/6/2023 at 11:33 PM, Lemonade said:
one way to clear recent list:
press Alt once (you will notice under Menu bar all top-level menus File, Edit, View... will have one letter underlined)
then press F (File), R (Recent), C (Clear) and Enter (to confirm)^ this.
Alt + F then R, C and Enter. Bingo!
-
Hello @FrazierWing - welcome to the forum
")
This is the place to ask for help. Post your code and the tech-heads will likely make some recommendations to help you improve the result and rendering speed.
-
@BoltBait's Fill from Clipboard?
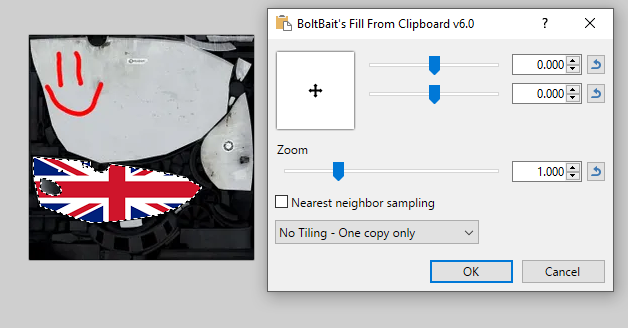
- Copy Union Jack image to the clipboard.
- In the target image, use the magic Wand tool to select one of the pieces.
- Run Effects > Fill > Fill from Clipboard.
-
That's really sweet @lynxster4. I really like what you've done with the aura!
-
 1
1
-
-
I think with a suitably low tolerance you'll be fine selecting just one hue.
Also I didn't make it clear, step 3.5 = Deselect the copied land before running 1px Expansion.
-
22 hours ago, toe_head2001 said:
It should be possible to combine those two buttons, and add some logic to decide which code path to take.
I'll take a look.
EDIT: PR submitted for review.
Thanks @toe_head2001 👍
People, here is a new build to try out. Changes...
- Two pairs settings from legacy planets were inadvertently being swapped. Fixed.
- @toe_head2001 has removed the Import button. Now old and new planets can both be loaded with the Load button.
- Versioning pushed out to 1.4.2
[I get the feeling there is still one setting which is off. I'll try to find it.]
-
1
-
 1
1
-
Please post the error message
-
...and today's the day!! Here's the new build. Time for some testing
<snip - new version below>
What's new in this build?
Well, everything. @toe_head2001 and @Rick Brewster made a heap of detailed suggestions to improve the plugin and @otuncelli basically rewote the entire plugin and cleaned up a lot of poor quality code. I'm indebited to these people for their generous assistance. ⭐⭐⭐⭐ . Among the changes...
- Lots of refactoring/cleanup and performance improvements
- HiDPI fixes
- New feature: Now, you can restore the exact same planet you save (randoms are also saved)
Along the way, the way planets were saved in XML was changed. This means existing planets didn't load, so I added an IMPORT button to allow legacy planets to be loaded. I recommend you load up saved planets and then SAVE them anew in the new format.
If anyone has trouble reviving a legacy planet, please let me know. Similarly, if you find a bug - a post here would be appreciated.
-
2
-
1
-
 1
1
-
2 hours ago, saramello said:
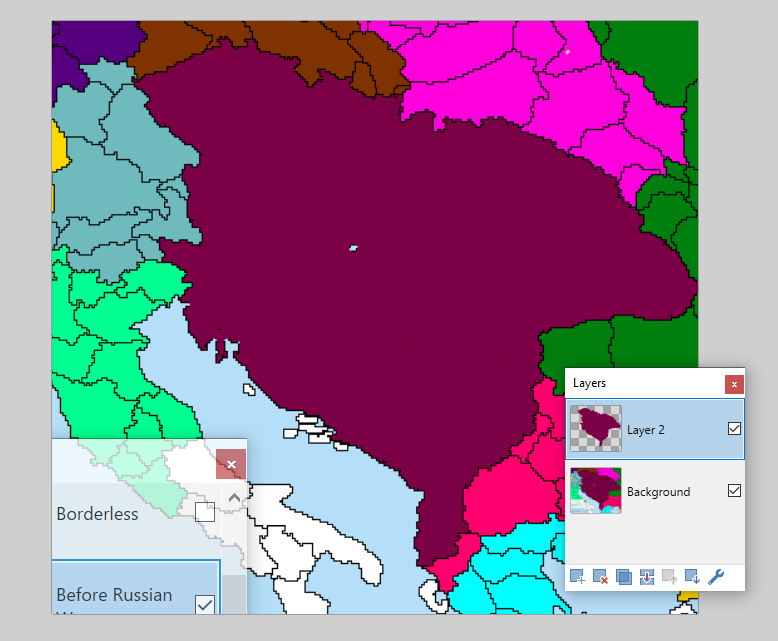
is there a way to tell paint.net to fill in all the internal lines surrounded by the same color?
You'll need this plugin: 1px expansion from @dpy's plugin pack, and one of Feather Object or AA's Assistant.
- Use the magic Wand tool with the SHIFT key held down to select all of the country color (I had to lower the Tolerance quite a bit make sure only one hue was selected).
- Copy the selection CTRL + C
- Paste the selection into a new layer CTRL + SHIFT + V
- Apply Effects > Distort > 1px expansion (I had to apply it three times to clean up Deep Purple).
- Note that you've increased the size of the country as a side-effect of closing up the internal borders. Apply AA's Assistant repeatedly (Ctrl + F after the first time you run it) or @BoltBait's Feather Object (Radius=3) to nibble away at the borders until the external border is again visible.
Repeat for each country.
-
3 hours ago, operamint said:
Finally updated the plugin. Hope it works for you.
Excellent. I'll have it resurrected and back in the Plugin Index next update.
-
1
-
-
@Dzdzovnica - it's time we let this thread die. If you want to re-start the conversation, please start a new thread.
-
14 hours ago, Adam870 said:
every time I need to save .jpg, I need to click File > Save As > change type to .jpg > click Save > click "Flatten" layers > click OK with compression 90% > then click Ctr + Z to continue working on layers.
Much easier:
- Ctrl + Shift + C
- Ctrl + Alt + V
- Ctrl + S
To update the JPG image from your developing image,
- Ctrl + Shift + C
- Navigate to the JPG image
- Ctrl + V
- Ctrl + S
Repeat as many times as you like.
-
1
-
Hi @Panchdara , if you type in the name of the DLL as the keyword and you'll get all the plugins in that DLL returned. Like this....

Cool?
-
March Update
.......umm, nothing. Check in again in April
-
 2
2
-
1
-


Help with Recoloring Ganondorf's Hair Textures (Magic Wand not helpful..?)
in Paint.NET Discussion and Questions
Posted
I selected the face color with multiple selections (chain them together by holding down the Ctrl Key).
Each selection added can have it's own Tolerance - so fine tune each new selection using Tolerance before adding the next one. Each time you want the highest tolerance that does not include any hair (this is called Selection Building).
When I had the entire face selected, I added a new layer and filled the selection with a contrasting color to act as a mask.
Use either BoltBait's Feather Object or AA's Assistant to soften the mask edge.
Select the unmasked region of the mask layer.
Return to the Image layer & run Hue/Saturation to apply new highlights to the hair.
This was a rather rushed attempt. With care you should be able to make the edges better