


csm725
-
Posts
2,130 -
Joined
-
Last visited
-
Days Won
1
Posts posted by csm725
-
-
I WANT CHILIES!
That is off of your usual style and you executed it amazingly. The chilies are so freaking realistic!
Also, Green Dreams is so beautiful.
-
Oh man, thank you! Means a lot!
-
Interesting result Sarkut.
-
Goonie, did you
a.) lower the opacity of the top layer?
b.) maybe you should bevel at higher settings.
-
Try dpy's Circular Text... [link]
Effects > Text Formations
Find a font with a circular period (.) -i.e. this one...
Restart pdn, open the plugin, choose the font, type in multiple dots (.....), adjust the radius to your liking, that's it. Here is what I got:

-
No problem l3ron.
-
Here is my result (Cambria Regular on a 500x150 canvas):

-
Thank you bbq!
-
Yeah 2-0...
-
No, it's 2-0 ptuZ...
-
Sorry ptuZ, I'm a Blue...
Also, logo is aliased.
Himself 1
ptuZ 0
Although if it was a CFC logo you get my vote. Because of that the score is:
Himself 0
ptuZ 1
Himself, blurry text and I would like it better with a transparent background.
-
-
Rubrica: "The end result is very god" - Typo?
 Thanks.
Frontcannon: Yes, something like polished ceramics. I would try any medium-thick serif font. Any serif font which is originally quite thin should work if you put it in BOLD (Times New Roman, Cambria, Georgia, etc.)
By the way, I used Garamond Bold for this. If you are wondering, I put the numbers at a smaller size so that they would be as tall as the letters. Just letting you know.
-
Entering with current:

-
This tutorial is available as a PDF. Click here to view or download it
Astounded by the lack of cool text effect tutorials, I set out to make one myself.
Today I shall instruct you on how to make some text that looks like this:
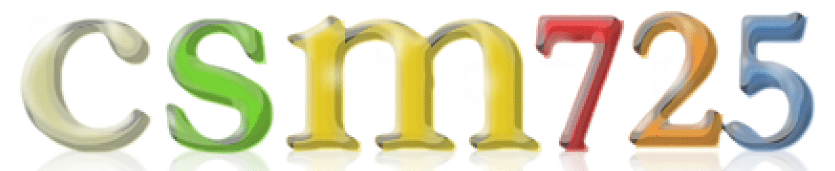
Pretty cool, right?
Plug-ins necessary to complete this tutorial:
AA's Assistant (dpy) - dpy's pack
Bevel Selection (BoltBait) - BB's pack
Trail (pyrochild) - pyro's pack
Alpha Mask Import (illnab1024) - [link]
Align Object (moc426) - [link]
Additional resources:
fontsquirrel, dafont (font sites - all free-of-charge and virus-free - tested)
Step one: Open a 500x150 canvas (no need to worry about anti-aliasing).
Step two: Add a new layer, name it TextMask.
Step three: Choose a font (preferably serif) and type up some text. By the way, I used Garamond Bold for this. If you are wondering, in the 'csm725' image, I put the numbers at a smaller size so that they would be as tall as the letters. Just letting you know.
![tut1v[1].png](//content.invisioncic.com/r125076/monthly_2016_10/57fc6f81358cf_tut1v1.png.be33cf2e41fe73d7652fb4c3b20a4d80.png)

Step four: Align to the Middle Center using Align Object.
Step five: Make a new layer between Background and TextMask, call it TextColor.
Step six: Select an area that covers up one letter, like so:
![tut2v[1].png](//content.invisioncic.com/r125076/monthly_2016_10/57fc6fe456ffd_tut2v1.png.1d849e9f48d1e754c58c29acaa0a1da0.png)

Step seven: Fill each letter-selection with a different color, make sure that the colors don't clash:
![tut3o[1].png](//content.invisioncic.com/r125076/monthly_2016_10/57fc700ff2793_tut3o1.png.bbaba4e7267853f2f9f68c996c85446f.png)

Step eight: Invert the colors of the TextMask layer so it is white. Make a new layer under it and fill it with black. Merge TextMask onto the black layer, select all, and copy. You can then delete the layer:
![tut4d[1].png](//content.invisioncic.com/r125076/monthly_2016_10/57fc70299799f_tut4d1.png.d649441bae1dac111939ac8baa532426.png)

Step nine: Load Alpha Mask with the following settings (onto the TextColor layer):
![tut5[1].png](//content.invisioncic.com/r125076/monthly_2016_10/57fc705191e08_tut51.png.3d57a2fab73290673b42bd4ff48103fa.png)

Step ten: Duplicate the TextColor layer and name the bottom one text shine.
Step eleven: Open up trail at the following settings:
![tut6o[1].png](//content.invisioncic.com/r125076/monthly_2016_10/57fc706edb26b_tut6o1.png.264a97a774d94e7f05635baf4e9e67fa.png)

Step twelve: Apply AA's Assistant at default settings to both the TextColor and TextShine layers.
Step thirteen: Magic Wand at 31% tolerance, shift-select any transparent area on the TextShine layer, invert selection. You should have all the text selected.
Step fourteen: Bevel Selection at the following settings:


Step fifteen: Adjustments > Curves (Ctrl-Shift-M) at the following approx. settings:
![tut8[1].png](//content.invisioncic.com/r125076/monthly_2016_10/57fc70cc6db45_tut81.png.7c1367fe32756ad2936e192908417c25.png)

Step sixteen: Repeat AA's Assistant on the TextShine layer.
Step seventeen: Set TextColor's opacity to 63:
![tut9[1].png](//content.invisioncic.com/r125076/monthly_2016_10/57fc70e40c048_tut91.png.2e9e9f60d32d7eff69a16738981508b3.png)

Step eighteen: Merge TextColor onto TextShine. You should now have two layers.
Step nineteen: Duplicate TextShine and Layers > Flip Vertical.
Step twenty: Drag the flipped duplicate and drag it until the 'top' of the flipped letters meet with the bottom of the actual layers.
![tut10[1].png](//content.invisioncic.com/r125076/monthly_2016_10/57fc71074a9f6_tut101.png.749daa479870ce4b78583d6763b0c23f.png)

Step twenty-one: Do a transparent gradient (linear) like so:
![tut11[1].png](//content.invisioncic.com/r125076/monthly_2016_10/57fc711fb7b34_tut111.png.b88327429f71d225cb32ef8bf3b51121.png)

Step twenty-two: Make a new layer above everything, call it Glints.
Step twenty-three: Go to the brush tool with white and draw some dots on the letters, this is where your glint-spots are going to be.
Step twenty-four: Gaussian Blur these spots at 3-10, depending on your taste. It should look something like this:
![tut12n[1].png](//content.invisioncic.com/r125076/monthly_2016_10/57fc713ae521e_tut12n1.png.0dc268d93cf70a9914631a0c5c940223.png)

Step twenty-five: Delete the background layer, flatten, and save.
Enjoy!
![tutresult[1].png](//content.invisioncic.com/r125076/monthly_2016_10/57fc7150b40ab_tutresult1.png.aac5bbc3ea0616e774eab0b1eeb9d93c.png)

#tut725
-
 1
1
-
 2
2
-
-
Thank you very much. BTW your sig shows up as a broken image.
-
Chrisco, l3ron - Thank you!
-
Weylin, thank you, I knew it wasn't particularly chrome-y.
-
<frikkin computer!>
-
-
Okay thanks!
-
Thank you very much Possum. Yours is also very nice.
-
Thank you very much, himself22!
-
New: Colorful Chrome Sig
Better than current?
![tut1v[1].png](http://content.invisioncic.com/r125076/monthly_2016_10/57fc6f81358cf_tut1v1.png.be33cf2e41fe73d7652fb4c3b20a4d80.png)
![tut2v[1].png](http://content.invisioncic.com/r125076/monthly_2016_10/57fc6fe456ffd_tut2v1.png.1d849e9f48d1e754c58c29acaa0a1da0.png)
![tut3o[1].png](http://content.invisioncic.com/r125076/monthly_2016_10/57fc700ff2793_tut3o1.png.bbaba4e7267853f2f9f68c996c85446f.png)
![tut4d[1].png](http://content.invisioncic.com/r125076/monthly_2016_10/57fc70299799f_tut4d1.png.d649441bae1dac111939ac8baa532426.png)
![tut5[1].png](http://content.invisioncic.com/r125076/monthly_2016_10/57fc705191e08_tut51.png.3d57a2fab73290673b42bd4ff48103fa.png)
![tut6o[1].png](http://content.invisioncic.com/r125076/monthly_2016_10/57fc706edb26b_tut6o1.png.264a97a774d94e7f05635baf4e9e67fa.png)

![tut8[1].png](http://content.invisioncic.com/r125076/monthly_2016_10/57fc70cc6db45_tut81.png.7c1367fe32756ad2936e192908417c25.png)
![tut9[1].png](http://content.invisioncic.com/r125076/monthly_2016_10/57fc70e40c048_tut91.png.2e9e9f60d32d7eff69a16738981508b3.png)
![tut10[1].png](http://content.invisioncic.com/r125076/monthly_2016_10/57fc71074a9f6_tut101.png.749daa479870ce4b78583d6763b0c23f.png)
![tut11[1].png](http://content.invisioncic.com/r125076/monthly_2016_10/57fc711fb7b34_tut111.png.b88327429f71d225cb32ef8bf3b51121.png)
![tut12n[1].png](http://content.invisioncic.com/r125076/monthly_2016_10/57fc713ae521e_tut12n1.png.0dc268d93cf70a9914631a0c5c940223.png)
![tutresult[1].png](http://content.invisioncic.com/r125076/monthly_2016_10/57fc7150b40ab_tutresult1.png.aac5bbc3ea0616e774eab0b1eeb9d93c.png)


Polished Ceramics / Colored Glass Text Effect
in Text Effects
Posted
Thank you for the pin!!!