


Ego Eram Reputo
-
Posts
14,585 -
Joined
-
Last visited
-
Days Won
267
Posts posted by Ego Eram Reputo
-
-
Text Distortion or Arc Text should be able to do what you want.
-
The Magic Wand will do it
")
Try setting the Tolerance quite low then add more selections by holding down the CTRL key as you click to select new colors.
The low Tolerance will stop the selection 'leaking' out to nearby shades (Tolerance of zero means only the shade you click on will be selected).
-
22 hours ago, HankP said:
I mostly find myself wanting to do this toggle on Fill (Paintbucket)
Took me a sec to figure out you want: the CTRL key toggle (vs sampling) that the Color Picker has applied to the Paint Bucket. That would align both tools. Not a bad suggestion!
I've filed an issue on Github so the request doesn't get lost.
-
...another tip: holding down the CTRL key forces sample-from-Image, but the toolbar does not change with the key. So it looks like Layer is still selected (if you look carefully there is a modifier applied to the cursor when Ctrl is held down)
-
On 2/7/2024 at 7:13 AM, Pixey said:
If you don't give us any more information, then we can't help.
Just this^. The plugin was published in 2007. If it hasn't been updated, it probably won't be. Without the requested information there is little we can do.
-
 1
1
-
-
Hello & welcome to the forum @SouthPark.
This thread is 3+ years old. I'll shortly lock it. If you wish to continue this discussion, please start a new thread.
Because you're new around here, I'll give you the lowdown....
PDN saves in a format that preserves information. If the format is unspecified (a New image) it's not a stretch for PDN to ask what configuration you want.
On first save for a new image, single layer images default to *.PNG. Multi-layered images default to *.PDN. These are chosen as the defaults so data is preserved.
Once saved, edits to the image will not ask for the file format again unless the parameters have changed (you added layers to a PNG for eg).
-
10 minutes ago, BoltBait said:
Make sure the file name does not have a space in it.
You'd think by now I'd have learned this ^. Solved
")
Thank you @BoltBait
-
-
Nice!
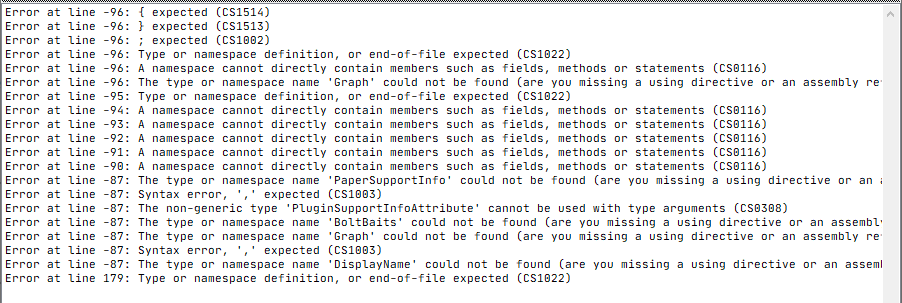
I wanted to have a play with this, but I'm unable to build the DLL from the source (using Codelab 6.11).

Appears to Render fine from Codelab ...but has build errors.
Edit: Is there a clever way to copy the Error List in Codelab?
-
21 hours ago, indrek70 said:
The problem is in this, that I do not see through the hand and I do not see where I am going to move the line point.
Click & hold the nub you want to move just outside the selection, then use the keyboard arrow keys to move the selection. The control is finer and the cursor doesn't get in the way.
If you're moving the entire selection, just use the arrow keys (+= Ctrl modifier if you need large movements). You don't need to click & hold any of the nubs to move the entire selection in this way.
-
- Open all your target images
- Use the Rotate/Zoom tool to rotate, displace and zoom your image (open it with Ctrl + Shift + Z)
- Activate the next image
- Press Ctrl + Shift + Z again
- Press Enter
- Goto 3
-
Another option: Try Effects > Color > Quantize. Set the Dithering level to zero, then progressively lower the number of colors. When you get down to a color count of less than six most of the detail will be reduced/blended into neighboring regions.

-
 2
2
-
-
February Update
No new plugins this month. Check in again next month
-
3 hours ago, tieTYT said:
Is this a bug? If it's not a bug, can you help me understand when the behavior in my GIF is advantageous? It'll help me understand when I should use it.
No, it is not a bug.
It might help to think of the layer as a pane of glass you're swapping between window frames. You take the transparency with you when you replace the old glass with new (in PDN you're copying the clear bits as well as the opaque pixels in the layer).
If you were to double-glaze within the new frame, you add the second pane of glass to the first, preserving both layers of transparency (this is akin to pasting into a new layer).
This might help explain: https://www.getpaint.net/doc/latest/WorkingWithLayers.html
-
1
-
-
5 hours ago, T.M.A. said:
it would be really nice if there was a way I could maake the same adjustments to the opposite side.
The trick here is to work on only one half and ignore the other. When you're done, mirror the completed side over the other.
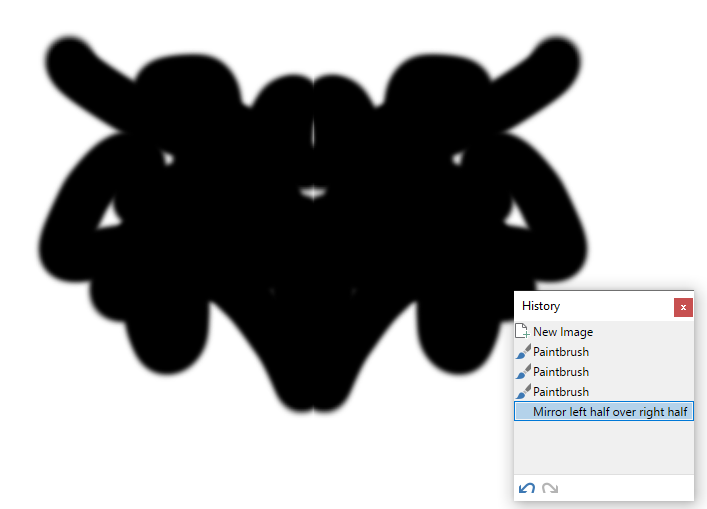
Link to some mirroring plugins: https://forums.getpaint.net/PluginIndex?keywords=mirror&author=All+Authors+&type=0&status=7&compat=3&order=title&menu=Effects+>+Mirror&release=0
-
1
-
1
-
-
Difficult because the writing is so faint and the blue pen is doing a great job of obscuring it (as, I suspect, the person scribbling on it intended).
I'd try to read the letters and reconstruct the words from that rather then trying to restore.
J-e-t-o-e-i | ?-?-d-e?
Do you have more writing to compare?
-
20 hours ago, canter12 said:
cant individually use the magic wand because that would take hours, and besides that ruins the anti aliasing
Assuming your text is over a uniform background.....
-
Select the background with Magic Wand
 and the Shift key held down (this selects all of the background including the bits inside closed characters)
- Invert the selection with Ctrl+ I
-
Select the background with Magic Wand
-
53 minutes ago, chuckee said:
I get to the point of having the checkered sourrounds, save as .png and when I go back paint the newly added .pmg image still has the white outlinearounf the image.
You've removed the background surrounding color, leaving blank pixels. To show you where this transparency is, paint.net shows you the checkerboard pattern. The checkerboard pattern is not part of the image, it is there as a visual cue to you.
You've saved as a *.png (which support transparency). Correct
57 minutes ago, chuckee said:when I go back paint the newly added .pmg image still has the white outlinearounf the image.
This is a result of incomplete removal of the white background. It shows up at the edges when you place another color behind the image. The usual method of removing these artifacts from the edges is to run the AA's Assistant plugin over the layer.
-
50 minutes ago, chuckee said:
I got an endless string of security challenges. What is that all about?
It stops spammers and bots polluting the forum.
-
No plugin is going to do that.
I'm seeing a trend in your posts where you ask for plugins to do artistic work for you. How about learning some fundamentals and applying that to create art?
Stained glass tutorial:
-
3
-
-
For the documentation on the Gradient tool + Transparency mode, follow this link: https://www.getpaint.net/doc/latest/GradientTool.html
-
1
-
-
10 hours ago, Otto04 said:
PS C:\Program Files\paint.net\Effects> dir '.\Analog Efex Pro 2\'


    Directory: C:\Program Files\paint.net\Effects\Analog Efex Pro 2
Long shot: Try replacing the spaces in the directory with underscores? \Analog_Efex_Pro_2\
-
12 hours ago, frer8833 said:
I mean PDN forgets all the later steps I took if I go back and press ctrl+copy
No it doesn't. Copying does not change the current layer, so there is no change (or addition) to the History.
12 hours ago, frer8833 said:......or make any other thing to the image
Correct (you can change the Primary & Secondary colors & View conditions for e.g.). Actions which change the active layer remove later items in the History. This is like the Grandfather Paradox of time travel, where travelling back in time and making changes alters the current reality.
-
On 1/16/2024 at 9:09 AM, Tactilis said:
1. Create a new layer and switch to it.
2. Draw your line/shape.
3. Press S to activate Rectangle Select and select the area surrounding the line/shape.
4. Ctrl+C to copy the selected pixels, which will be your line/shape and the transparent pixels around it.5. Ctrl+V to paste in the same location
6. Press M to activate Move Selected Pixels and drag to where you want it to be.
Or....
1. Create a new layer (Ctrl + Shift + N). By default the layer should be activated, if not - switch to it
2. Use O to activate the Line/Curve tool ("o", not zero)
3. Draw your line/shape
4. Duplicate the layer
 as many times as you need (Ctrl + Shift + D)
-
1
-


 and the Shift key held down (this selects all of the background including the bits inside closed characters)
 as many times as you need (Ctrl + Shift + D)
Text Along A Slight Curve
in Paint.NET Discussion and Questions
Posted
Fabulous!