


Helio
-
Posts
1,832 -
Joined
-
Last visited
Posts posted by Helio
-
-
It's okay, oma. Voting isn't over yet!
An OS stands for Operating System. Windows XP is an Operating System. Do you know what you see on your computer when you have no programs or anything open? You see the Desktop, with icons, a background image, and your Taskbar, which has the 'Start' button on it. That is what we would be changing.

-
Aww, thanks you two. You're too kind.
Don't worry, though. You will be able to use it, and soon!*
* meaning when I have some free time... <_<
-
Yes, it seems that the OS pack will take the Bacon!
It ought to to be a fairly interesting skinning object...
...Come to think of it, any of them would.

Edit: wrong ought!
-
Sorry, couldn't help it.
-
Hurrah! I'm glad someone noticed the ripple effect! I had particular trouble trying to get it to look right. :o
And yes, it was completely and exclusively created in PDN, excepting the photo only.
Thank-you very much!
-
I'm glad that you do!
-
Neat-o! Nice use of that color.
-----

100% Paint.NET goodness. 8)
-
Crazy Man Dan has been busy and under the weather, I believe.

-
That is the reason I don't think that I release voting results...
Seeing them may disappoint people from entering in the future, once they see how few votes they got (if any). It's not that people do not like your design, it's that they like other designs more.
Do you understand?
I will tell you that kipper010 liked your design a lot.
-
-
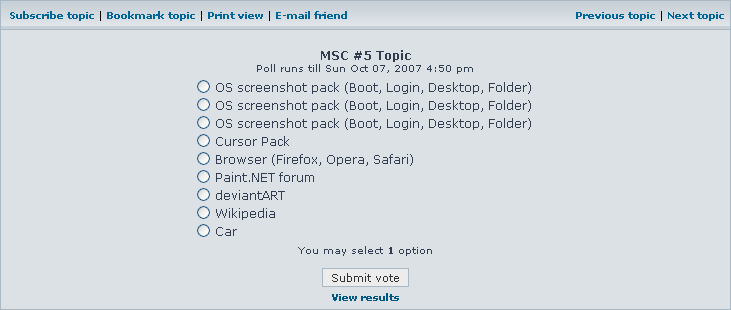
This is the new thread for discussing MSC #5. From now on, each consecutive competition will have it's own discussion thread.
Anyway, we need to choose a topic! Place your vote now!
-
Now if only I can get a poll working in this thread again...
Edit: Ulgh, not going to happen. I think it might actually be better to have a seperate discussion thread for each competition, though.
Edit #2: Time to move all discussion to here!
-
Voting is still open until 12:00am eastern time!
And could someone please fix the polls? A new thread will have to be started if the editing doesn't work.
-
I'd call this a bug:
I am trying to edit the MSC discussion thread for voting, and it keep removing and duplicating things when I submit the edit. The preview always looks fine, but it changes every time when I submit.
How frustrating!!
Edit: I also have tried posting a poll in a new thread, and there was no problem. It must be only when editing polls. Can this be fixed?!?
-
- [*:f24b3]Notice the small window to the bottom left that says 'Colors'. Click on the 'More >>' button.
[*:f24b3]There is a Drop-down menu at the top left of the colors window, it should say 'Primary'. If it says 'Secondary', select 'Primary'.
[*:f24b3]Select whatever color you want the grid to be (black is usually best).
[*:f24b3]Now change the drop-down menu to say 'Secondary'
[*:f24b3]It doesn't matter what the Secondary color is; white is fine.
[*:f24b3]At the bottom right of the window you will see a slider that says 'Transparency-Alpha'. Drag the slider all the way to the left until the counter says '0' (or just type '0' into the counter)
[*:f24b3]Okay, moving on. Now find the little window that says 'Layers' (should be on the bottom right).
[*:f24b3]Click the farthest bottom left button on that window, or press the key-stroke (Ctrl)+(Shift)+(N). This will add a new layer to your image.
[*:f24b3]Now run the Grid/Checkerboard Maker to your desired settings.
More on the Color window: (Link)
More on Layers: (Link)
More on the Layers window: (Link)
- [*:f24b3]Notice the small window to the bottom left that says 'Colors'. Click on the 'More >>' button.
-
Always glad to help.
Feel free to ask for help if you need it!
-
Hello, deaque. I will explain things as clearly as possible; remember, I do not know how experienced you are with computers, so I will assume that you are new to them, as you imply. Please do not be offended if I am wrong.
A plugin is an installable bit of information that allows you to do a certain action on your command.
Paint.NET's plugins consist of a simple .dll file, which only needs to be placed in the correct folder to work.
Most plugins are contained in a zipped folder. It is similar to a normal folder, but needs to be 'Extracted'. Anyway, let's get started.
- [*:cd785]First, click
[*:cd785]Close Paint.NET, if you have it open.
[*:cd785]Now, unless you changed your individual setting, the file should be visible on your desktop. It will have a little zipper running up the front. Right-click it.
[*:cd785]One of the options in the menu should be 'Extract All...'. Click this.
[*:cd785]The Extraction Wizard will appear. Don't bother with any of the options, simply click 'Next', 'Next', and 'Finish'.
[*:cd785]Now a window should appear showing the contents of the extracted folder.
[*:cd785]Click Start on your task bar, and open 'My Computer' in a new window.
[*:cd785]If you followed the standard installation of Paint.NET:- [*:cd785]Click '(C:)'
[*:cd785]Then 'Program Files'
[*:cd785]Find and double-click 'Paint.NET'
[*:cd785]And lastly, a folder that says 'Effects'.
[*:cd785]Drag and drop the contents of the extracted folder we dealt with earlier into the 'Effects' folder.
[*:cd785]That's it! You have just installed a plugin. Close all of the windows, and open Paint.NET.
[*:cd785]Click on the Effects tab located at the top menu.
[*:cd785]Hover over the 'Render' sub-menu, there you should see 'Grid/Checkerboard Maker...' Click on it.
[*:cd785]You can learn a little about how to use the effect here.
Enjoy!
-
What is the 'pyrochild.effects.common.dll'?
Anyway, I really like how this works! And I think it is great that you are including a Save and Load option with your latest plugins!
-
Hey dude!
Didn't understand any of that, other than the icon part!

I don't know if that's the kind of thing you are looking for!
-
If you wish to rotate a complete image, than you should use the Rotate image tools under the Image tab:
- [*:1bf47] :RotateCW: Rotate 90° Clockwise (Ctrl+H)
[*:1bf47] :RotateCCW: Rotate 90° Counter-Clockwise (Ctrl+G)
[*:1bf47] :RotateCCW: Rotate 180°
If you wish to rotate a single layer, you should use the Rotate/Zoom tool located under the Layers tab:
- [*:1bf47]
 Rotate/Zoom (Ctrl+Shift+Z)
You can also use the Move Selected Pixels tool to rotate a selection:
- [*:1bf47]Select the part of the image you wish to rotate
[*:1bf47]Click on the Move Selected Pixels tool ( )
)
[*:1bf47]Right-click and drag a corner of your selection (hold shift to constrain the angle of rotation to 15° increments)
Learn more about the Image tab: {Link}
Learn more about the Rotate/Zoom tool: {Link}
Learn more about the Move Selected Pixels tool: {Link}
- [*:1bf47] :RotateCW: Rotate 90° Clockwise (Ctrl+H)
-
I want to!
Nice shading... but maybe you could add shadow to the left-hand side of the right ear? Might add more depth?
-
-
No, there are 12 so far, but I would like to see twice that much!
-
Voting has been extended due to a lack of votes...
 Rotate/Zoom (Ctrl+Shift+Z)
 )
)
Monthly Skinning Competition Discussion -- #5 is over
in Paint.NET Discussion and Questions
Posted
I'm really thinking not. Then you have to get into the confusion of submitting multiple images...