


Lemonade
-
Posts
113 -
Joined
-
Last visited
-
Days Won
5
Posts posted by Lemonade
-
-
As Tactilis pointed out, Help button is the only one (in the top right buttons group) with a menu.
Maybe that is the reason for unusual tooltip behavior.
-
As Apollo702 said, it would take time to make this.
I'd work on a larger canvas, so you can move things around. Maybe work with 2 documents, one for illustration and another for cover where you import finished illustration or illustration segments.
Check BoltBait's Plugin pack (for outline and drop shadow, helpful for text):
https://forums.getpaint.net/topic/121343-boltbaits-gpu-accelerated-plugin-pack-for-paintnet-v50-updated-2023-07-28/
Here is a picture with some tips:
https://imgbox.com/de0UDK6x-
 2
2
-
-
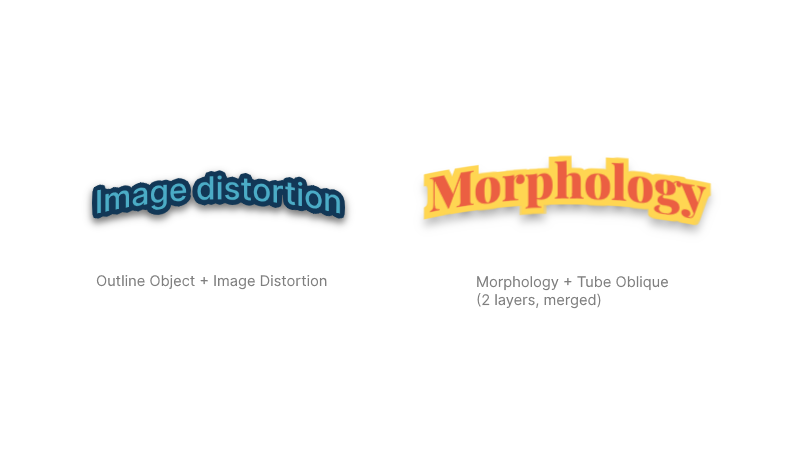
For outline there is Outline object by BoltBait:
For curved text, you could try Tube Oblique:
Or use Image Distortion plugin which goes into Paint.net > Effects folder. When you open Paint.net it is under Effects > Distort. I used second download link (not mediafire) and it works fine.-
 1
1
-
-
Nice! Easier to use compared to Dr Scott's Markup Renderer plugin.
If you want to give it a try, here are two text styles for the plugin:https://gitlab.com/-/snippets/3613586
(Open raw file using Raw icon, just before Download icon, then select all text and paste into Markup plugin)
Copy everything and paste into plugin top area (code editing window).
-
 1
1
-
-
3 hours ago, Welsh Yellow Cheddar said:
There are several plugins to manipulate text but I haven't seen one capable of changing the spacing in a way that the letters overlap. Please let, me know if you know one.
You could try this one:For this one to work, you'll need some html and css knowledge, mostly text manipulation.
The issue is there is no way to make the background of the rendered output transparent.-
1
-
-
Just to report that JPG version of paint.net screenshot is missing on the homepage:
https://www.getpaint.net/screenshots/pdn510_thumb.jpgPNG loads fine:
https://www.getpaint.net/screenshots/pdn510_thumb.png-
 1
1
-
-
From what I understand about paint.net, if you save as .png, then add new layer to your document, next save (CTRL+S) will open a save dialog and set .pdn as default filetype.
-
Here is a really interesting tutorial:
-
1
-
-
There is a difference when you zoom in and out. Here is an example from 100 to 200%:
Zoom in: Zoom out:
100 (+12) 100
112 (+13) 113 (-13)
125 (+15) 127 (-14)
140 (+17) 142 (-15)
157 (+19) 159 (-17)
176 (+24) 179 (-20)
200 200 (-21)
Values for zoom in are like this (after 200%): 24, 27, 30, 19*, 36, 40, 45, 51, 57, 71, 100 (from 600 to 1300), 200 (from 1500 to 2100)...-
1
-
-
Congratulations @Red ochre and @Disk4mat. Great entries everyone.
-
1
-
-
Thanks @Pixey, really like your mouse with a book!
@lynxster4 thanks for hosting. -
This is a good read:
-
1
-
-
6 hours ago, BlastOfBN said:
And it's probably a good thing that it's being changed to the Alt key in 5.0.8, because whenever you hold down control, this happens...

This is some sort of stamping feature, isn't it?This looks like a rendering issue. To avoid it, while the object is selected move with arrow keys in any direction once (1px), and then back (opposite arrow key) to original position. Then you can resize without object showing in the back.
-
There is a better option using Dynamic Draw:
Create new brush in paint.net, I did a small one with 40x100 px dimensions and 12px line in the middle (transparent background). Save as png.
Now create a new document and on a new Layer draw a curve with Line / Curve tool.
While that layer is selected go to Effects > Tools > Dynamic Draw
In Dynamic Draw, go to Add Brush Images and load your png brush and select from the brush list above.
Set brush size to 30-40, and under Special Settings disable Auto Manage (play with different values) and check Rotate With Mouse.
Draw over (follow) the curve.
You will get something like this:
-
3
-
-
Hey @HankP, this one is really hard
")
Here are 2 examples but none is perfect nor easy to use.
You'll need two plugins, Trail and AA's Assistant:There is also Vanishing Trails which is worth a try. I didn't tried this one.
Example 1: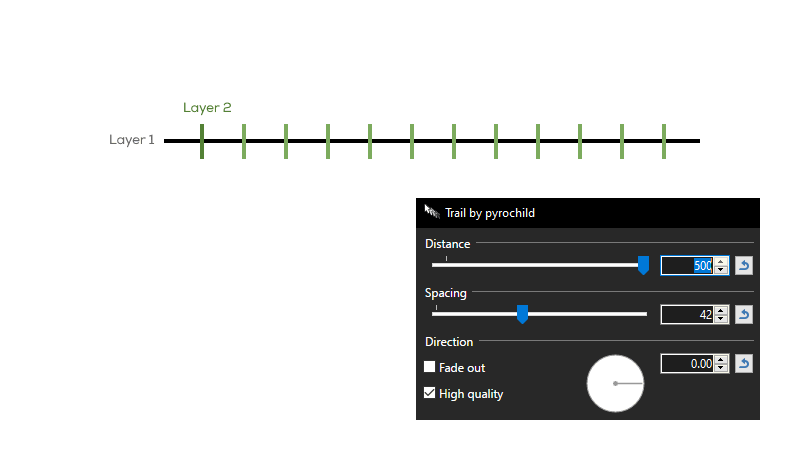
Create 2 layers, Layer 1 is a long line and Layer 2 is one short (perpendicular) line which we duplicate using Trail plugin (Effects > Object > Trail).
This works on straight lines only.
Example 2: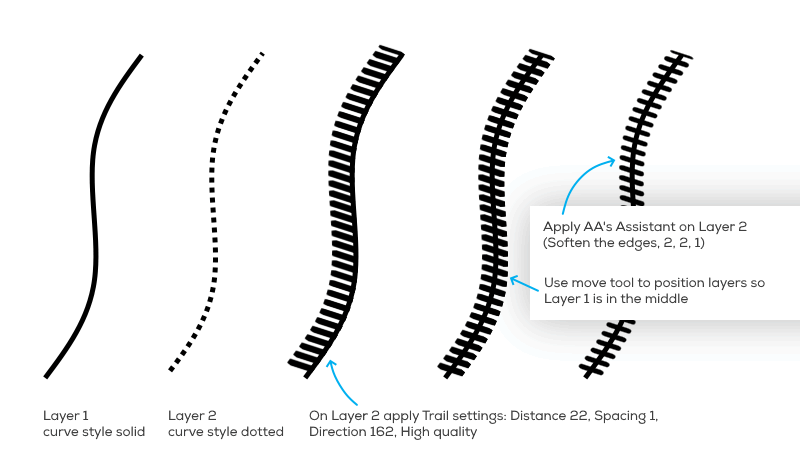
Again, create 2 layers, Layer 1 is a solid style curve and Layer 2 is dotted style curve. Try to somewhat match "curvature" of curves, so they look similar.
Layer 2 (dotted curve), apply Effects > Object > Trail (Distance 22, Spacing 1, Direction 162, High quality - these are setting used in my example)
With Move tool align any of the layers so Layer 1 (solid curve) is in the middle.
Use Effects > Object > AA's Assistant to smooth Layer 2 curves/lines a bit (AA's settings: Soften the edges, Sharpness 2, Gamma 2, Offset 1).
Depending on the curve orientation change Trail Direction.
This example works on straight and slightly curved lines.
Update: if you apply AA's Assistant on Layer 2 before Trail, you will get better results.-
1
-
-
Hello @cubic, you could try BoltBait's Outline Selection (part of the plugin pack, listed 26 under description):
I would select dark area (tolerance 10-20%), then create an empty layer and go to Effects > Selection > Outline Selection
Under plugin settings, disable Anti-Alias outline, for other settings everything is set to default. But you can try out different settings.
The last thing is to remove borders created at the document-canvas sides (paint them with dark color).
-
1
-
-
Hey @Blushock here is a section explaining the difference between pixelated and antialiased selection:
https://www.getpaint.net/doc/latest/SelectionTools.html#21 -
-
I don't have that issue.
New document (moderate size), few layers and effects applied. And then I did these steps:
- File > Print: cancel print dialog using X (Close), Cancel button and Esc
- CTRL+P: same process
- Print icon from the Toolbar: same process-
1
-
-
29 minutes ago, HankP said:
What tool are you using that gives you the diagonal measurement?
Shapes (below Text and Line / Curve tools) and then pick a Rectangle (or any shape, they all show Diagonal of the bounding box).
-
Oh, if you use Rectangle select tool, instead of Diagonal there is Area.
-
6 hours ago, HankP said:
(c) the length (diagonal) of the hypotenuse of the rectangle
Do you see Diagonal in the Status bar? When any shape is drawn, there is Size x,y and Diagonal.
But as soon as you finish (pressed enter, deselect or any other action like switching tools) that information is gone. -
This is really great @Tactilis!
Works on RGB and HSV fields.
There is one thing I changed, because AutoHotkey asked for version 1:##HotIf WinActive("ahk_exe paintdotnet.exe")Removed one # from the beginning of the line.
-
Even better, for color picker:
Settings (ALT+X) > Tools > Color Picker - After click: switch to previous tool and you don't need "WheelRight ... }" at all.


Tooltips are not displayed after the Tools, Layers, and History windows are hidden then made visible again using the Utility Window icons
in Troubleshooting & Bug Reports
Posted · Edited by Lemonade
added link to post
Just checked, Paint.net 5.0.11, Win 10 issue is there.
If any of the top right buttons (Tools, History, Layers...) is pressed tooltips are gone.
Creating new document resets tooltips back.
Update:
Also, I think there is an issue with Help button and menu drop-down.
If clicked on Help button, menu is displayed, but moving cursor away (Help menu not focused anymore) it closes, and then tooltips don't show at all.
Clicking again on Help button resets or "closes" the menu correctly.
This is probably related to: