


Lemonade
-
Posts
113 -
Joined
-
Last visited
-
Days Won
5
Posts posted by Lemonade
-
-
Your proposition does increase the contrast between cursors and background.
There is an option under Windows Settings > Mouse settings > Additional Mouse options > Pointer options to show cursor position when CTRL is pressed.
Although it is quite annoying (CTRL is used often inside paint.net), but maybe it is useful as an alternative.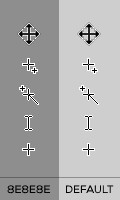
-
2 hours ago, Marilynx said:
When I hover over the DL button, it says "Waiting on (hame of server)," and after a couple minutes, that clears, but I still get nothing when I click on it.
Interesting. Try pasting plugin url below into browser address bar and see if it works (download should start instantly):
2 hours ago, Marilynx said:Also, I tried to post to that thread and could not. Is it closed?
Still opened.
-
Metallize (author dpy) plugin works fine with paint.net v5.0.6. Nothing shows under Settings > Plugin Errors.
Here is an example: https://imgbox.com/gkVi02zY -
Nice! The second part where you load smaller size image into large size document (and draw lines again) is to avoid any blur on the edges. Although it is slower and takes more time.
-
Hey @Marilynx,
All BoltBait's plugins start with v5 or v6 (latest versions) when you hover over the plugins from the menu inside paint.net.
BoltBait's plugins, check for the big blue Download button, made for 5.0+ paint.net version.
There are also older plugins versions listed under NOTE... ignore them if you are running v5.0+ version.Bevel Object is under Effects > Object and Bevel Selection Effects > Selection
Red ochre's Object Bevel is under Effects > Object -
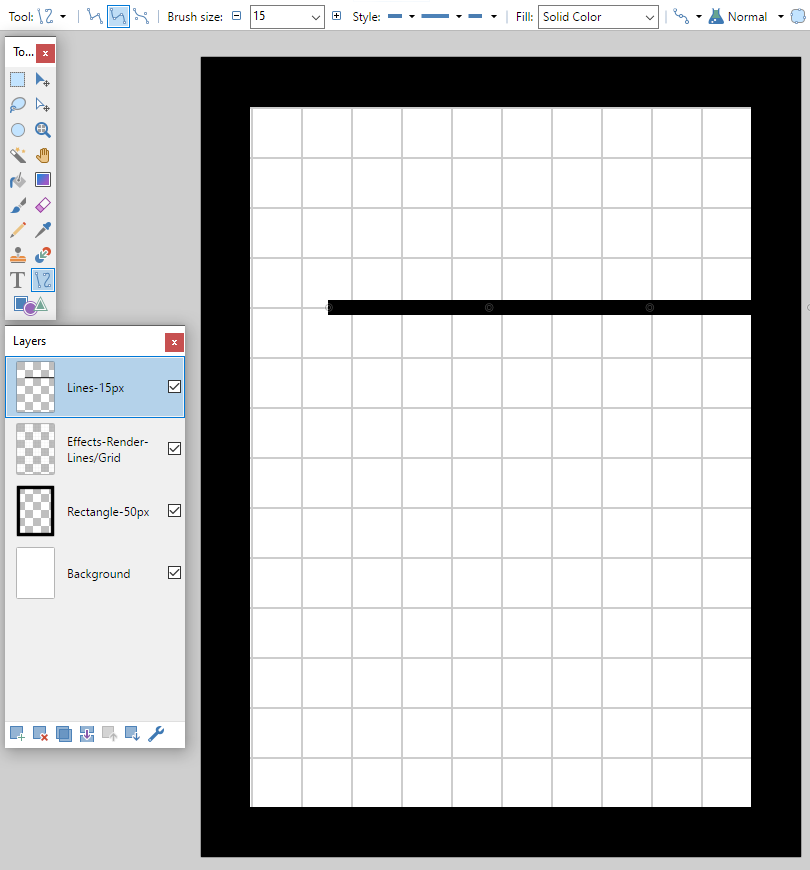
Played a bit with "low quality" image for fast drafts.
- Document size 550x835 px, default 96 ppi; the width 550 * 5 = 2750
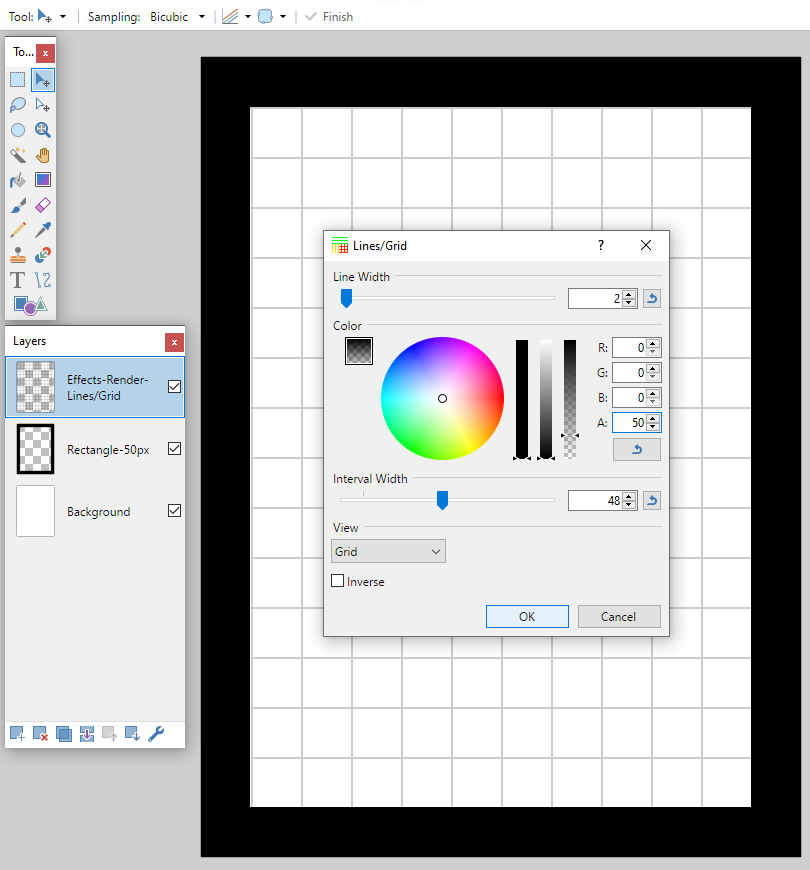
- Effects > Render > Lines/Grid: Line width 2, Interval width 39
- Now, while grid layer is selected, move 6px right and bottom (arrow keys) so the grid is somewhat centered
- For margins, use rectangle with 40px brush size
- For lines, 12px brush size
At this stage, no need to invert colors or apply Outline.
Copy or export as png, jpg...
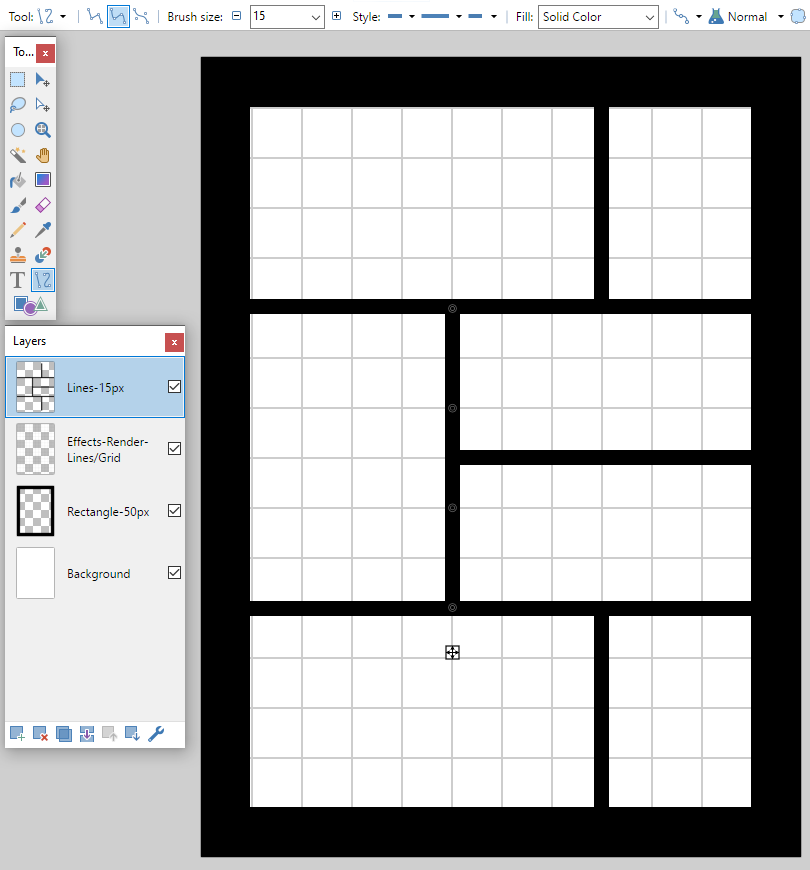
For high quality image, create new document 2750x4175 400 PPI
- Paste copied image (or load if exported) and resize to fill the whole area
- New layer (Margin), add rectangle with 150px brush size
- New layer (Lines), add lines with 70px brush size (maybe set layer opacity to 100-150 to see pasted image)
- After that, merge lines and margin layers, invert colors and set Effects > Object > Outline Object 14px
I'd play with different layouts (550x835 px) and only if I like something, then I'll proceed with high quality steps. -
Hey @City, considering that Grid plugin interval width is constrained to 100px, I would create a smaller size picture with grid first
")
For example, create new 2750wx4175h with 400 PPI, then resize to something like 900w (check-lock Maintain aspect ratio) and add grid only.
Now resize back to 2750w and draw lines over. And 15px line in my example is going to be something like 70-90px and margin instead of 50px more like 200-250px.
Or keep 900w and play around. When you have a template you like, save as png. Then create new 2750w, add png image and resize (with Move tool) to fit the canvas. Draw outline (margins) and lines over.
You could work with grid plugin and 2750w, but instead of 20 squares (looking at vertical squares) there would be 40-50 which is to much to work with.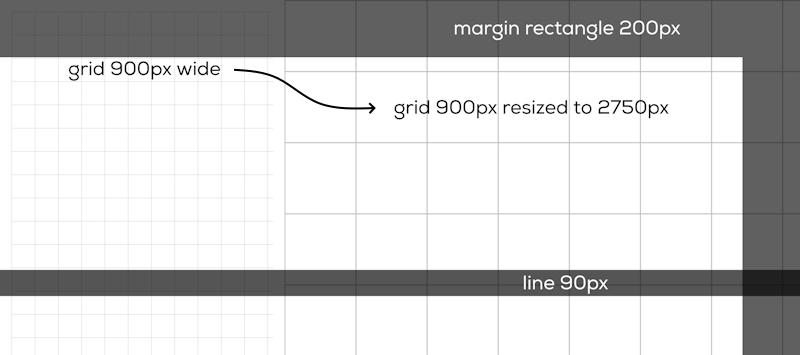
-
Paint.net is a great tool. I really recommend checking Help (F1 inside paint.net) and Tutorials section.
Line (Curve) and Shapes (Rectangle) tools are enough with some help from:
BoltBait's Outline plugin
and Lines/Grid by ReMake
Lines/Grid is useful to divide document and decide where to draw lines.
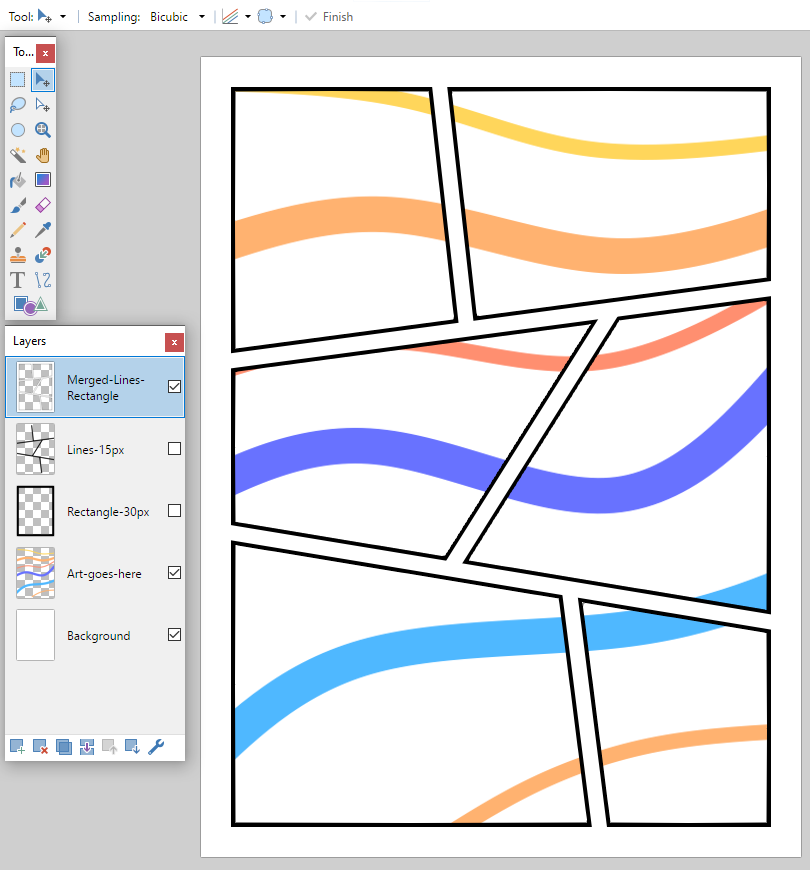
I'm not sure if I already saw a similar process posted before. Can't remember, so here goes.
Example 1SpoilerWork with default black and white colors for templates.
Create new document. I'm using 600x800 px here (for taking screenshots).
With Rectangle (Shapes tool) create document margin.
Add new layer and then Effects > Render > Lines/Grid. Adjusted to 14 "rows" so I can use 4, 3, 3, 4.
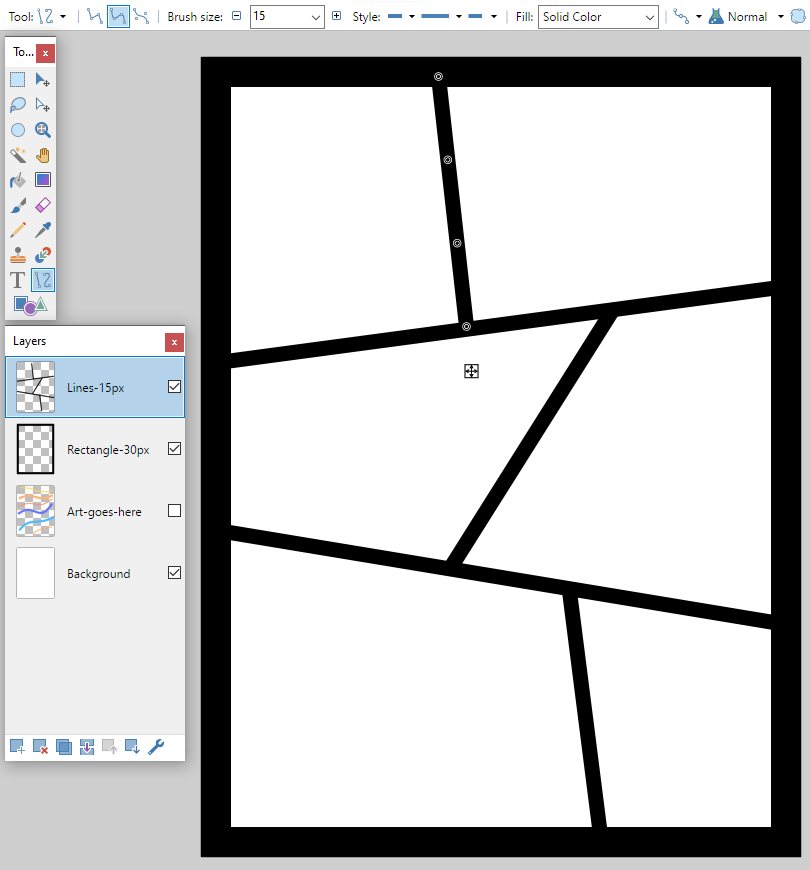
Create another layer and use Line (Curves) tool, hold Shift for straight lines.
Now you can hide or delete Lines/Grid and Background layers. I like to keep them all, just hidden.
While Lines and Rectangle layers are visible Ctrl+Shift+C will copy anything that is visible on the canvas.
Create new layer and paste.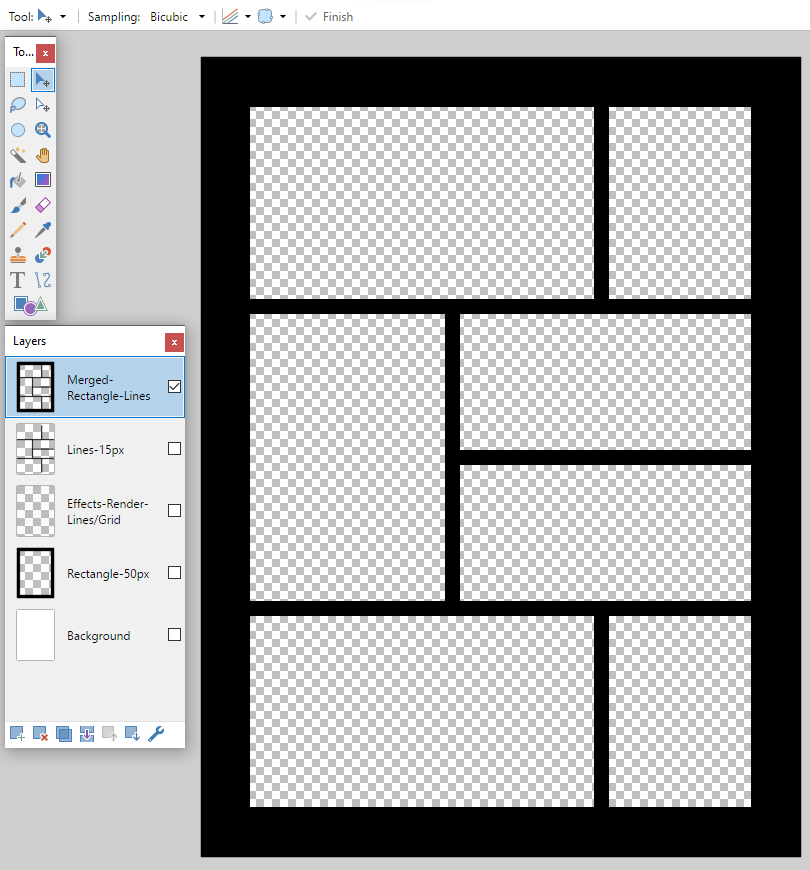
Go to Adjustments > Invert Colors (Ctrl+Shift+I)
Go to Effects > Object > Outline Object.
For straight lines disable Anti-alias and set Blur radius to 0.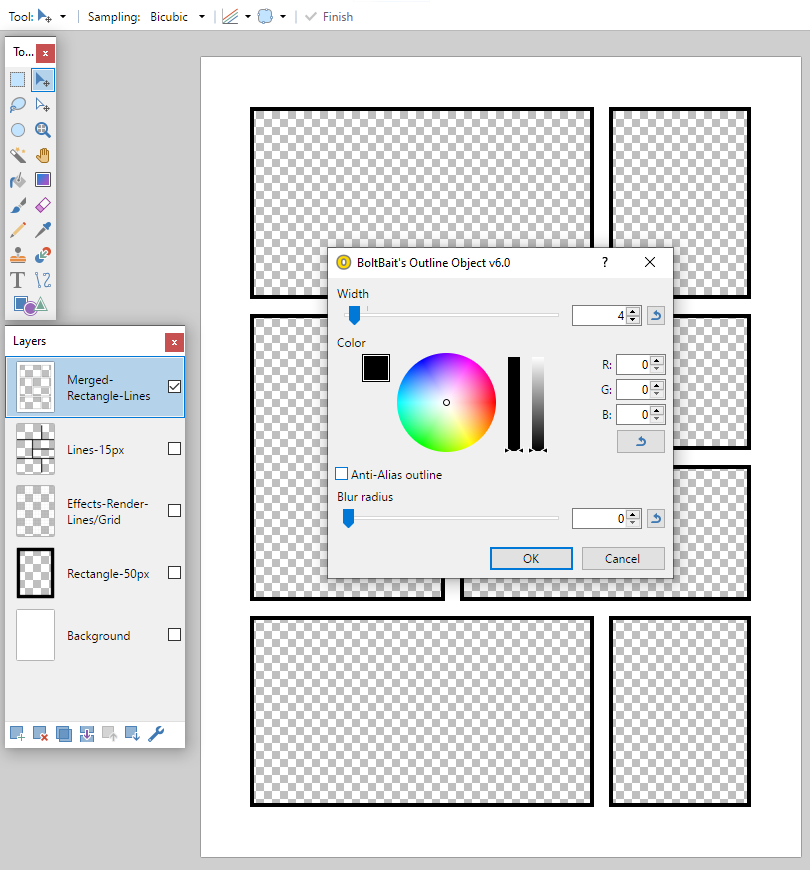
Add your comic art layer below.
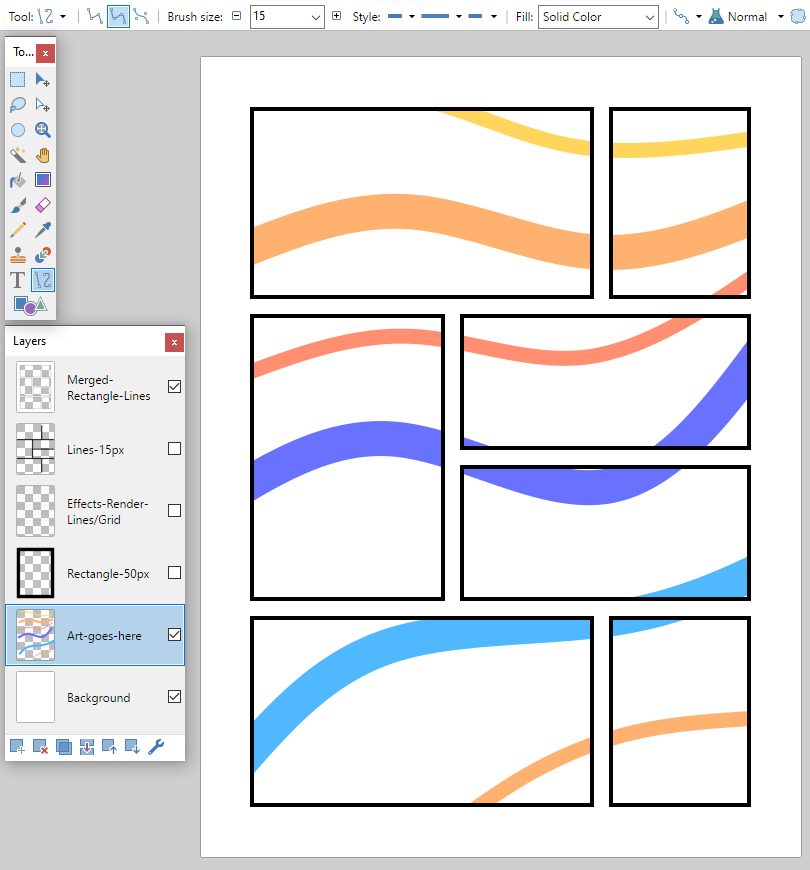
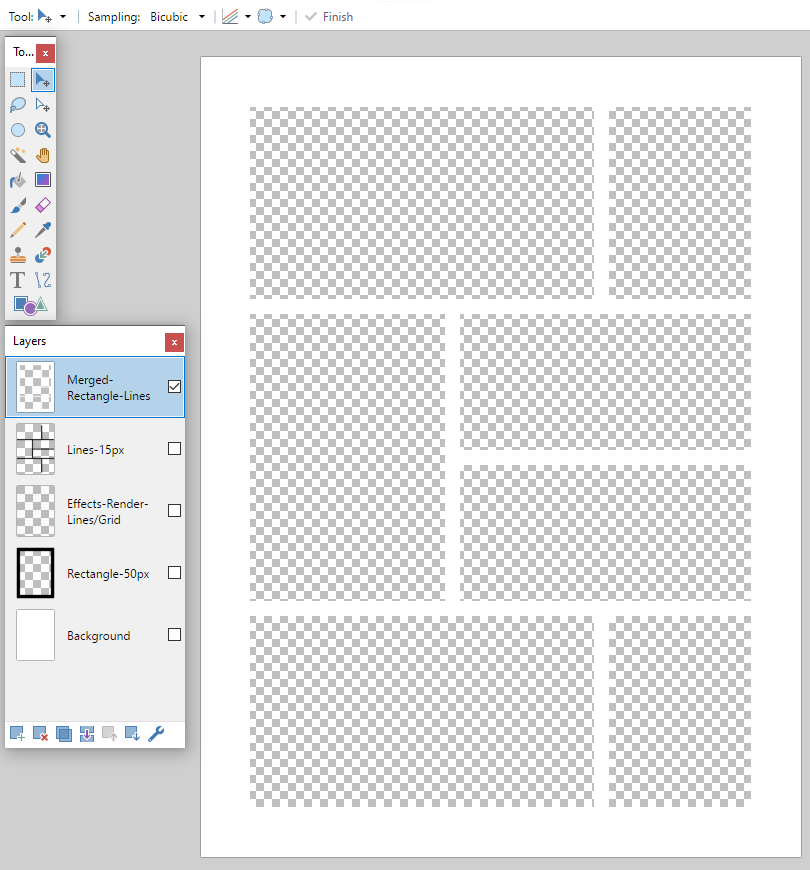
Example 2SpoilerUse Rectangle for margins and then with Lines tool create sections/panels.
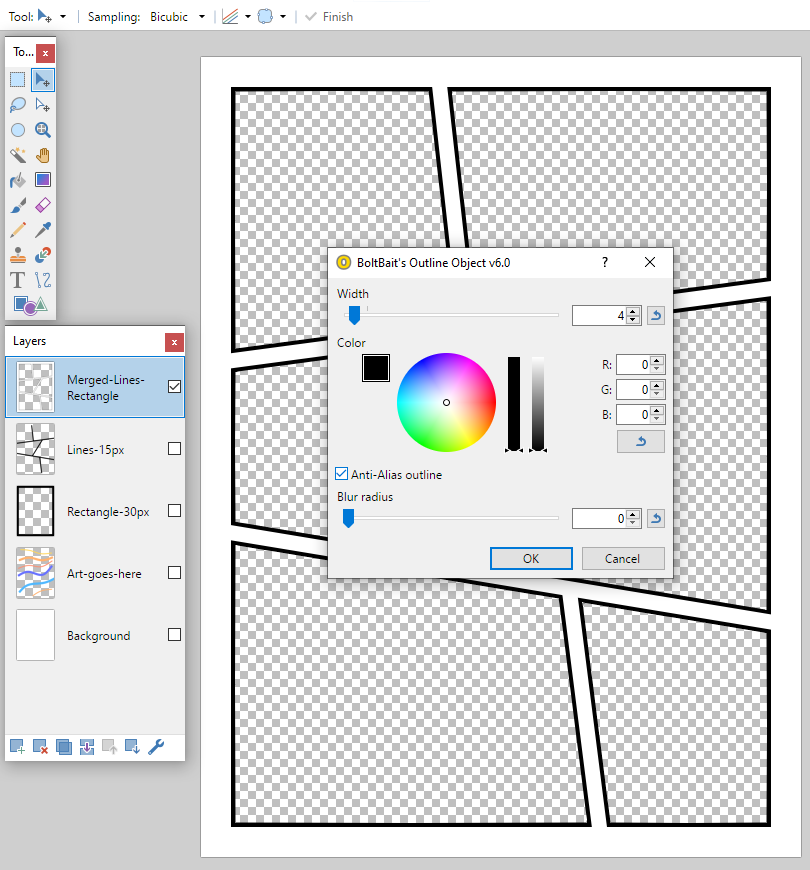
Merge Rectangle and Lines layers or create a flattened copy.
Adjustments > Invert Colors (Ctrl+Shift+I)
Effects > Object > Outline Object, enable Anti-alias and set Blur to 0.
-
 3
3
-
 1
1
-
-
Hi, interesting idea. Reminds me of Gimp and Gimpshop (Gimp with Photoshop panels style).
14 hours ago, Deluxe Paint said:400-500 pixel wide fixed panel would solve the issue:
Downside is the panel width, anyone using laptop (1280, 1366 px width and so on) would probably hate 1/3 or 1/4 of their screen covered with panels.
-
@Disk4mat nice!
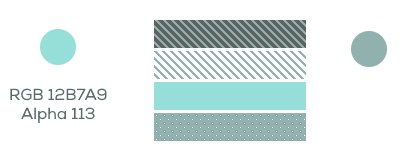
@eggxuted you are right, there is a color change if color is not set to opacity-alpha 255 when using any of the Bucket Fill types except Solid.
One way to avoid this is to work with solid colors and then change layer opacity, but every element with different fill type should go on a new layer.
Another easier way is what @Disk4mat posted with Gradient tool.
I'm using only left circle color here. Right circle is a color from fill types (diagonal, percent and so on).
-
 1
1
-
-
On 5/27/2023 at 11:04 PM, eggxuted said:
I am using the Paint-Bucket fill feature, "Wide Downward Diagonal," specifically, and the colors being used in the fill are, for some reason, darker than the ones in my color selection. Is this an unfixed bug or is there an easy fix?
In picture #1, Dark Green & Teal are the sample colors.
In picture #2, you can see the result of using those exact sample colors and the fill feature.
Ignore the Red/Gray dashes and the deep Green at the bottom..png.4379f1e4412945d17609c2a2549fa4a9.png)
.png.e824c05c9f40d3b9e766fd711316ba9a.png)
Looks like layer opacity issue. Easy fix: create new document, add your picture (duplicate so it is 100% opaque, merge) and pick a color holding CTRL. On a new empty layer, paint with bucket. If there is no difference between colors on both layers, then check your working document and layer opacity.
-
1
-
-
This is just an example using Clone Stamp icon color or Pan icon outline. Contrast in original icons is really to low, didn't notice until now.
-
Here is a modified script (well, not really a script, just a set of hotkeys for execution), where layer blend mode is set to Screen and opacity to 30:
; paint.net
#HotIf WinActive("paint.net")
^!f::  ; Ctrl+Alt+F hotkey - Set active layer opacity
{
    Send "{f4}"  ; Open layer window
    Send "{Tab down}{Tab up}"  ; Switch to opacity slider
    Send "{Tab down}{Tab up}"  ; Switch to opacity input
    SendText "30"  ; Set opacity number
    Send "{Tab down}{Tab up}"  ; Switch to blend mode
    Send "{s}"  ; Set blend mode to Screen
    Send "{Enter down}{Enter up}"  ; Confirm changes and close layer window
}
Open your image in paint.net
CTRL + SHIFT + N (default paint.net hotkey to create new empty layer)
CTRL + ALT + F (apply layer opacity and blend mode with Autohotkey), use this while new layer is selected (active) in the layers panel
I tried including Add new layer in the "script" too, but there is some weird behavior in Windows (didn't check what the reason for that is). -
On 5/29/2023 at 9:53 PM, kilbanne said:
And yes, i meant Filter = Screen blend mode.
Ah, now I understand I was confused if Filter is applied Effect or layer Blend mode. Or maybe a new empty layer named Filter.
-
4 hours ago, kilbanne said:
What i do is create a new empty layer, than set it to Filter, and put opacity on 30.
Then i'm all set to do all kinds of illuminations and play around with this layer, the problem is, creating this layer, and set the opacity to 30, for over 2000 images, is really anoying and time consuming.
Hey @kilbanne, try Auto Hotkey (https://www.autohotkey.com/) to speed up the process.
Here is a set of steps to set active layer opacity to 30, instead of Ctrl + F (by default in paint.net is mapped to apply last filter) it is set to Ctrl + Alt + F.
Create new file (Notepad is enough) and save as .ahk extension, then paste inside:
; paint.net
#HotIf WinActive("paint.net")
^!f::  ; Ctrl+Alt+F hotkey - Set active layer opacity
{
    Send "{f4}"  ; Open layers window
    Send "{Tab down}{Tab up}"  ; Switch to opacity slider
    Send "{Tab down}{Tab up}"  ; Switch to opacity input
    SendText "30"  ; Set opacity number
    Send "{Enter down}{Enter up}"  ; Confirm changes and close layers window
}
Double click on saved file should run the script (check taskbar for green H icon), and while paint.net is opened Ctrl + Alt + F should set layer opacity.
I don't understand what do you mean "...than set it to Filter," part. Is it Blend mode?-
 1
1
-
-
There is a different behavior if you are using Tab to switch fields or Click to type value then click on another field to confirm previous typed value.
With Tab it is as you posted (great find there) @Tactilis but if click and type value is used, then it is rounding.
Type 0.001 (for rotation or pan) and click on another field, nothing happens. The change is happening at 0.005, where it is rounded to 0.01.-
1
-
-
Hey @tieTYT, AutoHotkey is really great tool for assigning existing or new shortcuts in Paint.net
Install Autohotkey: https://www.autohotkey.com/Check Documentation and Tutorials while there, this is a good starting point: https://www.autohotkey.com/docs/v2/Tutorial.htm
1. Open AutoHotkey
2. New Script
3. Add script name, location where it will be saved and Empty or Minimal option (I choose empty) and hit Create or Edit.
A rudimentary script to swap CTRL+C and CTRL+SHIFT+C shortcuts (CTRL+C: copy merged layers and CTRL+SHIFT+C: copy layer):; paint.net #HotIf WinActive("paint.net") ^c:: ; Ctrl + C hotkey { Send "^+c" ; Ctrl + Shift + C } ^+c:: ; Ctrl + Shift + C hotkey { Send "^c" ; Ctrl + C } -
49 minutes ago, Disk4mat said:
@Lemonade I like your method because it can be done OOTB. Your instructions are clear but I do want to confirm something. While watching the animation, looking at the word 'wrap', it seems like WR are rotated clockwise and AP are rotated counter clockwise. Is there you used the Lasso tool to adjust each letter? Love your method.
Hey @Disk4mat, thanks!
Yes, as you said, every letter is selected with Lasso tool and then with Move pixels tool rotated in a way so the bottom of the letters (baseline) follow the red curve as a guide (clockwise and counter clockwise). In this case, WR andAP are rotated clockwise and counter clockwise.
Also, there is one part in the description missing (maybe it is obvious as is):
When duplicating text layer, one should delete or extract words with Rectangle or Lasso select tool, for example:
Layer 1: "Wrap text around"
Duplicate layer 1: delete "text around" keep "Wrap"
Duplicate layer 1: delete "Wrap" and "around" keep "text"
Duplicate layer 1: delete "Wrap text" keep "around"
So every word is one layer.-
1
-
-
Hey @Murzik16, here is an example without using plugins, although it is time consuming.
- Open a picture with object you want to wrap text around
- On a new layer, create a curve following the edge of the object, set low transparency, so it is barely visible
- Add another layer, type your text (word or sentence) and duplicate few times (4 words 4 layers, 6 words 6 layers, every word is a separate layer)
- Position separated words (eyeball it) and rotate slightly to follow the curve
- Now, select every letter with lasso tool + move selected pixels tool and fine tune, so they are precisely following the curve
-
2
-
2
-
-
On 4/19/2023 at 5:45 PM, Disk4mat said:
My best guess after reading the post a few times is that the OP is asking if the Primary and Secondary color can be displayed somewhere other than a floating color palette. As an example, color swatches in the status bar or main toolbar.
Could be misreading this. The OP wants more screen real estate and is currently toggling the palette (F8) but just wants the two active colors displayed only (some where).
After reading your post, I tried to remember where did I see similar feature to show primary color only. It is Art Rage, so I made a quick mock-up for paint-net:
https://imgur.com/a/myePRjx-
1
-
-
Hey @Davichad, here is a workaround for default document size (make sure to use Save as, so you don't overwrite default template file):
-
2 hours ago, Olivinism said:
However, whenever I do this with images that have a transparent background, it's automatically filled with whitespace
Is there any way to maintain transparency?
Hide background layer (uncheck in layers panel if it is present there)
select all (CTRL+A)
copy flattened (CTRL+SHIFT+C)
paste (CTRL+V) into another program.
As null54 said, depends if it will work with other program you are using. -
Affinity does this, 800*2, 800/2, + and - too. Really useful.
-
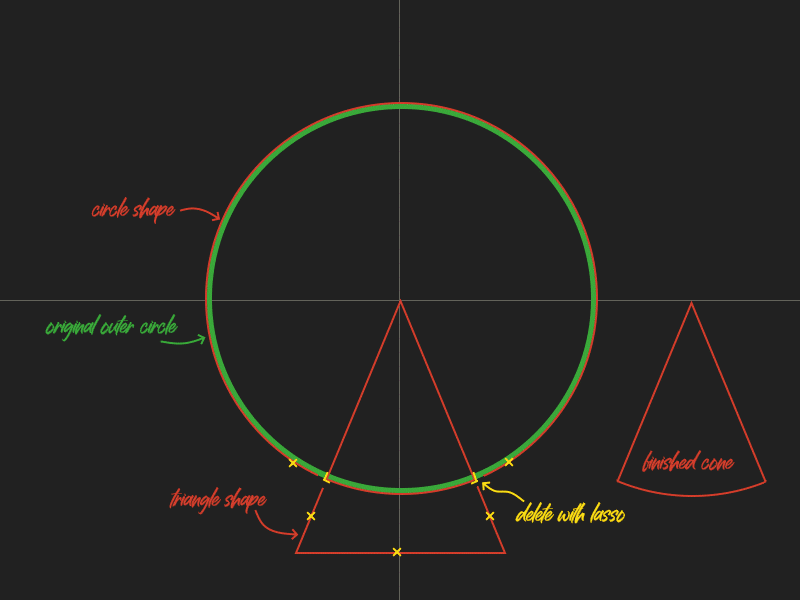
Hey @semar,
I would go with circle and triangle to create a cone, where circle is the same size as your outer (biggest) green circle. Then add a triangle and where both shapes intersect, use lasso tool to delete that area. Attached an example.


.png.4379f1e4412945d17609c2a2549fa4a9.png)
.png.e824c05c9f40d3b9e766fd711316ba9a.png)

Confusion WIth Bolt Bait's Alpha Mask
in Paint.NET Discussion and Questions
Posted · Edited by Lemonade
Hey @Marilynx, the process you explained (using a clipboard for mask) is from Illnab1024's plugin. Doesn't work with BoltBait's Alpha Mask plugin, but does work with BoltBait's Paste Alpha plugin.
Create 2 layers:
- mask (add some shape here)
- background (color, gradient)
If you want to use BoltBait's Alpha Mask:
- select background layer
Go to Effects > Object > Apply Mask
Current layer: background
Mask layer: mask
Mask type: Alpha
Method: Replace
[unchecked] Invert Mask
OK
For BoltBait's Paste Alpha:
- same process you explained above, copy mask layer to clipboard
- select background layer
Go to Effects > Object > Paste Alpha
Replace current alpha with
Alpha channel from clipboard
OK