IHaveNoName
-
Posts
420 -
Joined
-
Last visited
Everything posted by IHaveNoName
-
Remember the fonts I've used ...
IHaveNoName replied to hanspeter's topic in Paint.NET Discussion and Questions
Wish I'd done that when i first started a long term series of icon creations for a games console (emulators, apps etc). I always try to use an authentic font or fonts ie. one that was used by the original games, console or even original packaging so practically every one uses or trialed at least two different fonts. Before using that obvious and ^^ easy solution I kept copies of all fonts used in image resource packs for each icon and sometimes other fonts that I'd considered using instead but didn't too. It does not take up that much space but it is a much less sensible method. BTW I suggest that in any layer naming used it also includes the font's point size, specific name as listed by PDN and any customisation ie. italicization, emboldening and colour hex code etc. The latter can be useful if, like me, you often experiment with text colour choice and therefore the 'base' text layer colour may not be the final one used. Obviously you can save alternative coloured text trials in another layer but if they are all subtle variations precise identification can still be helpful. Same goes for the transparency setting too. -
How to move levels in a picture
IHaveNoName replied to Tazwood's topic in Paint.NET Discussion and Questions
I think he means he already has the other pictures in different layers. If that is the case then the solution is simply highlight the layer of the image you want to move in the Layers(F7) tool box and use the Move(M) (Selected Pixels) tool. You can then move the image in that layer around with mouse or keyboard directional keys. -
I just had a look on my own Windows 7 SP1 and I have had that KB2670838 update since 2016 and from the date I'm pretty sure it must have been included in the massive Convenience Rollup update I used after the virgin install of Windows 7 SP1 on the, then, newly built PC. So that update did not beak Aero, it works correctly on my machine but then, of course, I had/have nothing to compare it too so may be it does give you more blurry fonts on some web sites but if it does the effect is not noticeable. What I have found in my researches is that the update or rather the lack of it has caused problems for other programs like Kodi (previously XBMC) and some video games ie. it is required. If the same thing applies to PDN (or the current PDN version) then what is there that can be done other than install it and live with whatever real or imagined display issues it causes? This sounds all a bit Chicken Little syndrome to me - where is the actual evidence that installing this update has real graphical consequences? It appears all anecdotal.
-
I agree, the arm in the second picture looks pretty natural and only if you were told or shown that it was not the original position would you have been aware of it. The only thing that I would say is not as clean as it could be is the grey background behind where the arm was originally positioned. Again you simply would not notice it viewing the second picture in isolation. I've had that sort of minor problem myself and found that if you apply some type of blurring to the general area where the background recolouring is not as perfect as you would like sometimes helps. I had to look up what "dabbing" actually means and from the back of my mind I seemed to remember it was something 'unsavoury'. It actually is but that did not make any sense in this case so its alternative meaning was obviously intended: a particular dance movement. .
- 1 reply
-
- 1
-

-
Help gradienting and tinting image.
IHaveNoName replied to Y_Kazz's topic in Paint.NET Discussion and Questions
I just did a very quick, horribly rough go at this and Woodsy's suggestions are almost exactly what I did to get it into the ball park, mimicking the effect shown in the original image. AndrewDavid's suggestions just posted actually look better leaving some of the original colour too. The only thing I did different to Woodsy suggestions was convert the cut out, white outlined image to black & white (sepia might be even better) before using Color Balance to shift it to full yellow before applying the Hue/Saturation tool. -
Paint.NET is stuck at "Finishing".
IHaveNoName replied to a person's topic in Troubleshooting & Bug Reports
How many layers are we talking about here because unless v4.1.6 behaves differently from previous versions of PDN you should not be getting that Save Configuration progress bar with the PNG Save Configuration dialogue box. You should get the info box requiring you to flatten the layers first before saving as PNG. From the screenshot that is what is not happening. All the layers are still being shown separately when, just before saving, they should have been flattened. Unless this is a new glitch the first thing I'd be thinking is there are so many layers your laptop is running short of memory and that is why it is taking so long and not completing the save. Backup as a .pdn first as HyReZ suggested then try manually flattening the layers before going to the save menu to save as PNG. -
English GB (and other countries) localisation
IHaveNoName replied to charlco's topic in Translation and Localization
A standardised English form for use on the web would require some give and take but would it really be so bad giving up some of the irrelevant and often silly differences to make that happen? It is not as though we British English and American English speakers ever actually need a translator. We're used to US spelling from films and TV but British English spelling is widely accepted too, you just do not notice it when an "s" replaces a "z" or visa versa. Both are accepted in both regions and there are plenty of other examples. https://en.oxforddictionaries.com/spelling/british-and-spelling Centre is a typical throwback spelling to its French origin and is compromised when you use the word centring, particularly relevant in connection to graphics programs like PDN. Centring in British English is either pronounced with a silent "e" as an awkward two syllable word cen-tring or actually using the "e" missing from the spelling ie. centering , the US English form. But the US English spelling is compromised particularly for words derived from centre/center like central, eccentric, concentric, centralised/centralized etc all relevant to graphics programs and all spelt and pronounced the same both sides of the Atlantic. Therefore I'd propose using centre as a noun or adjective as in the Civic Centre but center as a verb eg. to center the cursor, making sense to use cen-ter-ing and cen-tered rather than cen-tring and cen-tred neither of which is pronounced in British English as they are spelt. -
How to move gif after adding the background?
IHaveNoName replied to HoLeePhuc's topic in Paint.NET Discussion and Questions
After spending time trying to get the GIF I used for my earlier tests to try to get the text layer to work without adding it to all frames I came back here and found the solution thanks to Pixey. I thought I'd try the Foreground layer naming form mentioned by Pixey and in Midora's plugin readme with the existing GIF AnimGIF.dll plugin to see if that would get the text to display for all frames but, as I thought would be the case, it did not work. So, if it is not clear to others: Midora's plugin must be used if you want to add something like text to a GIF so that it displays throughout the animation even when editing an existing GIF not just one created with the plugin. -
How to move gif after adding the background?
IHaveNoName replied to HoLeePhuc's topic in Paint.NET Discussion and Questions
I don't think that is quite what the OP wants to be able to do. He wants to move the GIF to centre bottom of a bigger white canvas and then add text to the white background. I had a quick go on a free test GIF I found:- Moving the GIF on the canvas is simple enough it is the adding of the text that is the issue. If you add the text to just the background layer it will only display for one frame of the animation. You appear to have to add it to all layers ie. all frames of the animation. Maybe Reptillian's suggestion is a solution to having to do that Thanks to AndrewDavid for bringing to my attention the 'Look At It' plugin. Very useful.
-
How to move gif after adding the background?
IHaveNoName replied to HoLeePhuc's topic in Paint.NET Discussion and Questions
It does work with text using PDN but, and it is a big but, I soon realised that you need to copy the text to every frame of the GIF. The test GIF I used has 241 frames and that was a simple one. Unless there is a PDN plugin to copy to multiple layers (?) from a practical point of view you are, as HyReZ suggested, better off using video editing software. I think you might be able to batch edit the GIF frames using IrfanView to add the text, that seems to be possible from what I've read but you would need to extract them all as separate images first. That seems like another crazy, crude solution. -
How to move gif after adding the background?
IHaveNoName replied to HoLeePhuc's topic in Paint.NET Discussion and Questions
Is the animated GIF in another layer to the white background or did you copy the GIF to a new white background image? In either case: you can try simply selecting the GIF area and recentring or dragging the GIF with the Move Selected Pixels tool to the centre. If the GIF and white background are in one layer just create another white layer underneath to fill in the now transparent area where you moved it from. HyReZ is probably right in his inference it is some animation format issue but if it was a still image I'd suspect you'd either just used Canvas Resize with the image tethered to the top left or Copied the GIF onto a new, larger canvas. By default the copied image is placed top left if the canvas size is bigger. If the image you're working on can be undone to a point before you added the background or you have another copy of the the GIF: centre that in a transparent background of the same final canvas size as you want to use, then create a new layer for the white background underneath. EDIT Just tried this with a test animated GIF and there should be no problems as long as you use this plugin and follow the instruction about renaming the extension to .agif. PDN won't display the animated GIF but with the plugin it will open each frame in a separate layer. This can take some time depending on your PC. You can then treat it almost like any other image file format, centering and adding a new background just as I described earlier. Once done Save As: "Animated GIF" and change the extension back to .gif and any program that can display animated GIF files (IrfanView for example) should work with the now edited image. -
Request: Change "save as" behaviour
IHaveNoName replied to songohanssj's topic in Paint.NET Discussion and Questions
I think I'm pretty much doing the same sort of thing as you except I do not print the images. Admittedly most of the stuff I'm creating using PDN are relatively small projects involving mostly 256x256 images for icon use with a games' console. So far I've done at least 150 with, typically, three versions or three completely different ideas all of which have to be tested at various stages to make sure they're actually usable on a 480p display. That requires regular saving as PNG or JPG for work in progress testing. However the PDN file is saved first every time as backup with its layers unflattened. I've been doing this for 8+ years. The default, Save As option (.pdn) has actually accidentally saved me from exactly the same mistake you described in the OP. If I'd just saved as a PNG or JPG flattening in the process and closed PDN I'd have lost hours of work on a particular layer I needed to or wanted to keep separate. What I'm saying is that if you discipline yourself to save the unflattened PDN file first as a master backup before saving as PNG or JPG then you won't lose any work if you accidentally close PDN. It doesn't take much extra time whatever method you use to do it. -
You mean you turn it off then turn it on again. That might be the IT support advice cliche fix, ridiculed to death in TV sit-coms and the like, but it does often work.
-
English GB (and other countries) localisation
IHaveNoName replied to charlco's topic in Translation and Localization
Thanks for providing this but I'm not sure why a British (English) localisation (localization) option is useful let alone a necessary addition for PDN. Apart from the American spelling of colour (color) and centre (center), the latter I actually prefer the US convention, things like the inconsistent use of "z" instead of "s" in some words is just as acceptable this side of the pond. I'm very much against localising (localizing) English use online because:- 1). it is almost entirely unnecessary as the meaning, even with a slightly different spelling, is 100% understood. 2). the use of a standardised (standardized) English form on the web is IMHO the best chance the world has of creating a genuine cross cultural, universal first or second written and spoken language. Localisation (localization) of online English undermines that worthy aim and creates divisions where none needs to exist. -
Request: Change "save as" behaviour
IHaveNoName replied to songohanssj's topic in Paint.NET Discussion and Questions
I do not understand the complaint about the "Save As" behaviour. If you're working on an image the primary "Save As" option is .pdn. It won't save the history but will save any unflattened layers, that's the important thing. You can save it as a JPG or whatever else you want too or instead but it'll have to be flattened first and for any format other than .pdn you're required to do this as part of the save process. But I don't see any reason for that if it is an image you're still working on. Use the .pdn save format until you've finalised the image. I often save a new work in progress .pdn file of an image at different stages of its creation so I can go back to an earlier point if I mess up. If you must save it as a JPG for some reason as long as you remember to undo the flattening afterwards ie. PDN is not closed, you can continue working on your image, all layers intact and the whole history of 'undoes' still available. BTW you're likely reducing the picture quality too if you save it as a JPG. -
change color of text not working anymore
IHaveNoName replied to ggg's topic in Paint.NET Discussion and Questions
I should have mentioned there is a crude method of bypassing this behaviour if you have another image open in PDN. With the text cursor still flashing with the image you're working just click on the thumbnail of the second image to open it fully. If you change the pallette in the second image, including by using the color picker, the change will also be applied to any 'open' text in the first image. However there seems to be some limit or other criteria involved as to how many times that can be done before the 'open' text in the first image closes. Hope this helps. -
change color of text not working anymore
IHaveNoName replied to ggg's topic in Paint.NET Discussion and Questions
HyReZ literally just beat me to it. Indeed it is because you use the colour picker tool: you're exiting the text writing tool when you do that and as that is not running when you change the colour the colour of the text you wrote does not change. If when you are writing text the text cursor is still flashing the tool is in operation and if you want to change the text colour then simply move the mouse cursor over to the Colors box and you can swap the secondary/primary colours or use any other colours from the palette you want. -
One reason to use a third party tool for compressed file types is that AFAIK no Windows OS can open RAR files natively. If you're installing something like 7-Zip which can do that you might as well use it for ZIP files too. Its own .7z format is also being used a lot now instead of the standard ZIP format for downloads although in PDN's case I've not come across any plugins that use it. PeaZip is a good alternative as it can open most compression formats too, including 7-Zip. BTW contrary to some of the lousy info you find out there only one tool can actually create or add to RAR files: WinRAR which is jealously guarded paid for software that also supports other compression formats including 7-Zip. In the absence of the necessity to create or add to RAR compressed archives 7-Zip, PeaZip or similar are preferable.
-
Excellent, 'just' a naming issue then. Pleased the suggestion solved the problem. But it doesn't explain why the Umbuntu Mono Filled font displayed in the PDN font list but could not be used.
-
I think it would depend on the program used to create the new font but I don't know why such a program would create a bitmap font when the base font and other prime fonts in the same family display and can be used by PDN. It probably is something very technical and no doubt RB will confirm or explain what the problem might be. However, I've just downloaded and installed the 13 Umbuntu Family fonts myself and PDN displays and can use 4 of them, as installed: Umbuntu, Umbuntu Condensed, Umbuntu Light and Umbuntu Mono. But if you go into your Fonts folder you'll find there are actually only two family font sets: Umbuntu and Umbuntu Mono. All the alternative fonts in the family like Umbuntu Bold, Bold Italic and Italic are all named just Umbuntu too. This is typical of font sets as those display options are part of the most text display programs. What I'm thinking is that your Umbuntu Mono Filled is not being properly recognised as a different font in the same family despite displaying correctly in the PDN font lists. If it is possible can you rename the font to something else, preferably not even Umbuntu eg. Umb MF. Back up the existing font file first and remove it from the Fonts folder of course then install the renamed version and test if that works. With the renaming it should install as a standalone font in Fonts rather than as part of the Umbuntu Mono font family. If it still does not work with PDN then chances are it is what Pixey said and likely RB will confirm is another PDN bitmap font display issue.
-
That plugin requires Ghostscript to be installed to work apparently. This is peculiarly current for me too because just yesterday I was creating some icons and the only source I could find for quality images of some logo and text elements I needed was a web site that for some reason presented all the downloads only as PDF files. I went searching for PDF to JPG or PNG conversion software and it seems like there is nothing out there except online conversion web sites. I think it is possible if you have Adobe Acrobat then you can use Print and choose the save file format but with other things Adobe like Adobe Reader it has to be done online too. Other PDF readers I had a look at do not offer any file type conversion facility. In the end I just went for a screen capture using Lightscreen of the quite large PDF images which are more than good enough for the 256x256 icon size I'm using.
-
You mean on a secure digital card? I would wait for RB's advice on this but I suspect you'd just treat like if it was any other portable app that had been installed on a flash drive or other external storage drive and just delete whatever is there in the normal way. I'm surprised it installed on the SD card at all, if that is what you do mean, for the reason Pixey has just posted.
-
How to change a PDN file to a PNG file
IHaveNoName replied to Stefanie's topic in Paint.NET Discussion and Questions
I may be wrong but I don't think the OP has a problem finding the file. If that was the problem PDN would simply report the file could not be found. From what was said the file is being opened correctly but not recognised as a PDN file or any other image file. As another has suggested here that sounds like an extension naming issue. Whatever format the file was saved in should make no difference PDN should still open it if it has the correct extension for the file type. I've checked and that is the error message you get when a PNG image file is saved as:- image name.png.pdn I would suggest that the OP has accidentally renamed the original file (may be by using Save rather than Save As) to that or some similar mistake. By default Windows does not show the actual file extension so to delete that and replace it with the likely now correct .png they will have to use the folder view options to display the actual extension being used (for Windows 7) :- Windows Explorer > Organize tab > Folder and search options > View tab and then untick the option to "Hide extensions for known file types" > click Apply. Now go to where that image file is and it will show the actual extension, probably .pdn. Change it to .png and once done that should be it. It should now display with the default .png Windows icon and open in PDN as a PNG. When you exit from changing the extension Windows will flag up a warning message about the file may not open blah, blah, blah. Ignore it. You should change back the Folder.....> View menu option to re-hide file extensions again. Once done, rename the image so it is not actually named "image name.png" or whatever the naming problem was. -
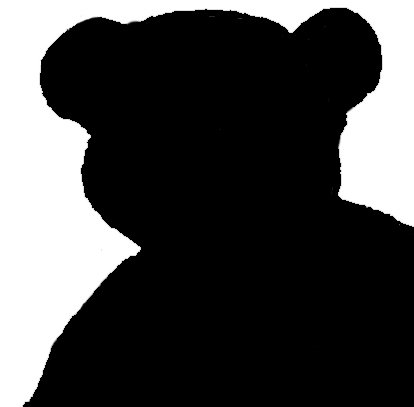
That is an effective alternative method for creating the contrast needed for the Magic Wand to be able to select the precise outline of the bear. It certainly gives a much cleaner outline than my attempt but hand drawing the border must have taken some time.
-
Those ways may work better but if it had been me and not being aware of those methods I would have gone back to an old school photographic technique: a high contrast mask. You simply copy the picture into another layer then convert that copy into b/w then up the contrast/alter the brightness until you get a good clean outline. The bear in the picture has a very distinctive darker line around its border and that should mean a pretty clean outline of that would be created by such as mask. You'd probably need to flood the rest of the bear with black to create a full silhouette. Now use the Magic Wand Tool to define the silhouette's outline, swap to the original picture layer and use that to remove the background. Below is is a very crude 5 minute attempt. The transparent background will display as white posted here. The problem is that it is a very low contrast image and the difference in tone, even with the darker outline, is not clear enough to create a clean mask. That was always the trouble you had when this was done photographically, retouching the lith (high contrast b/w) mask was always necessary. If I was doing this I'd take a lot more time cleaning up the edge of the mask and the picture with background removed. I'd probably feather the edge of the picture so any replacement background blended better. But it is proof of concept if those other techniques do not satisfy.