

Red ochre
-
Posts
3,022 -
Joined
-
Last visited
-
Days Won
125
Posts posted by Red ochre
-
-
Alternative method:
1.select 'magic wand'.
2.Click on the transparent areas - only they should show pale blue - (if all is pale blue click deselect :Deselect: and try again).
3.Edit/Invert selection - now just the opaque/translucent parts of the image are selected.
4.Edit/copy
5.Move to your new image and click Edit/paste into new layer.
6.Drag the newly pasted image into position.Also useful to press the F1 button and read up selection tools. Here's the direct link: http://www.getpaint.net/doc/latest/SelectionTools.html
Hope that helps
-
Nice new pieces!
Save the space-wasp head as an object. One day you will be experimenting with Pdn and think 'that looks like an alien insect body', what did I do with that wasp head?

+ good to experiment with shape 3D - good results!
-
BBQ, Blackpenny and Skullbonz - Glad you're liking the new ones and many thanks for taking the time to make a comment - much appreciated!

I've finally given the gallery an overhaul - dumped photobucket because they're useless and moved to Imgur. Hopefully all working now - I hate organizing links!


(included a few new/unseen ones and didn't bother with some older ones).
Thanks again
-
The city-scape with the sepia frame looks really classy!
Love the gallery banner and you've done well with the concave distortion one too - it's very tricky to do.
Off topic: I'm always disappointed at stations when the sign says 'Way out' then 'Cafe' - I expect to see a wild hippie party! -
Both new ones looking good - clever use of 3D object in the second one and great colours in the first.
-
 1
1
-
-
Many thanks Helen,Drew, BBQ and BP
.Some of them need titles - (don't make sense without them - or with them sometimes!)
- I've fixed that - and added another couple.
Thanks again!
-
I've added 2 new ones and a link to 'Tangles' on the first page.
Now using 'imgur' and .jpgs - thanks Pixey and Blackpenny and all for thumbnail advice!
-
Hello Terry - welcome to the forum!
I'm afraid I know nothing about wordpress headers (but others here will).
I would suggest two methods to cut a circular hole in a layer:
1. - With the header image all on one layer, select eraser and increase the size (you can type numbers into the brush width box if the ones in the drop-down list don't suit). Make sure 'Anit-alias'
  ( the default) is selected. Move the eraser to where you want the hole (the coordinates of the cursor (centre of circle) are shown extreme bottom right.
You can use the keyboard arrow keys to move small amounts.
Left click and you should have a nice smooth round hole (chequer-board background :AlphaChannelOnly:).
Save as a .png file to keep transparency.
2. - Select the elliptical selection tool.
Press the keyboard 'shift' button and drag the cursor diagonally to get a circle of the required size highlighted light blue.
Change to the white 'move selection' tool and drag the circle to where you want it. Press delete on the keyboard.
Unfortunately this leaves the edges of the circle rather jagged . This can be fixed using the plugin 'AA assistant', which will need to be installed first.
I would use the first method.
The author of the book you mention lives in New Zealand and is normally on the forum later.
Hope this helps in the meantime. -
Eagle - eye Pdnnoob - well spotted!
Same for me + are the followed threads email notifications still working?
Noticed the spam was back today - some of it quite inspiring in a surrealist way. Ipsosurrealum?
-
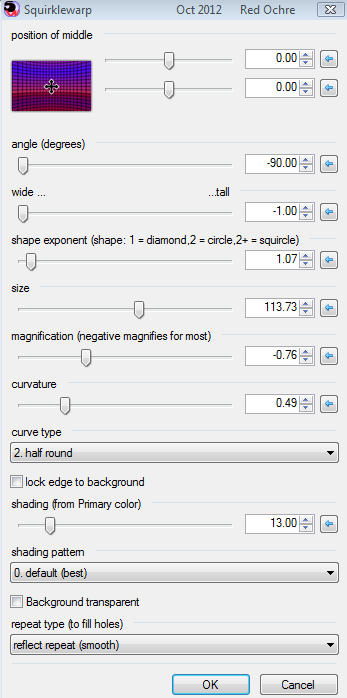
I'm not sure I understand it myself Pdnnoob!
There are some example settings on the thread - just play with all the sliders/drop-down choices and see if looks ok.
Probably best to start with a large canvas too as I haven't sorted any antialiasing/smoothing for this plugin.
There may be better/easier soloutions out there too!
-
-
Hi Alan,
Take a look at the post 6 above yours by EER (this page) - and use the gradient tool on transparent mode. Hope that helps.
-
So pleased you haven't given up on us!
I've made plenty of 'faux pa's' in my time here
- I just hope you don't let your work life get you down.
Again thanks for doing the hosting for so long!
-
Sounds like NN79 had a bad week at work - perhaps she will reconsider?
I couldn't read anything bad into what Blackpenny said - it was only a suggestion.
I'm sure Drew would make an excellent host if NN79 has quit.
I did notice that when the last lot of results where announced the thread title was still 'voting open' - perhaps that's why people voted after the deadline? - (not me honest! - I rarely vote - naughty step again ).
).
Anyways, thanks NN79 for running the comp for so long. -
Fascinating and over-looked tutorial (by me anyway) - many thanks!
-
Nice avatar too, Seniorpapa.
@ Blackpenny - thanks for linking to the YM tut - I hadn't found any interesting equations for that 3D shape feature before.
-
Interesting images - hope to see more
-
Hi Dug,
Photobucket are trying to send themselves out of business - there's a very entertaining complaints/feedback thread on their site. However your new links are working (back to the album).
OverEasy - great textures & nails.
DueNorth - another Dug classic - love it!
SoapBoxFrame - very clever techniques on the plant and rocks.
Paint-it-black - great door handle but you're meant to remove the door-furniture before painting. Then undercoat & fill, then do the panels before the stiles and rails . Good image though - reminds me a little of Magritte's 'La voix du silence'.
Bird-nesting - brought a smile - good work!-
1
-
-
-
Thanks for starting this mammoth task, it will be very useful.
Are you using some bespoke code to glean the info or just the manual method, or a combination?
Perhaps we can expect an 'EER's choice' list of some of the forgotten or hidden gems you have unearthed?
(Just a thought:-
Not wanting to 'break the camel's back', but have you considered a simple, alphabetical list of .dll names and the effects they relate to? - It is sometimes not obvious which effects depend upon a shared .dll - until you delete it!
I don't think links would be necessary as these are in the main lists and shared .dlls may not show up under the effect name. eg 'BaseUtility.dll', 'ComputeShaderEffects.dll', 'ConvoloutionKernel.dll', 'MathNet.Iridium.dll') -
Thanks for the encouragement Pixey and Blackpenny.
Your gallery is working well Pixey, but I notice that the images you link to are generally quite small. The problem with the thumb BBcode method is that it seems to take a very long time with larger images. I believe Pdnnoob uses the thumb tags method and it takes about 3 minutes for the thumbnails to load for me. I believe the full size image is sent to the forum and down-sized there, rather than the host just sending the smaller thumbnail. (but I know very little for certain).
I think I will probably stick with PB and my own eccentric method. If people want to see the just the full size image they must first click the thumbnail, then close the new browser page and click the link again. Not ideal - but I will get around to adding instructions at the top of the gallery next time I update.
By the way I noticed that imageshack forbid you to change their generated links - which is probably why they stopped you using the first method I decribed Pixey. I wonder what counts as changing the link? - could using BBcode 'thumb' tags be forbidden? (let's hope they don't realise!).
Blackpenny - I too complained to Photobucket and recieved exactly the same response email (word for word) apart from the operative (machine) called himself 'Andy' - how daft do these companies think we are?
I guess you get what you pay for - shame the hosting companies don't realise how much good will is worth. - We would all be recommending PB to people instead of advising against their 'service'. -
I particularly like the 2nd of the new ones - 4ksj0Tf - not a very catchy title!
'Light Rays' as the object layer?
Looks great - very smooth!
Could be a ?leaf in an air raid.Great work. Others very good too. I like your original thinking.
-
Well done Yellowman,Pixey and Dug. I thought Ventor's entry was very good too.
-
Congrats Sasha!


 and increase the size (you can type numbers into the brush width box if the ones in the drop-down list don't suit). Make sure 'Anit-alias'
  ( the default) is selected. Move the eraser to where you want the hole (the coordinates of the cursor (centre of circle) are shown extreme bottom right.
 and drag the circle to where you want it. Press delete on the keyboard.
 . This can be fixed using the plugin 'AA assistant', which will need to be installed first.
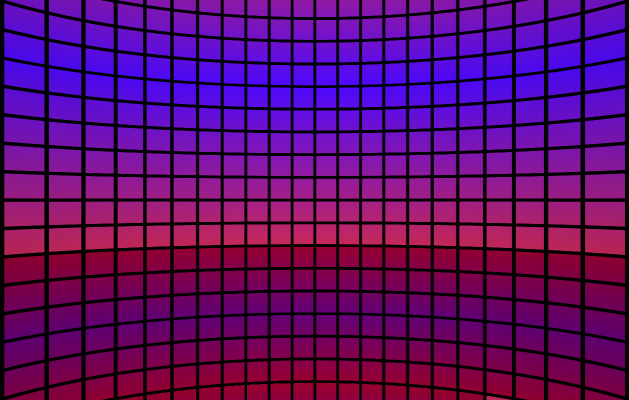

How to blend textured colors?
in Paint.NET Discussion and Questions
Posted
Hello Berniemtl,
 ).
).
This is tricky, I'd love to know of a simple answer. I've run into this problem when stitching together panoranas from seperate photos. The best advice I can give is to select the areas closest to the join and try to adjust the brightness/contrast and hue/saturation to get as close as possible. Try to 'hide' any joins where there is the edge of a feature in the image and use Gaussian blur on small areas. BoltBait's 'color balance' plugin can be useful for this too. Then use transparent gradients to try to blend layers together.
Good luck ... I hope someone can think of decent technique for this ... perhaps a 'contrast/brightness/hue/saturation- gradient' might be a useful plugin? (I'm not volunteering