


csm725
-
Posts
2,130 -
Joined
-
Last visited
-
Days Won
1
Posts posted by csm725
-
-

Agera poster with text
-
...One quick question, is CamStudio worth downloading?
No. In terms of video-recording freeware, go with Jing (Here). It is a free, basic version of Camtasio Studio. A shareware version in the middle of the range is Jing Pro, 15$ a month, for MPEG4 output. I think Jing's default is SWF, which may be a problem (Youtube doesn't accept .swf files). There are some converters out there, but they all pretty much suck. Also, I don't use Youtube for my vids, I use Vimeo. It has a 500MB per week limit, but no time limit. My orange tut was ~20 mins. You could upload the swf to your website (assuming you have one) and it is viewable. So in terms of free video recording software, Jing would be my recommendation by miles.
EDIT - Jing's default is indeed SWF.
-
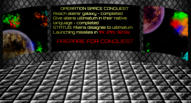
NEW - KOENIGSEGG AGERA POSTER

What do you think?
-
I found a program called CamStudio, and it is free.
Yes, that is what I used before Camtasia.
-
Cool! I just watched to Orange tutorial all over again. What program did you use to record it?
Camtasia 6
-
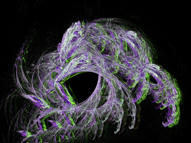
@Helen - Thank you, although I must confess it's not 100% PdN. :'(
@ChrisCo - Then I guess we'll call it an abstract text piece.
Also, expect more wallpapers and text pieces this week.
-
@Axle - Yeah, it was late when I made it and I wanted to go to sleep.
@BarbieQ - Thanks!
-
Its beautifully done. Something's missing though...I don't know what...but really, really well done!
Also, Chrisco, the transparency is a border of its own

Hahaahah. LOL.
And I'd like to thank pyrochild's Trail plugin, which I chanced upon whilst making the text.
-
Very nice! So glad to see you took my advice! They turned out great!
Ring of Water is by far my favorite!
Thank you very much.
NEW:

Bling Bling Text
-
Okay thanks. I'll work on it tomorrow, it's 10 PM here and I'm tired.
Anyways, one last image:

Better than current?
-
@Monkey Face, ChrisCo
You guys do realize that my sig isn't 100% PdN, right?
And also, ChrisCo, what sort of border would fit my sig?
-
NEW:

Ring of Water - 90% Apophysis
Acid Soul - 65% Apophysis
-
I like all of them except your current signature. Keep up the good work!
Thanks. If I may ask, why don't you like the Mac logo/current sig?
And also, Weylin, it may please you to hear that I made a tut for the floor. Look in the Textures subforum.
-
As requested by Weylin at my gallery...
Would be real cool to know how you did the floor....
I will show you how to make something like the floor in this image:
Partial credit goes to barkbark00's chrome tut.
Difficulty level: 4/10 - You need to know how to install plugins and access layer blend modes.
Plugins you will need to download:
PART I SUBPART I - The tile.
Step one is to open a new canvas (not at 2x or 3x the size of final product, you'll see why later - this means that if you want your final product to be 800x800, open a new canvas at that size, not 2400x2400), I used 800x800:

Next, add a new layer. Name it tile1.
On that layer, go to the rectangular select tool and hold Shift. Make a new selection.

EDIT: I just realized that the smaller your selection is in the beginning, the better the chrome turns out. So, you can start with a relatively small selection and when you have completed the tile, stretch it out a bit. See end for example.
Fill it with white and go to Effects > Selection > Bevel Selection. Oh, and make sure your primary and secondary colors are black and white, respectively.
Experiment with the 'Depth' field until the square looks rounded-ish. See this pic:

NOTE: I actually used Depth 34. You're going to want to use a Depth value that makes the image appear rounded, but not totally rounded.
Duplicate the layer (optional - name it 'tile1-copy')and invert the colors (Ctrl-Shift-I). Set the layer blend mode to Difference. Oh yeah, you can deselect (Ctrl-D) now.
This is how it should look:

Merge layer down and go to Curves (Ctrl-Shift-M) and make sure you are on Luminosity.
Make the path something like this:

Select anywhere outside of the square with magic wand (you may have to lower the tolerance) and invert selection (Ctrl-I). Go to Bevel Selection and bevel it with whatever depth. I used 6.

PART I SUBPART II - A more chrome looking tile.
See this animated .gif - note the smaller selection.

PART II - The floor.
Align the tile to the top-left, using Effects > Align Object.
Select outside of the tile and invert selection. Copy and paste. Drag the second tile so it is touching the first, like so:

Select outside of the two tiles and invert. Copy paste. Drag.
You should now have 4 tiles all on one layer. Select outside of them, invert, copy-paste, drag.
The amount of times you need to do this depends on the canvas size. This is the reason I told you earlier to make a canvas size at your final image size.
(not at 2x or 3x the size of final product, you'll see why later - this means that if you want your final product to be 800x800, open a new canvas at that size, not 2400x2400)
Once you have a whole row, select outside of it and invert, copy, paste.
Drag it under the current row.
Deselect, repeat process until screen is full of tiles.
If the alignment on either side (top, bottom, left, right) is off, use the Move Selection tool to stretch the whole thing out a little. Just so you know, the chrome in this example came out bad, yours will probably be much much better.
This is what you should have now:

Go to rotate/zoom (Ctrl-Shift-Z) and experiment with the settings.
There you go, a chrome floor.
PS Mods, is this a Newbie Playground, a Texture, or a Misc tut?
#tut725
-
Great new additions! Great humour too.
Thanks!
@Weylin - I could write a tutorial on the floor for you. The wall was NoNonsense's tut (here) and to repeat the texture I used Seamless Texture Maker (by madjik) - I forgot the settings, but if you just check and uncheck random boxes, you should find it easily enough.
Weylin, look in the Textures forum for the tutorial of the floor.

-
OMG I love the Alien Apocalypse one!!! Hahaha also, if you look in my interests, one of them is Armageddon (not the movie).. I'm obsessed with scenes of 'the ending' lol.
Thanks!
-
@BarbieQ - Thanks, but I mean something that lists all the topics you have posted in along with the latest poster in that topic. Rick? Pyro?
-
Where is the equivalent of a 'View your posts' button?
Thanks.
-
Nice pack. Kudos on the feathering for Outline Selection.
Also, you wrote in your first post in this topic that the plugins have been tested with PdN v3.5.5. That release hasn't (and hopefully won't have to) yet been released...
-
Poll please.
Unless you're still working on that paper. :rolleyes:
-
NEW PIECES

'Mac' Style Windows Wallpaper

My favorite: 'Mac' Logo

'Earthy' Logo

'Jamaica' Logo
Alien Apocalypse Scene
-
Nice reskin. All links to old forum seem to be working, is that supposed to be happening?
On my site, should I re-link to the new forum?
-
-
On topic: nice tut, cute result.
Off topic: To whoever runs the Russian PdN site (http://paint-net.ru/), next time could you ask me before translating one of my tuts to Russian (http://paint-net.ru/?id=36)?
Even though it wasn't an exact translation, I'd still appreciate it...


csm725 ‣ Sep 15 ‣ AAUXNEXT: POSTER ‣ P29
in The Pictorium
Posted
Thank you very much.