

Red ochre
-
Posts
3,018 -
Joined
-
Last visited
-
Days Won
125
Content Type
Events
Profiles
Forums
Blogs
Gallery
Downloads
Posts posted by Red ochre
-
-
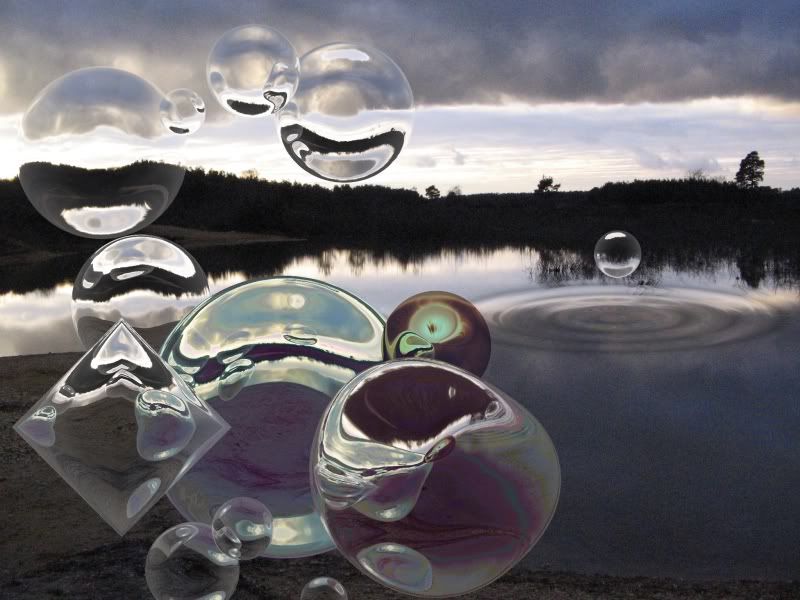
Shamelessly double posting!
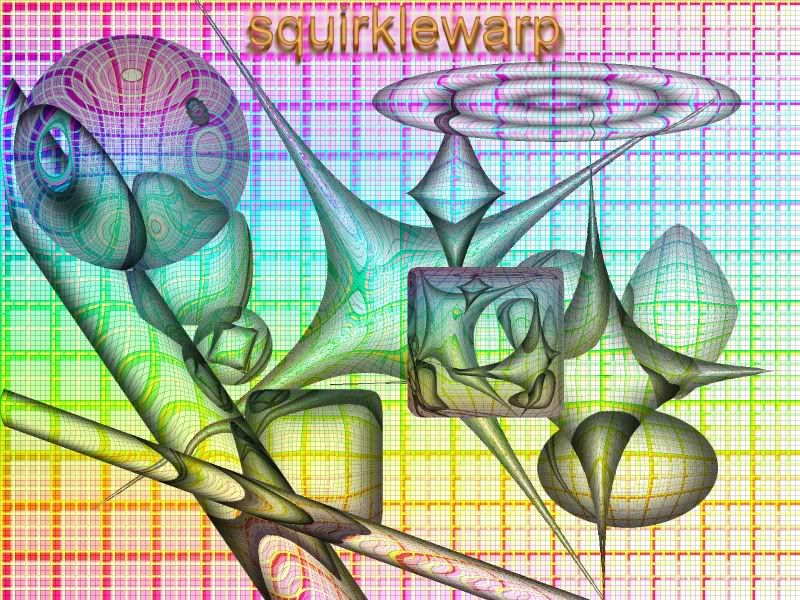
 - just wanted to show off what the new 'squirlkewarp' can do.
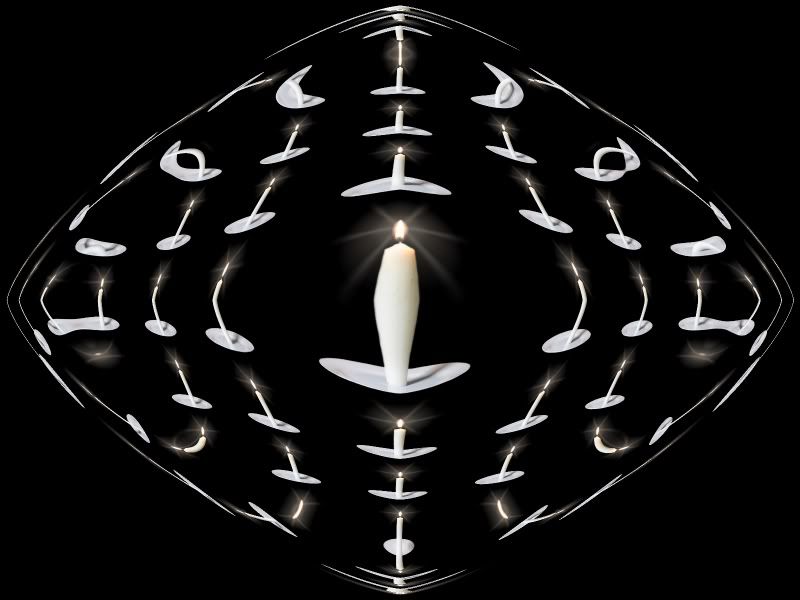
-
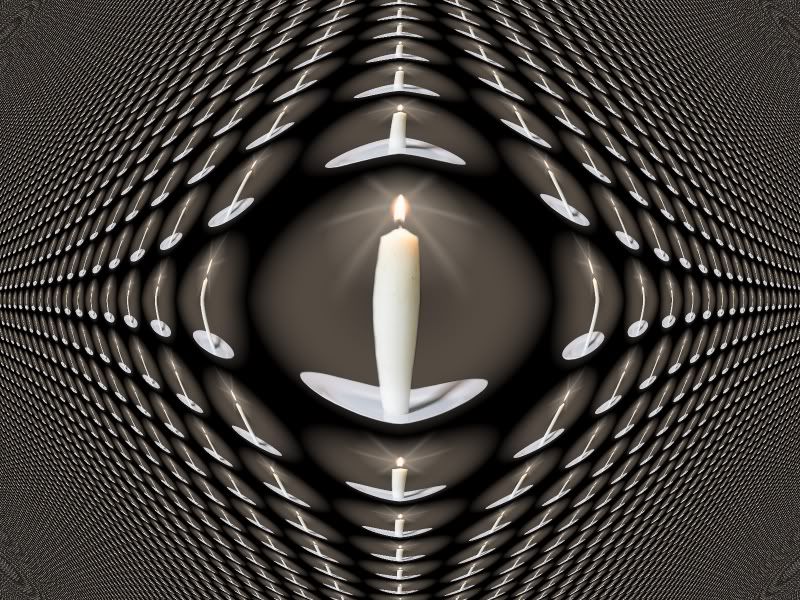
Done some more work on this one. The new .dll is above and will shortly be in the pack too.
It now has a button to lock the edge to the background making it better for 'bubble' type effects and also I've added 2 repeat options - which can produce images like the candle one above. Also some interesting shading options.
Enjoy

-
I like it! (them) - well done! - let's see more
-
 1
1
-
-
Firstly thank you EER for keeping the index up to date, through Christmas and earthquakes!

( and yes, I did eat too much!).
how did u make ur banner under ur post i really like it
if u use a plug in send me link to that
Welcome GITRDONE, Thanks for the compliments about my 'sig' - the banner at the bottom. However the best way to ask questions like this is to start a new thread under discussions and questions - It is all explained in the rules Forum rules. (You'll get quicker answers and keep the forum organised
).My signature used many plugins (including 'liquify' and 'smudge'), layers and freehand work and would take a long time to explain. - No font used.
The 'alphabets' are the system 'fonts' and you can get free ones from various websites. I think 'Dafont.com' do some but I can't find the link.
If you use the search link you can trawl through the old threads in the forum and will find plenty of useful info.
I'm sure if you follow some of the tutorials and experiment with plugins, you will soon have a 'sig' better than mine!
-
'Most viewed & downloaded/ least replied to', thread winner 2011!
(not actually official).We can't have that - many thanks for your hard work and happy new year.
-
Hello RedBeard, welcome!
Nice to see good drawing skills to start with and good work in PDN enhancing the image too.
Familiar Vinyl, - I never gave up on it - I like the scratches! - and what a shame all that space for album art has disappeared.
Logo looks good too - look forward to seeing more.
-
1
-
-
Thought I'd drop by and stroll around the gallery
Dark dreams: - enigmatic - the LHS face .. very gothic. Are those a set of points? ... I thought you had a 400 four?
Good colours - I like to see rich browns and greys .. I think computer art tends to send us towards over-bright spectrum colours (the opposite of oil painting, where they can get 'dirty' quite easily), it's good to see you've got control of the colours you use. The lighting gives me the impression of sunlight filtering its way to the dark corners of an old building.
Of course I could have completely misread it ... but I like it anyway
-
Whoops - I edited the post above instead of posting anew, as intended - anyway - it's updated now - please see above

-
Problem with portrait mode is fixed now - I've just updated the dll above and the pack and added 3 more grids too.
-
I've updated the pack. Fixed the problem with 'Compotool', so it works full size when the aspect ratio is inverted to portrait mode. Also added 3 more grids.
I've also added some smoothing to 'squirklewarp' to make the edges a bit less 'jaggedy' - also added 2 more types of rings - which are smoother internally too.
Happy Christmas
 .
. -
pdnnoob - sorry for not responding quicker (your post got a bit 'sandwiched') - many thanks for the feedback - really appreciated
-
Nitenurse79 - many thanks
Tanel - You're quite right
- spotted that myself recently - I will rectify it soon and update the pack too.(It's such a rigmarole to update everything and I don't think it will affect too many users, too seriously. Sadly, I don't see many pictures in a portrait layout - probably because it doesn't maximize the monitor space).
It should be easy to fix and I will.
Many thanks for reporting back though!
-
This looks like fun - thank you!
-
'Grid maker/checker board'(madjik's) plugin - I think
-
I've updated this now.
I can't do too much about the percieved low quality on the original 'rings' distortion - this is mainly due to the Tan function referencing points on the source image which are a long way apart. And hence do not appear as smooth as the other types of distortion - It is also really hard to add edge smoothing to this one, as the edges of the rings are not at the edge of the 'squirkle' - did you understand a word of that - I didn't and I'm writing it!
Anyway I've left that but added 2 more types of rings which are smoother and added better smoothing for the edges of the other types of distortion too.
In general, if the distortion appears 'rough' - try moving the 'magnification' slider closer to zero.
Hope this helps - have fun
-
Yes. I have been looking for a free image editing program for a client who has taken photos of her paintings. She needs to be able to straighten and crop them. Thanks for your prompt reply
I often use PDN to edit photos I've taken of my oil paintings. I find the Camera lens distortion plugin useful to use first - my camera tends to 'fisheye' at close range, this can correct it.
Oil paintings, in particular, are shiny and sometimes you need to take the photo from a slight angle to avoid unwanted reflections (always best to use daylight if possible). The resulting non-rectangular image can then be straightened with the 'Quadrilateral' reshape plugin Evan's effects. You could then use my composition tool to check the aspect ratio is the same as the original painting.
The 'curves' plugin can also help to get the colours as desired.
Hope these help
-
Nitenurse79 - many thanks
 , I hope you enjoy using it.
Ahmed - it's cool to be called cool
 - thanks!
 -
Barbieq25 - Many thanks for saying thanks
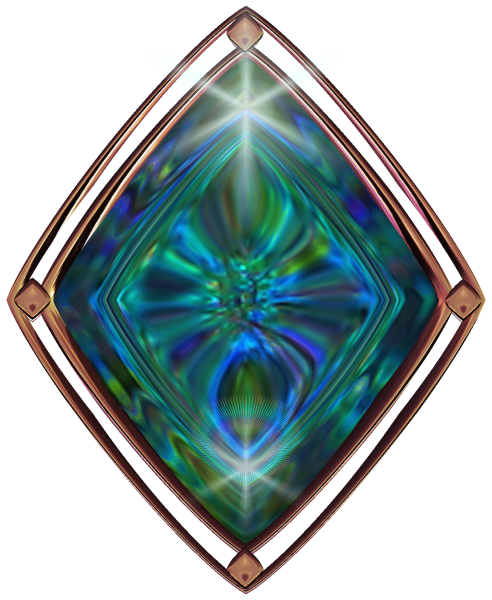
- and thanks for your great gallery too. I keep meaning to leave a comment, but there's never anything to criticize!Talking of 'squirkling' - here's my attempt at using squirklewarp for a jewel:-
-
Please don't name your files with a version number. The older version will have to be deleted manually!
Yes - good idea.
I will leave the names the same as they were in the last pack version and have changed the updated 'squirkle' to have the same name as the original.
Apologies if this has caused anyone confusion. If anyone notices 2 versions of one of my plugins, then look in the effects folder and delete the oldest one.
I will stick with the names as they are now for future versions of the pack.
-
toxicdj - Glad you're having fun with it! - what you've made looks great - but the edges may need a little 'feathering' - you could try using my 'Tweaktransparency' (in the pack) - with settings of edge = blur, middle = source, & transparency up to opaque (It's a damn confusing interface I'm afraid!).
Oma - Happy Christmas! - I actually thought it could be useful for current glass abstract landscape comp, so thought I'd better publish early.
'Queen of Paint 2010' - does that mean I can put 'by royal appointment' on my sig?
Thanks for positive feedback.
Generally, for bubble/magnifying distorts, it's best to keep the 'magnification' near to zero, but do try all the settings - you can get some great patterns when run on a grid background with the settings quite extreme. - Or try putting a highlight on a transparent layer then distorting it to fit over the existing 'squirkle'.
-
Thanks 'Welshy'
,I can't believe how quickly you posted - I'd only just pressed the post button.
Nice work on the 'Red John' picture (not relating to me I hope) - a bit too scary now you've added the scalpel !
Wonderful copper colours on the keyhole and great wood textures as ever.
Cheers John (Red ochre).
-
I've just added 'Squirkle' - (I've updated the UI spelling mistakes!), and 'Squirklewarp' - a versatile distortion tool for squirkles!
-
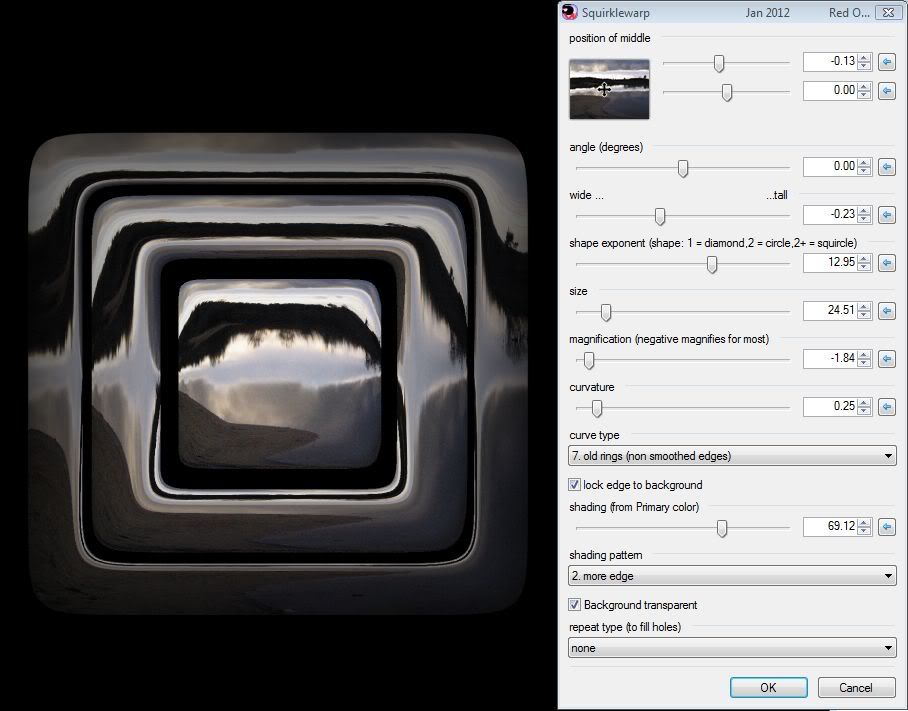
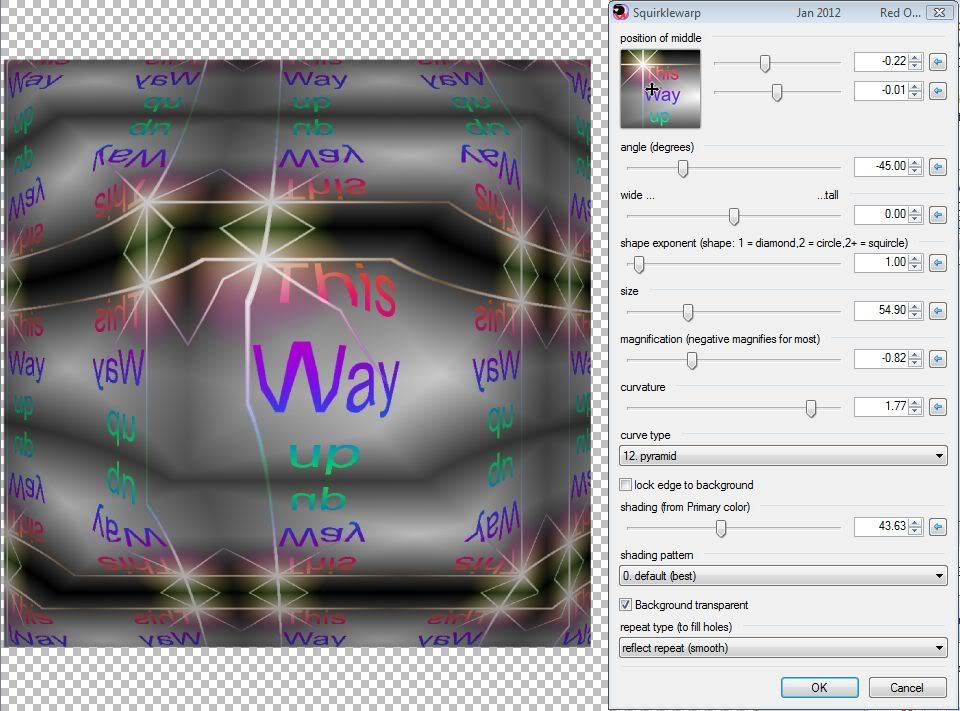
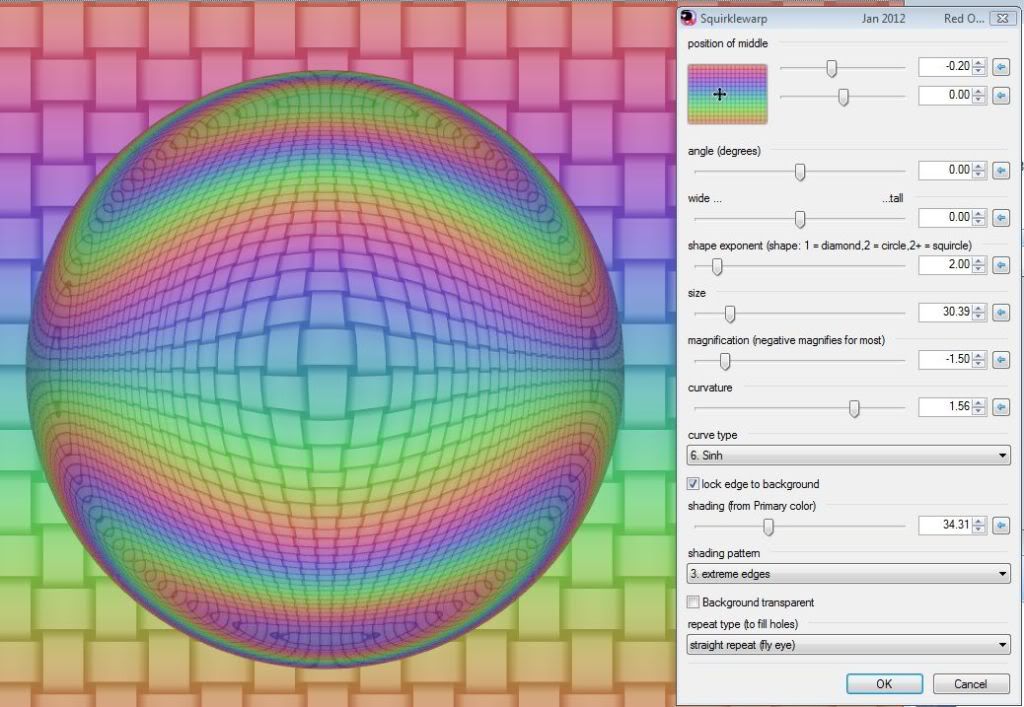
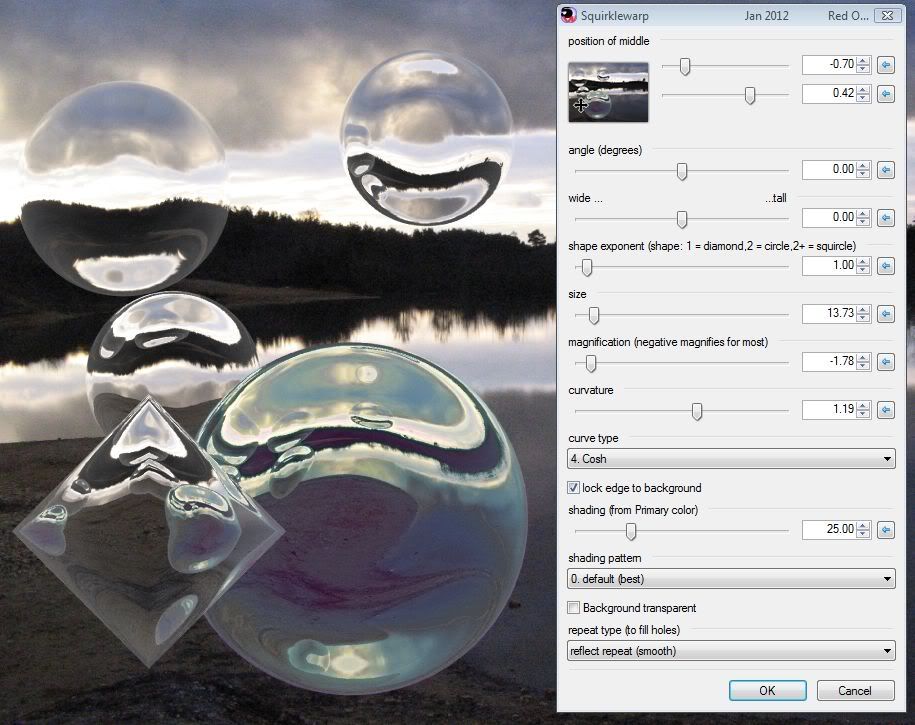
Squirklewarp
This tool will distort the current layer in a 'squirkular' shape. In other words anything from a diamond through circle/ellipse to a rounded rectangular form.
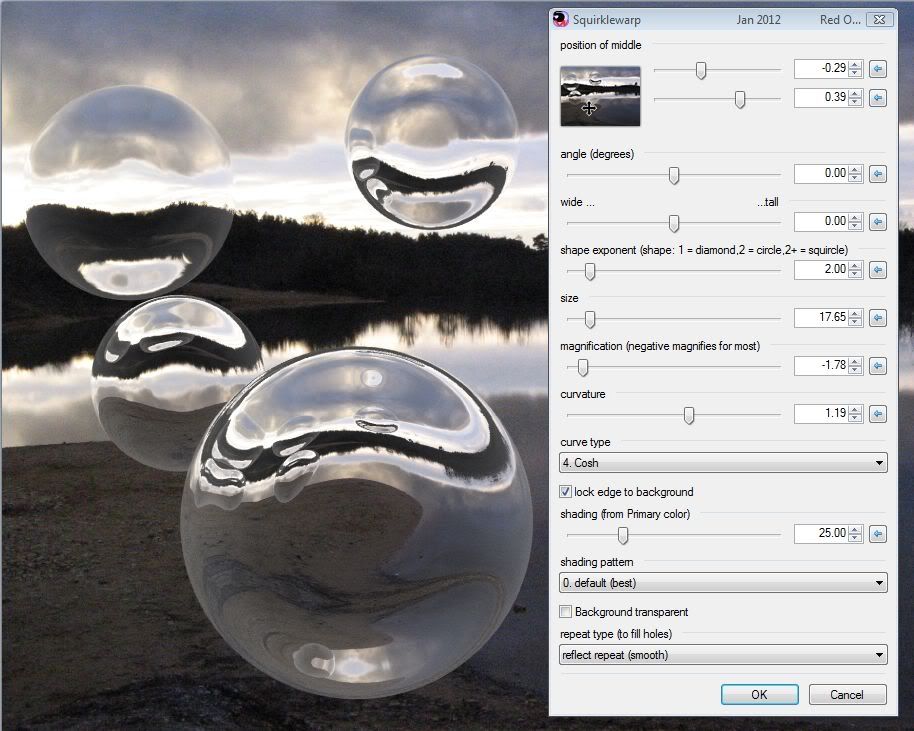
It is useful for producing glass type objects, buttons and warping text layers.
It is in my updated Red ochre plugin pack
I have changed the default shape to circular as this is the one I use most.
All feedback appreciated.
Here's what it can do:-
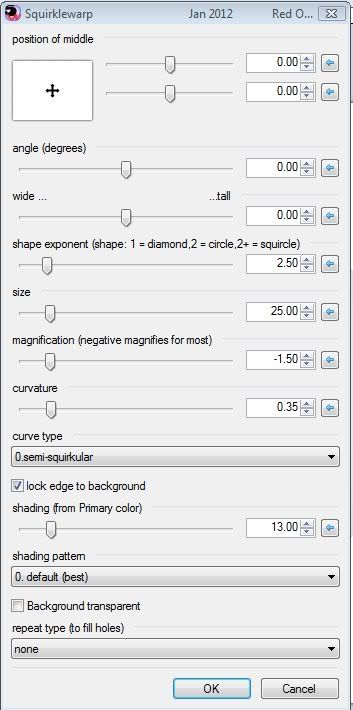
Notes on use:
I assume that position, angle, wide... tall and size are self explanatory.
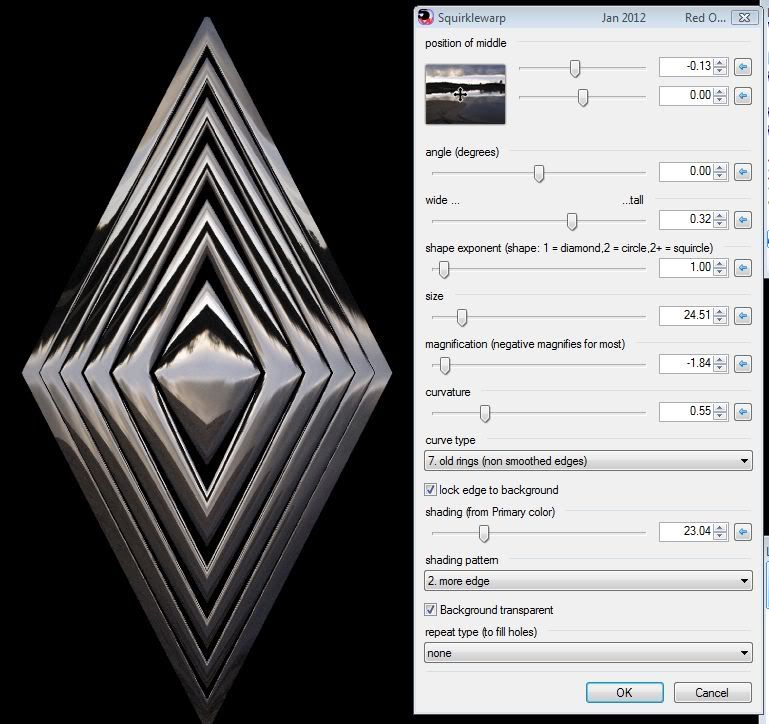
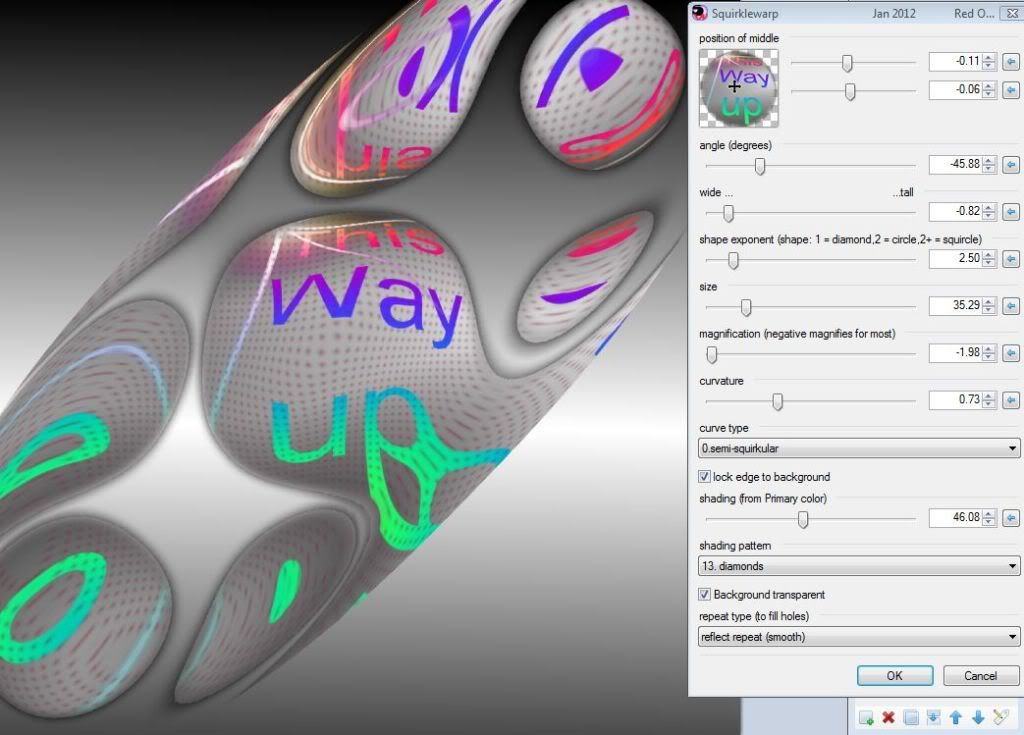
shape exponent: this changes the shape from a diamond through circle/ellipse and 'squirkle' to a
rectangle with rounded corners. To see what you are doing it may be worth pushing the shading slider
up to maximum (with shading pattern left at default), and then change the shape slider to see the
range of shapes. The default shape exponent is 2.5 (a squirkle) - you may find an exponent of 2 (a circle)
is most useful for standard bubble, lens and sphere effects.
magnification: the distortion (all types) is based on the the distance from the centre of the shape,
this is then multiplied by the magnification. Hence if the magnification is zero, there will be no distortion.
If the magnification is close to zero, it will be subtle and if large it will try to reference outside of the
original image. This will result in 'holes' or bits missing from the shape unless the repeat type is set to
'reflect repeat' or 'fly's eye'.
curvature: the distance from the centre divided by the maximum radius is converted into an angle. A trigonometrical function is then applied to this angle to achieve the distortion. Curvature multiplies that angle. What this really means is that a small curvature could be compared to a shallow disc (if semi-squirkular) or shallow pyramid (if pyramid)
and a large curvature will produce a more curved surface. If using the rings or ripples curve types, increased curvature will produce more rings or ripples.
Magnification and curvature work together to produce the distortion. When the edge is not locked - think of the effect as a lens in front of the source image. The magnification is the distance of the lens from the paper, curvature is the curvature of the lens.
If the 'lock edge' control is ticked, then it is more like stretching the source image over a domed shape.
Sorry - so difficult to explain!
I would recommend using the effect on a grid or simple photo and adjusting these two controls until you get a feel
for how they work.
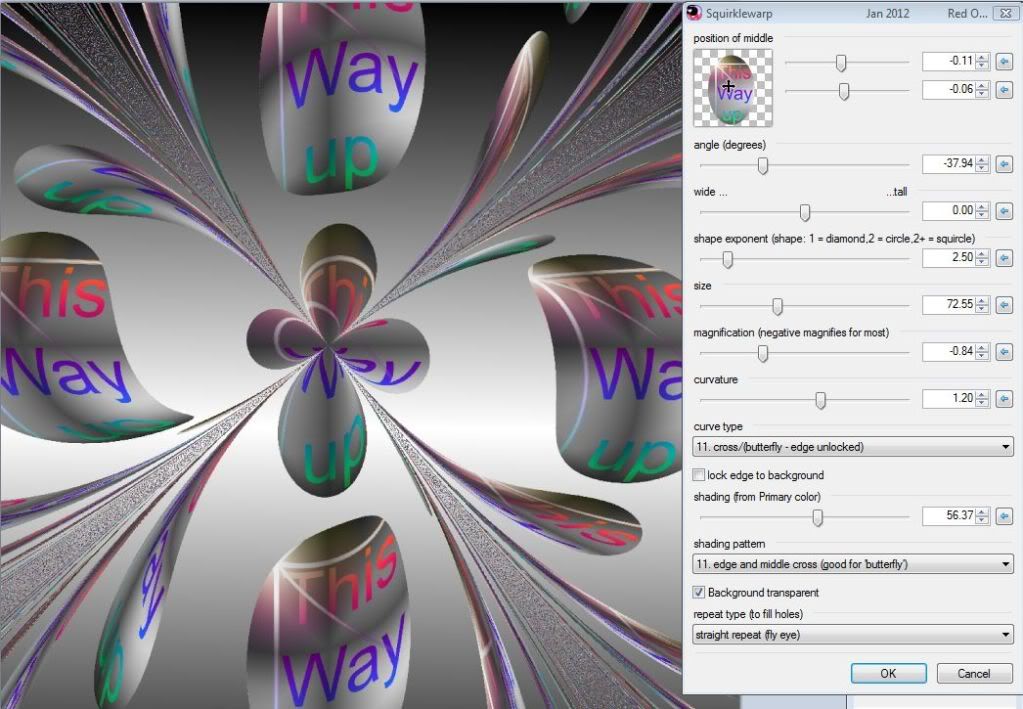
curve type: It is almost impossible to give descriptive names to previously unseen distortions!
Some are subtly different, some are bizarre - try them all! - and see the difference when 'lock to edge'
is unlocked/locked. If holes appear, because the distortion is extreme or the shape is near to the edge of the
image then try using the 'repeat type' button, to fill the holes.
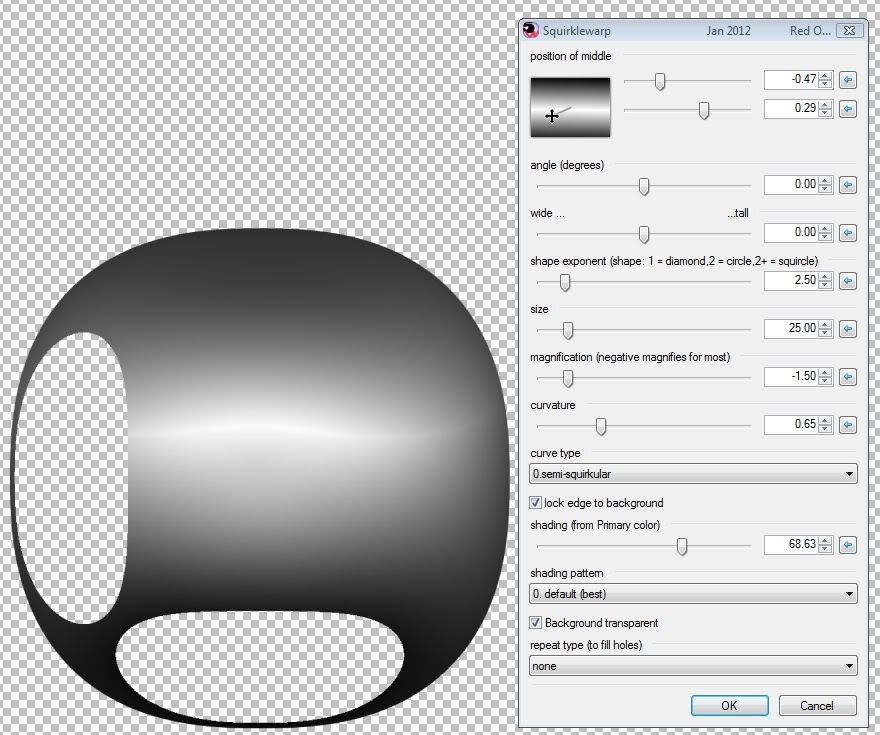
lock edge to background: when ticked (the default), this reduces the distortion at the edge. This gives the
appearance of the surface of the image bulging. When unchecked the effect behaves more like a lens.
Unchecked is better for more extreme effects, the compound (fly's) eye type effect for example.
shading: this determines the amount of shading from the primary color. Since this is normally black it will
shade the squirkle to give a 3D effect. I've found that for bubbles a white primary color works well, and selecting
a more vibrant colour can give good coloured glass results.
It is also really useful to see the edge of the shape, even if it is turned down before rendering.
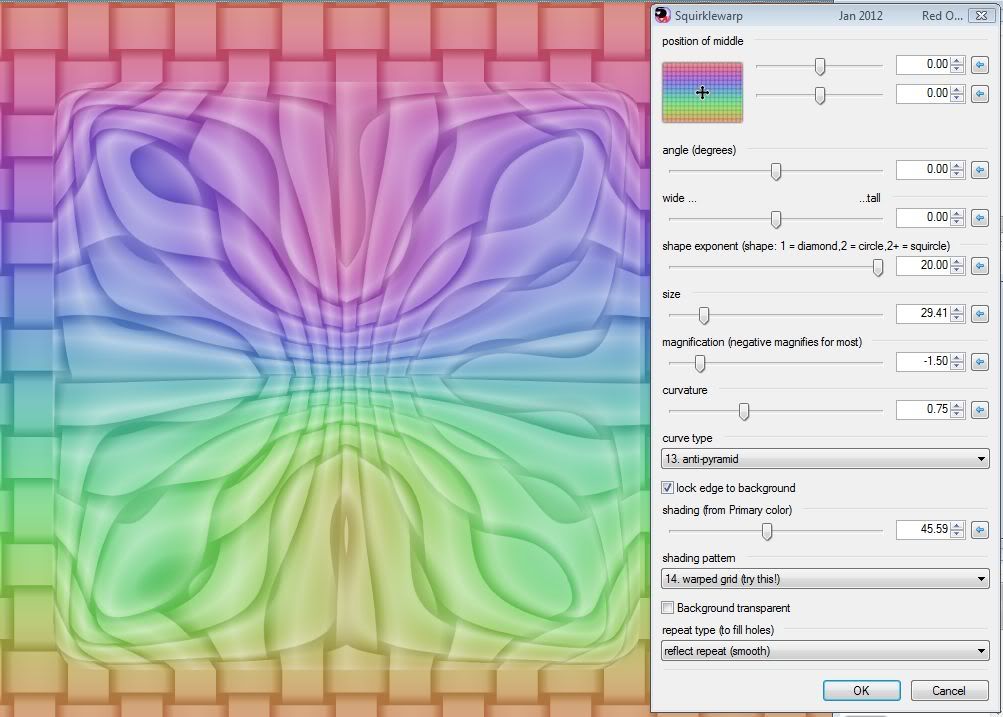
shading pattern: for each curve type I have devised a pattern of shading that I feel works. However,
this list gives the ability to try different patterns. I recommend trying the grid pattern, as it gives some clue
as to what the distortion is doing. Generally the first ones shade according to the position within the squirkle,
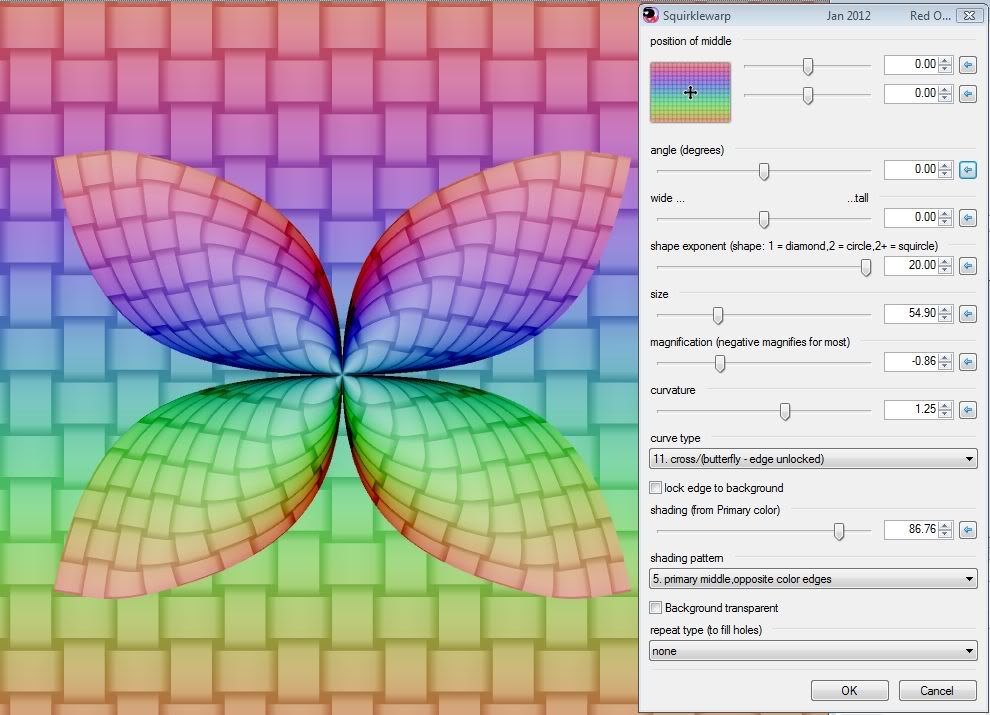
the latter shade the source image. I recommend using the 'butterfly' shading with the 'butterfly' distortion
(I could not set that as the relevant default type within the program).
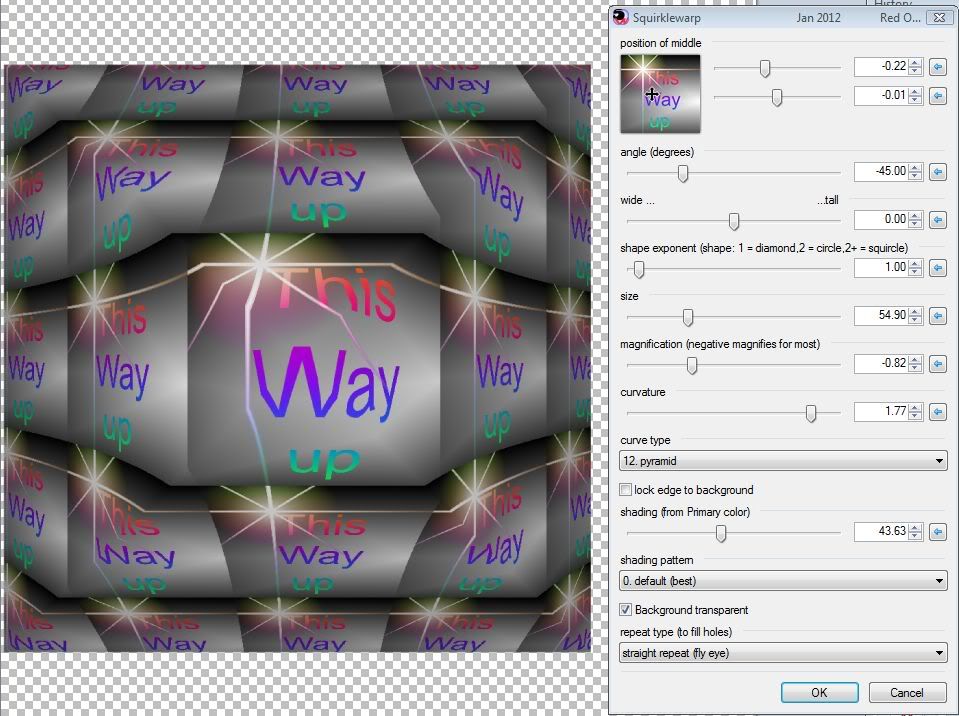
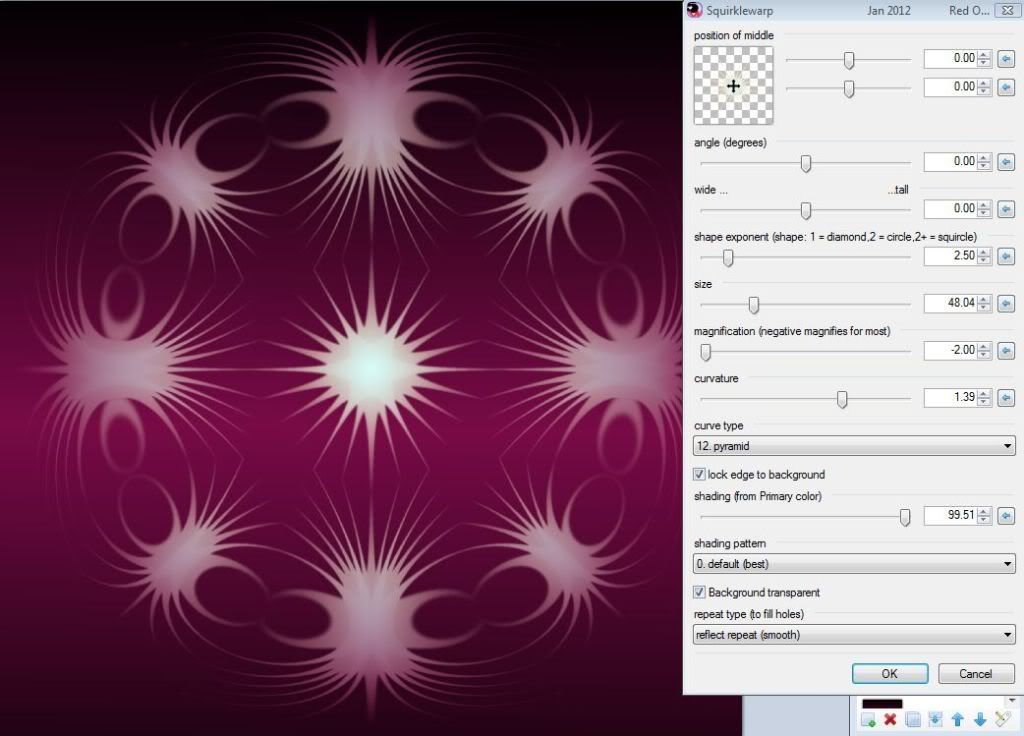
background transparent: this will make the area outside of the squirkle transparent. I tend to duplicate the original layer
then produce the squirkle on the top layer with a transparent background - this gives more opportunities to adjust the image. Add a shadow, blur the source image or add more shading to the squirkle, for instance.
I have also found interesting results from running the effect again on the object layer.
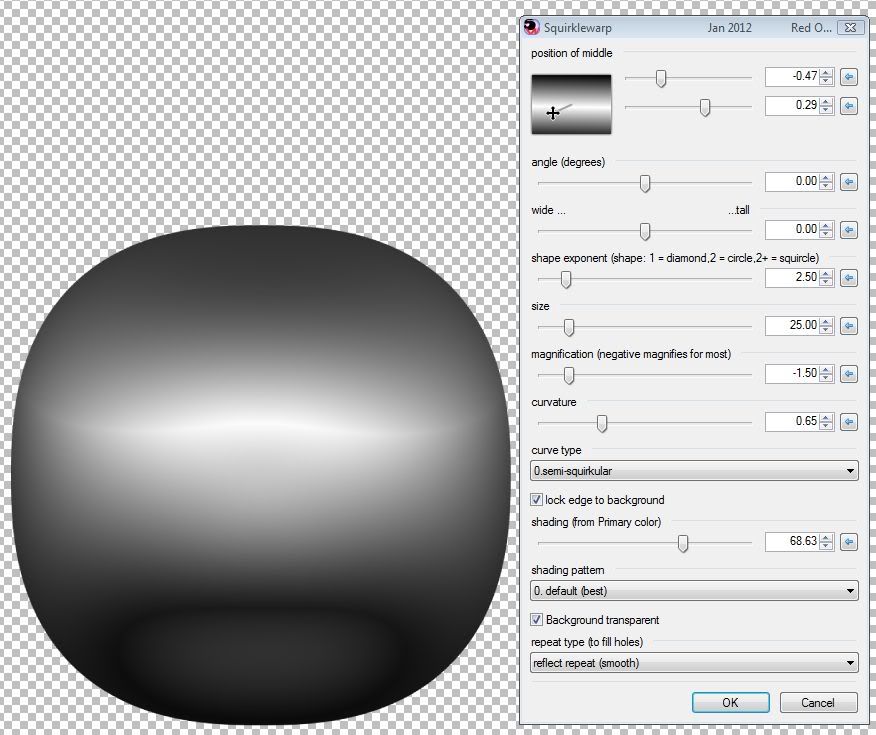
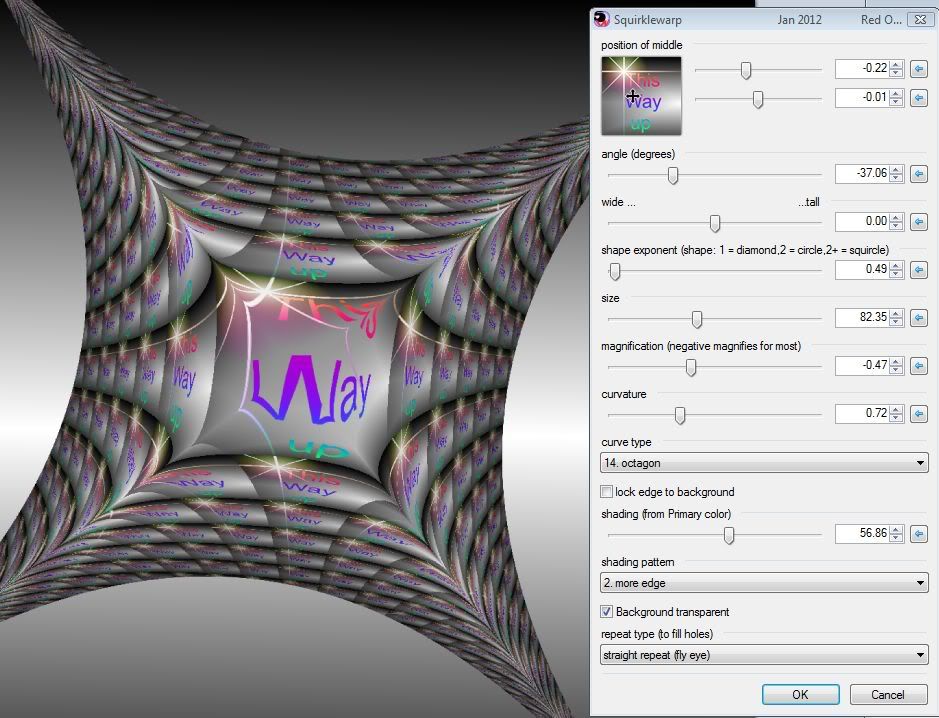
repeat type: with the default of 'none' the distortion will stop when the edges of the source image are reached. This can
create some interesting shapes, especially if used on an object layer. If however you want to make a 'bubble' , then the
'reflect repeat' will be best as it will give the appearance of a seamless join to the filled area. The 'fly's eye' option simply
repeats the original image - so if there is a gradient on this then the joints between the repeats will be very noticeable.
Known issues: Although the outside of the squirkle is smoothed, edges within the squirkle - at the source image edges where 'holes' appear, or between the 'old rings' are not smoothed. If this is a problem I would suggest ticking the transparent background button and subsequently using the 'feather' plugin on the object layer produced.
Also, the averaging method I've used only averages the nearest 4 pixels, so when the distortion references widely spaced pixels the appearance is not perfect. If I corrected this the effect would take an age to run, I don't think the loss of quality is that great as this only really applies to extreme distortions where the eye is not examining closely.
Here are some screenshots showing the effect UI, which may explain better
http://i1127.photobu...ples/holes1.jpg
http://i1127.photobucket.com/albums/l621/Red_ochre/squirklewarp%20examples/holes2filled.jpg
http://i1127.photobu...ingsquirkle.jpg
http://i1127.photobu...ingsdiamond.jpg
http://i1127.photobu...lyeyelowexp.jpg
http://i1127.photobu...ples/flyeye.jpg
http://i1127.photobu...flectrepeat.jpg
http://i1127.photobu...mondshading.jpg
http://i1127.photobu...utterflyeye.jpg
http://i1127.photobu...terflyweave.jpg
http://i1127.photobu...ainbowweave.jpg
http://i1127.photobu...eavepattern.jpg
http://i1127.photobu...s/weavegrid.jpg
http://i1127.photobu.../urchinwarp.jpg
http://i1127.photobu...les/bubbles.jpg
http://i1127.photobu...quarebubble.jpg
http://i1127.photobu...les/ripples.jpg
-
2
-
 1
1
-
-
Hello 'HyReZ', welcome!
Great images - looks like you know what you're doing
.My only slight criticism would be that they're too symmetrical. However, I think that's the nature of computer art and something I'm guilty of too.
I look forward to seeing more.
 - just wanted to show off what the new 'squirlkewarp' can do.


 - thanks!
Squirklewarp
in Plugins - Publishing ONLY!
Posted
Hello Delpart, - thanks for reporting back - glad you're exploring what it can do
Interesting that you are using to make perspective grids - I actually did a lot of work trying to make a fish-eye perspective grid plugin - but I got a bit stuck - I may go back to it, having had the experiencing of writing this one.
The results of the unpublished 'Fish-eye perspective grid' plugin are shown below - It's relatively easy to do out of phase sine curves for the left and right vanishing points but these will only line up with parallel verticals - like in Escher's ' House of stairs' - I would like to get a distortion going in all directions - that lines up - easier said than done!
I may go back to it - obviously normal 3 point perspective is just fisheye perspective with no curvature (I hope!) - anyway as I'm not a real programmer and not a mathematician this may take a while
Thanks again for responding!