


Ego Eram Reputo
-
Posts
14,581 -
Joined
-
Last visited
-
Days Won
264
Posts posted by Ego Eram Reputo
-
-
Ok, two days to go and no one wants to be first. So here goes....,
I call these my Glow-In-The-Dark-Icons:

I'm using symbols from the webdings and wingdings font for the base and applying simple effects from there. [edit] I have just released the plugin I used to create the symbols, you can find it here: WhichSymbol [/edit]. The lower images show the icons at their planned 64x64 pixel size (the black box is 64x64 to give an idea of scale).
I often need to wring a few quick icons out in quick time and this is my usual method. If you can't figure out which icon is which, I've not done my job very well have I ?

Surely you guys n gals have something better to show off by now?
-
Updated 12 December 2010 - 'Recent History' buttons!

Update 24 October 2010 - New UI
WhichSymbolPlus allows a symbol or character to be chosen and applied to the canvas from any installed font.
Thanks to these guys for their help:
- Pyrochild for his help with the XML loading & saving.
- Simon Brown who revised and recoded the original codelab plug-in, and was most generous with his time and source.
- BoltBait for the TextRenderingHint!
You will find this plugin located in the RENDER submenu.
(New) When you commit a character to the canvas (by clicking OK), the character is saved to the upper most 'History" button (the contents of the other buttons cascade downward). You can easily reproduce the character by running the plugin again and selecting the appropriate 'History' button. Note that the anti-aliasing setting is not saved, nor the color used (the plugin always uses the current primary color).
This is the fourth incarnation of this plugin. Here's how the new UI looks....,
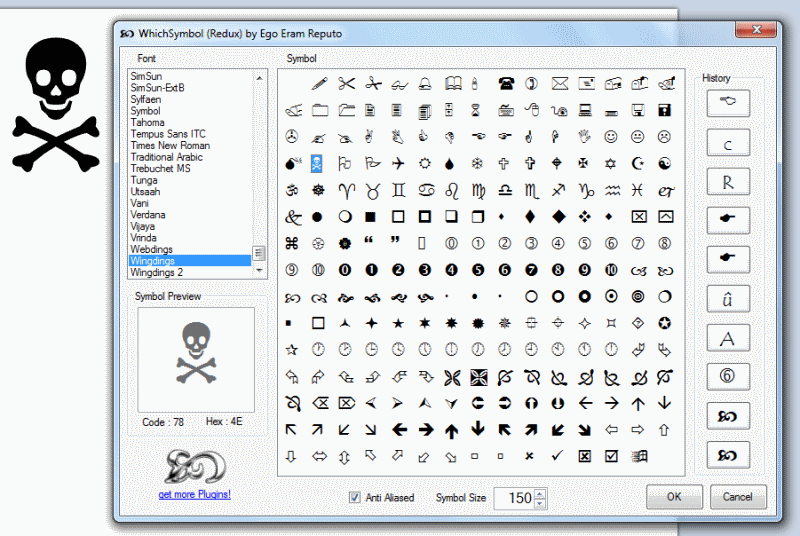
The UI explained:
- Select or change a font by clicking on the font name.
- Choose your symbol by clicking directly on it (it will appear in the preview area and also on the canvas). Click OK to commit the symbol to the canvas.
- Anti aliasing checkbox chooses between smooth & pixelated.
- Symbol size is changed with the up/down arrows or by typing a number into the size box. Measurements are in pixels (maximum is 1000).
- (New) Quickly recall any one of your 10 most recently chosen characters by clicking on one of the 'History' buttons.
To install the plugin, download my Plugin Pack and unzip it. Run the *.exe installer (written by BoltBait). Restart paint.net.
-
 5
5
-
Hi I think this is a great plugin since with this I can have different width, height in my grids.
But I miss one option; I want to be able to choose the width of the lines used to draw.
I really would appriciate if you could make this.
Sorry that is beyond the algorithm I'm using to draw the cells. You should investigate Madjiks Gridmaker plugin as this will allow you to set height, width and brushwidth. here's the link: Grid Maker Plugin (2007/05/24) v3.0 http://paintdotnet.12.forumer.com/viewtopic.php?t=4879
-
Wow :!: This is a seriously impressive update!
The new UI controls are an excellent addition and bring a whole new range of possibilities to plugins made with codelab. I'm gonna have to spend some serious play-time fiddling with the "all grown up" codelab in the next day or two.
Many thanks BoltBait, you're awesome.
-
Forum tip: Read the posts that have been locked (closed) by the Moderators. These posts have a little padlock icon next to the subject.
Helpfully the Mods will usually explain why the thread has been locked, what rule has been transgressed and where to find the rules.
Finding out how the rules are applied helps you to avoid posting blunders of your own.
-
Hi,
I'm looking for a C# technique to interogate the currently selected PDN font. I just really need the FontName and FontSize, but I'm not sure how or where to look for this info.
Can anyone point me in the right direction? Thanks.
-
- [*:1rso81hp]Curvature correction on the border : i'm open to any procedure because none has - up to now - been good enough to recover this deformation. I also tried to find what algorithms are used in commercial programs but nothing usefull has come out.
Here's what I would try: Get MadJiks tubeoblique plugin viewtopic.php?p=19735#p19735 and have a play with that.
My assumption here is that the curve of the page is a section of a larger cylinder. If we can stretch the image around the internal surface of a similar sized cylinder we should have a way of correcting some of the distortion.
My next recommendation would be the shape3D plugin - again with the cylinder shape. viewtopic.php?p=52345#p52345
Note: I haven't actually tried these techniques & they are probably only going to be useful if you have a small number of images to correct.
Hope this helps.
-
Ewww! VB.NET! Eww!
Still, if it gets more people writing plugins, I guess I really shouldn't complain.
But... VB.NET...
I hear you :wink: but it's what I have installed. Yes I could d/l VS but I have a rural dial-up connection and the files are huge!
My point was that this template does exactly what it is intended to do and is easy to use - even in a "humble" version of VB.
-
This template is simply brilliant :!:
I flicked the template through VB 2005 express last night and had the default *.dll running in PDN in minutes. Unbelievable :shock:
So if you fancy creating an effect in Visual Basic rather than in the C#/Codelab system you should give this template a try. I highly recommend it!
This template obviously took a fair amount of hard work to put together - many thanks to Jesse for making it available.
-
(Completely humbled)As for now EER kindly made me some suggestion for these plugins, andpermitted me to post them.
Thanks Ego Eram Reputo!
(we could expect some good stuff sooner or later from EER...)
MadJik certainly deserves all the praise for these excellent plugins. His code is not only elegant but extremely fast too. I really like the UI's as well.
Thanks MadJik.
-
...you will be able to add as many sliders, check boxes, angle choosers, etc. that you want.
I'm sure all codelab users will be excited about this pending update.
Brilliant! Many thanks BoltBait.I am also looking at Ego Eram Reputo's requests (above). -
Ah found me a leetle bug...
 just as well it's only beta and not a weta
-
Bother you 2 more things, Please keep the dll same file name, and only add the version number for the zip, so users don't need to always remember to delete the old file, and can just replace it.
Please put in "render"
Thanks.
*.dll now just called CellMaker (with no version number) and placed in Render as requested. New ZIP file added (YMD: 10/02/08) to incorporate these changes.
-
Have you updated the attachment to CellMaker2.0 (with y,x loops) on your 1st post?
Please also add the date of the update, so users will know if the plugin have been updated or not.
Thanks.
Done!
-
Hmmmm... I hadn't thought of that either.... good point about the y,x vs. x,y given the way the "rois" are passed in. While in theory, I had been focusing on the point that you cannot make assumptions about how the rois are passed in, I have observed that they are always (in my testing so far at least) are horizontal slices, very long in the x direction and very short in the y direction. Thanks for the tip.
Madjik really knows what he's talking about. I just ran a simple test on the value of y,x loops vs x,y loops. Without changing any other code I found the speed increase impressive!
1600x1200 pixel canvas:
CellMaker2.0@12,12,2 = 62 seconds
CellMaker2.0 (with y,x loops) @12,12,2 = 31 seconds
-
Your actual version is really slow with small grid step...
This is due to your way of coding.
Plugins are really efficient if we use the y,x loops.
You could have a read with a variable x if you stay with the same y.
But if you try to change y, then the running time start to increase.
And the more you change y, the more the process is slow.
The 'rect' in the code is an horizontal part of the source image with only few lines.
If you read with 'y + something' you will ask too often to read outside the 'rect'.
This will create memory usage and slow down the whole process.
I hope I'm clear enough. I'm perhaps not 100% correct but the idea is here.
These are the lines I'm talkng about:
 // Loop through all the cells in the selection
 for ( int x = 0; x   {
   for ( int y = 0; y     {
 ///// y loop should be the first !

if (selectionRegion.IsVisible(Left,Top) && selectionRegion.IsVisible(Right, Top) && selectionRegion.IsVisible(Left, Bottom) && selectionRegion.IsVisible(Right, Bottom))
///// as top & bottom are variables!

dst[ Left , Top+j ] = PrimaryColor;    // draw left wall
dst[ Right , Top+j ] = PrimaryColor;   // draw right wall

dst[ Left + 1 , Top + 1 ] = PrimaryColor;   // fill in the extra squares
dst[ Right - 1, Top + 1 ] = PrimaryColor;
dst[ Left + 1 , Bottom - 1 ] = PrimaryColor;
dst[ Right - 1 , Bottom - 1 ] = PrimaryColor;
///// as top & bottom are variables AND you are using +/- 1 !!
As I said this version doesn't take care if the corners of each cell are entirely contained within the selection.
I just provide it to show you a good way to use the y,x loops. Up to you now to see how to add the tests for it...
Thanks for the code examples and your tutorial! I had not considered that the y,x loops would be appreciably quicker than the x,y loops.
Each cell must be inside the selection so that a valid maze can be constructed (the next step - CellMaker was just the preliminary construction but it worked well so I thought I'd release it).
Just because you accept criticisms....I do, and I'll learn plenty from your post. I'll study your code over the next few days and see what I can come up with. Thanks again.
-
That's cool!
Next one : bee grid ? (hexagonal!)
Hasn't the hexagonal fill plugin already been done?
CellMaker v2.0 is a piece of a larger project (codename:Prim - for those intrigued) and is my first foray into C#, so I'll gladly accept criticisms of my code.
-
This plugin has been superseded by Cellmaker Rev(isited) by zoonel, release date: Dec 06, 2009
you can find it here: Cellmaker RevThis plugin is very similar to the Gridmaker plugin. It simply makes a grid of cells within a given selection. There are three corner options, hard, soft (corner pixels are removed) and rounded (three of the corner pixels are removed for a rounded look).
[edit]
Thanks to a number of suggestions from Madjik the code has been sped up considerably, hence the new numbering: CellMaker 3.3 replaces all previous versions. Note: The function of the plugin has not altered between versions, only the rendering speed.
CellMaker is now found under the RENDER submenu (Ash's request).
It works like this:
Note: if you really want this plugin, you can find it in my plugin pack http://forums.getpaint.net/index.php?/topic/110145-eers-plugin-pack/ -
I've been playing with Codelab a little lately, thanks BoltBait for all your hard work on it.
As my eyes get weaker I find it harder to read text on the screen. So, would it be possible to setup some default settings for codelab with maybe a codelab.ini file?
// Codelab.ini
//
0,0,799,599     // Window coordinates: top left to bottom right (so I can resize and the new size will persist on reopening).
16              // Font size in pixels
#00FF00         // Comments color
I don't want a fully featured word processor, just a little tweak to make the font/opening window a bit larger.
[edit additonal]
If an *.ini file is not going to happen, my other wish is for a couple more tools on the toolbar?

-
the odd thing has to do with the top right corner, the code i tried was to figure out a different equation for when the canvas has dimensions like 801x801, and then run it only when the canvas had odd dimensions, which i know is rare to have a canvas like that, but still i would like to be efficient
Why run two equations based on odd/even canvas size?
Why not run the same code on both with the rider that the odd sized canvas will be perfect and the even sized canvas will have a 1 pixel column (or row) unused at the right edge (or bottom edge)?
(I haven't tried your code so I'm only guessing to the effect you're after.)
-
I support the request for a blur brush!!

Absolutely agree!
Life would be complete with a resizeable gaussian blur tool / paintbrush.
-
Didn't the Rolling stones say "time is on our side"? Well it wasn't! Hence the rushed pic with altogether too much blurring around the base.

As usual: No stock images were harmed in the production of this image
100% PDN
-
Due to my editing of a rule, this is now the official thread for discussing TRC. Pretty much nothing else to say, so start posting! Also, if any of you have ideas for a new name for the competition, then please say.
Sorry, just clarifying: this thread is for discussion and the other is still for posting?
[edit] Got it figured from your last post in the original thread.
-
janettsue said:You get pretty much the same effect with this method. I find it easy.

Paint bucket-fill mode 70% (primary color black, seconday white)
Frosted glass- Maximum scatter radius 5
Minimum scatter radius 5
Smoothness 2
Emboss- Angle 40
Nice :!:
If you wanted some variation across the whole block you could use a cloud layer as per my original post. With the extra layer you can introduce some darker and lighter areas depending on the roughness and scale of the clouds:


WhichSymbolPlus (updated 12 Dec 2010)
in Plugins - Publishing ONLY!
Posted
I wrote this with codelab, which uses c# I believe. To be honest I find c# remarkably easy to understand and would recommend you grab codelab and go through some of the source files. You might find yourself coding plugins before you know it. :wink:
I am always happy to release the source (if requested), though I have to admit a certain brute-force style of getting things to happen rather than any coding finesse