


Ego Eram Reputo
-
Posts
14,592 -
Joined
-
Last visited
-
Days Won
267
Posts posted by Ego Eram Reputo
-
-
Actually, you don't even have to do that. Just make sure that when you are backfilling, move the middle layer over, not the top layer. You may still have to backfill a few times depending on the size and position of the image, but keep the backfill layers in the middle. This would allow you to do all of the text 'A B C' in the original example at one time, instead of letter by letter.
The problem with this technique is that potentially, the backfill for C would be overwritten by the right shift for B. This is why I recommend doing the elements individually and working from right to left.
[edit]
Right, I've got what you mean now (I've thought about it :wink: ). I still have a problem figuring out if your technique will work as you intended.
Backfilling is a cumulative thing.
The backfill from C is flattened onto the background, and this makes up the initial background for the right shift of B. therefore, I don't think backfilling the elements together in one step will accomplish the task. Backfilling the right most element changes the background for the next element (the one to the left). Please feel free to post a sample pic to demonstrate.
[/edit]
-
For those of you who want the secret of eternal life wider autostereogram images:
The trick is to split up your "floating" image into vertical strips (width less than the image phase). Each strip can then be moved as if it was a separate floating element.

Antelope Leaping
Note: If your floating element is finely detailed, use a background with a very fine grain. I tried this image with a larger scale background, but the antelope just got lost in the background.
-
That's "Pleasantville" (just to remove any ambiguity) :wink:
-
Can all the moderator/old dab hands/ masters of pdn PLEASE PLEASE be a little more helpful in these forums.
It may just be a perception of mine, but I find the mods and users (young and old) very helpful. Don't be quick to think a short reply is a terse one, generally this isn't the case. Mods especially have a heavy workload around here and short, to the point, replies are very common.
As a novice who is keen to embrace pdn it's very disheartening to be fobbed off and told to seach.The original poster was not "fobbed off" IMHO. They were taught something of value - the search tool location. The link was given and the term that the user should be searching for was supplied. This is a technique I wholeheartedly support as it teaches users to be self starters and a little more independent.
If a poster has already searched unsuccessfully for something I think it beholden on them to let us know that in their post. That way we avoid "tried that" types of followup posts.
-
Nope, he means real ponies. I've tried to suggest llamas (viewtopic.php?p=255940#p255940), but the idea is just not getting any traction

-
Trust me, I've tried everything. I simply cannot view these images. It may have something to do with the fact that I can control my eyes independently (e.g. I can focus on two objects at once).
You have my sympathies
It must be intensely frustrating to be unable to view these images and see what people are going on about. The only other thing I can suggest trying is:
1. look out your window at a far off object.
2. now draw your focus to the window frame.
3. now back to the far object.
4. Feel what your eyes are doing? You need the far away focus, with the image reasonably near (40cm or so).
Your eyes must be quite unique, I've never heard of independent focusing before. Does this ability it have any obvious benefits?
-
I still have an actual binary abacus I made years ago to teach myself AND, OR, XOR and the other logic gates. Works a treat with MOD too

-
I remember that I created and posted a 3D image before using a different technique called (cross-eyed)but looks like was not easy for some to view it even with the explanation details,it was more complicated on 13 levels(called 3D flowers)
http://paintdotnet.forumer.com/viewtopic.php?f=26&t=22626&start=780
I've always found the cross-eyed method a real strain on the eyes, but loved your images!
Usually these dual image types are created by taking two photos of the same subject with the camera moving 100mm between frames. How did you manage that effect in PDN? Lots of math & spacing the different elements?
-
Opacity of 45% using the range 0-255 is the same as: 255*45/100 or 255*0.45. Figuring this out (with a calculator) is infinitely preferable to changing the system that is also used for the color channels R,G & B.
As an occasional plugin developer my vote is definately for the status quo. 0-255 is a binary thing that developers understand :wink:
-
Doing detailed work while zooming in is very tedious and frustrating, since you have to constantly move the color/tools/layers dialogs around. Would it be possible to have a way to scroll off the side of an image (maybe limit it to scrolling far enough over that the corner/border is centered)?
Why not just toggle the floating windows off? The "four-fingered-salute" involves pressing the four buttons F5, F6, F7 & F8 all at once to toggle the four windows off. Pressing the same four keys will toggle them back on again. Individual keys of course will toggle an individual window :wink:
-
Thank you all for your kind words. It is very humbling to receive such wonderful comments. I have to admit to being quite stoked with the reactions thus far, especially David’s “tutorial of the year” comment!
@Yellowman: Yes you’re absolutely right about the colored image, the letters and the depth. Re Sig: Yes I had considered this: viewtopic.php?p=251582#p251582
@ Mike: Glad this tutorial gave you some insights. It took a fair bit to work all this out & I’m pleased it has introduced something new for PDN users to play with. "One of the best tutorials?" Really? Wow! Thanks.
@ Sharp & Pyrochild: Try these two viewing techniques:
1. Print out the image
2. Sit somewhere quiet & put the image up to your nose. Don’t attempt to focus on the image.
3. Slowly draw the image away from your face, again without trying to focus on the image itself.
4. If you get the image to arms length – you’ve missed it. Repeat the process.
Alternatively:
1. Print out the image
2. Stand in front of your bathroom mirror. Focus your attention on your reflected eyes.
3. Slide the image up the mirror surface until it is in line with your eyes, try not to change the focus of your eyes from when you were looking at your reflection.
-
...and because the text is "fixed" once you have deselected the text tool or shifted the focus to another layer, it's a very good idea to get in the habit of always placing your text on its own layer. Now if you need to edit the text, it's a relatively painless process to delete the old layer and create a new one.
If you have loads of text, keep a copy on a Word/Notepad document so you can simply cut-n-paste it into your image (when the texttool
 is active).
[edit]There is also Simon Browns incredibly useful re editable text plugin: viewtopic.php?f=16&t=24685 [/edit]
-
Stereogram Autostereogram Tutorial – by Ego Eram Reputo 29 March 2009
 This work is licensed under a Creative Commons Attribution-ShareAlike 4.0 International License.
This tutorial is available as a free PDF. Click here to open or download the PDF
Warning, this tutorial assumes:
1. You know how to MOVE
 an entire layer by a number of pixels left or right
2. You have installed & can use WEAVE and DENTS (not absolutely essential if you can create some other nice pattern for the background)
3. You can DUPLICATE
 , RENAME and MERGE
  layers
4. You know how to view a stereogram image
What is a stereogram/autostereogram?
An (auto)stereogram is an image which contains a hidden 3D image within it. Viewing the image in a certain way tricks the eyes into seeing the 3D image which appears to “pop out” of the original image. For more information: Stereogram (Wiki this) and/or Autostereogram (Wiki this)
How do I view an (auto)stereogram?
There are several ways to view the image in order to see the 3D image within. For more information: http://en.wikipedia.org/wiki/Autostereogram#Mechanisms_for_viewing
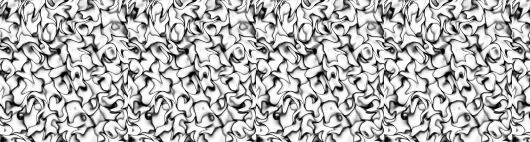
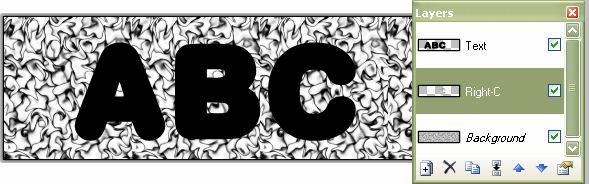
The Background
Your background needs to be a pattern that repeats across the horizontal width of the image. Preferably the pattern should repeat four or more times across the width. In this tutorial I’m going to call the width of the repeating pattern (in pixels) the Phase. The phase determines the maximum width of an element that you can have “floating” in the foreground over the background. So you cannot have a floating element that is wider than the phase (well actually you can, but that is beyond this simple tutorial).If your floating image is say, text, make sure that each character is no wider than the width of the background phase.
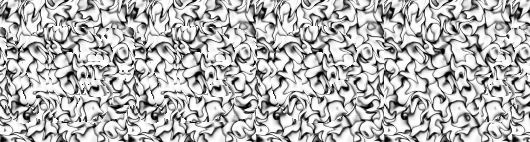
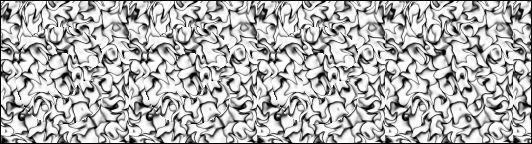
Here’s the background we’ll be using in this tutorial, (530 x 142 pixels)
1.Weave @ size 10 & 25 degrees
2.Dents @ Scale:156, Amount:16 & Quality:2
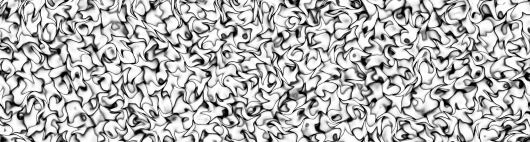
Now we make the background repeat across the horizontal width. To do this we are going to tile a strip 128 pixels wide across the width of the image. Here’s how:
3. Duplicate the layer
4. Select the top layer and move it
to the right by 128 pixels (128 is our Phase = P).
5. Duplicate the top layer
6. Select the new top layer and move it
right by 128 pixels
7. Repeat the duplication & moving steps (5 & 6) until the whole image has been tiled left to right in 128 pixel wide strips.
8. Merge
 all the layers from the top down into a single layer
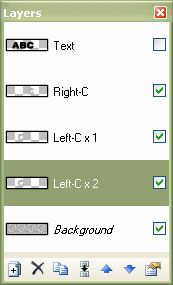
9. Name this layer “Background”
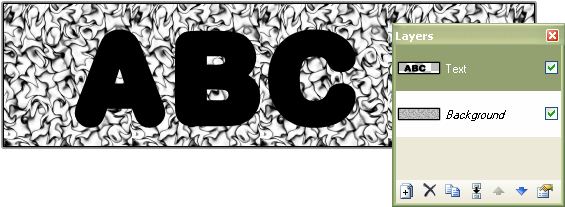
The Foreground
Now we need something to “float” over our background (“They all float down here” – Pennywise
 ). For this simple example I’m going to use the characters ABC.
10. Add
 a new layer & rename it “Text”.
11. Select the text tool
and a fairly large font and type the characters in black onto this new layer. Pick a font that is fairly thick and also a reasonable size. I’m using a font named Plump MT @ about 90px. Position the text slightly left of centre. Remember, the width of a letter should not exceed the image phase.
12. Select the letter C with the wand
 (Shift+S selects the wand tool then click on the letter C).
13. Invert the selection with Ctrl+I.
14. Duplicate the background layer
and select the top of these two identical layers.
15. Rename this layer “Right-C”
16. Press delete to remove the previously defined selection.
17. Select the Move tool
and move the Right-C layer to the right by 6 pixels. 6 pixels is an amount that can be varied later when you get familiar with this technique. Smaller shifts (say 3 or 4 pixels) will make your floating foreground elements appear nearer the background. 10 pixels would make the foreground appear further away from the background. Stick with 6 pixels for the duration of this tutorial.
Testing, testing
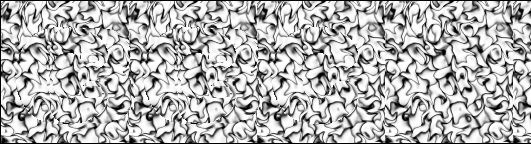
Now your stereogram will actually work. Turn off the visibility of the TEXT layer and view your stereogram with parallel eyes (tip: focus on the wall behind your monitor, or alternatively, focus on your reflection in the monitor surface). Keep at it until you can see the C floating above the background.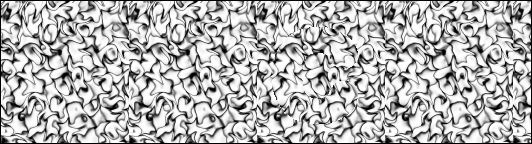 But wait! There’s something wrong, right? :? Yep, there is a funny “inverted” C to the left of the floating foreground one. It should look like it’s sunken into, or is behind the background. Well spotted ? The technique I use to remove these artifacts is called “Backfilling”.
Backfilling
18. Duplicate
the Right-C layer.
19. Rename the lower of the two identical layers “Left-C x 1”
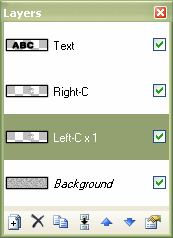
20. Select the Left-C x 1 layer
21. Move
this layer left by the same number of pixels as the phase. In this case 128 pixels to the left.
All done? Good, try viewing the image again.
There still may be an artifact visible to the left, but further left that it was before. We need to backfill again, by another 128 pixels. So….,
22. Duplicate
the Left-C x1 layer.
23. Select the bottom of these two identical layers.
24. Rename this layer “Left-C x 2”.
25. Move
this layer to the left by 128 pixels (one phase).
That should take care of the last artifact. View your image to make sure all the sunken in artifacts are really gone.
That’s just so cool isn’t it?
You can now merge the Right-C layer and all the Left-C layers together.
26. Select the Right-C layer and keep merging down
until you have only the Text and Background layers remaining.

Time for a B
Now you need to repeat the right shift for the character B.
27. Make the text layer visible, and select that layer.
28. Select the letter B with the wand (Shift+S selects the wand tool then click on the letter
 .
.
29. Invert the selection with Ctrl+I.
30. Duplicate the background layer and select the top of these two identical layers.
31. Rename this layer “Right-B”
32. Press delete to remove the previously defined selection.
33. Select the Move tool and move the Right-B layer to the right by 6 pixels
34. Backfill the artifact B that appears in the image by first duplicating the Right-B layer
35. Rename the lower of the two identical layers “Left-B x 1”
36. Select the Left-B x 1 layer
37. Move this layer left by the same number of pixels as the phase (128 for this tutorial image).
38. If you’re really unlucky, you may have to backfill once more (creating and moving a layer called “Left-B x 2” in exactly the same way you did for the “Left-C x 2” layer [steps 22 to 25]).
39. Select the Right-B layer and keep merging down until you have only the Text and Background layers remaining.
Now you should have a floating stereogram image of a B and C.
Lastly, A Time
40. Make the text layer visible
41. Select the letter A with the wand (Shift+S selects the wand tool then click on the letter A).
42. Invert the selection with Ctrl+I.
43. Duplicate the background layer
44. Select the top of these two identical layers.
45. Rename this layer “Right-A”
46. Press delete to remove the previously defined selection.
47. Select the Move tool and move the Right-A layer to the right by 6 pixels
48. Backfill the artifact A that appears in the image by first duplicating the Right-A layer
49. Next rename the lower of the two identical layers “Left-A x 1”
50. Select the Left-A x 1 layer
51. Move this layer left by the same number of pixels as the phase. In this case 128 pixels to the left. As A is the left most letter, you shouldn’t need to backfill it. But check by viewing the stereo image just to be sure. If you do have an artifact, repeat the backfilling technique [steps 22 to 25 but for the letter A this time ]
52. Select the Right-A layer and keep merging down until you have only the Text and Background layers remaining.
53. Deselect the Text layer visibility.
54. Save
 the finished image!
How uber-cool is that?
Notes for the Wicked:
1. You can vary the depth of the letters by one or two pixels to make them appear at different depths from each other.
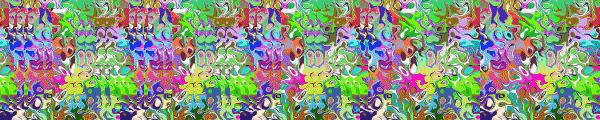
2. Don’t feel that your background has to be colorless either:
Wicked or what?
-
 1
1
-
 3
3
-
-
You're welcome! Glad we could help you out. Keep on using the search tool and asking questions. That's how we all learn from the people who know :wink:
-
Try searching for feather.
BoltBait also has a plugin that might help (feather selection) & there is another plugin called alphaspace which might be of interest.
Edit: also look at Mike Ryans Alias Plugin
-
I was wondering what would be the best submenu for it: Distort, Render or Stylize?
Am I too late to recommend distort submenu?
-
You're probably going to want to invert the colours of the negatives before any other image processing. The keyboard shortcut is Control + Shift + I.
For more info: http://www.getpaint.net/doc/latest/en/A ... sMenu.html
-
Search. It's in the top right hand corner of the screen.
I have always been disappointed with the built-in forum search tool. So I usually default to this: http://www.getpaint.net/search.html
@Kyronea: Use the link above and type in anti aliasing. The second result is the one you want :wink:
-
Have you tried tweaking the wand's tolerance? Its the % figure in the wand toolbar, and it adjusts how much/little of the surrounding pixels are selected when you click.
-
I don't recall a specific snow plugin, but a quick search found these threads detailing a couple of snow making techniques:
viewtopic.php?p=211474#p211474
Remember, his URL is your friend >> http://www.getpaint.net/search.html

-
You posted this exact post just four days ago and it was immediately locked. Haven't you read the post that followed your original post?
-
Try: Icon Archive although there are loads of others.
-
Amen to what Minoeman just said.
I don't want to repeat your abbreviation, but if it means what I think it does then you should remove it from this family friendly forum. Seriously.
-
Yes, can do. And so can you :!:
First, SEARCH for the "fire effect" plugin (by Tom Jackson).
Read mini-tutorial in the opening post
Download and install the plugin
Open PDN
Open your image
Add a new layer
Create the shape of your flame in black and then BLUR it
Run the Fire plugin
Any problems: FIRST read the entire thread where the plugin was posted :wink:
 is active).
 an entire layer by a number of pixels left or right
 , RENAME and MERGE
  layers

 ). For this simple example I’m going to use the characters ABC.
 (Shift+S selects the wand tool then click on the letter C).
 .
.


Stereogram / Autostereogram Tutorial
in Creations
Posted
Yeah, I know it's a pain, sorry. I am considering a series of stereogram plugins to do most of the hard work for us. These are not confirmed yet (just a fledgeling idea).
Thank you! I'm very glad you have enjoyed this tut.
Welcome to the forum!