


Lemonade
-
Posts
113 -
Joined
-
Last visited
-
Days Won
5
Posts posted by Lemonade
-
-
What @Pixey said. We can't help you without knowing what web service you are using.
But what you can do: add white (any color) background placeholder for your logo (for example 500x500 px and logo in the middle) and check if it fits the proportions of a (web service) picture display area. Repeat the process - changing background size until you get the proportions right. -
Hello Carey78,
unfortunately there is no best or easy way to do this.
Please check Paint.net Help, especially these tools:
https://www.getpaint.net/doc/latest/CloneStamp.html
https://www.getpaint.net/doc/latest/ColorPicker.html
https://www.getpaint.net/doc/latest/EraserTool.html
https://www.getpaint.net/doc/latest/Paintbrush.html
I'd start working on new layer and not the picture directly. Because white area doesn't contain any skin texture, I'd copy using selection tool parts of the normal skin and overlay-cover (on a new layer) white area. Then with the brush, eraser and layer opacity work on blending edges of the copied skin area.
-
 1
1
-
-
SquirkleWrap is a really great plugin for all sorts of distortions.
-
 2
2
-
1
-
-
5 minutes ago, oregongrown said:
I got it @Lemonade, thanks for your help as my brain wouldn't have kicked in until you started giving me some ideas that I knew I could handle!! OG!

Nice!
-
Hey @oregongrown, what step (listed above) are you struggling with?
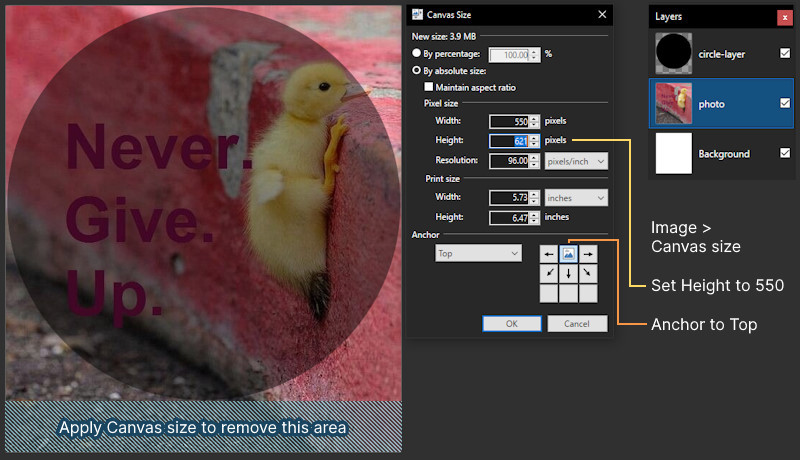
Circle and circle layer are not necessary, they are just a visual indication where your avatar will be cut if the platform (social media, forum) is using rounded profile picture style.
If you use picture from the first post, going to Image > Canvas size and changing height to match the width of the picture is enough.
Make sure "Maintain aspect ratio" is unchecked.
-
3
-
-
Hey oregongrown,
the easiest way is to start with square document or picture (256x256px, 512x512px and so on).
- Create new empty layer (referred as a Circle layer) and draw a circle with Shapes tool covering the whole area (hold Shift while drawing to lock aspect ratio).
- Set layer opacity to 50-100 so you can see everything below. Circle layer is just a guide, you can hide or delete afterwards.
- Add your picture if it is not already there and move in the Layers panel just above Background so it is set between Background and Circle layer)
- Create new layer above picture layer and add your text. Make sure there is an empty space (margin) left between elements you want to show and circle. Think about book page, there is always margin around.
- When you are done, delete or hide Circle layer and save your picture.-
 1
1
-
-
There is another option for custom dashed lines (and shapes too), but it requires dpy's AA's Assistant plugin:
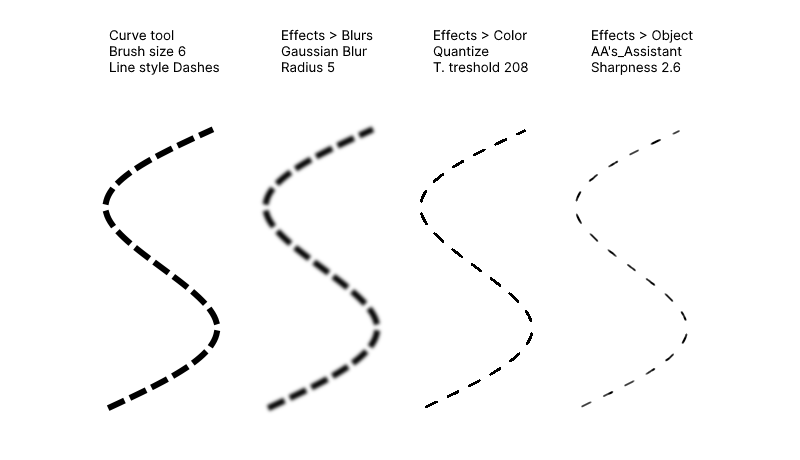
For colored lines, set Quantize Algorithm to Median cut.
-
1
-
-
On 12/14/2023 at 9:21 AM, JackHalland said:
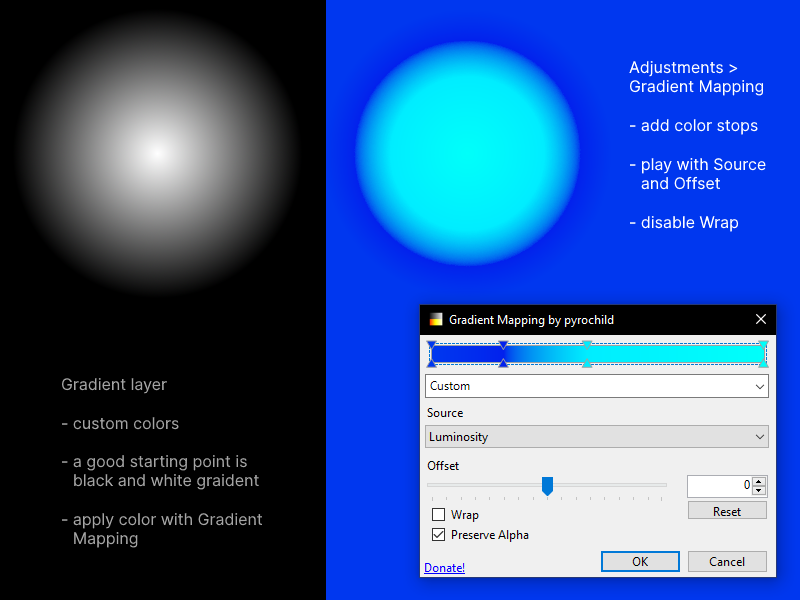
Thank you for replying, but I realize now that my explanation and the image was faulty. I know how it works when drawing a linear gradient. Problem occurs when drawing a circular gradient and I want a short transition at the edges or corners. I could use the brush tool, but I use a mouse and I'm not super steady with my hand. It would have been nice if there would pop up one or two points to drag to adjust the width of the transition, once you have drawn the gradient. Is there a way to do that?
Try out Gradient Mapping plugin (after installing, check under Adjustments):
-
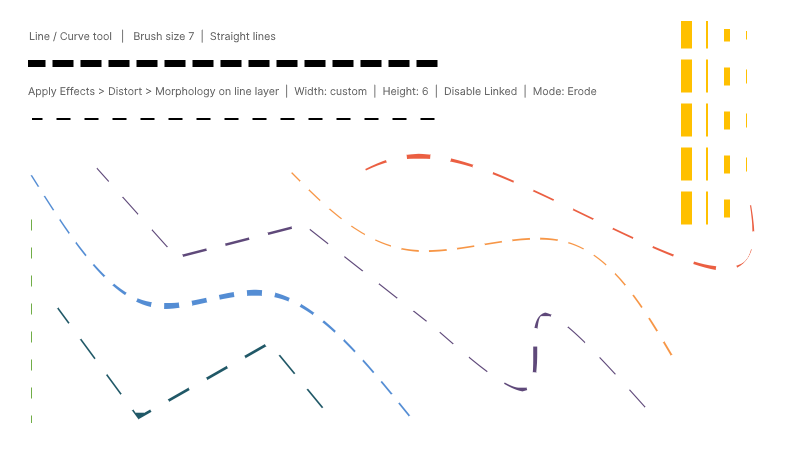
Check out Morphology Effect (Effects > Distort > Morphology).
Create a line with Curve / Line tool (brush-line size 7) and apply Morphology:
for horizontal line - width custom, height 6, disable Linked and Mode: Erode
for vertical line - width 6, height custom, same as above
for curved lines, I can't get line thickness to 1
You can manipulate line spacing with brush size and Morphology.
-
2
-
-
2 hours ago, Savastano said:
That's probably not it. I drew the lines presented above in paint.net as straight lines and added arrowheads. I need a plugin that will allow me to create such lines automatically by setting the distance between the triangles and their size. Then I would like to save such a defined line so that I can use it the next time I draw
Maybe Trail plugin might help. Check example 1 here:In this example there are two lines, replace "green" short line with triangle and then apply Trail effect.
But there is no option to draw as a Curve / Line tool.
-
While pasted part is still selected, with Move tool (M) grab one of the "knobs" to move around.
Hold Shift while moving to keep proportions of the element.Example: https://imgur.com/a/lqu1as5
More here: https://www.getpaint.net/doc/latest/MoveTools.html
-
1
-
-
7 hours ago, HenryH said:
(is there another way to unfreeze it?)
From paint.net Help: CTRL + B (twice). First combination zooms to Window, the second restores the previous zoom level.
Hit CTRL + B, then move around with mouse.-
3
-
 1
1
-
-
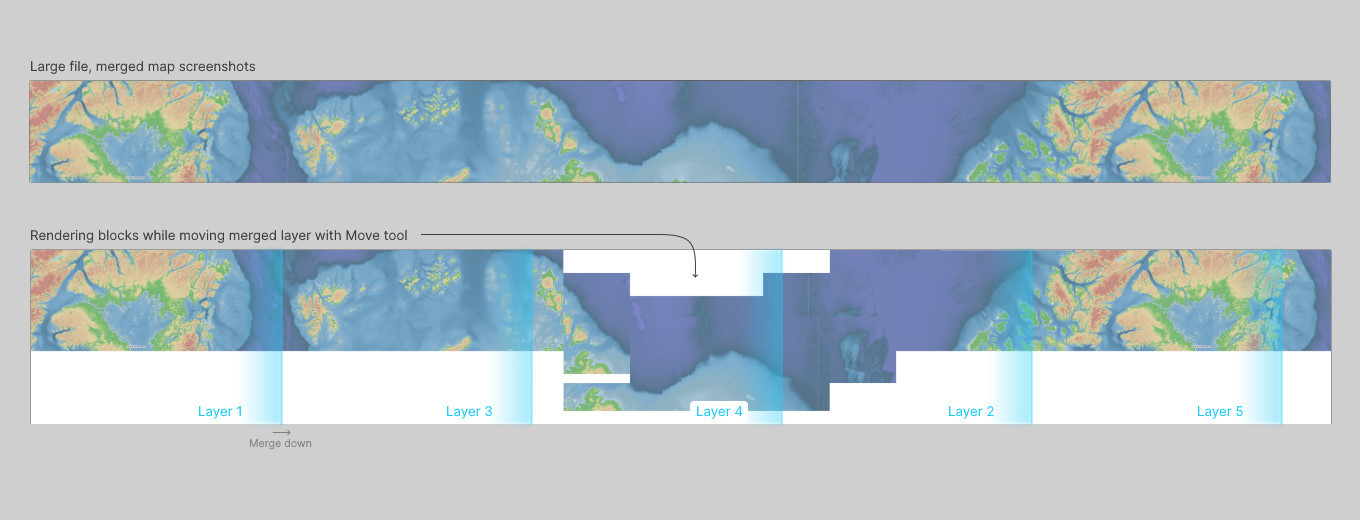
Are you referring to "rendering blocks" while dragging merged layer with Move tool?
Instead of merge down layers order 1, 3, 4, 2 and so on, what you experience is paint.net shows them in order of layer creation (1, 2, 3, 4) but just while dragging with move tool?
-
Effects > Object, that's what BoltBait wants to see.
-
1
-
-
Hey Lollard,
try right click on your picture > Open With > Choose another app and from the list select Paint.net. Check Always use this app to open .png .jpg, .gif files.
If it is not there, click More apps (at the end of the list).If it is still not there, click on Look for other apps on this PC and browse where your Paint.net is installed (for example: Local Disk (C:) > Program Files > paint.net) and click on (select) paintdotnet.exe then OK.
Similar process is to right click on a picture (jpg, png or gif) then Properties. Under General where it says Open with: click on Change. And then find Paint.net on the list or browse for it.You'll have to go through this process for all file types which you want to open with paint.net: jpg, gif, png, tiff...
-
You are right, although it is a great plugin, it doesn't work well in this case.
I did play around and it is really hard to create what you are asking for without going through a lot of steps.
Maybe there is a plugin suitable for this.
Here is an example with Polar Transformation plugin:
For this you'll need 3 textured layers, one is for horizontal path, one for vertical and last one for corner, which is stretched and looks a bit ugly.
Spoiler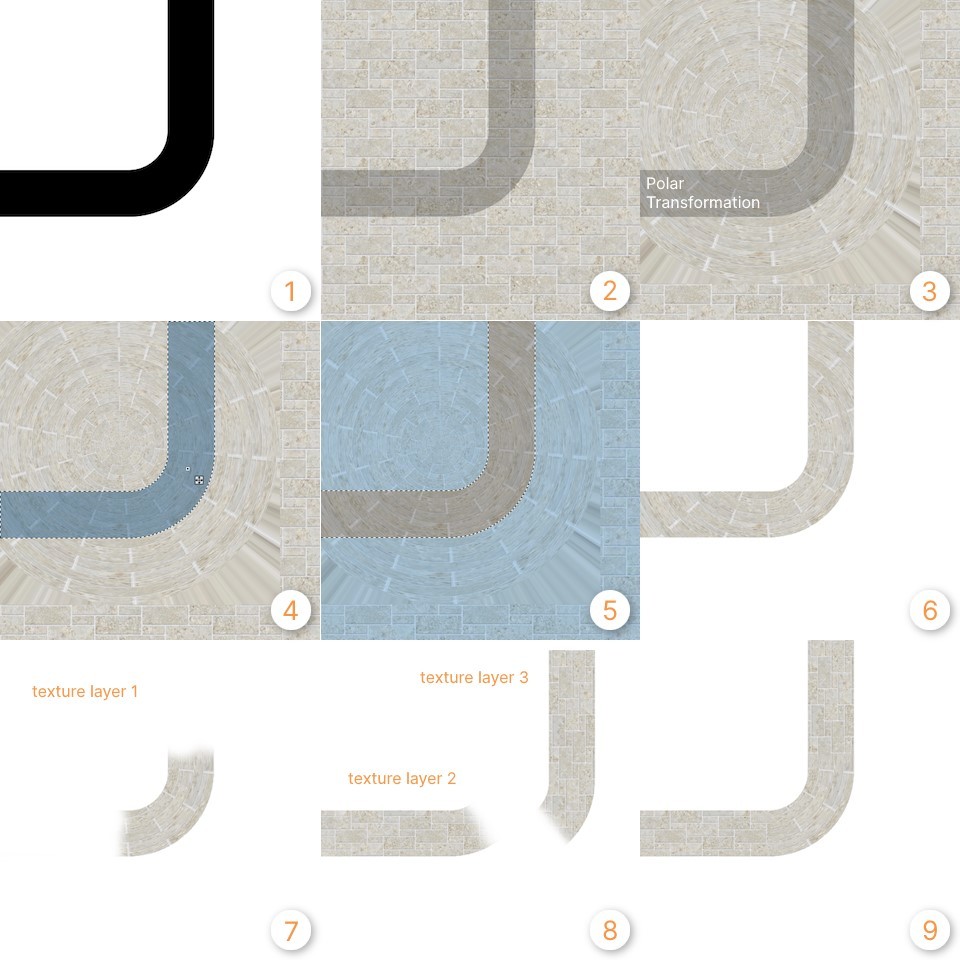
1. A path on its own layer
2. Add texture layer below (duplicate twice so you will have 3 texture layers)3. Run Effects > Polar Transformation - Rectangular to Polar on one texture layer (texture layer 1)
4. Create selection of path (click on a path layer with lasso tool, or Shift + click outside the path, then ignore step 5)
5. Invert Selection6. Delete
7. Eraser tool, delete everything except the corner
8. Both texture layers are scaled down a bit to match "polar" layer (3), texture layer 3 is rotated, then go through the same process selecting path layer with lasso, invert selection, delete everything except selected area for both texture layers. And with eraser tool erase (for texture layer 2) top area and for texture layer 3 bottom area
9. downside of this process is that texture has to follow the direction of the Polar Transformation
A quick update: instead of Polar Transformation, Shape3D plugin gives better results:

-
There is Image Distortion plugin, select a shape closest to what you need and play with settings:
-
General Kenobi
")
One way to do this is using BoltBait's Outline plugin (inside plugin pack):
https://forums.getpaint.net/topic/121343-boltbaits-gpu-accelerated-plugin-pack-for-paintnet-v50-updated-2023-07-28/For straight road:
- use layers for these steps and merge them later, with layers you can always change colors or textures of different elements
- layers order top to bottom: Yellow, Black, White, Grey, Background
- add first layer Yellow: create a yellow line with Line / Curve tool (shortcut O) while holding Shift key to make the line straight
- duplicate layer Yellow, then rename bottom layer Yellow to Black and while it is selected go to Effects > Object > Outline Object (set desired width, color black and anti-aliased on or off)
- duplicate Black layer, rename bottom Black layer to White layer and again apply Outline Object (this time white color, smaller width)
- duplicate White layer, rename bottom White layer to Grey layer and again apply Outline Object (this time grey color)- you can now use Grey layer as finished road piece.
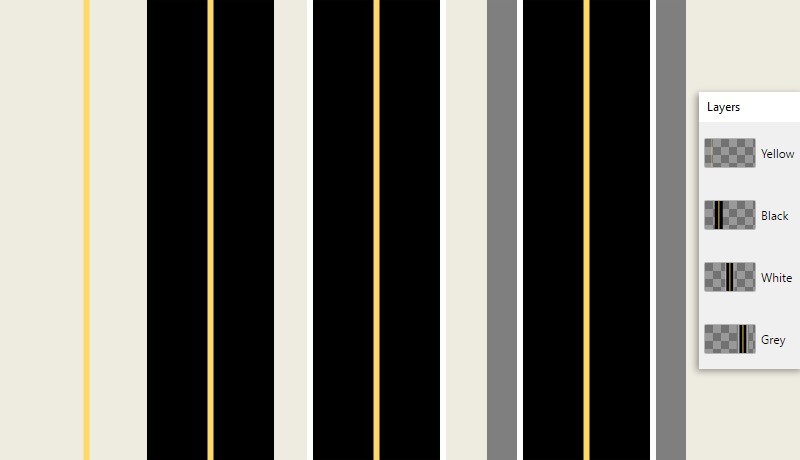
For curved road:
- it is the same process with layers and their order
- with Shapes tool (shortcut O,O - two times O) select Ellipse / Draw Shape Outline / Brush size (make sure to set the same size used for Curve / Line tool above) and set the color to yellow
- add new layer Yellow, and while holding Shift create a circle, then while it is still active (8 "knobs" around and one in the middle) move to one canvas corner so that the middle knob cross is aligned with corner (you will get a quarter of a circle)
- now, duplicate Yellow layer, rename to Black and select, apply Outline Object, and repeat.
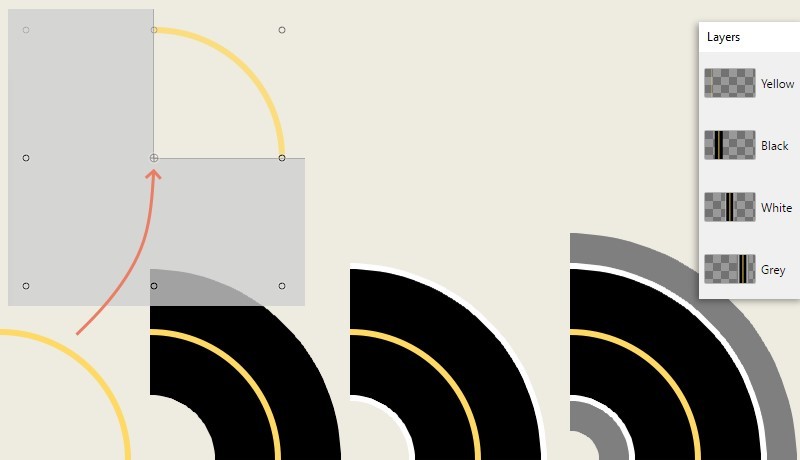
And combine them:

-
1
-
1
-
-
After using Outline (Effects > Stylize > Outline) object colors are inverted.
Select text layer and apply Adjustments > Invert Colors.
Check out Plugin Index for other Outline plugins:
https://forums.getpaint.net/topic/15260-plugin-index/
-
Hey @Capt.Marsh, under paint.net Settings > Pen & Tablet, check Windows Ink. If disabled (unchecked), I have the same issue with delay.
https://www.getpaint.net/doc/latest/SettingsDialog.html#4.3-
1
-
1
-
 1
1
-
-
@CHRISSY945, what is your paint.net version? Latest is 5.0.11
If I understand correctly, you are doing these steps:
1. Random picture is opened in your browser, right click, Copy Image
2. Open paint.net, File > New Document (or New Icon), paste picture
3. Under Layer Properties if you set Opacity to 1, you get that deepfried/distorted result4. You are using only one Layer, without changing Blend Mode: Normal under Layer Properties (although 1 opacity is almost invisible, not sure if that makes a difference)
To make things easier, could you use this picture
and after saving in paint.net upload to imgur and share the link with us.
This way we have original and your version for comparison. -
You could try this one:
Or even better what IHaveNoName posted (last 2 paragraphs, using Pencil to create color blocks and resize):
https://forums.getpaint.net/topic/8527-multi-color-gradient-v30-may-17-2018/?do=findComment&comment=552053 -
1 hour ago, Tactilis said:
By which, I think you mean "Alt+H for Help disables tooltips while the Help menu is displayed. They return after the menu is dismissed."
This is normal behaviour.For example, press Alt+F for the File menu. While menus are active, tooltips throughout Paint.NET are suppressed.
You'll see the same behaviour in other apps.
The suppression of the tooltips after clicking the Utility Windows buttons is a bug.
There is a difference in Left side menus behaviour and Help menu.
Steps for left side menus:
- Click once on File, Edit or any listed item- Menu is displayed
- Move cursor away from the menu or buttons, menu is still displayed
- To dismiss active menu, click anywhereThis is a normal behaviour.
Help Menu:- Click ? button once
- move cursor to the left but not over the menu below
- Help menu closes as soon as the cursor leaves button area
- Tooltips don't show unless clicked on Help ? button again -
If any of the buttons are activated with keyboard shortcuts (F5, F6, F7, F8, Alt+X), tooltips work fine, but Alt+H for Help disables tooltips.


How to create graph paper in 5.0.12?
in Paint.NET Discussion and Questions
Posted
Just to confirm Graph Paper works fine, visible under Effects > Render.
Paint.net 5.0.12, classic installation.
Already installed in Effects folder OptionBasedLibrary v0.7.8 (.dlc, .dll) and OptionBasedLibrary v0.7.9 (.dlc, .dll)