


Marilynx
-
Posts
310 -
Joined
-
Last visited
-
Days Won
1
Posts posted by Marilynx
-
-
Hi Marilynx,
The best way to learn what a plugin's controls do is just to play with them! You won't break anything (I hope) and if you want to set them back to default click the little reset arrow at the end of the slider.
I recommend running it on a new layer as this make it easier to manipulate later in your image.
The two square boxes (double vector controls) affect the start and end positions, all the rest of the controls have names which describe what they do.
Well, I have played with it, and since I'm looking for a specific effect, like a base pattern for a nice twist of DNA, preferably made of tiny, irregular pearls, it's getting a little frustrating that I can't figure out how to which control does what.
Now, I grant you that I am probably being extremely impatient, since, just about now, I've been using PDN for a whole whopping month.
However, your last sentence about the double vector controls just explained something which I did not know and had not figured out. So, I'll go back to tinkering.
-
My take on this....

-
I've restored the images just for you Marilynx
 I've asked Fuzzy for the PDF so that too can be attached.
Oh, thank you SO much. I am really digging in and trying to learn how PDN works. There are a whole BUNCH of designs I have always wanted to create, but I am not, nominally, an artist, though I can design things. I'm generally more of a Wordsmith than a visual artist. So I am going through all the Tutuorials that might have any piece which resembles something I might use to make these, trying to learn HOW the appearance was created, and then seeing if I can adapt it to what I need.
-
Vote? On a Saturday? Ah, maybe Louisiana?

Louisiana. Yeah. Y'know, it's that Napoleonic Code thing. "In 49 states, the law says... but in Louisiana....."
-
Hi this doesn't seem to be working right. I'll try again.This goes to Google Drive where you can download a screen clip of Welshblue's Metallic Text in a zip file.
https://drive.google.com/file/d/0B7GgB5-aM2B2aTNBOF9OTXVuMWM/view?usp=sharing
Hope this works.

Oh, thank you very much! I will play with that first thing in the morning! After I go vote!
-
Click the 'Follow this topic" button at the top of the thread.
Click on your username at the very top and select " my content".
Hope that helps
Thank you. Yes, it does! As I said, this software is different from others I have used. Just a matter of learning what's where. Things are a bit fancier these days than back in the old text-only CompuServe days!
-
I've moved that tutorial to the Graveyard due to the lack of images. If anyone wishing to revive the tut should post a new version in a new thread.
If you don't understand how to use a plugin - post in the plugin thread.
If you have issues with a tutorial, again please post in the tutorial thread. That way we can sort out these things as we go.
Well, although I have been online since 1987, the software for this Forum is new to me. I haven't quite figured out how to FIND the posts I've made to threads other than ones that show in the main Forum, or which I have bookmarked. There doesn't appear to be -- or I haven't found it -- a way of being notified in a timely manner that there is a reply, and no "New to Me" listing. Nor can I find a list of my posts and click through to them to see any replies.
Of course, I could be wrong. It wouldn't be the first time.
Here is another tutorial for which the pictures (and apparently, most of the tutorial) have disappeared.
-
Maybe these text effect tutorials can help you?
http://forums.getpaint.net/index.php?/topic/25924-clipwarp-shiny-text/
http://forums.getpaint.net/index.php?/topic/30103-bling-text/
http://forums.getpaint.net/index.php?/topic/27764-realistic-roughcast-metal/
http://forums.getpaint.net/index.php?/topic/31796-diamond-text-effect/
The Texture Shader looks like a really cool plugin. http://forums.getpaint.net/index.php?/topic/31964-texture-shader/
Yes, Texture Shader does look neat. Complex. All the settings! And I have no earthly idea what any of them mean. Boltbait's FILL (from clipboard or file) is pretty neat. I think it's in his pack.
I really like Pixey's Bling Text tutorial, even though that isn't quite the effect I am after. I'm sure I'll have a use for it at some point! (Thanks for pointing it out! I hadn't found it yet....)
That first tutorial looks interesting, but does specify it's not for newbies, which I emphatically still am. Still, I may give it a whirl. Worst I can do is loose what little sanity I possess.
This one I've already tried (having done a search of the Forum). Couldn't get it to work. It's possible that I confused some of the directions. This is a classic example of what I was talking about. No images available unless you jump through 16 hoops, DL each picture and then re-write the tutorial to include them. This one seemed as if it would be the closest to giving me metal effects, but I cannot get it to work.
On the Roughcast Metal one, Illnab1024's Plugins aren't compatible with PDN 4.x. I haven't yet found a newer version. Maybe I just overlooked it.
I think the diamond tutorial, although not the effect I am specifically looking for at this time, will have plenty of uses, so I thank you for pointing me to it.
-
I have seen some very cool tutorials about making metallized pictures.
I've got the plugin installed.
As far as I can tell, it doesn't work for me.
I assume this means I don't understand the steps, but it's very frustrating.
I need to be able to do silver, iron, gold copper/bronze, and platinum.
I've been tinkering with various gemstone tutorials and have some promising results. One of them showed some really neat rings that the gems could be set in... but no instructions on how to make the rings.
Others have no pictures, broken plugin links, or broken screen shot links. (I really hate the ones which have, instead of an image, Posted Picture, where I have to click on it, and then download the picture, and go back and forth and practically rewrite the tutorial to include the screeen shots.)
I genuinely wish tutorial writers, in addition to including the names and links to the plugins they use, wouldinclude Effects => Render => Etc. to show where a plugin is installed. That way, it is possible to check very quickly to see if one has already installed the dratted thing.
I did get an almost-bronze effect using Orange, Yellow, and Boltbait's Effects => Render => Flames, and then running another Boltbait item, Effects => Render = Shape3D. Unfortunately, I have no way to apply this texture / metal to anything else.

-
Is there a tutorial on either of these videos? I find them fascinating, but hard to do, stopping the video, popping back to PDN, and then restarting the video....
-
This tutorial is very helpful to me. I did not use it on an object, but on lettering, the way Ishi suggested.
-
Downloaded this, figured I would work my way through them all. Started to do the second one, Hardwood floors. Clicked on the required plug-ins and, for both of them, got "Snap! This page isn't here! 404 error!" I've been getting that on a bunch of tutorials. Either that, or the screenshots are not available, or require sixteen cartwheels to get to.
-
Played with this one. This has not been feathered. I was doing fine until I hit Step 9, and had to read it about twelve times before I could figure out what I was being instructed to do.

-
Okay... I would very much like to thank everyone who took the time to chip in on this thread. I am saving it, and when November is over, I will get my Fotolia subscription and DL the wolf and the moon I need for this. Well, and the DNA and hand I need for the first one, and the mountain road and singer for the second one, and then start digging through tutorials.
I've already spotted three I want to work through....
-
I have to say that I did not know about "Jump to Next Active Layer" as a feature?
I don't like it.
It does, however, explain some of the editing issues I've had....
-
I can certainly see it, both in my original comment and in the quoted portion in your comment. Can anyone else see it? Is it a magic wolf?
Obviously a magic wolf. Because this morning, when I clicked on this thread, I can see it just fine.
Gremlins. Has to be gremlins. Or the House Invisibility Spell. You know, the semi-sentient creature who hides whatever you're looking for UNTIL you ask for help, whereupon it places the item in plain sight and the person you asked for help says, "What do you mean, you can't find X? It's RIGHT HERE!" while you hear giggling in the background....
-
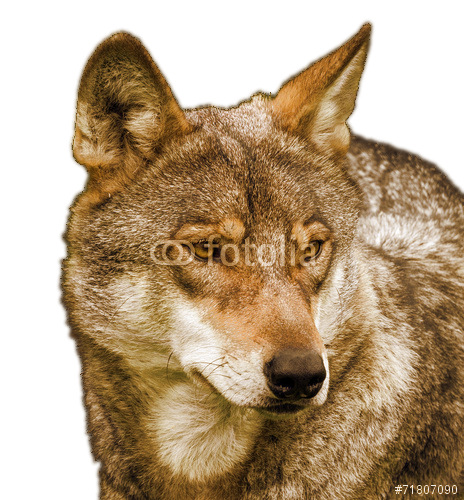
Here's a recolored wolf, using what I think is a useful technique. I didn't recolor the eyes; I just wanted to show a method for coloring the fur.
Uhm, am I looking at something incorrectly? Because I do not see the wolf.
-
Yes. The top layer should have the edge trimmed back to eliminate all of the background pixels, or the pixels that are a mixture of background and foreground (wolf fur). The purpose of this layer is to prevent erasing any foreground pixels that happen to have the background color. The lower layer should include the entire image, or at least all the edge pixels. You could erase most of the background away from the edge, but I find it easier to leave the entire background. (What I refer to as the lower layer is actually the middle layer if you add a constant-colored contrasting background as the lowest layer.) You then use the HSV Eraser, or something similar, to erase the background, leaving the edge. If there are any remaining pixels away from the edge, they can easily be erased using the Eraser tool. It's much more important to get a good-looking edge than to erase every background pixel.
Ideally, the edge will be smooth, but for the wolf picture, it may still be a little ragged. (It would be much easier to get a smooth edge if the background color were more distinct from the wolf's color.) Various tricks can be used to smooth the edge. I first used the Zoom Blur since it blurs outward from a central point, which is sort of the way the fur grows. Then I applied the AA's Assistant and BoltBait's Feather. These are for me the go-to plugins for edge smoothing.
I could probably do a better job then I did. I'm not too pleased with the darkish line along the top of the wolf's head.
EDIT: To smooth the edge, you might also try using Red ochre's FurBlur plugin as Cc4FuzzyHuggles suggested. That seems like an excellent idea.
Okay, just when I thought I understood the two layers, you threw in a third layer on me?
Have the Furblur from RedOchre. I don't really understand the controls on it.
Zoomblur is apparently built in....
-
Glowing eyes.....
2. make a careful selection around the eye with the Ellipse select tool. Zoom in with Ctrl + Mousewheel makes it easier. Get as close as you can then press M twice. See the control
Erm, what's Ctrl+Mousewheel? I have a touchpad mouse with two buttons... although experimentation shows it has an arrow on the right side of the pad, which, together with Ctrl, does in fact zoom in on a picture....
Learn something new every day. I've been using this style of mouse for years and never noticed that arrow before....
-
Shutterstock has the original version of the photo with a grassy background. If you click Preview in the lower-right corner you will get a high quality version with a very faint watermark that can be cut-and-pasted into PDN. You can use it to experiment with coloring. I doubt you should post that version, even modified; it might be a copyright violation. Perhaps posting isolated areas, such as the eye region, would be okay.
Actually, the grass background version of that is also on Fotolia. I checked with them today. No, it does not come with a transparent background, and no, there is no way of contacting the photographer to see if they would like to upload the one they used to make the black background one. <sigh> Nice idea, though.
-
Another useful background-removal plugin I'll mention (because I wrote it) is the HSV Eraser. It may be a little difficult to use, but it allows considerable control over which pixels get erased, and the "Portion of Non-Erased Color to Preserve" feature allows "soft" removal of edge pixels for less ragged results. Besides the explanations in the HSV Eraser thread, I show how it can be used to remove a background while leaving hair in a comment in a thread on the subject.
The wolf photo is actually fairly difficult becuase the dark gray fur is similar to the black background. The following version of the wolf photo was produced by the ideas mentioned in the hair comment, followed by a few steps to soften the edge. Keep in mind that the upper layer contains the non-edge part of the image, to fill in any non-edge pixels that might be erased by the HSV Eraser, and the lower layer contains the edge pixels. Before I merged the layers I applied the following steps to the lower layer.
Effects>Blur>Zoom Blur:
Zoom Amount: 2
Center: 0.07, 0.51
Effects>Object>AA's Assistant
Soften the edges: Checked
Gamma: 1.42
Offset: 1.00
Effects>Object>Feather Object
Feather Radius: 2
I find Zoom Blur is often a useful trick for softening the edges of fur.
Okay, let me make sure I understand what you're saying. You're saying I should have two wolf layers, one of which may have the edges trimmed back a little to get rid of the last of the background. And a second one which is the edges, extending slightly farther in than the edges of the other layer. And then feather or blur the edges, put the two wolves (main wolf) on top, and then merge the two layers?
-
My quick hack - without a plugin in sight...
Is that something like you want?Oooh, yes, it is! <grin> I did figure out the copy-and-paste of color numbers, but I appreciate your mentioning it!
Is there a similar way to turn some or most of the white to a cream tone, just to make the two wolves look as if they are marked similarly, but obviously not the same colors?
Glowing eyes.....
Nice doggie! Ooooohs a GOOD BOY then?I like that... and some very helpful tips in there for using the selection tools, too. (Thanks for that -- I can refer back to this thread!)
Although Mr. Gray Wolf is the good guy and Mr. Rust Wolf is the bad guy, so I'll do Mr. Gray Wolf's with the glowing gold eyes. Mr. Rust Wolf's should be glowing red.
-
Marilynx, the photo has obviously had the original background replaced with a black background. I wonder if perhaps the same image can be purchased with a transparent background. If it can, then you probably don't need to worry about that aspect of the process. You could just figure out whether you can to do the color-changing part. If that works out, you could decide whether to purchase the hi-res image. I don't know much about stock photo companies, but I would think most people who purchased the image would prefer to get one with a transparent background, rather than having to reinvent the wheel by re-removing it.
You know, I have to admit that I like that idea. I had chosen that one because (a) I liked the wolf, and (
 it seemed as if the black background would be easier to remove. I think perhaps I will check with both Shutterstock and Fotolia and see if it is, in fact available on a translucent background.
I wouldn't upload a hi-rez that I copied from the website -- I am extremely careful about copyright issues. I don't want to cause hassles for me, or this Forum! But since the stock photos are relatively expensive, I don't want to buy pix I'm not going to use. (Hey, there are BUCKETS on there that I would like to buy! Especially now that I am beginning to learn PDN and have a really nice editor to play with.)
Thank you for spotting the picture on a different background, and thank you for the suggestion of looking for it on a transparent background.
-
I tried to fiddle around with the wolf picture, got some interesting re-colored results, but no luck with the eyes, nothing looked good in my opinion. You'll have to figure out the eyes on your own.
Argh! Here I was hoping you would come up with something absolutely brilliant!


 it seemed as if the black background would be easier to remove. I think perhaps I will check with both Shutterstock and Fotolia and see if it is, in fact available on a translucent background.
Glass Ball
in Beginner Tutorials
Posted
Ah, yes, thank you... that does make more sense. Maybe I will make a copy of the tutorial and put your emendation into it for the sake of what little sanity I possess.