


Greg135
-
Posts
81 -
Joined
-
Last visited
Posts posted by Greg135
-
-
Tutorial on exactly this subject: http://forums.getpai...ky-backgrounds/
Thanks Ego Eram Reputo,
I'll take a look at that tutorial.....
Another question - if you get a .png image (say a logo)...but it has a solid white background...is it possible to remove the background?
Regards
Greg
-
Hi there,
I remember seeing a post about a plugin which allows you to remove the background from an image...
Unfortunately, I don't remember the name of the plugin....
Any ideas?
Or if you can point me to a Tutorial that deals specifically with removing a background colour from a
complicated image i.e. an image with a complicated outline...
Much appreciated
Regards
Greg
-
DPI is for American system users
If you are using Metric system, then you need to deal with DPCM (dot/cm)
Open new file, and do these in same order:
1-Put 118 for Pixels/Cm
2-Put 21 for Width
3-Put 14.8 for Height
Click OK, and start working on your design.
This is equivalent to 300 DPI
EDIT: spelling correction
Thanks yellowman,
We work in metric sizes, so I was struggling with that conversion...
Regards
Greg
-
1. I haven't a clue
 sorry
sorry2.
The highlighted portion there is where you change resolution (dpi). Make sure the thing to the right of it says pixels/inch. Then, set the print size below it to the size you wish to make the image (since it's A5, I would assume 14.8 × 21.0 centimeters).
3. dpi = dots per inch. In other words pixels/inch = dpi. If you want to make the conversion, go ahead, but you could just save time and change that box to say pixels/inch

4. Answered in 2
5. Answer too obvious. PDN all the way!

Thanks pdnnoob....
I just hit a flat panic, when they called me to tell me that 5 hours of work was wasted....
But having done some searching here and on the web, I think I have a better understanding...
You know the old adage...."a poor workman always blames his tools" - well I clearly didn't understand how to set the job up correctly in the first place...
Regards
Greg
-
Hi there,
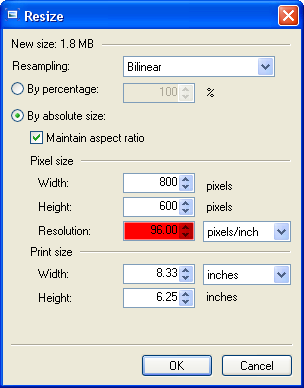
I was asked to design an advert for a magazine by one of my web clients.....
I went and set the size of the advert to A5 (see original settings attached) and completed the advert.
I got a call from the magazine company saying that the advert was too "small" and that they needed the image to be at least 300dpi.
They said that I needed to "set up the palette to 300dpi" (I think they were referring to Photoshop)
Boy, so I'm faced with having to go and redo the whole job.
My questions are:
- When I set up the new job in PDN it tells me that the New Size is 2.0Mb, but when I finished the job it had gone down to 295kb - any idea why?
- How do you set up the whole job to result in a resolution of 300dpi?
- What is the relationship between pixels/cm and dpi?
- How do you set up the job for the right size ie A5 but increase the resolution?
- I'm loathe to ask this question here but will it be better to go and design this advert in something like Gimp?
Apologies if these questions are quite basic, but designing for a webpage is the exact opposite as for designing for print because with the web you want images to be very small.
Here I need the finished advert to be 2Mb is size. At the moment, the finished advert is only 295kb.
I appreciate your input here.
Regards
Greg

-
1. create your gradient on the first layer (light blue --->dark blue)
2. add a new layer
3. set the primary color to white or cyan and press the "more" button to set the transparency between 10 and 20
4. select the ellipse tool
5. set the fill option to "draw filled shape"
6. draw ellipses, circles, ...
or
do steps 1 to 3 except the transparency (between 30-50)
4. select the Lasso selection tool
5. draw a selection looking like the free form shape you need
6. fill the selection
7. add a new layer for each shape and redo steps 4 to 7
8. merge down the layers with shape
I've done this with a mix of these both technics:

Hey MadJik,
Awesome....thanks.....your example is great!!!
Regards
Greg
-
This may help you on your way ?
http://forums.getpai...ect-by-request/
Changing the colours to suit ?
Thanks Welshblue,
Great tutorial....that's exactly what I want to achieve....
Regards
Greg
-
Hi there,
I'm working on creating some different effects in a header.....
I have attached a picture showing the effects that I want to copy.....the black arrows point to the elements that I need.
Just so you know, I have tried for quite a bit.....but alas I can't seem to get it right....
Appreciate your insight....
Regards
Greg

-
Thanks MontNman,
Looking at that tut right now....amazing results....
Regards
Greg
-
Thanks too Pdnnoob, Welshblue and Yellowman!!!
BTW Yellowman, that tutorial is quite brilliant....need to play around with it a bit....
All the advice is much appreciated!
Regards
Greg
-
Ok, I've knocked up a bit of a quick tute to see if this is what you are looking for.
 New trick for me attaching a file! Thanks Greg!
Hey Barbieq25,
Brilliant.....thanks for going to the trouble....really helped me to get the steps into the right sequence.
You're a doll.....lol
Regards
Greg
-
From the Plugins sections, I would download & install the True Blur first. Your need to restart Paint.NET if you already have it open.
On the header of your choice, add a new layer & move it below the image (figures).
Select the colour you'd like the glow to be (halo). With the paintbrush set to a reasonable thickness go around the figure. You really don't have to be too precise with this.
You can then use the True Blur to suit what you'd like. Not sure if the current version has Bolt Bait's Fast FX as standard but the Glow on that may also give you good results. Otherwise there is Glow under the Photos section.
Hope this has been helpful. Please ask again if you need more help.
Hey BarbieQ,
Thanks for your reply......
I played around with the options you shared but not quite getting it........drats....
I think I'm getting seriously confused between the layers and exactly how to apply the effects.....
It's raised more questions....can I ask you to explain further:
On the header of your choice, add a new layer & move it below the image (figures).
- am I working on the header with the new image added to it?
- why do you move the new layer below the image?
- are you saying that the new layer must go betwwen the new image and the header layer?
- which layer should I be working on?
Select the colour you'd like the glow to be (halo). With the paintbrush set to a reasonable thickness go around the figure. You really don't have to be too precise with this.
- Did that exactly using about a 25 width paintbrush.....
You can then use the True Blur to suit what you'd like. Not sure if the current version has Bolt Bait's Fast FX as standard but the Glow on that may also give you good results. Otherwise there is Glow under the Photos section.
- Tried to use True Blur and the Glow but both affect the whole picture and not just the halo area???
- how do you just get the effect on the desired area?
Hopefully you can help.....
Regards
Greg
-
Gradient set to transparent should work for you. Not sure there is a specific tute for that but maybe look through the help files? Also try Feather (plugin available form the Plugin Thread).
Hi BarbieQ,
Thanks for the reply....but I played around with the Gradient and it had no affect whatsoever.....Is there something I'm missing?
The same thing with the Feather option....
But let me explain what I did first:
I took the picture and removed the unwanted parts of it on the right hand side. This meant that the picture had an uneven edge on the right.
So, applying the Feather plugin only affects the canvas edges of the picture and not the uneven curly edge on the right....See image attached......
Is there a way to use the Feather option just on the uneven, curly edge?
Also, how would I use the Gradient in this example?
I have also attached the header with the picture inserted....so you can see why it's only necessary to Feather/Gradient the right hand side.....
Thanks...
Regards
Greg


-
Hi there,
I'm not sure if I am using the right terms here, but I want to blur or fade just one side of a picture to help it to blend into a new header image....
I don't want the picture to look as if it has just been stuck on top of the background....It must look as if it's an integral part of the background.... the picture has a very defined, dark "hard" edge
and I would like to "soften" it ....is that possible???
What techniques are available to integrate a picture into a header background?
Are there any specific tutorials available that you can point me to?
Appreciate your help...
Regards
Greg
-
Hi there,
I want to remove the portrait images on this header and replace it with a new portait but still want to have the "halo" (??) effect of the lighter blue surrounding the new portrait....
As you can see from the attached header image, the "halo" effect follows the shape of the woman's head....I want to be able to recreate the same look.....
How do I do that?
I'm a relative newbie to Paint.net so please provide detailed steps....appreciate it.
I have attached the current header.....
Thanks
Regards
Greg

-
It's not an absolute but it is very likely that PNG's will work better that JPGs.
PNG's support transparency, JPG's do not. For a graphic that you want to have overlaying another, it is pretty much essential to have transparency support (unless its a strict box shape).
PNG's are not supported by older browsers (like IE6), but then IE6 should DIE DIE DIE! (so this shouldn't bother you much).
JPG's do not work well on line drawings, lettering or simple graphics (sound like web graphics to you?). This is because the image loses clarity and sharpness due to the lossy compression. JPG's work best with photographic images (the format for which the filetype was created).
Try this simple exercise:
1. Take any web graphic you are using & open it with PDN.
2. Use Save As..., to alternately save it as a JPG, PNG & Optimized PNG.
3. Compare filesizes.
4. Open each image in a browser tab & flick between them. Any visual difference that is worth bothering about?
My guess is that OptiPNG comes out the smallest, by far. I tried this test with a 1024 x 768 photo (Win7 sample pictures: Penguins), here are the results:
JPG @ 100% 608.2kb
PNG 1.7mb
OptiPNG 264kb
More...., JPG quality
Hello Ego Eram Reputo,
Thanks for the explanation.....
I followed your example with a photograph as well....
Interestingly, I got the opposite of what you did....
The image size was 3000x2000 JPG
The JPG size was 2.59MB......... final size 3000x2000
The PNG size was 9.06MB .........final size 3000x2000
The OptiPNG was 5.43MB ..........final size 3000x2000
Admittedly, I was unsure of the settings to use in OptiPNG.....so I set the trials at 7
Is there something that I'm missing here?
Appreciate your insight....
Regards
Greg
-
Also u can use the gradient tool. Select the
 Gradient tool and set the white's transparency to 0 in MORE. Then clcik and drag across your image, now u have a multitude of colours. You can also use the
  color picker tool to choose your favourite.
Thanks SAND33P,
Now why didn't I think of that.......that provides infinite possibilities....
Regards
Greg
-
You simply cannot resize the image down to a smaller number of pixels without incurring some pixelization when the image is expanded again. The harder you squash an image, the worse it will get. See here: http://forums.getpai...-print-and-web/
Instead, save the images as Optimized PNG's. You'll find the OptiPNG plugin here .
You should also crop the images heavily (make the client scream with rage if you have to). For each little bit of image that you can remove the final filesize will be smaller.
Very important: resize to the final dimension that will be displayed. One of the biggest mistakes is to upload an arbitrarily large image (say 1024x800 for example) then force the browser to display it at a smaller size (e.g. 200x150). The browser is still going to download that large image in it's entirety in order to compress it to the smaller size. Instead, resize the image to its final size (in this case 200x150). Use Image > Resize. The ratio of actual image size to displayed size should always be 1:1.
Thanks Ego Eram Reputo,
This really helps....Are you saying that Optimized PNG's are better to use on a website than Jpegs?
The tips on cropping and saving to the final size....great.
Regards
Greg
-
Set your starting color as primary color.
Expand the Color window. (The button that says More >> )
Move the slider labeled V: .
Fantastic....thanks Sarkut!!!
Have a great day...
Regards
Greg
-
Hi there,
This might sound like an absolutely dumb question....but bear with me please....
A customer has given me a colour to work with but I have to come up with a darker version and several shades that are lighter as well.
I'm stumped....I've played around with the colour wheel in PDN but can't seem to generate the right colours....
I always seem to come up with something that doesn't match the colour the original...
How can I generate several shades of a colour?????
Your help is appreciated...
Regards
Greg
-
Hi there,
I developing a new website for a client....the challenge is that they have a load of images and photos that they want on the website...
Apart from causing the webpages to load slowly, Google also penalises these webpages.....
Can anyone suggest how to resize images to small sizes in pixels (25-35kb) but the image must still be fairly large i.e 600x600 and it must look good?????
Are there other programs available that can do this? Preferably free!
Appreciate your help...
Regards
Greg
-
Thanks Welsh and Ipswichmanc....
I'll take a look at those tuts.....
Regards
Greg
BTW.....I take it you're a Ipswich/ Man C supporter?????
Go you Spurs!!!!!
-
Well I'm quite proud of myself.....
I tried the steps as explained and I was able to reproduce what Ipswichmanc showed above....
My results are virtually identical so I'm not going to post them up.....
However, is there a way to try and integrate the woman a bit more into the background?
Just so she looks as if she is emerging from the background????
Is that possible or am I trying to fight above my weight here?????
Really appreciate the help so far...
Regards
Greg
-
Well done Ipswichmanc....that's exactly what I'm trying to do....
But can you point me in the right direction to do it myself....
You know the story - you can give a man a fish and he eats for a day....or you can teach him how to fish and he can eat for a lifetime!!!
Regards
Greg


 New trick for me attaching a file! Thanks Greg!


Removing backgrounds...
in Paint.NET Discussion and Questions
Posted
Thanks Ego Eram Reputo,
Fantastic....does the job perfectly!!!
Thanks so much.
Regards
Greg