


Zieon Eslador
-
Posts
148 -
Joined
-
Last visited
Posts posted by Zieon Eslador
-
-
Excellent. Thank you. Nice tutorial too btw

Fixed the pictures. Thanks, though really it's more guidelines than a tutorial, you can change just about all of the settings and still get a nice bullet. :wink:
-
Rotated text was in at some point but it died a long ago.
Really? I must not have gotten the memo...
-
Please resize your images to a maximum dimension of 800px as per the Tutorial Guidelines. Thanks.
Alright, I have less than ten minutes right now, it'll have to be in the afternoon.
Welshblue, awesome outcome.
-
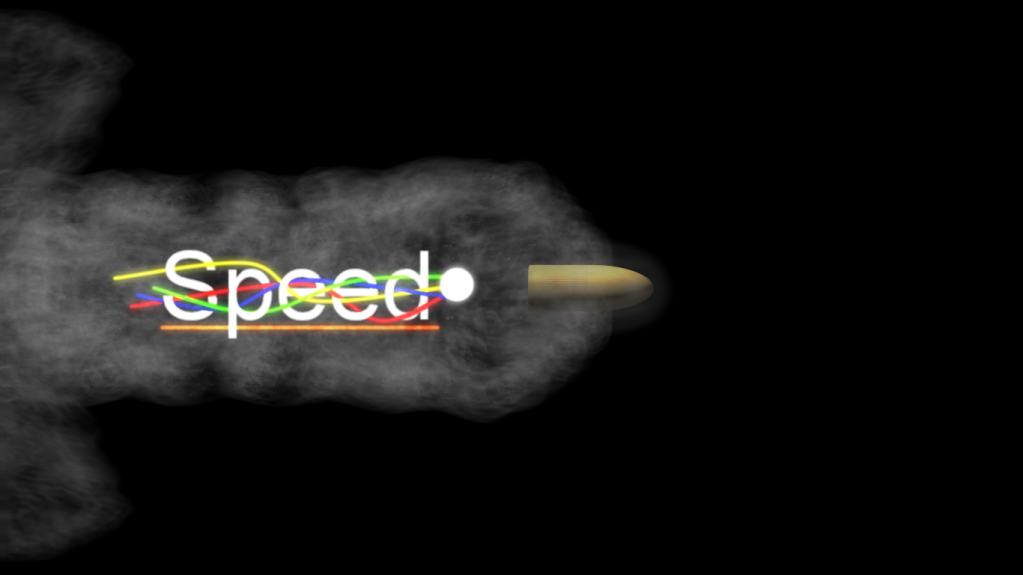
Added my entry for the WOTW #10, "Speed" to Desktop Art.
-
This tutorial is available as a PDF. Click here to view or download it
Plugins needed:
Ed's Egregious Effects (Buried somewhere in that plugin pack)
Steps:
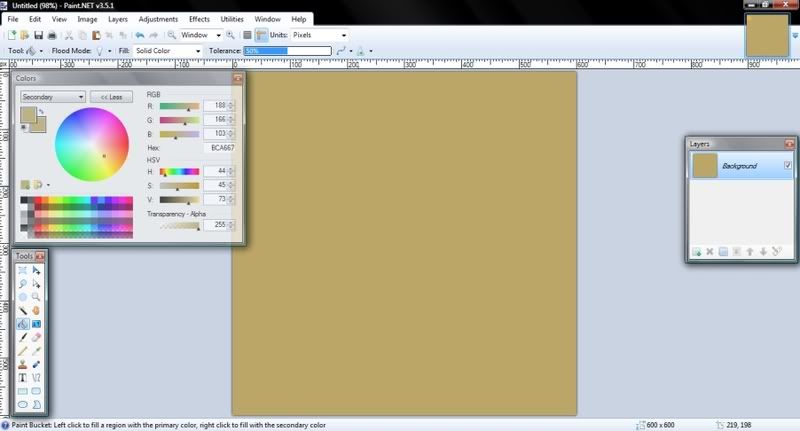
1. Resize image to a square.
2. Use the paintbucket to fill whole square with this color: BCA667
3. Make a new layer and switch your secondary color to black.
4. Select a area similar in size to the one in the picture, then fill it in with the bullet color.
5. With the rectangle still selected, run Half-Tone with settings-
Shape: Line
Size: 20
Angle: 90
Brightness and Contrast: 0
Quality: 5
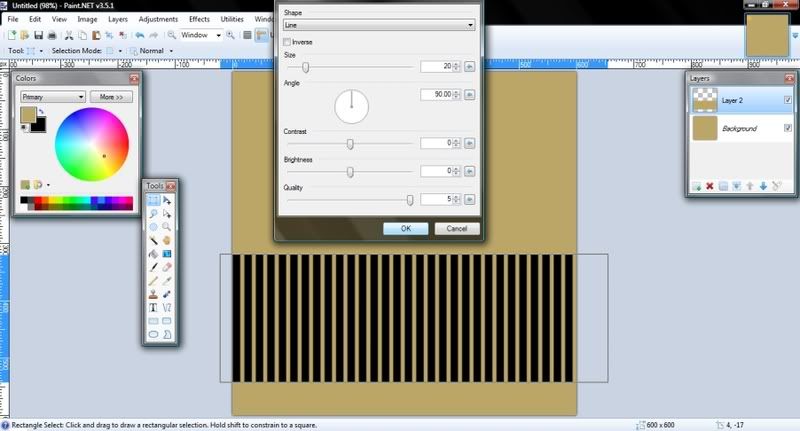
6. Under Adjustments, edit the transparency to -90.
7. Create a new layer and move it under "Layer 2."
8. Switch your secondary color to white and run Clouds with settings- Scale: 250, Roughness: 0.75, and Blend Mode: Normal.
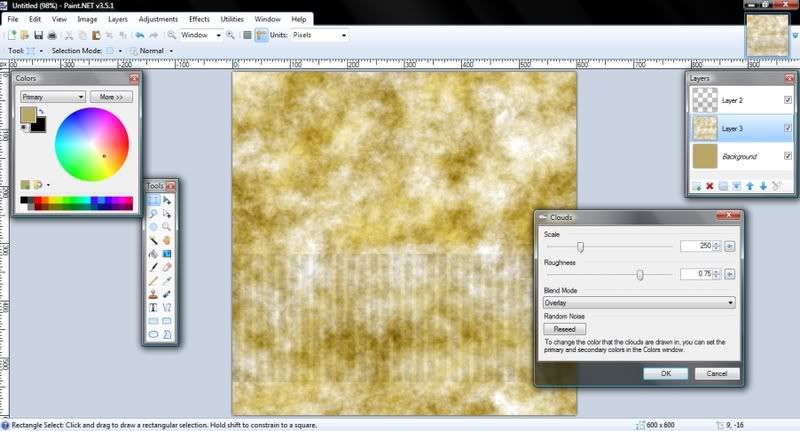
9. Switch your secondary color back to black and run Clouds on the same layer with the settings- Scale: 250, Roughness: 0.75, and Blend Mode: Overlay.
10. Change the properties of "Layer 3" to Multiply with an Opacity of 75.
11. Press Ctrl + Shift + F to Flatten the image.
12. Run Shape3d with Cylinder settings.
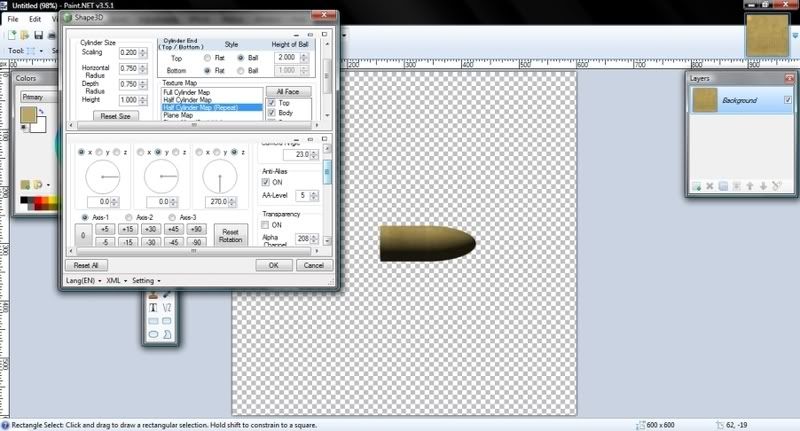
*Here is the Scaling and Settings and I used-*
Cylinder Size-
Scaling: 0.200
Horizontal Radius: 0.750
Depth Radius: 0.750
Height: 1.000
Cylinder End-
Top-
Style: Ball
Height of Ball: 2.000
Bottom-
Style: Flat
Height of Ball: N/A
Texture Map-
Half Cylinder Map (Repeat)
Anti-Alias-
On
AA-Level: 5
You don't need to use the exact same settings as mine, there are many different types of bullets and you can play around with just about all of the effects I used to customize yours as you see fit. Welshblue's creation (3rd post down) is a perfect example of how this tutorial can be improved upon with a bit of customization.
Don't forget that you can change the rotation, lighting, camera angle, transparency, and position all in Shape3D.
*If you wish for your bullet to be a bit on the golden side-
Follow the color instructions in steps 2-4 and after you have finished making the bullet, duplicate the layer, run gaussian blur, and and change the blurred layer's settings to Color Dodge at 100-200 Opacity.
Make sure to tell me if any of the steps aren't clear and I'll fix them. 😉
-
(Click for larger version hosted at DeviantArt)
-
Okay maybe there's one but no one has exactly found it yet .. You perhaps have to play around with the axis ?? So maybe try it out and see what you come up with if anything ?? It's the only way to find out ..
No, I meant- "This is exactly what a Half-Sphere map is, the image is only wrapped halfway around the sphere. This gives the visible side higher quality and makes a bowl shape if turned."
It isn't an illusion, just something MKT implemented in his plugin. Still, it's pretty helpful for those who haven't found it yet...
-
That's just what a Half Sphere Map is...
Exactly what he said...
...but no one has said that yet? Who is 'he'?
-
Ok. How's This?
How's this?
Those are the exact same image...?
-

I've always loved that render, good use for it.
-
...I'm not seeing any illusions?
-
The reflection is way too sharp, but other than that I think they'll look much better together than bluish buttons.
-
Hi
i've been around this forum a few years. The point of this sentence is what exactly...?
Just read some posts where people have posted perfectly legitimate working tricks, tutorials etc. and noticed just how bloody rude most of the old hands are to noobs. Rude? As in stopping an overflow of tutorials that variate by 2 steps or so? I'm not seeing any rudeness in locking tutorials that are almost exact copies of ones that already exist. I've seen several threads locked that I think shouldn't have, but there aren't enough to make the problem you're describing. You've mistaken the word "newb" for "noob." Newbs generally learn to use the search function after the first time their topic is locked for request a tutorial that can be found on the second or third page. Noobs are the ones who do not learn from their mistakes and show no signs of trying to after their 3rd, 4th and 5th warnings. I've plenty of patience for newbs, but I have a hard time being kind to noobs.
So what if you posted a long winded tutorial some 2 years ago and the new member can't find it; the last three I read used newer plug-ins and were simpler and well illustrated. very suitable for noobs using the non-standard interface of Paint.Net Good point here, but without these newer locked tutorials clogging up the first pages those old tutorials would be on the first few pages and just as easy to access.
I'm trying to get junior & senior health staff to use the program and have to apologise in advance for the very hostile forums. Hostile. This one was a joke, yes?
Co-operation should be the rule and I believe (Ok I know there is) a thread called something like BE NICE TO THE NEWBIES or DON'T BITE the NEWBIES. Note the word "Newbie."
(Don't bother correcting me, I really am not anal enough to search for it, unlike the rude superior posters so predominant here.) Alright, fair enough.
So the rule is - BE NICE
You were a noob once and a spotty goofy toothed one too, at that. I can quite truthfully never been a "noob." Though I was a "newb" for a very long time.
Yes, I am a Qualified teacher/trainer/ instructor and Scientist; so don't get nasty with me desk jockey's.
A bit of hypocrisy in that sentence, isn't there?
Thank you and take this in the Spirit of Christmas 2009
be nice to your fellow man. Will do.
OK let the whinnying begin.....................

Me in blue. Don't take anything as an insult, I've been told I'm very bad at internet sarcasm.
-
Good job with the landslide victory, LumièreDuSoleil! :wink:
I figured 0(-.-)0 would atleast place, I liked his quite a bit...
-
I have it in my plugins according to my Program files, but i cant find it on Paint.net. What is it supposed to be under? It is a transparent layer on top of the layer i want to morph it into. It's only four letters, so all i really want is the first and last letter to become taller and wider, ya know?
Look under "Render" it should have a little green cube as an icon. You'll have to play around with the settings a lot but it should do what you're wanting to do.
-
If the text is on a transparent layer, you could use Shape3D and have the text wrapped around a sphere. Play around with the settings to make the sphere match the size of a raindrop.
-
-1 How do I save the 1st cropped picture or do I even need to?
-2 It puts the new cropped picture as a background in the Layers window, is that right?
-3 am I supposed to be adding a new layer before opening up the 2nd picture to crop?
-4 When I add a new layer a new layer window opens up.
-5 If I try to add a new layer the box is grey and white checkered, what does that mean?
-6 How do I "Create a new layer in the new picture and hit Ctrl + V?"
-7 My layers window box on the bottom right went away and now I don't know how to get it back.
-8 Is layering going to put my pictures on top of each other or side by side? I want them side by side.
1 - You don't need to save it since Pant.NET keeps tabs of artwork(Little boxes under the Minimize, Maximize and Close buttons), but you can save them by going to File > Save As... and them saving the image as a .pdn.
2 - Yes, that is supposed to happen.
3 - No, once you open the second picture you add the new layer.
4 - That mini-window gives you info on the layers in your image. Selecting a layer highlights it in blue in the layer window and allows you to only draw in the selected layer.
5 - That is the way Paint.NET shows transparency. It just means that there are no pixels there and if you save the image as a .png, the areas filled in with checkerboard patterns are invisible. (Yes, this is supposed to happen in my instructions)
6 - In the mini-window there is a button that looks like a white rectangle with a green plus sign, click it. Or simply hit Ctrl + Shift + N. Crtl + C is the keyboard shortcut for Copy and Crtl + V is the keyboard shortcut for Paste.
7 - Hit F7 on your keyboard.
8 - When they are on different layers they can be moved over top of each other, but you can move the pictures individually by dragging them. You don't need more than one layer, but it is easier to more the individual pictures if they are on different layers.
To select the whole picture just follow Part 1, Step 1 but click on the :ZoomOut: and drag the mouse from the bottom left of the light blue Pant.NET background to the to the top right of the Paint.NET background.
I don't mind helping, everyone starts somewhere.
-
Alright, for part 1-
Hidden Content:1.)Use the tool while holding Shift to drag a perfectly square selection on the picture. (Don't hold Shift if you want a rectangle)
2.)Use the
 tool to move the selection if you need to.
3.)When you have the selection over the part of the picture you want it cropped to; hit Ctrl + Shift + X.
4.)Now select the whole picture, and open up the next picture you want to crop. Create a new layer in the new picture and hit Ctrl + V.
5.)In the layers mini-window select the bottom layer. (You can delete the empty layer)
6.)Follow steps 2 - 5 until all of your images have been cropped and are open in PDN tabs.
For part 2-
Hidden Content:1.)You should have 9 PDN tabs open in the top right under the close button. Hit Ctrl + N and make a new image that is big enough to contain all nine pictures. (9 100x100 pictures = >900x100)2.)Go to the first tab and select the entire picture with the
tool, hit Ctrl + C and go back to the new image.3.)In the bottom layer, hit Crtl + V and move the picture around to where you want it. (Use the coordinates at the bottom-left if you want)
4.)Now, create a new layer.
5.)Follow steps 2 - 4 for each tab until you have all the pictures in the new image.
Good luck, and feel free to ask again if anything in this post doesn't make sense. :wink:
-
the description of the song perfectly matched Master Chief's character. He's a leader and all and never gave up.
Alright, that's a good enough reason. :wink:
-
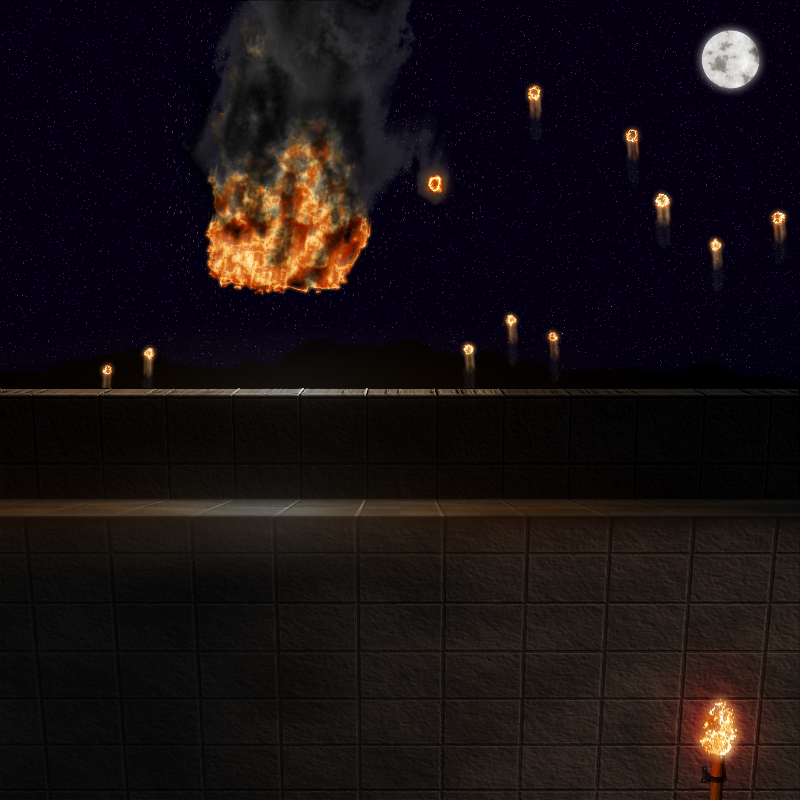
Man_On_the_Moon
I love the whole thing, except...
Why is Masterchief in the background?

-
a bit awkward... are the burning stones supposed to fly up??
Futher good work ;-)
Haha, no, I'm not that insane...sorta
Midnight's silence was broken only by the faint sound of heavy cranks turning, far off in the night. No one took heed; there was peace in the land and few knew the sound of a catapult's winch. The silence was shattered as a burning rain of fire and pitch fell from the darkness.Thus began the siege of Dareinshai.
Made in about 4 hours using only Paint.NET.
-
are some of the bits of meteor supposed to flying up because i thing you motion blurred it the wrong way if its not.
Sorry, I should make that clearer like I did at DA...
Midnight's silence was broken only by the faint sound of heavy cranks turning, far off in the night. No one took heed; there was peace in the land and few knew the sound of a catapult's winch. The silence was shattered as a burning rain of fire and pitch fell from the darkness.Thus began the siege of Dareinshai.
-
I had no idea what to do with this one...
-
Added
 to Realistic Images.

 tool while holding Shift to drag a perfectly square selection on the picture. (Don't hold Shift if you want a rectangle)
 tool to move the selection if you need to.
[WOTW] Discussion
in Paint.NET Discussion and Questions
Posted
I'm pretty sure 15 days is longer than a week, but I don't know where we're going to get 5 more entries...