

lynxster4
-
Posts
3,775 -
Joined
-
Last visited
-
Days Won
204
Posts posted by lynxster4
-
-
lynxster4! That result of yours is great. Thank you so much for your effort and time. For you a little gift.
Here's my finished product, I hope you like it.
I love it, Seerose! He seems to 'pop' right out at you. I can assume you used a little more bevel?
And the Snowman family is adorable! Thank you for the pictures and the 'kitty gift'.


I'd very much like a link to that website if it's not too much to ask for

Very cute cookie smiley gif, Maximilian!
I don't think Scrapbook (Lydia) would mind if I gave you the link to her website: http://pdnscrapbooking.wix.com/scrapbooking#!blank/c24vq
It's a work in progress!

-
 1
1
-
-
@Scrapbook.....Thank you, Lydia! Your comments are much appreciated. I'm glad you and others will find it useful.
-
Okay, here's my take on this. I started with gray rather than yellow, since I already knew I wanted silver for the metal. I tinkered with the settings to have gray again later in the tutorial. I did not do the drop shadow. I used and opal from the Opal Tutorial. On that, I used the same sized canvas as for the jewelry tutorial, and when the time came to resize the canvas, I reduced it by 12.5%, which is what the scale on the tutorial called for. I also used Color Balance to shift the tones more towards the blues and greens.
Interesting.
I really like that opal effect you have going on. Very nice image!
-
I don't know much about cookies, but I do find this tutorial quite appealing. Looks like a cute outcome to me

Thank you, Maximilian! I'm glad you like it. More cookies for Santa!

-
1
-
-
Lydia,
This pack is really great! Very nice work!
 I'll definitely use this.

-
1
-
-
This tutorial is available as a PDF. Click here to view or download it
This is my first tutorial. I hope it is useful for you.
Plugins required:
BoltBait's Plugin Pack-Bevel Object
Lydia's Little Snowman ShapePack:
http://forums.getpaint.net/index.php?/topic/32531-lydias-little-snowman-pack/
This texture file:
This is what we're creating (a version of this image is posted in the Shapes Forum, but it is a 'quick' color job. This tut will give more realistic frosting).

1. Make a blank transparent canvas, 600 x 800.
2. Select your color: R-73, G-33, B-0.
3. Select Shapes Tool. Select ‘SM Snowman’.
4. Draw shape in Outline Mode with brush width set at 25; making note of how big you drew him (450x650).
5. Deselect shape and center him using Align Object, directly under Effects menu.
6. Erase brown eyes, nose, mouth and buttons.
7. Using Paintbrush Tool, fill in with same color brown, the little spot (no need to be precise). Name layer ‘Cookie’.

8. Add New Layer, select off-white (R-248, G-248, B-248) as your primary color and draw another snowman in Fill Mode, slightly smaller (438 x 638); deselect and center. Use Paintbrush to fill in transparent areas. Name layer ‘Frosting’.
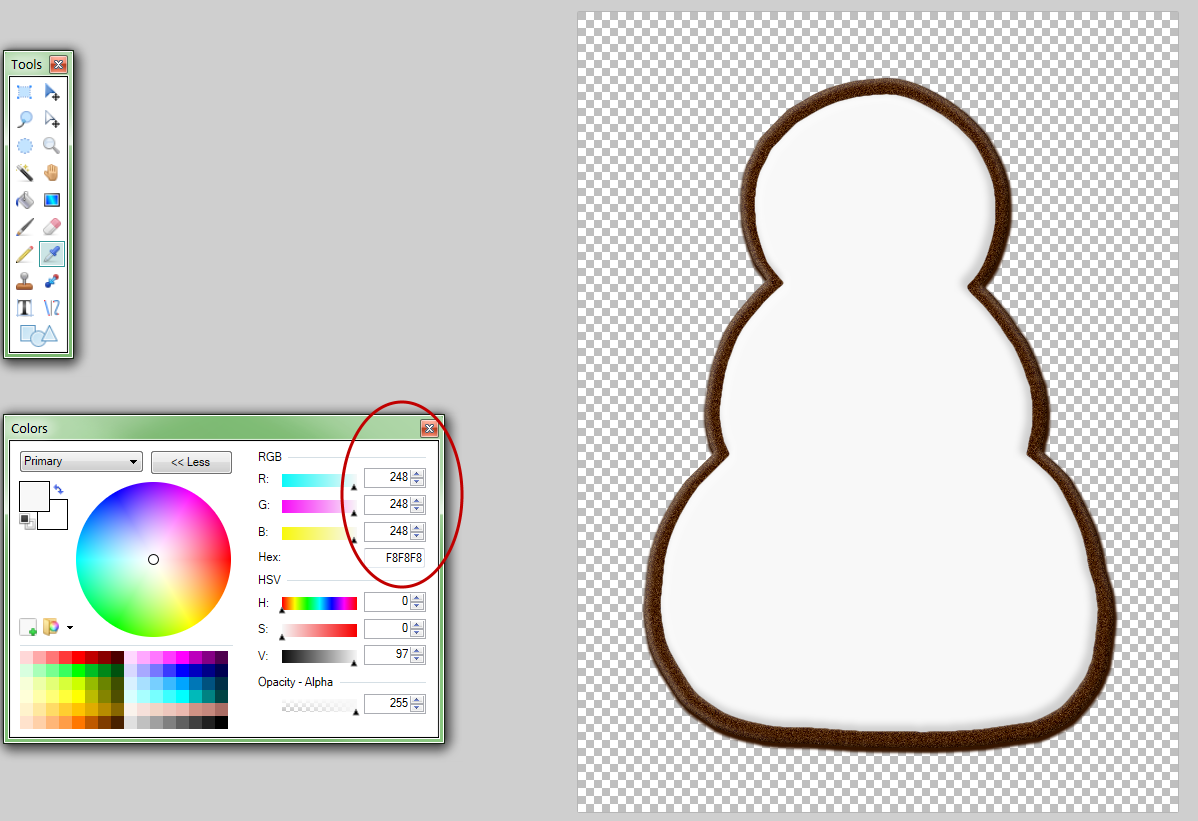
9. Add New Layer, draw the snowman in white again, using your original dimensions of 450 x 650, in Outline Mode, brush width of 5 and center him with Align Object.
10. Erase the body outline only! Then duplicate this layer 2 times, naming each layer appropriately (eyes, mouth, buttons) and erasing what you don’t need in each layer. (I like to keep things on separate layers in case you make a mistake).
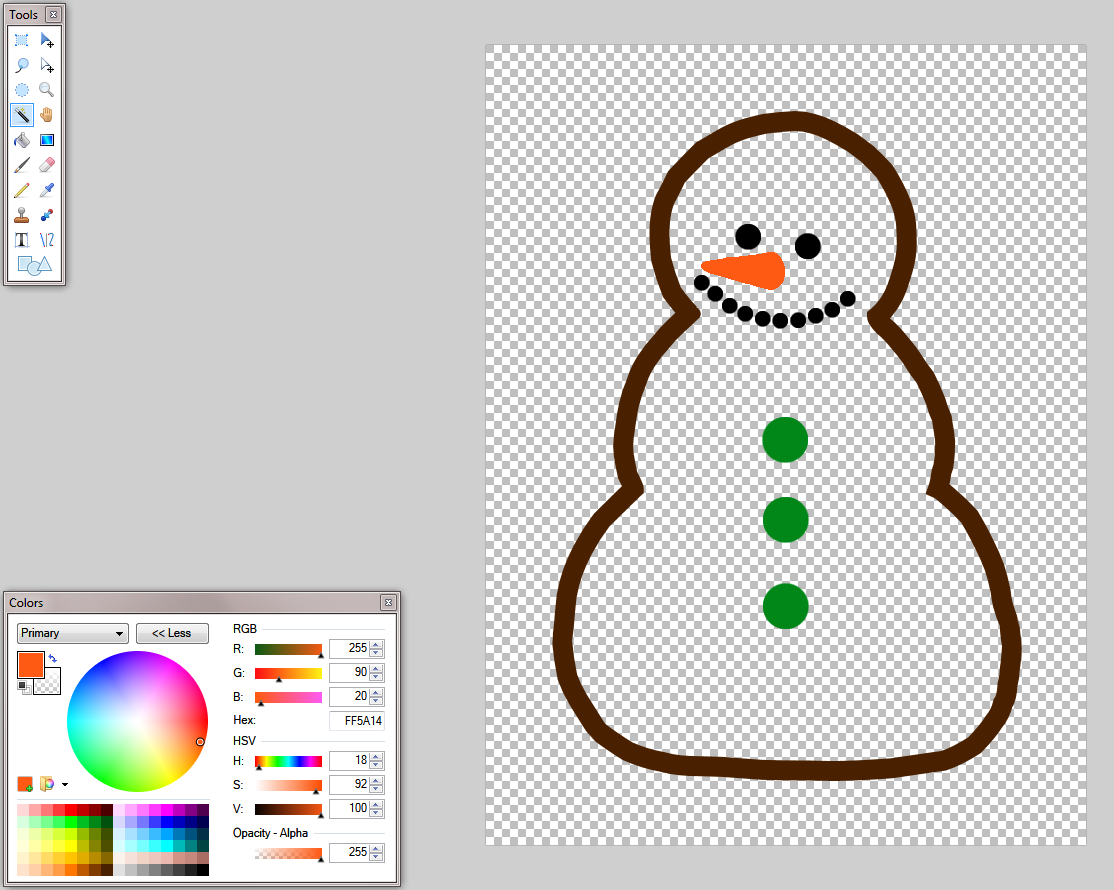
11. Select black, Paintbrush at 100% hardness, brush size 25. Use the white layers as guides.
12. Make new layer directly above the white ‘Eyes’ layer and make two black dots, clicking about 2-3 times.
13. Do the mouth, following the directions above in step 12, except the brush size will be smaller.
14. Change color to green, R-0, G-135, B-24, and do the buttons.
15. Change color to orange, R-255, G-90, B-20, and draw the snowman again, keeping it on Outline Mode, brush width 5, at 450 x 650, then center it.
16. Erase everything except the nose and make a new layer directly above the ‘Nose’ layer.
17. Fill the blank new layer with the orange color.
18. Go to ‘Nose’ layer and hit Magic Wand to select nose, then up to orange filled layer and hit Cut. (You could just fill the nose shape with orange from Paint Bucket, but you won’t get a total fill; this method ensures you do.)
19. You can now delete all the white outline layers (eyes, mouth and buttons) and the orange nose outline.
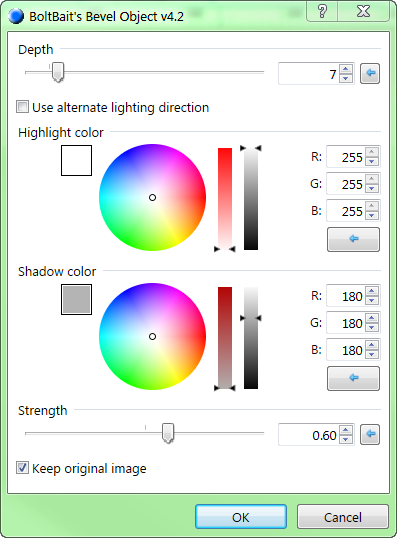
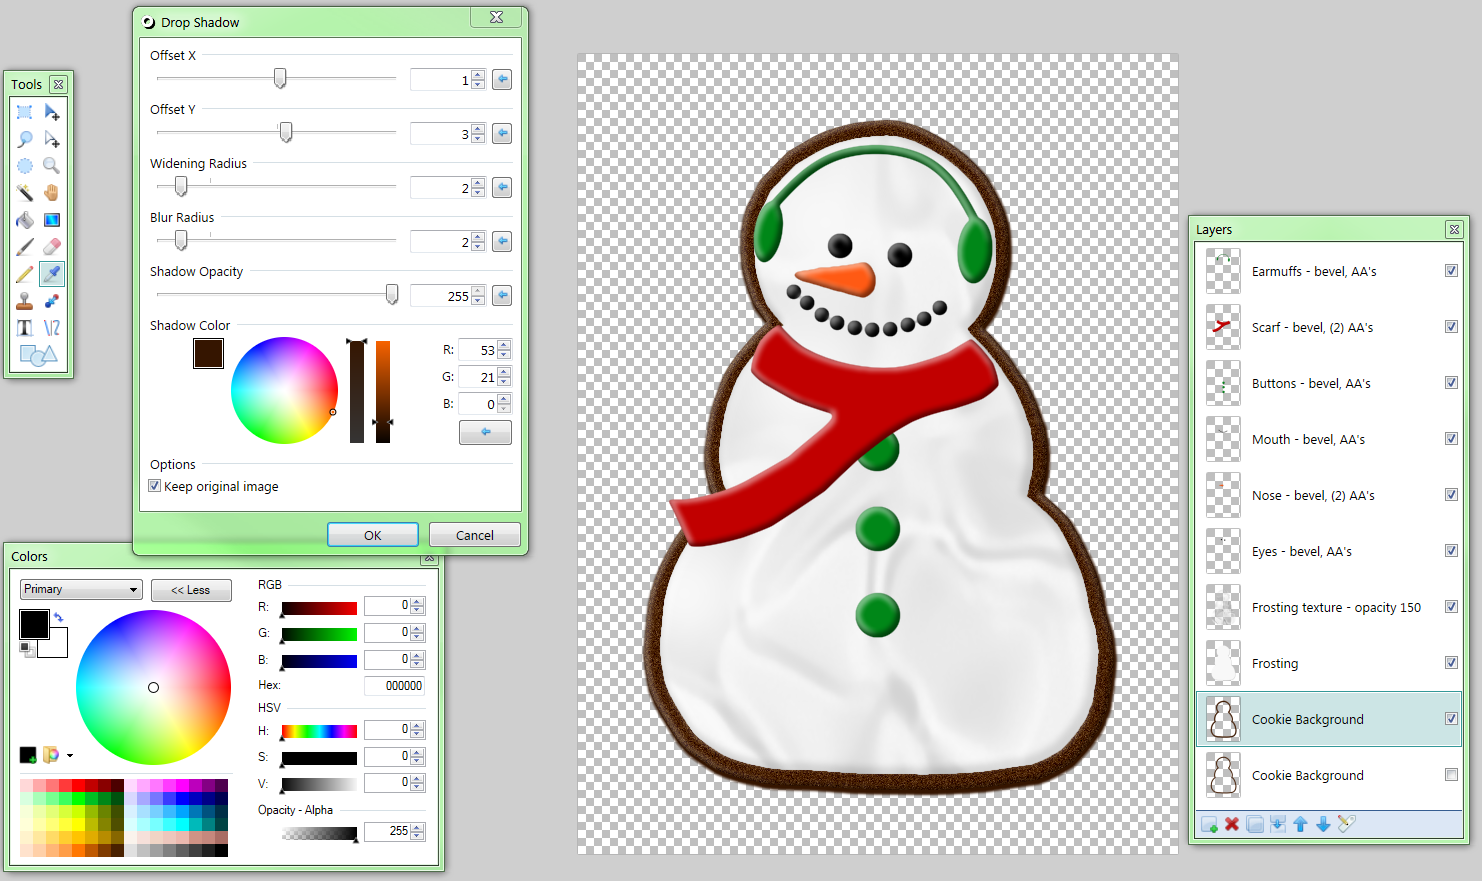
20. Select ‘Frosting’ layer. Bevel object with these settings and apply AA’s assistant.
21. Open pattern file satin_130. Edit—Select All, Edit—Copy (to the clipboard).
22. Select ‘Frosting’ layer, Magic Wand, Edit—Invert Selection.
23. Add new layer directly above and with new layer selected, go to Effects--Tools—BlendModesPlus, using these settings:
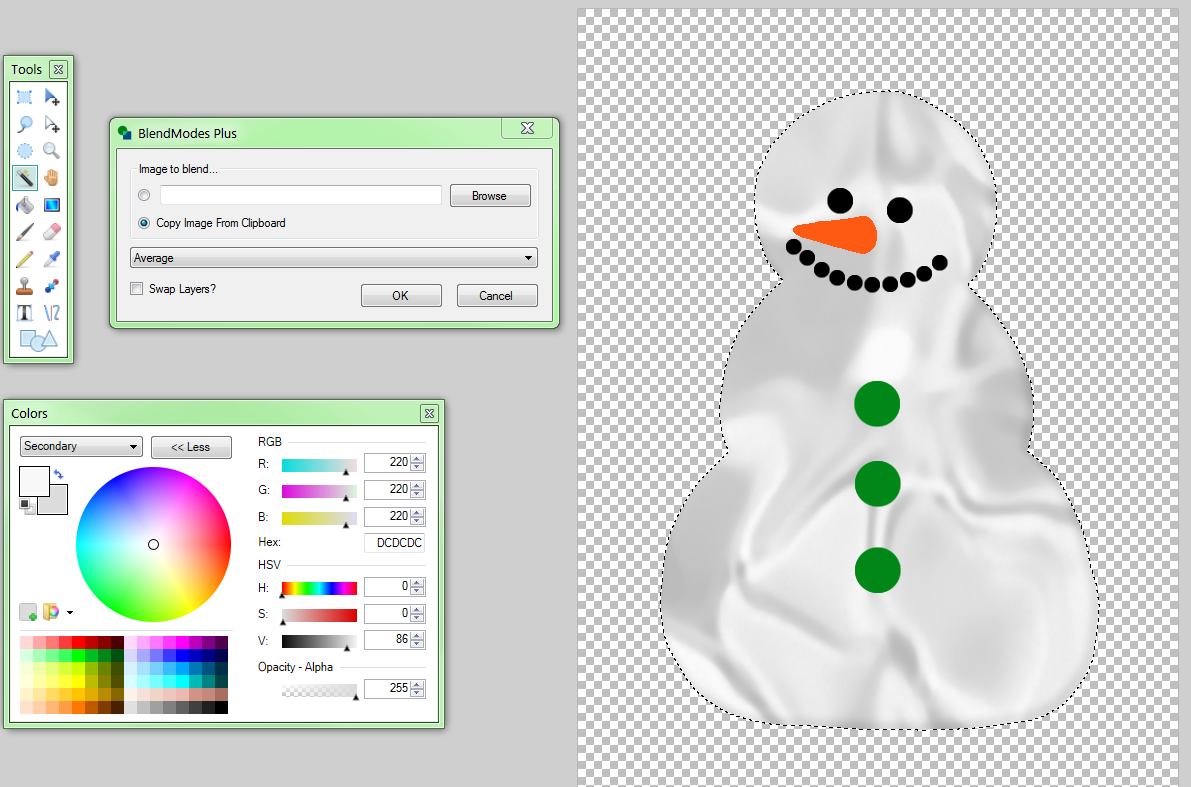
24. Deselect image, open layer properties and rename to ‘Frosting Texture’.
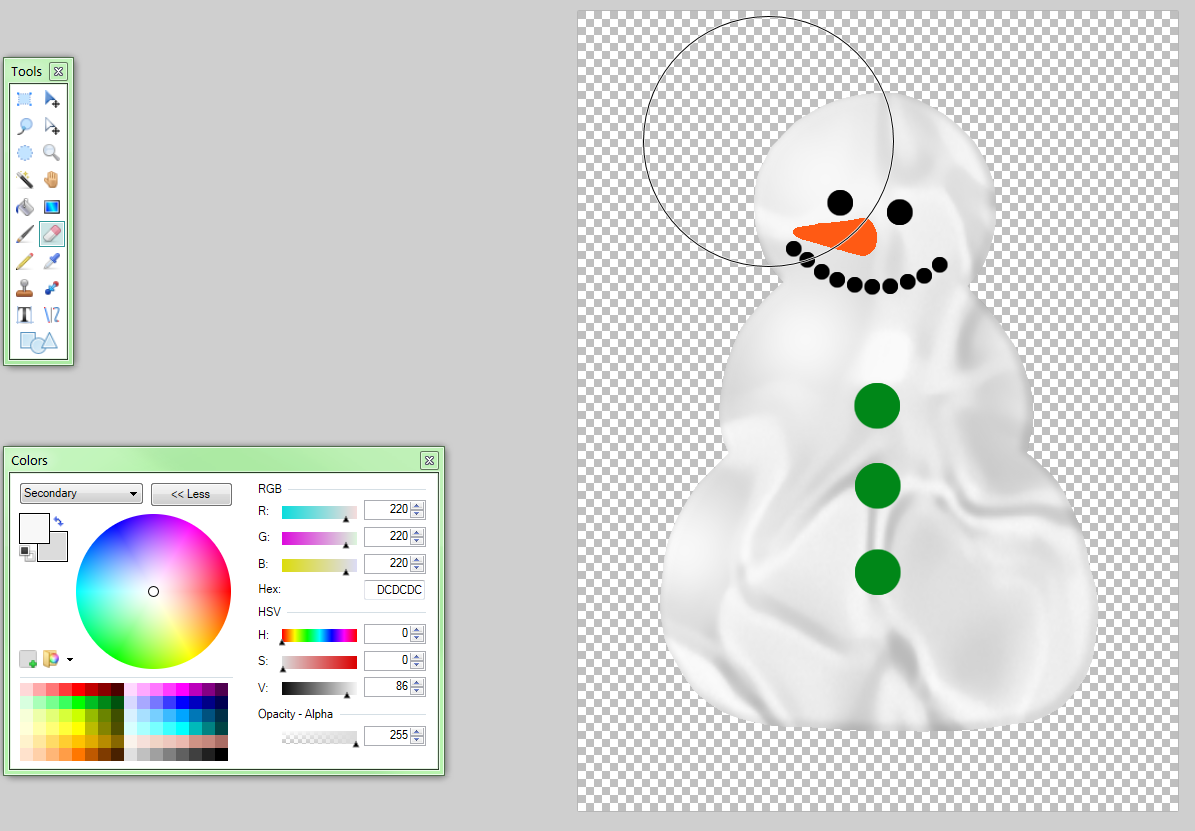
25. Select eraser, brush width 250, hardness 0% and remove some of the solid gray in head and upper body; (go easy, use single, quick clicks!)
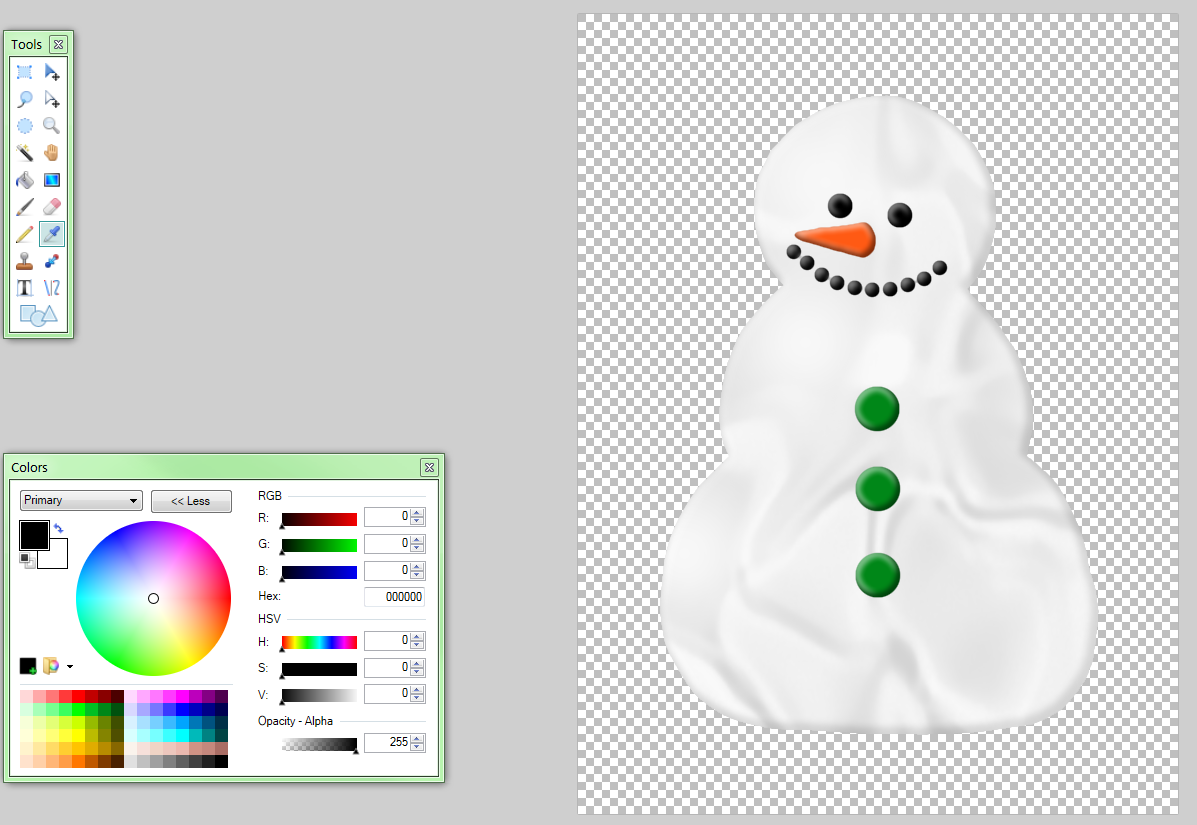
26. Compare image 5 & 6 to see if you got rid of enough gray.
27. Open layer properties on ‘Frosting Texture’ layer and set opacity to about 150 – 160.
28. Select the ‘Eyes’ layer, do Effects—Object—Bevel Object, highlight color white, shadow color black at default settings.
29. Effects—Object—AA’s Assistant. Eyes are done!
30. Repeat step 29 on the mouth and buttons.
31. Repeat step 29 on the nose, except use (2) AA’s Assistant.
You should now have something like this:
32. Create a new layer, select the Shapes Tool, select SM Scarf and Draw Filled Shape with a shade of red.
33. Resize it until it properly fits around the snowman’s neck, deselect.
34. Do a Bevel Object and (2) AA’s Assistant on the scarf.
35. Create new layer for earmuffs; use same color green as for buttons.
36. Draw two filled ellipses and a line curve (at 10 brush width) similar as shown.
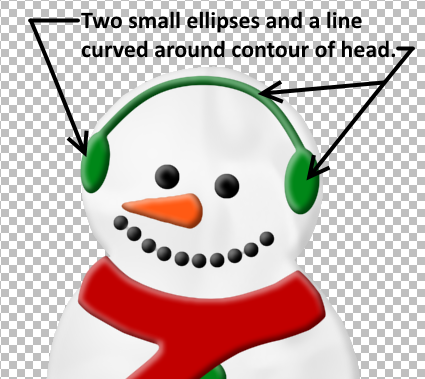
37. Do a Bevel Object and AA’s Assistant on the earmuffs.
38. Now, to the ‘Cookie’ background!
39. Because we have so little cookie showing, we’ll use Effects—Noise—Grain at 170, -20.
40. Use Effects—Object—Bevel Object at a depth of 4, strength 0.30, using white highlight and black shadow.
41. Add a Drop Shadow if you wish, using a dark shade of brown.
Now you have a Frosted Snowman Cookie!
Depending on color selected for the ‘Cookie’ layer, you can make sugar cookies, gingerbread cookies or molasses cookies.
If you want something like this:
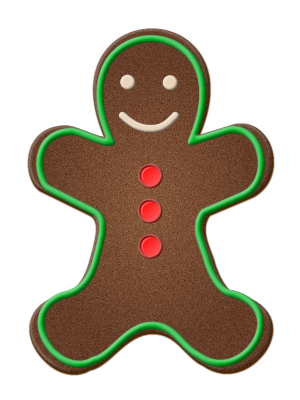
Simply reverse your two major layers. Make your ‘Cookie’ layer solid and use a texture or grain effect (or use Outline and fill with a gradient like the above picture, then use the grain effect).
Make your ‘Frosting’ layer in Outline Mode and apply Bevel and AA’s Assistant.
I hope everyone enjoys this tut and I would love to see your pictures!
EDITED: 12/6/15 - Fixed a typo in Step 8.
-
6
-
-
So what did you use for the animated one? AnimGif?
By the way, you seem to like cats. I find myself obsessed with our pet cats.
No, Ishi, I used Midora's animated plugin found here: http://forums.getpaint.net/index.php?showtopic=31629 It's great!
I am a cat lover. My profile picture is of my cat at home that I spruced up a bit.
Thank you for stopping by!
-
These will come in handy! Very nice pack.
-
'Beautiful' stuff, Lydia!
-
WOW! So beautiful. You should do a tutorial on how you made that! I love it!! You should do TWO tutorials. One for the frosting and one for this one. Many would love them and learn from them.
Thank you, Lydia. See...these shapes do come in handy! It was the starting point for a wonderful idea.
-
The style in itself is experimental and the ideas usually come spot on whilst working.
Are you referring to those 'ahah' moments you get while working on a comp?
 I get them, too. It's wonderful.
 -
I thought I'd try another way of working - taking a leaf out of Pixey's book, no, not an animation. Gave up on those years ago. Just a different style. As always constructive feedback is always appreciated. I did have a reference picture that I found on Pinterest - no longer there. Just called Puss.
That is absolutely adorable! It has a jewel-like effect. I love it, BBQ.

-
So this is the unresized,full sized version of my SOTW submission for this week. As mentioned on that thread, this artwork is 100% PDN. The sea was once again made through Flood (Photoshop plugin) via 8bf Filter and though the combination of Water Reflection and Wobble plugins.
Ishi, I just love it! The day / night contrast is striking. The whole comp emits a lot of feeling. Well done!

-
1
-
-
The snowglobe is very nice, Lynxster! I like the rainbow spectre in the hearts' reflections, it kind of makes the hearts look like they were made of mother of pearl. And the base is neat too, the darker lines gives it a soft wood texture
Glad to see you have started a gallery, looking forward for more pics!
Thank you, Limon! I'm happy you stopped by to take a look. When making this, everything just 'fell into place'. Inspiration goes a long way...
 Iynxster4! I love the idea well composed. I love the heart inside. Thank you.
 You're quite welcome, Seerose! Glad you like it. See what you can make out of some simple shapes?
-
2
-
-
Oh, that's a very nice creation! The hearts have a very unique texture. It reminded me of mercury. I really like the animation, too. Nice job! Looking forward to seeing more
Thanks so much, Helen! Glad you like it. I've been in your gallery, too...so many beautiful shiny images!
-
1
-
-
On 11/29/2015 at 6:14 PM, barbieq25 said:
Oh that is very nice! Very clever. Great to see you've started a gallery here. Well done!
Thank you for the kind words, barbieq! I'm so glad you like it. I've seen your gallery, and some of the compositions are simply stunning.
My original 'first' post inadvertently got moved and seems not to be able to be fixed. It is the 10th post down on page 41.
Go there to see my initial images and what barbieq25 is commenting about. Thank you for visiting! 🥰
-
@ Scrapbook....100% PDN!
See these links:
http://forums.getpaint.net/index.php?/topic/31629-animated-images/
http://forums.getpaint.net/index.php?/topic/31665-make-an-animated-gif-with-midoras-plugin/
-
- Popular Post
- Popular Post
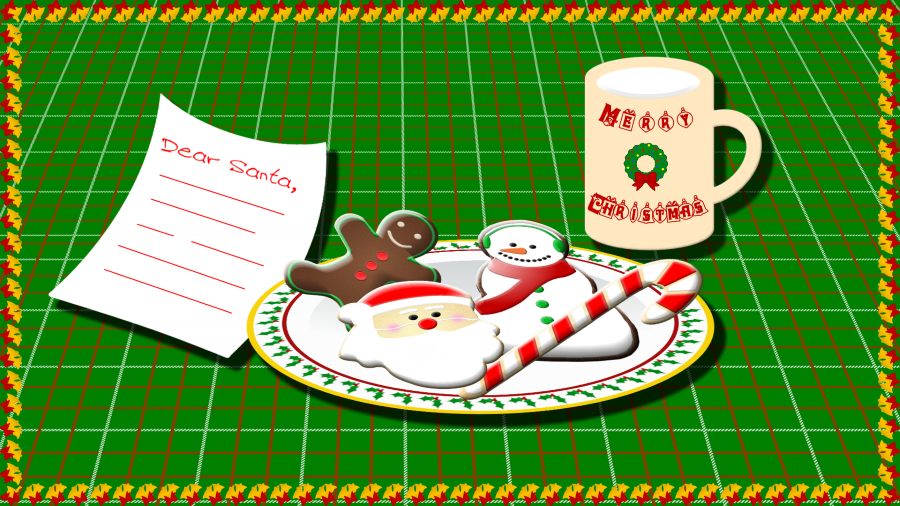
Cookies for Santa - A Christmas Wallpaper (made almost entirely from shapes made with DH ShapeMaker, toe-head's Tattersall plugin and TR's Paste Frame.). Everyone, please enjoy!
Hi everyone! I'm active over in the 'Shapes' thread. Busily creating shapes and coloring a few in here and there. Our fellow member ScrapbookWithPDN made a wonderful snowglobe shape and I started tinkering with it. And suddenly, it took on a life of its own.
I have many hours invested in this composition and I thought it would also look good animated. The picture is 99.9% PDN. The heart in the globe was made by me years ago, but in a different program.
I started using PDN about eight years ago and I love it! Many thanks to all who have contributed to this wonderful, free software and the many plugins available. I'm also starting to get hooked on Midora's animation plugin...great stuff! And I can't say enough about Shapemaker.
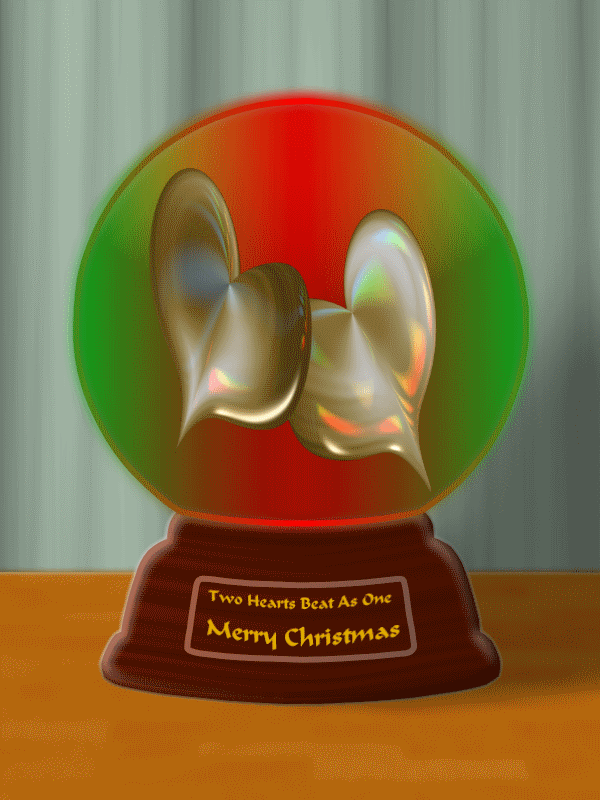
I hope you enjoy what I've created and I hope to be slowly adding to my gallery.
-
 3
3
-
15
-
 1
1
-
I can see this plugin as being very useful on certain photographs.
Thank you, BoltBait.
-
@Rei...I use this plugin all the time. Thank you so much for making it!
-
Very nice shapes! You're really churning them out.
-
@Seerose...thanks so much!
-
Lovely! Reminds me of the tree in my favorite holiday cartoon feature. I watch it every year.
-
Beautiful Christmas tree shapes! These will come in handy.


Create A Frosted Snowman Cookie
in Creations
Posted
Thank you BBQ! I'm glad you like it.