


cjmcguinness
-
Posts
494 -
Joined
-
Last visited
Posts posted by cjmcguinness
-
-
For more information on how to use the Magic Wand tool take a look at the section in the PDN help file; paying particular attention to the use of the Tolerance (you'll find it in the toolbar at the top of the screen). Lowering the tolerance will select less of the image.
Additionally, I would also refer you to this tutorial on Cutting out images, the easy way. I use this method a lot.
-
I hereby do proclaim that the theme for SOTW #6 shall be ... Friday 13th
Good luck to everyone!
-
I have another suggestion for SOTW#6 theme.
With just over a week to go, how about a Friday 13th theme?
Entries could be based on the popular series of slasher movies, or anything else related to this superstitious date.
I would suggest starting this as of Friday 6th July, with the deadline for entries being Friday 13th July itself.
Anyone want to second this suggestion?
-
When you save it as a .JPG image, in PDN in gives you the option to select how much you want to change the quality. It usually defaults to 100%, but if you change it to 50% you might still keep a decent image but it will decrease the file size.
Here's a visual of what spongey437 was referring to:
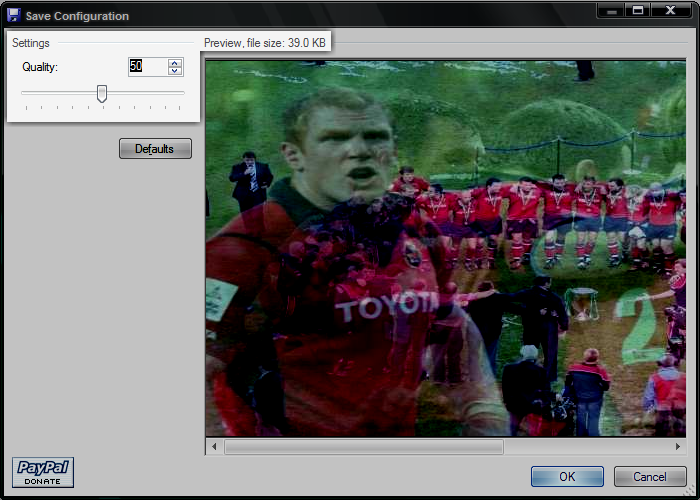
Just move the slider until the filesize is as small as you need it. I've tried it at 50%, producing a filesize of 39.0 KB; with no real detectable loss of quality.
-
@NotArtsy
Crop to selection is usually greyed out if you have nothing selected on your canvas. Make sure you are using the Ellipse Select tool
 and NOT the Ellipse tool
  .
.The Ellipse Select Tool
highlights a section of the canvas, you will see a rotating dashed outline when an area is selected. If your Ellipse has a thick black border then you are most likely using the wrong tool (I know it can be confusing as they are both called Ellipse - but one is a Selection tool for highlighting an area of the canvas and the other is for drawing an Ellipse shape )Once you have dragged your 400x400 ellipse selection try pressing [CTRL]+[sHIFT]+[X] keys together (this is the keyboard shortcut for crop to selection).
-
Thanks cjmc, keep us updated on how that's going!

***UPDATE***
The Wikibook Tutorials page is progressing (slowly).
It now has links to 60 of the (by my calculation) 465 active tutorials published on this forum.
No rest for the wicked!
-
All you have to do post the image is put
at the end (instead of ).
-
Is it OK if I use these to attempt another Firefox theme?
Absolutely, you're free to do with them what you will.
Please post the final result, I'd be interested to see it.
All the best.
CJ
-
Paint_boy, here are some I had previously created...
Green - size 40
 Green - size 20
Blue - size 40
 Blue size 20
-
It seems like no firm concensus is ever going to be reached and the forum is going to stay organized as it is.
I have therefore decided to take a slightly different approach - the Paint.NET Wikibook.
You may (or may not) be aware that usedHONDA started a Paint.NET Wikibook project a while back and, with his blessing, I have undertaken the task of compiling a tutorials index page.
I have decided to stick roughly to the list of categories I suggested in the first post of this thread and I am in the process of posting links and information on as many of this forum's tutorials as I can.
There are a few PDN tutorials that have been converted into specific Wikibook pages; but mainly the links in the Tutorial Index will be directly to their forum location.
Over time this tutorial index may be expanded to include tags and possibly 'level of difficulty' ratings for each of the tutorials; but for now I am concentrating on compiling and categorizing the list.
-
~UPDATE~
New page
The Paint.NET Wikibook now has a Tutorials index page where links to tutorials will be organized and categorized.
The page is in it's infancy and will be constantly updated over the coming weeks to populate it.
-
2. Framing Composition: Follow the Rule of Thirds to keep an interesting composition. This image was well-framed to begin with, so that's a plus. In the case the the image with which you're working is not, you may have to crop creatively or isolate and move the subject and replace the background.
In relation to the compositional Rule of Thirds, I actually published a tutorial on that very subject in this forum a while back (went pretty much unnoticed). So, for anyone who's interested in aesthetic photo composition, as well as checking out the wikipedia entry, take a look at this tut - Cropping Photographs - The Rule of Thirds
-
By the way, nice smooth edges on your cutout. Did you use an Alpha Mask for that?
No, never quite got the hang of using the Alpha Mask. I simply cutout the image and feather. Perhaps I should practise using the Alpha Mask more often; might produce some even better results.
cjmcguinness, NICE job with the Portrait plugin! Glad someone is getting some use out of it.Both your Portrait and Feather plugins are indespensible for photo manipulation. Just got a new digital camera and I am producing some fantastic results using both of them.
-
Hey, how would i try and make this picture look more professional? lol
*not the background, i cant find a background to flow with the tint of her skin and everything*
just, her... lol

This is something I've done with a lot of pictures of my family members - turning them into what looks like a studio portrait, using BoltBaits fantastic Portrait plugin.
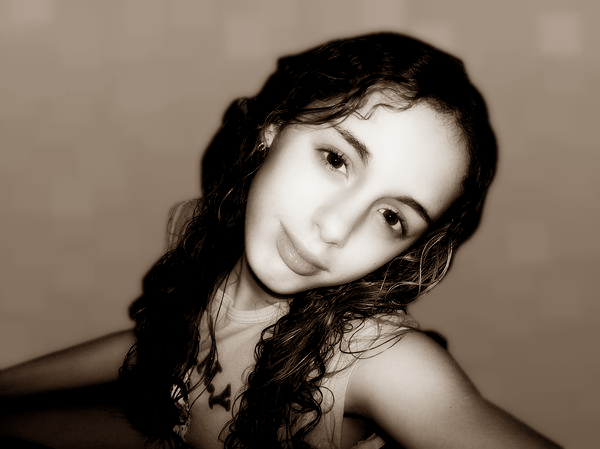
I personally think that black and white (or mono) portraits look more professional. However, instead of the traditional greyscale b/w I prefer to use the Adjustments > Sepia instead.
-
No, I think it should be a "must post something here" for all (old/new) forum member (as well as the pictorium!) : add a new rule?!
This thread was dead and buried before I even joined the forum; I, for one, am glad it was resurrected..
I call this Paint.BLISS

-
from SOTW #5[/url]":7ac78]So, on to SOTW #6?
As the winner of SOTW #5 does this mean I get to nominate a theme for SOTW #6?
If so, there has been some interest (from Pyrochild & The_Lionhearted) in basing it on CMD's Jerbert character and I'm all for this,

Therefore I propose SOTW #6 theme should be Jerbert Fun Facts
Anyone have any other suggestions?
-
Wow! Seriously, thanks to all who voted for my entry; it's a real honour.
Congrat's to all entrants the standard was excellent; I'm thrilled to have come out on top.
So, on to SOTW #6?
-
I like this too, only if there is an "ashtray" forum to put these tutorials into:
"Look at this totall cool random effect I stumbled into involving the polar inversion effect..."
As a Moderator you would have power of veto over all tutorials submitted by members; either placing them into one of the organised categories or banishing them to the pictorium or some other 'miscellaneous' thread, where many of them belong.
-
@Tillerman,
As you are new to the forum I suggest you take some time to read through the rules, paying attention to rule 13.
The maximum size for a signature is 500px wide / 150px tall.
I'd advise that you amend your current signature before it is removed by one of the forum moderators.
-
eventually we should have a Jerbert-themed SOTW.That would be awesome.
I'd like to third the suggestion that SOTW #6 should be Jerbert Fun Facts.
I'd love to have a go and see how many Jerbert fun facts we can all come up with.
Of course, all subject to CMD giving the idea his blessing.
-
@Tillerman
Welcome to the forum.
I'm afraid you've missed the boat on this SOTW#5 competition. Entry submission ended last Friday, 22nd June.
However, there will be another competition beginning very soon and if you check out SOTW Theme Discussion you can have some input into the next competition theme.
Feel free to check out the submissions for SOTW #5, you can even vote for your favourite - voting is open to all forum members.
Oh, and BTW, placeholders were frowned upon during this competition and I would advise that you do not put a placeholder in any future competition.
Look forward to your submissions in future competitions.
-CJ
-
On the theme of car conversions, check these out:
What would you get if you could mate two cars?
-
I have only been a member of this forum for just over 3 months, but in that time the membership has grown exponentially and the number of posts in the General Discussion area for a "How do I do this..?" when more than one tutoral already exists leads me to believe that newer members are struggling to locate the required tutorials due to the weight of tutorials being posted each day.
There have been numerous threads in several different places within the forum discussing better, more convenient ways to approach the posting and moderation of tutorials. I would like to add my own suggestion, regarding the reorgnisation of the forum to allow easier navigation to required tutorials.
Currently "Tutorials" resides within the Paint.NET discussions index. I would propose that it is now time that "Paint.NET Tutorials" was promoted and given completely it's own section. Within this index, tutorials could be organised according to categories, such as:
Paint.NET Tutorials
> Tutorial Submissions
> Basic Tools & Effects
> Digital Art & Drawings
> Effects & Adjustments
> Miscellaneous
> Photo Manipulation
> Signatures & Avatars
> Text Effects
> Textures & Patterns
> Web Graphics, Buttons & Layouts.
(These are just some suggested category names, perhaps 10 categories is too many, the amount of categories and the way they are organised could be decided my the admin/mods or suggested by forum members via a vote)
The first in the list "Tutorial Submissions" would be the place where users submit new tutorials. All sub-categories would be locked so that new topics cannot be posted by forum members, but topic replies are allowed. It would be the duty/responsibility of the moderators to review the newly posted tutorials and decide which category they should be moved to. Mods would have final say where tutorials may possibly fall into two (or more) categories. Also, if a mod decides that the post does not constitute a tutorial it would, at that time, be moved to the Q&GD area.
If this reorganisation was to take place it would also be a good opportunity for the moderators to go through the list of almost 500* existing tutorials and classify them, possibly deleting some of the closed and obselete threads.
I would wager that a large number of the users visiting/registering on this forum are looking for tutorials to help them to learn and explore the power of PDN. I think by giving tut's a categorized section this would help them find what they are looking for and massively cut down on the unneccessary "How do I..." posts in the Q&GD section.
I'd be interested to know what the moderators and other forum members think of this suggestion and what categories you think would be suitable for organising current (and possible future) tutorials.
Thanks for reading.
-CJ
*490 as of 00:30 GMT, 2007-06-25
-
 and
and  .
.
Kiosk Orbs!
in Creations
Posted
I too made a Kiosk Orb a while back, adapting the aforementioned Photoshop tut.
I even started writing a PDN converted tutorial on how I made mine, but never finished it (it was turning into a bit of a novel!); so I am glad someone else had the patience to produce such a thorough and well explained tutorial.
Great write-up and fantastic results. I can see this being used for a lot of avatars.