


Limon
-
Posts
107 -
Joined
-
Last visited
-
Days Won
3
Posts posted by Limon
-
-
Thank you so much Helen, Pixey, Maximilan, Red and Seerose for the positive feedback! I'm happy you liked it

I went back and noticed the cage ........... lovely outcome as well. Me thinks you like birds
 .
.Thanks Pixey, and yes, I do like birds
Not just because of their beautiful plumages, but also their intellect: They are one of the few non mammals who can solve multi-stage problems, along with squids (*Nerd alert*  )
)-
 1
1
-
-
Thank you so much Maximilan! I feel honoured
I wanted to make a picture of a crow, and decided to give him an expensive plumage


-
5
-
-
The notebook papers look great, and your abstract art is as always colourful and beatiful!
Thank you for sharing, Seerose!
-
1
-
-
Welcome to the forum, SunnySkies!
Some really interesting pics you've got, and the points of views in the photographs are very nice. I especially like the swirly version of the umbrella picture, it made me think of Van Gogh's "De Sterrennacht"
Nice work, and thank you for sharing!
-
Great tutorial Pixey, and a lovely bottle too! Thank you for sharing it

EDIT: And thank you for digging up Sarkut's Gradient Mapping file. I have been looking for it for ages, but haven't been able to find it since I didn't know what it was called

-
9
-
-
The letter H is wonderful, so clean and glowy! And you have a beatiful singing voice, Helen

-
1
-
-
Wow, Pixey! As usual very beatiful and detailed, looks like some really expensive perfume
-
1
-
-
Thank you Nils for dropping by and for the comment, I'm happy to hear you like what I have done so far. I really enjoy your photomanips
And thank you Lynxster, Seerose, Red ochre and Helen, always a pleasure hearing from you guys
The evil cat was inspired by my own pet cat, I've seen the way she looks at our parakeet way too many times -
A well written tutorial and easy to follow, Pixey. Well done!


Lots of possibilities too, here's a magnifying glass

EDIT: Gee, my manners
! A big THANK YOU for making this tutorial, Pixey! -
1
-
-
I recycled parts of my metal wire cage tutorial to make a bird cage this time. It's 100% PDN, and the dove is from Lydia's shape pack
http://i1351.photobucket.com/albums/p791/linneasimon96/Caged23_zpsxtzkudjd.png
-
5
-
-
Seerose, that is a very nice result, thank you! The Incendia pic proved to be great for this tut
Looks very nice and sparkly, thank you for sharing it Pixey! I'm glad to see you back at the forum again
-
Thank you all for the comments, it is truly inspiring to me
And thank you Ishi for the tips, that is always appreaciated! I'll keep it in mind when working with casted shadows.
-
Congrats everyone, top class entries from all of you!
Thank you DrewDale for the hosting!
And a happy new year to all of you!

-
Lynxster that is a great result, thank you for sharing!
I love the onyx inside the cage, and using the fractal gave some really nice texture to the cage. Well done!

-
1
-
-
Welcome to the forum Nils!
Nice work on the tut, I think it was well explained and the steps were easy to follow. Thank you!
Merry Christmas to you too - Joyeux Noël à vous aussi - God Jul till dig också
-
Lynxster, those cookies look delicious! And the plate underneath them looks great, I love the border with the mistletoes
-
I like the effect you got.... but I'm not sure what a "simple bucked fill and noise" is or how to do it / find it.
I know where to find motion blur, at least -- nice to know I was on the right track with that!
I have Pyrochild's grid warp -- guess I will have to tinker with it and try to figure out what the dickens I am doing with it.
When you say you made a gradient-looking shading, where you meaning linear? Or was it a solid the shape of the horn which you ran a clear gradient over to make shading?
And yeah -- I have MJW's plugin, but I really have no idea what does what on it.
Thank you Marilynx!
Hehe butterfingers, I meant bucket fill
(press F on the keyboard). Fill the clipboard with the color you want and open the effects menu --> Noise: Add Noise. Set the saturation of the noise to 0. Then use motion blur with a high number on the distance to obtain a wood/fibre-looking texture.The gradient looking shading, yes. I did that one manually because I wanted to make it look like the horn was twisted. I selected the shape of the horn and filled it with a light grey color, using the brush with a dark grey color I made a thick lining around the edges and used Red Ochre's Overblur to make a smooth transition between light and dark (therefore the vague term "gradient-looking"
 )
) -
MJW, really nice result, the reflection is great! I really need to play around with Texture Shader, when I figure out how to use it...
Made an attempt at a new black pearl just a couple of days after my first one, and ended up with a very nice result... and permanently merging all of my "note layers" into a complete mess
Finally backtracked all of the steps today!
-
1
-
-
I used a simple bucked fill and noise on default (except for the saturation which I set to 0) before running a motion blur. After that I used Pyrochild's grid warp plugin to stretch the texture I made alongside the horn. Then I made a gradient-looking shading, duplicated and ran MJW's texture shader to add some lighting (downloaded the plugin today so I'm not going to say I know what I did there before it happened
) I put the texture shaded layer above and set it to Lighten, the duplicated shadow layer on top and set to Overlay.
-
3
-
-
Background is my own picture of last year's fireworks. The rest is 100% PDN.

-
5
-
-
Thank you everyone for the positive feedback, I'm happy to know that you find the tutorial well written
(unclarity was my biggest worry when posting it)Skullbonz, I can think of two seams occuring in this tutorial. The first one is when using Bevel Object, just strech those parts of the grid with a selection. The other one is some excess pixels from trail plugin, there some good old eraser should do the trick!
And Seerose, that is a great result! I love the ripple effect, and the cage makes me think of Earth's magnetic field protecting us from solar particles. Thank you for sharing your result!
-
Barbieq, all of the photomanips look stunning! I especially like the one with the water lillies, the rugged concrete background is a nice contrast to the delicate flowers
-
- Popular Post
- Popular Post
This tutorial is available as a PDF. Click here to view or download it
As requested, here's a tutorial for my metal wire cage. This is my first tutorial so if there are any mess-ups, tell me and I'll try to fix it.
When you are done you should end up with something looking like this:

Plugins required
-
Start with a 1600x1200 canvas.
-
Erase the background.
-
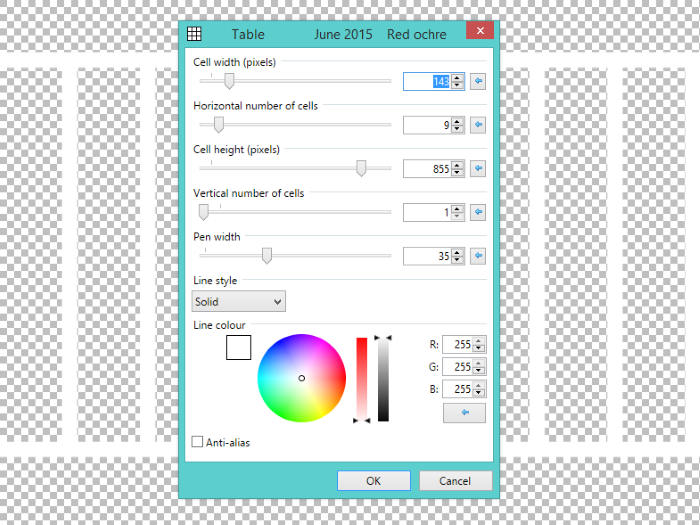
Run Red Ochre's Table Plugin with the settings below.
-
Run Object Align – Center Both to place the grid in the middle of the canvas.
-
Run Boltbait's Bevel Object with Depth: 12, and both Higlight Color and Shadow Color to black. Strength: 0,5
-
Select a picture with an even distribution of light and dark tones. Copy it to place it in the clipboard.
An example
 Hidden Content:
-
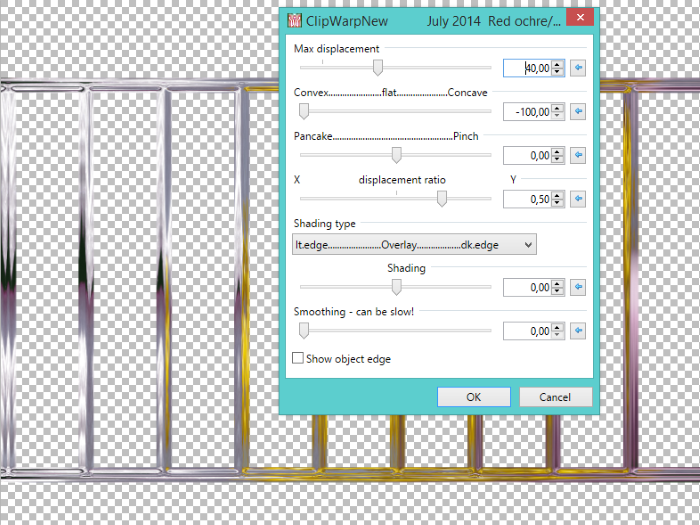
Run Red Ochre's Clipwarp New with the settings below.
-
Run Black and White.
-
On an new layer, draw a horizontal line with the line tool set to thickness 1. Run Object Align – Center Both.
-
Select the area below the line with the magic wand tool and go back to the layer with the grid. Cut out the selection.
-
Paste the lower part of the grid onto a new layer. Delete the layer with the line. (I named the two layers to Grid Above and Grid Below to keep track of them)
-
Duplicate both of the layers and run Brightness/Contrast with Brightness: 0 Contrast: -100 on both layers. (These were respectively named Grid Above – Grey, and Grid Below – Grey)
-
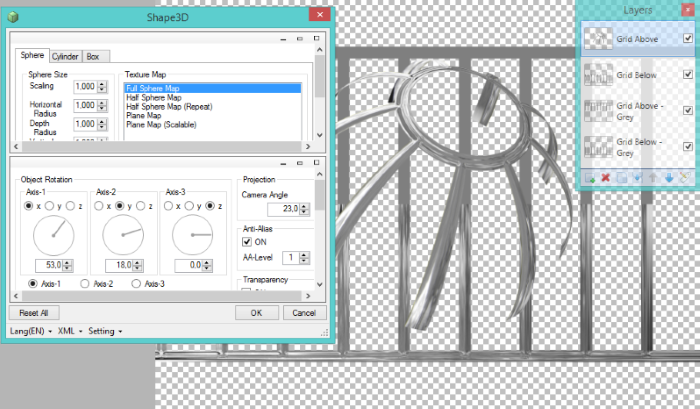
Select the layer with the top part of the grid and run Shape3D with lighting unchecked and these settings. Repeat on the bottom part.
-
Select the grey top layer and run Shape3D with the same settings for Object Rotation, but with the lighting checked (settings shown below). Repeat on the bottom part.

-
Set both the grey layers to blend mode Reflect.
For silver/chrome skip step 17-19
-
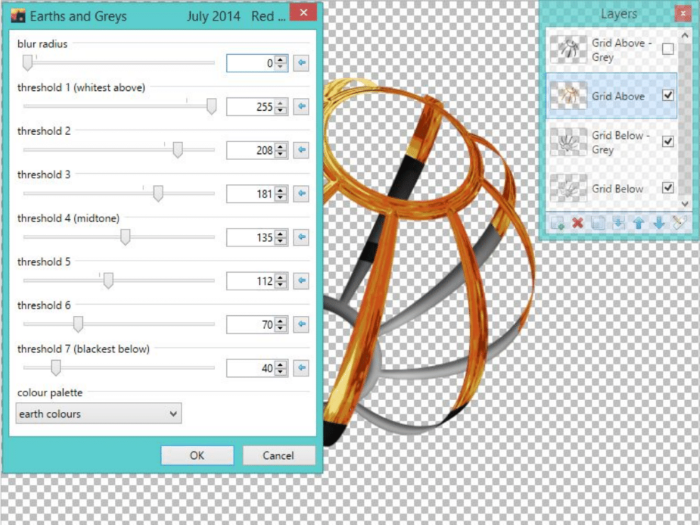
Go to the grid layers and run Red Ochre's Earths and greys plugin with the settings below.
-
Run Ed Harvey's Color tint. Hue: 35, Tint Amount: 255
-
Run Hue/Saturation with Hue: 0, Saturation: 70, Lightness: 5
-
Merge the grey layers onto each layer, make sure top and bottom is not merged together just yet!
-
Duplicate the merged layers and run Pyrochild's Trail plugin with the settings below on both layers.

-
To get a gem, a kitten or any other object you may want inside the cage, paste the object on a layer between the top and bottom layers. For the image up top, I chose a gem shape from Lynxster4's Faceted Gemstone Pack, and colored it using the method from Red Ochre's tutorial on how to color gem shapes.
-
Flatten the image and you are done! (Save a .PDN copy if you want to make changes or re-use parts!)
I'm looking forward to see your results, just make sure to resize your image within the 800x600 limit before posting
EDIT: Thank you Eli for suggesting Red's table plugin easier
-
10
-
Congratulations Ishi to the first place
Si Borg, Barbieq25 and Boltbait, great work!All of the entries were stunning, such a diversity of ideas!
 )
)


Limon's PDN Pics - Update 17-04-04 (Page 5)
in The Pictorium
Posted · Edited by Limon
Thank you Lynxster! It took some time making the plumage work the way I wanted it to do. Lots of layers deleted on that crow
Another blingy creation, all PDN. I used the Curly Lines plugin to make most of the golden shapes, and Lynxster's gemstone shapes are there too.