


happierhannah
-
Posts
18 -
Joined
-
Last visited
-
Days Won
1
Posts posted by happierhannah
-
-
I understand this process. Once the custom brushes app opens up and you select your brush, you have the option to use either Mask or Colour. Colour mode gives you the actual object you used as a custom brush, Mask mode lets you choose the colour, but you loose the detail in your brush (if thats what you want to do)
See the screenshot below, I'm sure this is what you mean.
Edited by nitenurse79, Today, 04:32 AM.
Yes, exactly. If I wanted Unrecognizable splotches I could use the regular paint brush.
-
I'm sorry, I think I'm still lost. If I was painting with a standard brush, this would essentially be the steps: 1.) Select the color red and paint the rose petals 2.) Change the color on the color wheel to green and paint the stem 3.) Change the color on the color wheel to yellow to paint a bee This process doesn't work for custom brushes?
lol that would work, I guess I just want it as a stamping tool sort of, to stamp lots of fully coloured objects in a row, yep sounds about right.
-
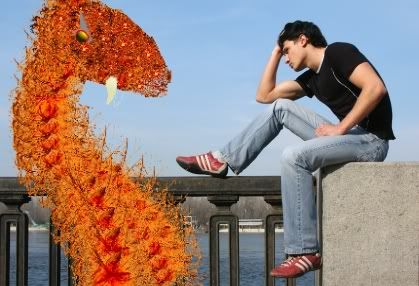
I made this seamonster/dragon using a custom brush, I know it sucks, but I'm working on it.
-
He wasn't asking a question, so you don't have to

I like winking
And I'm sorry I didn't clarify, I meant you only get one colour at a time, i.e. you get a red rose, but you can't choose to make the stem green, or you get a green vine, but you can't add shades of yellow, unless you do it manually afterwards.
-
You're welcome. Did you delete them, or are you using the colorwheel?
With the color wheel you only get one color, when you find your own images to use and delete the background, save them as .png and add them to custom brushes you get FULL COLOUR multi-coloured custom brushes
-
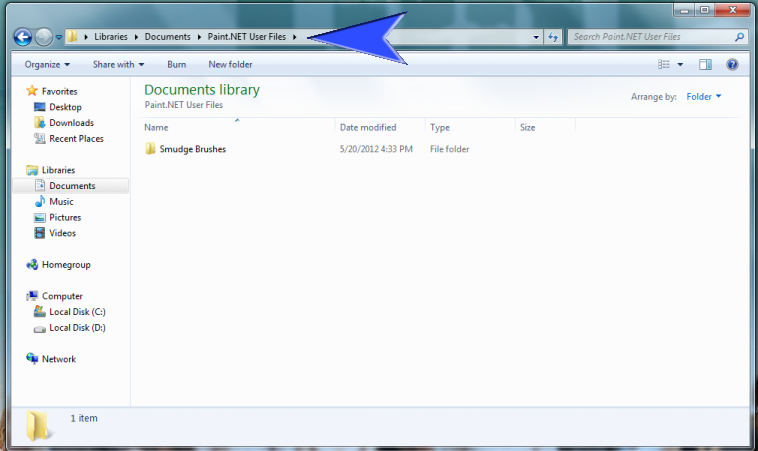
The picture above is from Windows7, this shows where you should find the folder where the custom brushes are at. EDIT: You commented that they're all in Black and White? Aren't you changing colors from the color wheel to paint in something other than the default colors?
Oh and btw,I didn't want them solid colored, if you find your own images in full color (for instance a rose) remove the background and save as a png you get FULL COLOR multi-colored custom brushes

-
 The picture above is from Windows7, this shows where you should find the folder where the custom brushes are at. EDIT: You commented that they're all in Black and White? Aren't you changing colors from the color wheel to paint in something other than the default colors?
 Thankyou!! I have the power now
-
Ahhhhh I feel like such a noob
 haven't felt this way in a while. So, I actually don't have a folder entitled User Files - I checked, thoroughly. I'm thinking perhaps I just ought to remove the custom brushes mini plugin from the paint.net and I'll get rid of all my custom brushes that way? i don't want to cause the program to lock up
 -
It seems that to get rid of them, you would go to that same folder where you put them initially and delete the ones that you don't want. http://forums.getpaint.net/index.php?/topic/18959-how-to-use-custombrushesmini-v19/ "What do I do next? Open up Paint.NET. This should create a folder in My Documents\Paint.NET User Files called "Custom Brushes". This is where your custom brushes files will be stored."
The thing is, I did delete the .png's from the effect folder, but I installed them in Paint.NET to use them before, so I'm thinking there must be some way to uninstall them??? Thanks, btw
-
Hi, I've been trying to delete some of my custom brushes because I really don't care for them that much, but I haven't been able to figure out how

-
Agreed .... nicely written tut' I just tried it with Overlay instead of Multiply ... reducing opacity and it got the same result But who cares ... good result either way
I just tried that as well, and you're right, the results are similar, but I noticed some differences.
1. When you do the overlay effect some parts of the picture are more saturated (then my way) and some are less saturated, giving it a bit of an unbalanced look.
2. The image isn't as clear. (which could be achieved by adjusting the sharpness but then you're back to more steps again)
3.It still looks very 2-D with a kind of gray, filmy covering over it, not allowing the objects in the picture to present themselves individually.
Thanks for the idea though.

If you follow the link the picture on the left was done using the overlay mode, and the one on the right, using my method.
http://i1251.photobucket.com/albums/hh541/Hannah_Vlasblom/beforeandafter1.jpg
But even just doing the overlay does make a big difference, but doesn't give quite the same results.
-
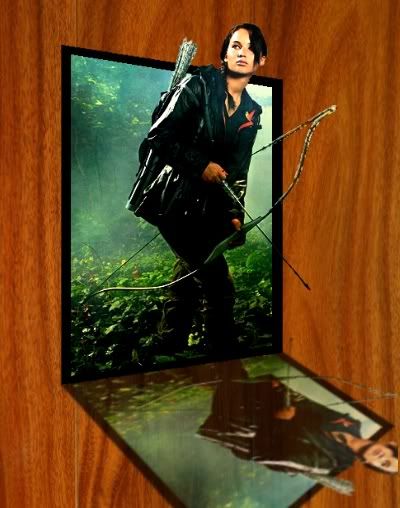
I know this is really old, BUT I just had to show what I made!! ^_^ It's Katniss!
http://i1251.photobucket.com/albums/hh541/Hannah_Vlasblom/Katniss1.jpg
-
There's definitely a difference. I was looking for different methods on how to make photos look better using PDN. I really like this tut. Quick and simple.
Glad you like.
-
Your technique certainly does give a photo some 'pop'. You've linked to the plugins used, posted reasonably sized images and explained everything nicely. Well done on your first tutorial!
Thank you!
-
Nice technique. Q: how does your method differ from duplicating the layer and setting the blend mode of the upper layer to Multiply?
I've tried duplicating the layer and setting it to multiply, but I've found that when you do that, the photo looks blurrier, the colours less vibrant, and the photo still looks as if it has a slight gray filmy layer covering it. With my technique it allows the photo to pop out, and become more dimensional, not to mention vibrant
-
This tutorial is available as a PDF. Click here to view or download it
This is my first tutorial, and yes, I'm a newbie to the forum, but I've been fooling around with paint.net for a couple of years now, and I check the forum regularly even though I've just now become a member! So, on with it now.
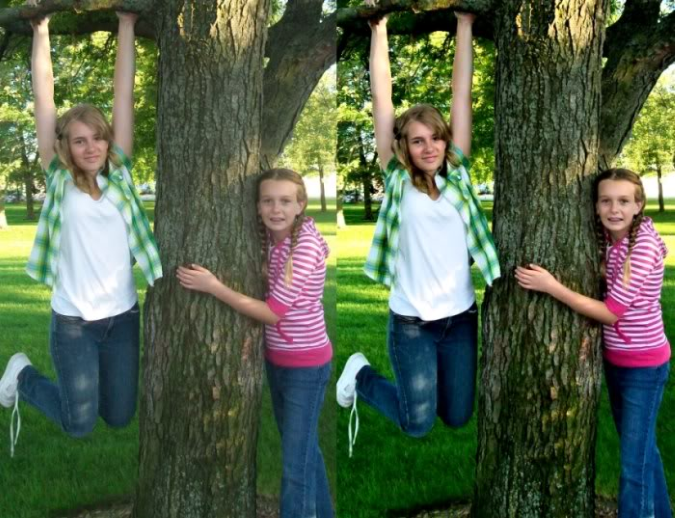
These are the before and after pics of the photo I'm working with.

This is really quite simple, however, you will need a couple of plugins:
Local Contrast Enhancement (part of Tanel's Plugin Pack)
http://forums.getpaint.net/index.php?showtopic=11619
And Combined Photo Adjustments (which is part of BoltBait's Plugin pack)
http://forums.getpaint.net/index.php?/topic/8318-boltbaits-plugin-pack-updated-december-12-2011/
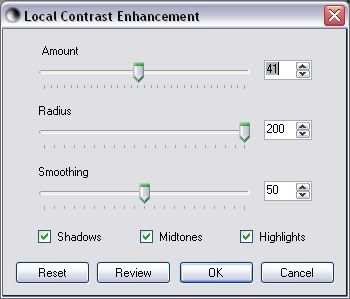
Open up your image and click Effects → Photo → Local Contrast and set it to:
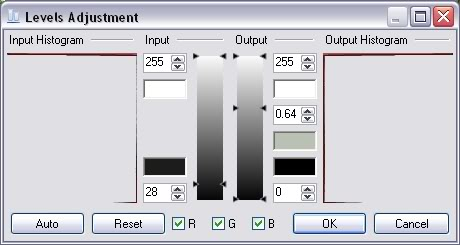
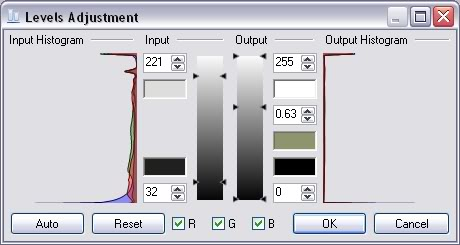
Next click Adjustments → Levels and set them to:
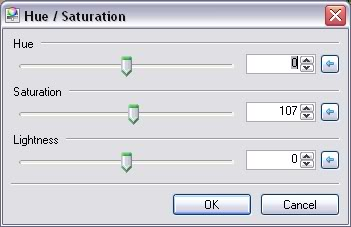
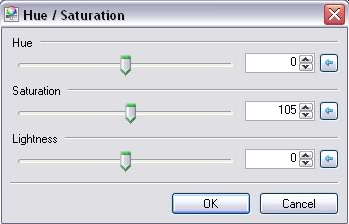
Then click Adjustments → Hue/Saturation and set it to:
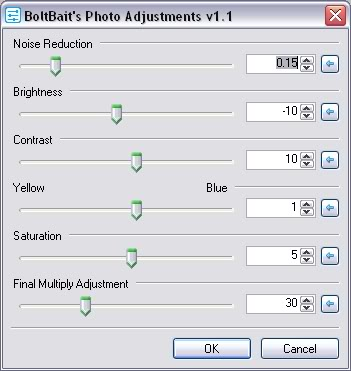
Last, click Effects → Photo → Combined Adjustments and set it to this:
And my finished result, the before and after:
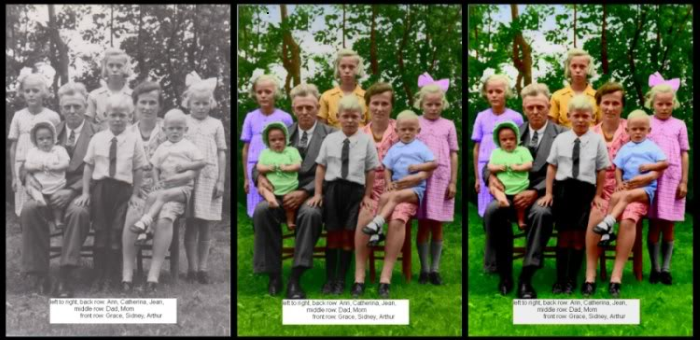
Some images do better with different settings however, depending on their quality. The first image you see (below) is the original, the second is the one I colourized, and the third is after I made it more vibrant.

The other effects were a bit dramatic on this colorized photo, so I used these ones instead.
Effects → Photo → Local Contrast
Adjustments → Hue/Saturation
And lastly, Effects → Photo → Combined Adjustments

And once again, the finished result:
If this helps even one person - I'll be happy ^_^
-
 1
1
-

Performing A Sky Swap
in Image and Photo Touch-ups
Posted
This tutorial is available as a PDF. Click here to view or download it
Forgive me if this has been posted and I didn't see it. Even though performing a sky swap like this is easy I was scouring the web trying to find out how to do it in paint.net. And it's just such a pain sometimes when your photo is beautifully exposed for your subjects and your sky gets blown out. Or maybe the sky was grey that day. Either way, you can fix it.
NOTE: This technique creates subtler skies.
First you must find a sky to use. There are several free ones here:
https://www.facebook.com/dsiskphotography/app/128953167177144/
Just go to where it says More --> Freebies. Otherwise find a sky photo elsewhere or use your own.
1) Open your image in which you wish to swap the sky.
2) Find and open a suitable sky image which "matches" your photo.
3) Paste sky into new layer in multiply mode, set layer opacity to around 240. Adjust the sky and the position of the clouds to your taste.
4) Use a transparent gradient to blend in the new sky just below the horizon line.
If you have a very straight horizon line you may skip step 4. Simply crop your sky at the horizon line.
5) Set eraser to 200 width and 27 hardness. Erase the parts of the sky which are covering and creating a haze over objects/subjects in the foreground.
And you're done!