


Celestrial
-
Posts
14 -
Joined
-
Last visited
Posts posted by Celestrial
-
-
Been away for a long time, though most people don't know me so that doesn't matter anyways.
Anyways I'm here to show you guys how to do 2 things:
1: Create rough liquid ( The basic idea of it, someone can do better than me I'm 100% sure)
2: Put any textures into it, pictures, patterns, anything you can save in a picture format. (Again, see someone can do it better than me, I'm just providing basic ideas.)
We're doing this (Results vary for each user, but should be the same idea): (Picture got deleted cause I was stupid. Please scroll down to the end to see. Will provide other examples as soon as possible. EDIT: Some examples are at bottom of post, but here, I'll post it right here.)

Plugins needed:
Smudge Tool : http://forums.getpaint.net/index.php?/topic/10634-smudge/ By pyrochild. He's awesome.
(Mentioned) Shape3D: http://forums.getpaint.net/index.php?/topic/18968-shape3d-2007-08-24/ By MKT. He's awesome too.
Other required items:
A surface picture to place your liquid on. (Can be anyhere, splatter on blank canvas, or stairs like I'm doing, basic idea.) The stock picture I'm using is here: http://themaisonette.net/wp-content/uploads/2012/11/By-nimmrichter-cda-architects-interior-wood-stairs-design.jpg
A texture for your liquid. (Can be anything, I'll even cover how to make clear water of sorts. Patterns, pictures. Will be very distorted.)
Lots and lots of patience.
WARNING: THIS TUTORIAL IS GOING TO BE LONG. VERY. LONG.
Part 1: Creating basic liquid:
1.1: Make a blank canvas, put your base image onto it, like so:

1.2: Decide where your liquid will start.

1.3: To begin creating your liquid, you have to know what basic liquid puddles look like.
The most important part to remember is the edges of the liquid, it can be any shape you like, but the edges are the main aspects. Look at these examples:
http://www.wakingwalt.com/images/puddle.jpg <- This one has a good idea of how puddles should look like, so if you're doing a stair like me that's what's doing to be on the steps.
http://thumbs.dreamstime.com/z/melted-chocolate-dripping-18929561.jpg <- This is for the very edge of your liquid, if you're making it drip. Your liquid can flow down stairs like I'm doing in solid wide spread, but when it comes to the ending of your liquid this is how it's going to drip.
1.4: To begin, on a new layer, make the starting point for your liquid. It can be a complete puddle if you'd like but that's not important at the moment. You can accomplish this by using a combination of the Line Tool (more specificly, the wavy aspect), the Circle Tool, and the smudge tool to an extent.

1.5: We can now begin to place the liquid. First, we must fill the shape we just made so we can accomplish two things:
Get rid of lines (Eww ugly)
Have an idea of how it's going to look and save us a ton of work on filling later where it can take more work.
To do this, draw a line to make a complete puddle (Not required if you've made a complete puddle, only for people that did it like me above.)

1.6: Fill it in by Inverse Magic Wand (Select outside your "puddle" and then CTRL + I), and then paint bucket it a color of your choice ( If you're just doing a straight color, then you should fill it with the color you want your liquid to be. This also means you won't need to do textures, like a good part of Part 2 is about.) If you are doing a puddle or a splatter that is viewed top-down, you can skip to step (2) from here.

1.7: Now deselct and use the Layer >> Rotate/Zoom Tool to add depth and place it at your desired starting point, like below. Anyone who's doing a puddle like this can stop now and skip to step (2), this part is for those making it flow.

1.8: Now, starting from your "base puddle" or something, draw lines that are how much you want the liquid to flow. It MUST conform to the "surface" picture you are using, for example as I am using a stair, I will make it fall and turn left and repeat. If you're doing slopes or curves, draw slopes or curves. It's all fine as long as it conforms to the "surface" picture. Like so:

1.9: So now that we have the "flow" we can draw a line across and fill it using the same method in step 1.6, Inverse Magic Wand and paint bucket.

1.95A: Almost forgot the drips. Remember earlier in 1.3 I showed you a lot of pictures? We're going to use that now to make the dripping. Like making the base, you can do this through a combination of the Circle Tool, the Line Tool, and the Smudge plugin. Like so:

1.95B: Use the Layer >> Rotate/Zoom tool to rotate and then the select and move tool to resize and place it just like we did with the "base puddle". This should leave you finished with the step 1 instructions. Your result is something like this:
Make sure to merge layer down so you have a complete liquid on one layer!

Alright, that concludes the basics of making a liquid. Now we move on to the actual texturing and fine tuning.
Part 2:
(2): Now duplicate the layer that contains your liquid, you should have 2 of those. Save one for later. At this point, you should not move your liquid, as any more work we're doing is going to be based on that liquid's position:

2.1: Now on a new layer, get your picture you are going to liquefy and put it there:
(If you're doing only a color, skip to 2.7)

2.2: Now comes on of the hardest parts to explain. Those of you who are doing only a puddle can skip these few steps and go on to (2.4A) from here. With the liquid flow, you have to cut your picture into multiple parts to mimic the flow of liquid you've created. Since my stairs has six steps on it that my liquid is oozing over, I have to cut my picture into six pieces and put them ALL on seperate layers:

2.3: The reason for a new layer per piece is that we're going to use the Layer >> Rotate/Zoom to match the flow of the liquid. If you're doing liquid flow down a ramp/slants you should have an easy time with this, for those doing curves (Such as flowing down the side of a vase), you can use plugins to get the curve on the pictures, one such example I can think of is Shape3D which can make a cylinder/sphere using your image that you can crop to your liquid's flow. So here's my way of forcing my image to match the flow of the liquid:

2.4A: Shrink our pieces down (If you have any. For puddles, just shrink your image) to about the size of your liquid:

2.4B: You can now merge all pieces down to a single layer (Ignore if you're just making a puddle). After doing so, switch to your liquid layer (Any of the 2 will be fine) and select the outside with Magic Wand tool. Then select the layer with your pieces again, and press delete. It should leave you with a clean image of your (almost) metled liquid, like so:

2.5: Dayum, dat look fine... Errr anyways, moving on. Now select your liquid by doing Inverse Magic Wand again:

2.6: You can now use a multitude of plugins of your choice to distort the picture how much and as much as you like to give it the "liquid" feel. Here, I'm using the smudge plugin to connect the pieces of the "liquid" in the above picture. But no matter what you do, do not deselect the liquid. This is my result:

2.7: Now merge the layer down onto the liquid layer. You have another one, and wer're going to do something with it. Select your remaining liquid layer with Inverse Magic Wand and then use Selection >> Outline Selection. Set color to white and set thickness of outline to 1:
Make sure your outline is on another layer too!


2.8: This should be your result:

2.9: Select your remaining liquid layer (The one you duplicated ealier at the start of part 2 and used in 2.7) and use Blurs >> Gaussian Blur...
And set blur to a value of 3:
This should give your liquid a very slight "shadow".

Part 3: Fine tuning, adding shine and bevel.
3: Select the outline you made in 2.8 and Gaussian Blur it with this setting:
Afterwards, duplicate the layer and merge the two outlines. It gives a slight "bevel" to the liquid.

3.1: You can now just add more shine to it however you like. In the below picture, I'm using white blurred lines to add depth to the 90 degree bends in the liquid. I also added some splotches of blurred white to give that shine some liquids have on them.

Aww man, while editing this post for consistency I accidentally deleted the picture I was working on in the tutorial... I'm sorry guys...
I'll provide other examples
 . Anyways, In the above picture, that's what your finished product should look like a bit. You guys can improve upon my methods to make better results. Since I derped and deleted the picture, that bottom right corner above is what mine looked like finished. I'll edit this post tomorow to add examples of what could be done with this method (In the top part of this post I mentioned clear water and patterns. I haven't forgotten those. The examples will cover them too.)
Please comment, criticize, and discuss!
EDIT: I have examples now, this one is clear water:

To make that, just make 2 layers of liquids, one black and one white. Set both transperancy to however you prefer, dark liquid, milk, ETC. Gaussian Blur both layers to make it blend into the surface. Now do steps 2.7 to 3 but instead of making a white outline, make a black outline. At this point you can add detals like ripples by drawing them with white lines and blurring them.
Other examples (Ask if you need help):
Toxic sludge:
Vase Of Human:

To do the above I just smudged the hell out of the melted picture to give the liquid feel.
Happy liquifying stuff!
Again, please comment, question, criticize. -
I just noticed today your reply. Thanks for the explanation. When I try another one, I'll have to try using a transparent gradient, although I'm not sure exactly where it should be applied.
Put the white where you want the "light" to shine, make it fade out so it has sort of reflection
-
By "gradient shine" do you mean Gradient Mapping or something else? In either case, can you give me further explanation on how to use the technique? Same with Motion Blur. Thanks.
Gradient shine is when you use a white/transparent gradient on a corner of and object to make it shiny.
You can use motion blur by setting the blur to opposite the direction you want your glass to "fall"
(I haven had much experience with motion blur so i wouldn't know)
-
So i have come up with a way to make ice cubes. Or something that looks like it.
Plugins Needed:
Shape3D
Bevel Selection (Not sure if it comes wit paint.net)
Smudge Tool
You Can Find These Plugins Around The Forums
Here is my first attempt at my own concept.

I've noticed i have too many bubbles scattered around and they are too dark, so i fixed those problems in my second, better attempt (the result of this tutorial below)
So, first order of action, make new canvas + fill it with desired color (preferably something light, like blue) and add a new layer:

On that new layer, fill it with black and reduce the transparency to about 50ish. This is so you can see the cube when working with the ACTUAL cube. Oh, and name the layer Shape

Use Shape3D to render the Shape layer into a cube and rotate it how you want. Re-size it a bit so it looks like a cube, and duplicate it.

Name Your new layer Cube and reduce the transparency to 5-10. We kept the the shape layer to let us see the cube, as it's nearly invisible.

Make new layer, name it Outline, and using the line tool (size 2) with white color, outline the entire cube, not just the outside:

Gaussian Blur the outline with a radius of 5.

Now make new layer and render clouds on it with a scale of 115.

Using the lasso tool, select a random white cloud and cut it.

Delete the cloud layer and paste the part you just cut in a new one:

Then use Gaussian blur with radius of 10 on it.

Use the Smudge tool on it to get desired shape and move it under your Outline layer:

Now go back to your Shape layer and use magic wand to select the cube.

Now make a new layer under your Outline layer and render random shape fill with these settings:

Now using the magic wand tool, select the outside of the circles and invert (Ctrl + I).

Use the Bevel Selection tool to make it look like bubbles. Then deselect.

Use Gaussian blur with a radius of 3 on it.

From this point on delete the Shape layer. Make a new layer below the Cube layer and merge the Cube layer down, then merge everything else down.

Copy pasta to your hearts content. You can use the Layer/Flip/Rotate tool to modify the cube so you don't have to redo everything again:

Eh.... It still looks like the first one
Maybe you guys can do it better than me?
-
 1
1
-
-
thanks for the tip. I knew it was "off" somehow and you pinpointed the problem! I'm assuming you mean outline before making the multiple layers, not after all the work is done at the end?
Yes, outline it before making layers, otherwise you just outline the shape of the glass piece
-
Here's my try, even though this topic isn't very active! I enjoyed learning a new technique today. Thanks for the Tut.

just noticed that you can't really see the effect on white, so here's my other try. sorry to repost. Hope that is okay.

You should outline it twice with the outline objects tool, give it more "glow" than just a white outline, i did that and got a better result for the glass's edge, it looks like in the first example (one with the blue monster)
-
After many hours of trying to figure out how to generate the edge of the glass shards, I think I got the gist of it. (I copied the shard image to a new layer, used the arrow keys to move it and then merged that layer with the shard layer.) But mine did not come out looking like broken glass. More like a jigsaw puzzle. Any ideas on how I can get better results? I especially like the first one you did.
You can use the "gradient shine" technique to add some reflection to it
Just make sure you have a direction for the source of light.
EDIT:
You can also add a bit of motion blur to make it look like it's falling
And i have another tutorial comming up too
-
Great tutorial & a great result Celestrial.
IMO you should have put the end result of the tutorial up as the headline picture for "We will be making this today".
Otherwise I can't wait to have a fiddle with this one.
Cheers,
Thanks, i updated it now
-
Yeah, so after i made my making a galaxy tutorial, i decided to make another, so here we are!
We will be making this today:

Another Example:

Another example:

PLUGINS NEEDED:
So, create a new canvas of your choice (preferably a bit larger than the image you want to "shatter"), and fill the background black

Then take the photo you want to "shatter" and put it on a new layer.

Then, this is where you make the shape of the "shards". Select your image randomly like this:

Then cut and paste in a new layer. Name it Shard 1, do this for all the shards you want to make, in this case, I will only make 2

OPTIONAL:
Select small portions of the picture and paste them on a new layer (this is the little "fragments" of glass you see) like so:

Then, use Layer - > Rotate/Zoom tool to turn your shards how ever you want.

Move the shards how ever you like....:

Then, use outline object on your "shards" two times like this:
Make sure to do this for ALL the shards

Then use the magic wand tool to select the outside of your "shard". Press control + i and copy the rotated shard. Then use the move selection tool.

This part is a little complicated, paste your copied shard on top of the original one, move it in the direction you rotated it in 1 pixel by pressing your arrow keys in the direction you rotate it(So, if i rotate the shard top right, i would press up and right), repeat it how ever many time you want (this is the thickness of the glass). The idea is like this tutorial, how you layer something to make it 3-D.

Then use outline object on it like earlier, then glow it with these settings:

Make sure to do that for ALL shards:

And you're basicly done!
You can also add a "shine" to it by using a gradient glow.
Result:
Comments and feedback welcome
EDIT: I used only one outline for the tutorial, which is why my result may be different than yours, if you do it like i said, you will have the glass effect of example #2 on top of this post.
-
Here's my attempt at it. I played around with it a lot and got a little carried away! What do you think?
Looks REALLY cool! Nice result
I like your galaxy core too! Really shows how flexible this technique is xD
-
Really cool tutorial!! I've made galaxies before, but not like this!!! I'll have to try this out!
Thanks, if you have questions i can answer them
-
This tutorial is available as a PDF. Click here to view or download it
Moderators Note: Images in this tutorial have kindly been supplied by Lynxster4
So i am a long time lurker on here, this is my first tutorial on these forums (be easy if i make a mistake please)
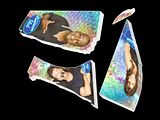
Today we will be making something like this :

Plugins needed :
So, first step, make a new canvas of any size you like ( i think a big one will be good depending on what size you want your galaxy).
For this tutorial's purpose, we will be using 800x600
Step 1 : Stars
Fill your canvas with black, then make some stars using noise set to low coverage( depending how many stars you'd like in the back ground), zero color saturation, and high intensity.

Step 2 : The galaxy
Add new layer, then render a Julia Fractal (Effects>Render>Julia Fractal) on the new layer. Name the layer galaxy.

You can change colors of the fractal by using color balance or hue/saturation.

Add some nice glow to it (Optional, makes it look better)

Use twist on it, you can change how your galaxy will look with this option.

Put nice glow on it again ( This will be the light every galaxy emits)

Now this step is tedious, but it makes your galaxy look real (enough that is)
Make a new layer, and use a size 2 brush color white to dimple on your galaxy "arms" ( the "bright stars" of the galaxy)

After that, put glow on those "stars" with these settings:

Put a Gaussian blur on those with a radius of 1, then merge layer down

Now glow again on the new combined layer with maximum radius, - 100 brightness, and low contrast like this:

Step 3 : The core
Like with all galaxies, we need a core, so make a new layer, and set the color of your galaxy as secondary and a lighter version as primary:
Then render clouds with these settings:

Then run Shape3D on that, scale it down to the size you want of the core, then turn the x axis on lighting to max like so,

Then run Gaussian blur on it with a radius of 15-30

Glow it like this then merge layer down :

Now select the layer galaxy and use Rotate/Zoom (Layers -> Rotate/Zoom) and rotate it to how you want it:

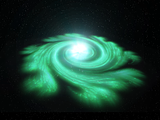
And you're done! You can customize it more by adding more stars or more glow to it, change it's color too! You can also add a low zoom blur to it ( This results in that green galaxy above , forgot to take a picture of this step, but i recommend it, just make sure you have a duplicate layer to keep the details)
Here is my result:
Hope you enjoyed this tutorial (my first)

I will answer all questions on this tutorials too if you have trouble

-
 3
3
-
-
This is really cool!
Here is my go at it:


Liquefying stuff 101 (Sort of hard...?)
in Tutorial Graveyard
Posted
Thanks EER!
I've updated the post to include pictures of examples. If anyone has a question I'd be happy to help.