


Minoeman
-
Posts
862 -
Joined
-
Last visited
Posts posted by Minoeman
-
-
I'm sorry you feel that way. I didn't mean any attitude.
-
Minoe', do you like Mountain Biking by any chance?
Yes, I do.

@Goonfella: Hm... I don't know, maybe I'll try that sometime.
@Yellowman: Thanks for your comment.
-
That was like the second thing I made... Thanks for teh comment, though!
-
Yeah, it is. I made a mistake on the size, I believe it's 1680x1050. :oops:
-
Just poppin up to tell you all that one of my best images is coming...
-
I'm sorry I haven't noticed your gallery latter.
Your a great artist and that monkey is amazing!
-
How the f(Mooo?) do you do those planets! Seriously.
-
Shiz, you gotta post a tut on how to do that.
-
Fine. I'll call it....
"Outcomes box"
-
I would say one of your amazing planets, a comet, or a space ship.
-
Your artwork is getting better and better, and your also one freaking good artist!
You've added a lot in a week, so it's hard to coment on just one. >.<
Your glossys are still the best.
-
:shock: :shock: :shock:
Haven't been here in a about a week and I have to say....
:shock: :shock: :shock:
Uh......
Holy cow, pig, smokes, shiz, etc. That space scene, (Your newist,) Is freaking awesome!
:shock: :shock: :shock:
-
That is awesome. Yes, it's a new style as well. You should be proud with that.
LOVE it!
-
I selected different shades on my palette, and the opacity should stay 255 on all layers.
When I mean turn down the opacity, I mean how much your bush sprays. Like how transparent it is.
-
I dunno, because I felt like it?
-
Did you read the rules at the top?
 The image your rating needs three reply's in order for someone to post a new one.
 -
Nice new sig.
-
Holy bloody potato. That planet is awesome. The aurora effect is awesome.
I love the stars as well, an awesome color choice. That lighting is
genius on the planet, and the moon.
One of the things I love most about it is the textures. Really,
how did you make that? Total 10/10,
-
This one is my favorite.
-
Make a new layer, fill it with pure white. Draw your line in pure black. If you want a thick line, like in the tut, just increase the brush width. Then using the line tool, taper the edges. Make sure the line is white. Once you've tapered, set the blend mode of the layer to multiply, and all the white will be gone.

Blooper made a video on this method. If you ask him then he might share it with you.
Honestly, I don't believe that video tuts are any good. They're harder to fallow.
-
The mistress of glossies does it again!
Ten thumbs up!
Mistresses? More like goddess.
-
I like your golossies, and wish I new how to make them.

-
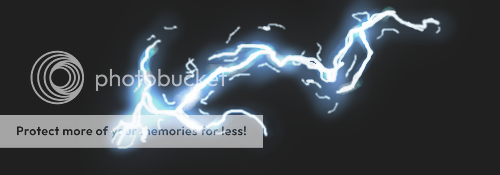
Hello everyone! It's me, Minoeman, and today I will show you how to make this image.

Plug-ins needed:
Feather.
Basic anti-alias.
Outline object.
Step 1:
Of course, open up a canvas size 500x175 and fill it in with any color.
(Black grey is preferable for this one.)

Step 2:
This next part is tricky. This is where you decide your lightning bolts basic outline,
but then you need to add some other parts around the the line.
First, select your dark color. (Your dark color should be a darker version of your light.)
Then, turn down the opacity to 10. Add a new layer, and start drawing your outline with the brush size 30.

Now, once you have that done, take your lighter color, brush size 20 and opacity 5,
and color over your end point of the lightning bolt and highlight it.

Now run gaussian blur at 6-10.

Step 3:
This part may get annoying. Now, add a new layer, grab your bolt color,
(Bolt color should be a lighter version of the light color!) at 255 opacity and size 3 brush, do
zig zagz with your mouse following the bath of the bolt you made earlier. This may take 5-10
tries to get it right so you may want to zoom in to get it right.

Step 4:
Add a new layer, use the same color, but lower the brush size to 2 and change it to :AntiAliasingOff: ,
and start drawing more zig zag line branching off the big one. Then run basic anti alias.

Now, lower the pen size to 1, and start drawing sparks shooting off the main bolt, without touching it.
Then merge with the main bolt and run Gaussian blur at 1.

Effects/photo/sharpen at 3, then ctrl-f to do it again.
Step 5:
New layer, grab white as your color, select 4 for your brush size, and start outlining most of your lines.
(Only get about 3-5 of your sparks). Then run feather at 1-1 with true feather checked.
Merge layer down until you only have your black/gray background and one other image, then duplicate it.

Step 6:
On the duplicated layer, set the blend mode to color dodge, and run Gaussian blur so that you can see
a glow, but it's not to bright so prob. around 40-60. It should look something like this.

Step 7:
Add a new layer, set the blend mode to color dodge, and grab your light color. Set it's brush size to ten,
and the opacity to 10, then Start painting it over the parts you want to be brighter then the rest. Then,
grab your dark color and color over parts were it needs to be around the color of your choice, so for
my case, were it needs to be bluer.
Final Step:
Now, add a new layer, set it to color dodge, the brush size 2, :AntiAliasingOn: on, and start painting
some random sparks all over your man bolt and branches with your dark color. There needs to be a lot here.
After everything one of those sparks is out, Gaussian blur at 1, and your done!
-
Also one more question When i use the Magic wand and cut the sides, the sides doesn't look smooth...
That's because they're aliased. Search for "Anti-alias plug in" or "Feather"
Also, when you use either of those two, make sure the object your :AntiAliasingOn: is on a separate layer.
 The image your rating needs three reply's in order for someone to post a new one.
Minoeman's Dome: My eye!
in The Pictorium
Posted
Okay, so...
You know how I said a masterpiece was coming soon? Well...
I'm stuck. I can't figure out how to make some realistic metallic feel to this.
Any help?