


Frozen_byte
-
Posts
256 -
Joined
-
Last visited
Posts posted by Frozen_byte
-
-
My first Space picture without any tutorial! - Only the plantes are similar to Withers ones.
I uploaded the PDN, than you will see my new method
 *too lazy for Tutorials*
http://bloodynoir.freehostia.de/stuFF/Space.pdn

size 1024*768 now:

-
look at your sig, there it is....
otherwise try this:
Make a colored\white filled Cricle,
Add Froted Glass
Add Zoom Blur
fiddle around with these Plugins.
-
:shock: I'm invisible
Okay, again:
I have a Problem with your Plugin [how the most people *g*].
My Brushes are Streched and they aren't available in original size:

-
my brushes are streched, if I want to use them:
how can I fix it?
[lol forgot to post the question O,o]
Cancle button:
Press the X and than pres STRG+Z so nothing happend....
but I need an undo button too^^
-
my brushes are streched, if I want to use them:
-
-
Uhm, you need for every own brush a new ordner... Ther's no easy copy paste, please fix it
btw: atm im using 210 brushes :<
-
WoW, it helps a lot, thank you!
But why are only 20 Brushes allowed?
And how to expand this limit?

-
I think he used a variation of this tutorial:
than he maked the Background transparent and used a Stock image for the Windowslogo.
-
Use Search:
Tipp:
Set the Flood mode mode from contiguous to global [missing the Icons!!!]
-
to improove the shadow\lighnings:
Use a second vertical gradient with Black and White on a new layer.
blend mode: "Glow"
Hers my attempt:

What I have done:
1. New Layer
2. Wrote text
3. Dublicated
4. Used the "Outline" [no "Outline Object"!] Radius: 2 Strength: 4
5. Blendingmode of the Borderlayer: Normal, Opacity: 80
6. Used the horizontal Black\White gradient on a new layer [on top]
7. Blendingmode of Gradientlayer: Glow, Opacity: 255
7. Swiched to textlayer.
8. Used magic wand and selected the space [global mode to select the space inside the O, too]
8. swiched to the Fradientlayer and pressed ENTF
9. done.
-
New lettering of my name:

with a dark background:

-
Look there, Wither maked a complete Space:
and for the stars only:
[wither linked there in his tutorial, too]
-
Second work:

The Stockimage is deep deep hide in google...
Sorry can't find the original image anymore.
It's deeply buried in google =(
-

Thanks to Wither and his marvelous tutorials.
-
I think he mean to make this part:
3.Start near the right of the canvas at around (385,50).
Using a white paintbrush at a width of 20 pixels, click once.
Move your cursor 5 pixels over using the arrow keys, lower the pixel width by 1 using the '[' key, and click once again.
Keep doing this until your pixel width goes down to ten.
easier^^
-
My first Photo coloring, gothic Style:
Before:

After:

With an Label:

-
:shock: :shock:

WOW!
Edit:
And an Avatar:

-
Thats wonderull,
~Tutoruial request
~ -
Backround:
Lightrays
Text:
Drop Shadow
viewtopic.php?f=16&t=1411&start=0&st=0&sk=t&sd=a
The Puffel:
Stock Image, i think.
ncfans signature:
http://pdnshowcase.googlepages.com/mysignature
Have Phun
-
okay, here is my New Sig
I like it^^
The Face is an Stockphoto, rest is 100% PDN

-
Another way to make something like This:

Here the PDN, so you just have to replace the Pictures:
http://bloodynoir.freehostia.de/Tut/Infrared.pdn
Short description:
:AddNewLayer: Add new Layer:
Fill with #FF0000
Mode: Overlay
Opacity: 200
:AddNewLayer: Add new layer
Fill with #FF9D00
Mode: Multiply
Opacity: 20
:AddNewLayer: Add new layer
Fill with: #FAFF00
Mode: Darken
Opacity: 255
:DuplicateLayer: Dublicate Picture
Move it on Top
Mode: Overlay
Opacity: 100
Done!
it isn't like the real infrared effect, but many peple don't like the green and purple...^^
-
The Lightning ball [in the hand]:
PS tutorial....
The Bolt:
viewtopic.php?f=15&t=21288&p=114968&hilit=bolt#p114968
And a much of lightning layers xD
-
Just 4 Fun:


Just added the Bolt:

header 4 a firend:

Thats it


Making Polished Spacescapes v2 [Image heavy]
in Creations
Posted
This tutorial is available as a PDF. Click here to view or download it
Okay, here is another way to make Spacescapes like this:
Plugins you will need:
Shape3D
Diagonal Lines
(Dents is part of PDN)
Align Object or find a newer version in this pack KrisVDM's Plugin Pack
Zoom Blur Deluxe
- - - - - -
1. Your Background
Okay, Start with a new layer [your own Wallpaper size] and add Noise with these settings:
Intensity: 100
Color Sat.: 0 [or 20]
Coverage: 3.5
___
Make another Layer and add Noise with same Settings. Use Gaussian Blur
  Radius: 1 or 2.
Set the Opacity to 120 and Blendmode to Glow
___
Duplicate you first Layer and apply Frosted Glass plugin
  : Maximum/Minimum Scatter Radius: 0.11
Smoothness: 1
___
Erase a curve on your "Frosted" Image [thx Lego, but I'm too lazy to fix he image yet -_-]:
Merge your Layers down
___
2. Your Planets [Quiet similar to Withers]
If you don't want to modulate the Shape 3D Setting yourself, Load this XML in:
http://bloodynoir.fr...pace/Planet.xml
http://uploaded.to/?id=4sfofv
http://mentors.webho...tuFF/Planet.xml
___
Add new Layer Take a color by your choice and fill the new Layer
  .
.
___
Apply Shape 3D:
Take a scaling as you like it
___
Make some Clouds on a new layer
  [default settings]
Blendings:
Mode: Glow, Overlay, Multiply [choose an alternative]
Apply Shape3D again with same settings.
___
Add a new layer add Noise
  add Gaussian Blur Radius: 2-3 [depend on your Planet Size]
Switch to a "Planet layer" select all space out of your Planet .
.
Switch back to your "Blurred Noise Layer" press DEL to delete.
Blendingmode: Overlay
Opacity: 255
___
Add a new Layer between your last Planet layer and Background again
Switch to a "Planet layer" select all space out of your Planet and press CTRL+I to invert selection
  .
.
Fill selection with White [or another light color] .
.
Add Gaussian blur, radius: around 15 .
.
___
Now move your white blurred circle 1px left and 1px down [or where the lightning of planet is] .
.
set:
Blendingmode: Normal
Opacity: 180
___
3. The new cosmical Clouds
So, add a new layer as always
Set primary color Black, secondary color Transparent 100%
Do clouds with settings:
Scale: 380 - 650
Roughness: 0.50 - 0.80
___
Do it three times, set Blendings:
First Cloud Layer:
Mode: Color dodge
Opacity: 255
Second Cloud Layer:
Mode: Multiply
Opacity: 159
Third Cloud Layer.
Mode: Multiply
Opacity: 255
___
Well then? - Yes! :AddNewLayer:

So now Press B for Paintbrush .
.
Take a large size: 60++
Color anywhere.
Pick a Second Color, lower your Size
___
Use Gaussian Blur radius: ~35
Take another color, lower your size, add radius: ~30.
Take another color, lower your size [or don't do it], add radius: ~25, again.
Do this a couple of times, till you got this:
A last Blur around 135.
__
Switch Blendmode to Lighten, Opacity to 80
Do this "Clouds" again and again, till you like it.
Set all layer Blendmodes to Lighten and Opacity to 80
___
Than add a new layer
Make Diagonal Lines:
Scanline Interval: 25
Brush Width: 2
Anti-Alias: 5
Angle: 45
___
Use Dents plugin.
#General:
Scale: 55
Amount: 50
Quality: 5
#Detail:
Detail: 70-100
Roughness: 50
Turbulence: 10-20
#Rest as Default
Blendmode: Overlay
Opacity: 90
___
To light up your Clouds, paint them and use Gaussian Blur radius: 135
Blendmode: Overlay
Opacity: 255
___
Okay now there is a problem and it's very ugly!
to clear it we need to edit our Starscape again:
Duplicate the Starscape layer and set Blendmode to overlay:
___
But now there are only a few stars...
so we will add some new:
Add new layer
Add Noise :
:
Intensity: 100
Saturation: 0-10
Coverage: 100
Add Frosted Glass
Maximum/Minimum Scatter Radius: 200
Smoothness: 1
Blendmode: Normal
Opacity: 30
___
Yeah, that's a cosmos, isn't it?
___
4. The second Planet
Read above [second chapter] to see the specific way, here is just a conspectus
___
Take your Second planet behind the first and move it away.
Do a transparent Gradient :LinearGradient: :AlphaChannelOnly:
  on your First Planets atmosphere, to get a better look.
___
5. The huge Fireball.
Okay now we will add our Sun.
Make a new layer on top .
.
Make a Paintbrush Dot in the Middle [use Align Object] Radius: 15-25
___
Use Frosted Glass Plugin
Maximum Scatter Radius: ~7.78
Minimum Scatter Radius: 0.00
Smoothness: 2
___
Use Zoom Blur Deluxe, set amount to highest and quality to high
Duplicate layer CTRL + F
Duplicate layer CTRL + F, again
Merge the two lower Sun-Layers down
___
Move your two layers to an edge of your planet
Deactivate the top layer
Make an Transparent Conical Gradient :AlphaChannelOnly:
  on your lower layer.
Blendmode: Screen
Opacity: 255
___
Switch to upper layer and make another Transparent Linear Gradient :AlphaChannelOnly:
Blendmode: Additive
Opacity: 255
___
Add a new layer behind your planets
Draw an white filled Eclipse with Paintbrush tool
___
Do Gaussian Blur Radius: 15-25
Blendmode: Normal
Opacity: 90
___
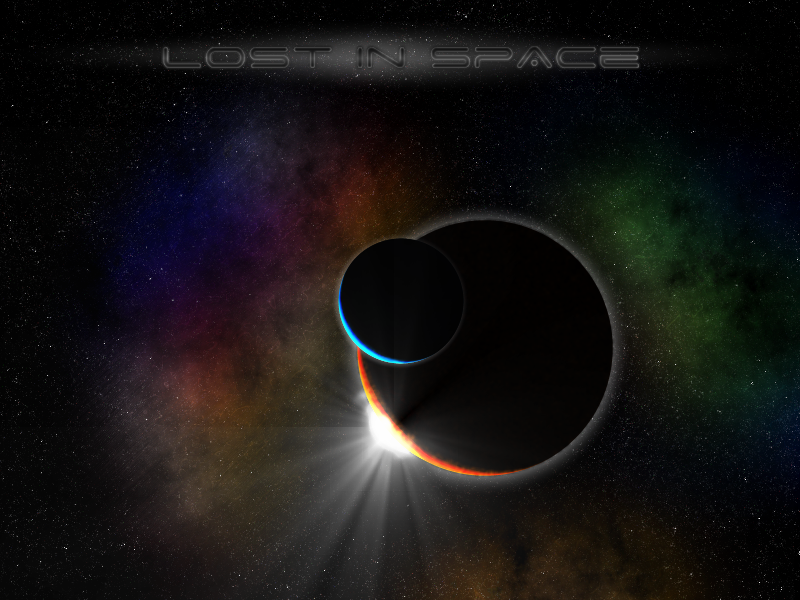
5. Finally you are done.
That's it.
here is your Result:
It looks pretty well, I think
I memorized all Icons, now
Feel free to post your try.
Feel free to correct my English .
Feel free to post suggestions [like how to get a Sun behind the planets].
Started to make this Tutorial: 9:00 PM; finished: 12:31 PM
Thanks MediaMonkey for playing music all the time.
Have Phun.