


lylcoup
-
Posts
40 -
Joined
-
Last visited
Posts posted by lylcoup
-
-
On 6/20/2023 at 6:19 PM, IHaveNoName said:
I don't think there is any hope of you even slightly improving the document's readability by sharpening or increasing the contrast.
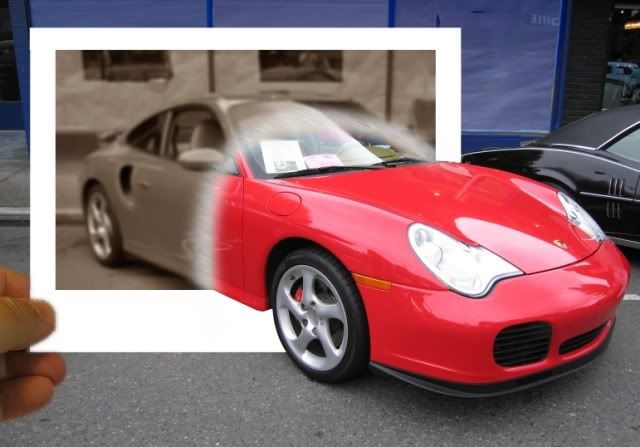
If the original image files are at the same resolution as the one you posted, 480 × 640, you are flogging a dead horse. The finest text detail probably occupies only a single pixel block at that resolution and all that enlarging it will do is make that block bigger. No doubt, you have discovered this yourself.
As ^ ^^ said, the only solution is to re-photograph the document at a far higher resolution, the highest your camera has available. I recently had to copy a till receipt to provide proof of purchase and I was amazed how good my relatively cheap £90/$120 digital camera was when used at its maximum 4K resolution.
But a few other things - for any type of document or image copying always position the camera perpendicularly to the document, not at an angle. Get as close as you can so it fills the screen. Don't use the digital zoom to do that if your camera has that option.
For best results use a tripod or some other form of support. Even with the 'magic' of anti-shake processing it won't be as sharp as it could be if you use such support. For the same reason use the self-timer or a cable release to trip the shutter.
You are absolutely correct. I was just hoping for some possible way to do this, but I knew there probably wasn't anything that could be done especially when zooming in blurs the photo. I wish I had access to this document lol, that would make things so much more uncomplicated! Thank you for your time and assist.
-
On 6/20/2023 at 5:23 PM, BoltBait said:
The best way to deal with this is to take another picture with higher resolution this time.
I would of course, but I don't have access to this document. I only have this picture of it. 😏
-
Hello all,
I really need help with this. I have some pictures of documents that I cannot read as it gets blurry when I zoom in to read it. I try to use the sharpen tool, but it doesn't help me to be able to see the text on the document/pic. I don't have the original document to refer to, only the pictures. It is extremely important that I am able to read the text on these pics...
I am a "newbe" using PDN although I have been using it for years. Is there a way to be able to make the text on a picture more readable? What can I do to make this possible? I am attaching one of the pics in with this message below. Thank you for taking the time to read this, and any and all help is very much appreciated!
lylcoop

-
Is it possible to make it compatible?
-
It's a Samson Galaxy Android tablet
-
Hi I have a Samsung tablet and I want to know if I can download PDN on it?
-
Oh. lol I'm such a noob
-
 1
1
-
-
Hello All,
Is it possible to put thumbnails next to a title in the posts in the pictorium and tuts and plugins so we can get an idea of what the item looks like?
-
On 9/1/2006 at 1:29 PM, entY8 said:
One little mistake
 :wink:
Hello all,
I read that the fonts should be put in the "filetypes in the paint.NET folder, but I thought they belonged in the c/windows/fonts folder. I want to be sure although I think it is the latter where they belong. Could you confirm this for me please? Thank you all you are very helpful.
(Please ignore my sig, I made it years ago when I first started using PDN and haven't changed it lol)
On 9/1/2006 at 1:29 PM, entY8 said: -
We'll help you create your own image - but not do it for you. This forum specifically forbids soliciting for artists/artwork.
But I don't know the first thing about drawing...
-
-
Hello,
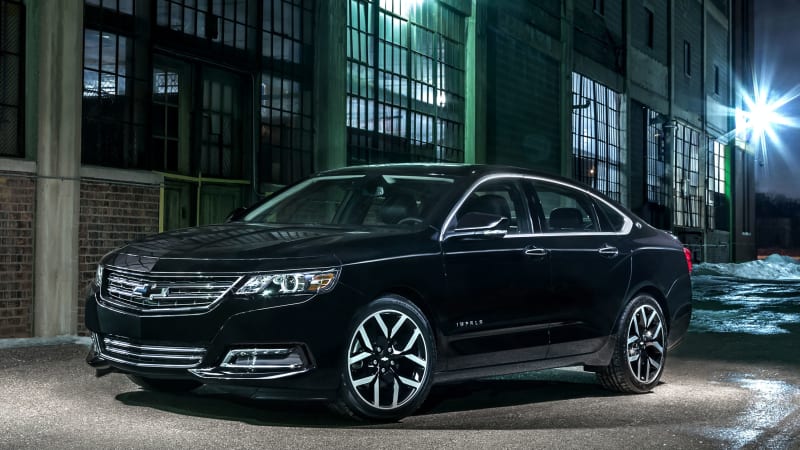
I need someone to draw something specific for me. I'm not good at drawing and I need a comical picture of about 3 or so people bent over... with someone walking on their backs toward a bank. As in someone walking all over other people and laughing all the way to the bank. The 3 people that are bent over should be wearing a black suit or something similar. Maybe with some sweat drops coming from their brow. The picture should have a vehicle in it as well... color black... and 4 door maybe a chevy impala but only year 2008 or above. I have included a pic below. If someone could draw this up I would be eternally grateful.
Thank you for reading

lylcoup
-
Don't be sorry! Tutorials are a great place to start learning about Paint.net, but we actively encourage you to alter, amend, remove and insert stuff to try and customize how the final image comes out.
You've made a really nice job of the parchment too! Great job.
moved? where?
-
Unfortunately the pics aren't available or showing and so can't do this tut

-
Your work is occasionally great, but please try a new layout

Your kidding right?
-
I can usually fix internal forum links. Just make a post in the tutorial thread to let us know the links are not working.
<moved to Paint.NET Discussion & Questions>
There are a lot of them EER, but I will do what I can
-
There are many of these tuts that have bad links or pics that aren't there any more and it is disappointing when you finally find something you want to try but when I go to the tut the links are bad.
-
-
Hello,
I am trying to creat this sig and am having a problem with the scale part of it. When i try to scale it to 150 it keeps going back to 10. It only goes as high as 10. I am wondering if this is why mine wont make the V in the middle. It doesn't dip in the middle. Where am i going wrong?
-
Okay folks I'm getting there, but can't manage to outline the image very well with the lasso tool, and get the white frame round the main part of the shot. Any hints. I tried to do an "easy" shape ( a building) but the edges were all over the place, how you folks manage complicated shots leaves me bewildered and very jealous.
Cheers
Briddo
Hi Briddo,
Did you manage the box shape yet? I used the line/curve tool, instead of the rotate/zoom tool(in the layers tab), because I found it easier than trying to guess the amount to use with rotate/zoom. With the line/curve tool you can manipulate the rectangle much easier. Also, don't forget to use the feather effect (in the effects tab) in every layer to smooth the jagged edges, good luck! I'll be looking for your pic

-
im a little more than confused now. what does cutting out a picture have to do with popping out of a picture.
mrmagoo144
The tut says:
"Then use the lasso tool to select the parts that are out of the picture, making sure that you are going all the way to the picture so that none of the white line shows."
Towards the end of the tut it says to "cut out the parts of your pic that you want out of the frame" , to do this you must select those parts, and follow the rest of the tut to create this effect. I used the line/curve tool because the lasso tool is harder to be precise with. The tut: "cutting out images..." shows you how to do this.
-
Basically, you use the cut-out technique to isolate the subject of your picture from it's background by putting it on its own layer. Then, use other layers to build your picture frame.
BTW, here is one that I did:
wow, awsome job Boltbait. I love how it turns from b&w into color
clever man

-
Hi Briddo,
Did you receive help yet? I too, had a problem with the box, and spent a lot of time with this tut, but I love it. I learned a lot with this tut, it's my fav. And I am new to photo manipulation and graphics as well, but I have discovered I love it. Here's my end result:

Let me know if you still need help... I'll do what I can
Hi Folks, I have been trying this tutorial and really need some help. I am a complete novice at photo manipulation and a bit of an idiot. I can only get as far as step 2, I don't understand how to create the black box or how to proceed any further. You folks are probably having a good laugh but is there anybody who could give me an idiots guide on how to do this tutorial. I need detailed button by button guidance. Is there anybody out there who has the patience to help?Hope you can help
Briddo the idiot

-
@lylcoup very good first post in the pictorium. only things i can see is you have a few ragged edges especially along the top of the picture frame (white portion) and the eagles feathers edges.
Ok Oma thank you very much I appreciate it, and I couldn't figure out how to feather the inside of the frame. I did feather the "box" while making the frame, and I even tried to feather the inside by removing the black part so there was just the frame, but I still couldn't, I even tried to "feather" it by "hand" pixel by pixel lol but all in all it turned out ok thanks for commenting


How to sharpen a photo to read text?
in Paint.NET Discussion and Questions
Posted
Yes, but I don't have access to this document. Thank you for replying 😊