


toxicdj
-
Posts
34 -
Joined
-
Last visited
-
Days Won
1
Posts posted by toxicdj
-
-
I am downloading this for two reasons.
- It looks damn epic
- Myself and my friends fell in love with the word squirkle a few years back and we believe it is a word that should be used more often. So I am willing to support in any way that amazing word and all things related

Decided to play with it a little... and got this

(I did use bevel selection to make it come out better... might make it my sig xD)

-
 1
1
-
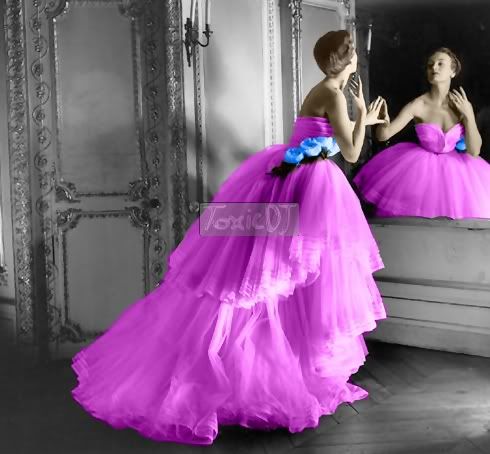
NMD - feel free to use it as a wallpaper. Thanks for the wonderful compliment.
Toxicdj, thanks so much. A bit of a change for me from the jewels.
I love all the art nouveau/deco stuff you do. That was an amazing style period.
-
This tutorial is available as a PDF. Click here to view or download it
When trolling through images on Google, I'm sure everyone has seen pictures with a faint, but still relatively annoying white image over the image you want.
People do this for a lot of reasons. To protect their work from copyright infringements, so people will ask for the work instead of just using it. And in most instances, they are selling their work and don't want it pirated.
Now I dont know how useful this tutorial will be to many of you. But I find it never hurts to have a watermark handy in any case.
This is a very simple tutorial, but very worthwhile.
Plugins Needed:
CustomBrushesMini
Now... on with the tutorial...
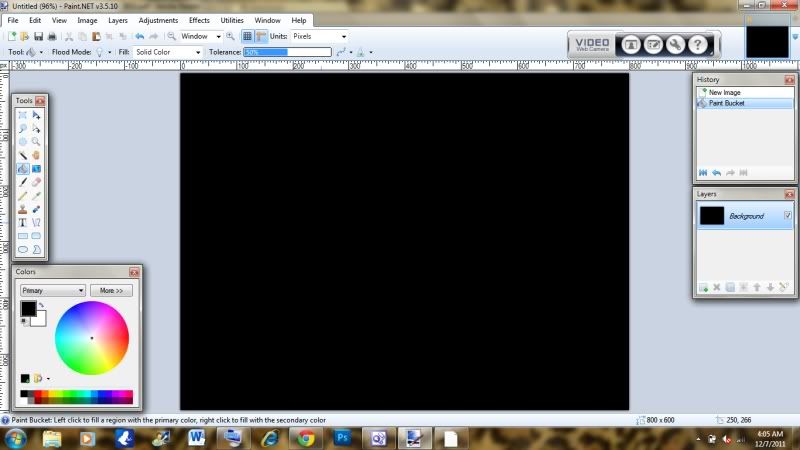
Create a new document. Size and resolution dont matter. But I usually use W:800 H:600 Res:300.
With your primary color set to black, use the paintbucket to fill in the background. This layer is not permanent. It will just make your watermark easier to see.
Create a new layer. This is the layer your water mark will be made on. Here you can do whatever you want. I'm going to use my current sig.
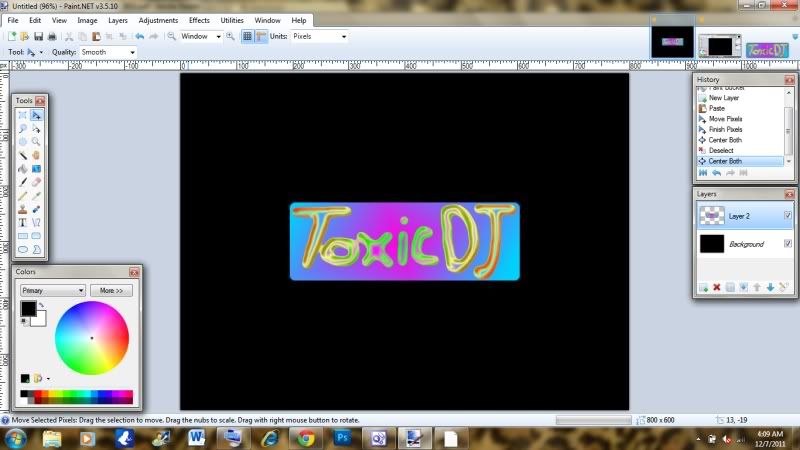
So now you should have something that looks similar to this. The placement doesnt really matter. I just prefer it in the middle.
Now as I'm sure you have all noticed, a watermark is usually grayscale and somewhat transparent. So what we are going to do now is go to Adjustments/Black and White.
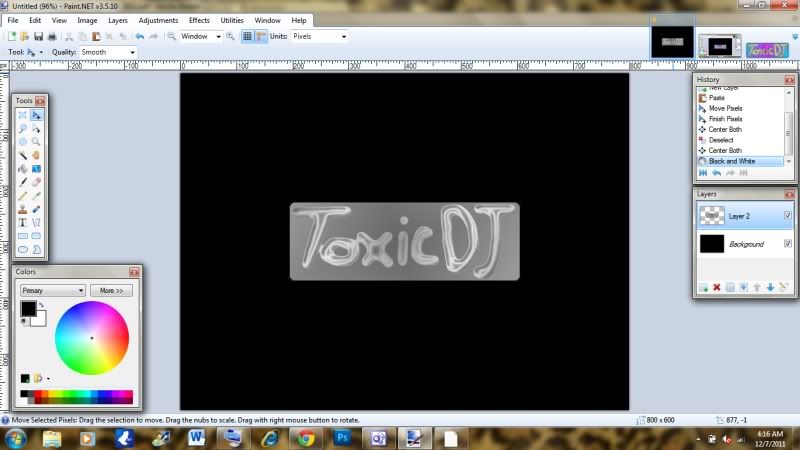
It should now look something like this.
Now select somewhere other than your watermark and press Ctrl+I to invert the selection, then Ctrl+C to copy it to the clipboard. Create a new document and leaving image size as is, set resolution to 300.
Create a new layer and delete the original background layer.
Press Ctrl+V to paste the image onto the canvas.
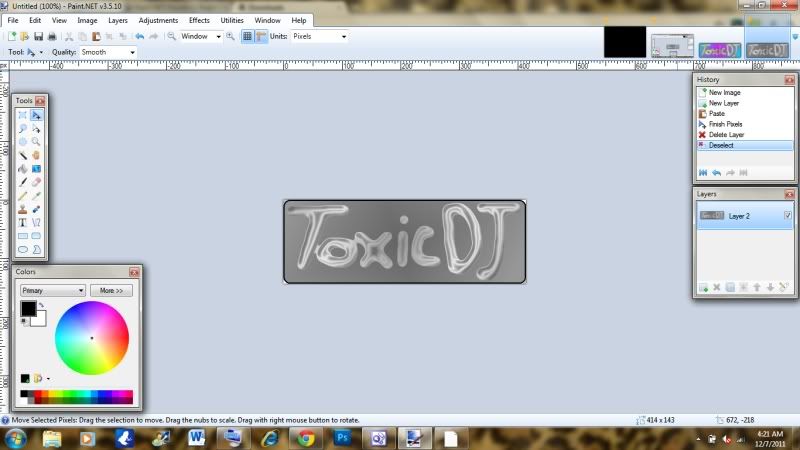
Size doesnt really matter here. In fact the larger the image the better.
Press F4 to bring up "Layer Properties" and set opacity to 120.
it should now look like this:
Save the image as a .png, and open up a new document again.
change the background to whatever, then go to Effects/Tool/Custom brushes mini.
Click ":Add new brush" and load your image.
Resize your watermark to however you want it, then WOO HOO! You're done!
Here's my finished product: (Artwork under watermark done in Photoshop and for demonstration of watermark only)
-
Can someone lock/delete this? I've figured it out xD
-
Is there a way to make transparency on custom brushes?
I had an idea to make custom brush sets similar to those used in photoshop.
I know in Photoshop, Custom Brushes are done with opacity maps With white being transparent and black being full color and all the greys in between being different levels of transparent.
I've tried doing that with custom brushes mini and I've also tried making the images transparent, but I just cant seem to make it work. I can get either completely solid and completely transparent. But nothing in between...

-
I'm loving the new content Barbieq... they look great
-
UPDATE
Added new section and pic... Enjoy
-
EDIT: awww...jim beat me to the shape 3D addition xD
Great tutorial! I revised it to work with shape 3D and used welshie's suggestion
 Keep up the good work!
OMG Thats amazing xD
-

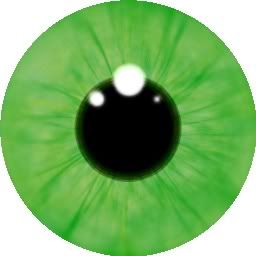
A radial gradient helps get a more spherical shape

I enjoyed this tut. I'd never used Random Lines before. Could be wicked for abstracts
But for now, I'll keep playing with this tut before entering Aislin's competition Well I must say yours looks a hell of a lot better than mine, and fixes my shading problem. I didnt even think of using a radial gradient-facepalm. Which steps did you do it on so I can update the tut. I'll credit you with the idea of course xD
-
1
-
-
Very clever. Nice touch using Inside Out
... a bit of tweaking and playing and it's potentially totally realistic
(But don't quote me on that - I'm not one of the portrait makers )I'm sure with some tweaking and some patience that you could make it a realistic eye. With eyes realism is all in the shine I think. I'm working on a way to make a more realistic shine to the eye so when I do I'll add it to the tut...
-
hmmm idk then... maybe pm one of the admins... they might know whats going on. I remember having a bit of trouble with pdn when I ran on Vista. I think it is just one of the fails of Vista.
-
awesome! This would help me with my SL avi's!
I'm not too sure how the store on SL works, but you could even make some up and sell them. Thats my plan for IMVU haha...
-
I was a bit confused when I signed up. But I agree with @david.atwell... There really is no need for them. People spend most of the time in the forums, not trolling profiles... Really no need to have them...
-
I just reinstalled PDN and it's still not there.
Hmmm... maybe re download the .dll and copy it over the original one?
-
OOOPS! So they are! I have been doing fish images for a while & I have them on the brain.
I can see how they look like both. But I'm running on sleep deprivation... so if someone said they looked like candy canes, I would probably see candy canes as well lol.
But they are pretty epic. Love em
-
Its working fine for me...

Maybe check and see if the .dll files are still there?
-
Thank you both so much
I'm glad you both like it. And thanks for the links... I couldn't remember which came default with PDN or not... -
Love it... my outcome is my sig... obviously lol
-
I'm impressed! A very nice tutorial.

Thank you.
(your first 'rep' point is well deserved
 )
)Thanks Very Much.
I really hope this comes in handy for someone as it will for me
-
Nicely done! I'd pull back slightly on the jitter, but that's just a question of preference. Otherwise, it's even better than I was asking for
While I'm here, very well-written eye tutorial. Now I have to see if I can use it with the 3D eyeball tutorial for even more coolness
It would be pretty awesome if the two did work together

I was thinking i might need to slow down on the jitter as well... will do so on my next hair texture
-
- Popular Post
- Popular Post
This tutorial is available as a PDF. Click here to view or download it
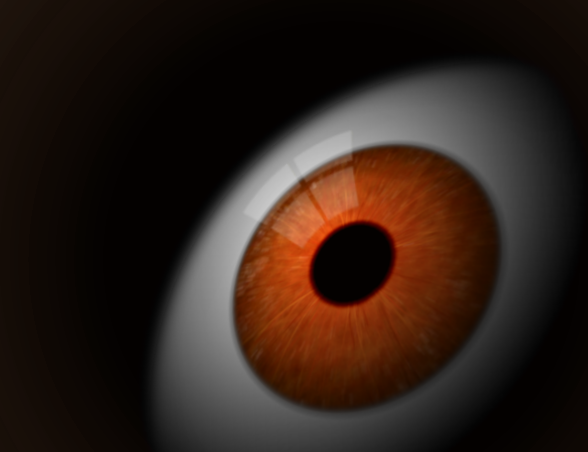
I saw @Ash's tutorial on making realistic eyes (find it Here) that inspired me to write this tutorial on Semi Realistic eyes. These are great for things like IMVU/Second Life, Blender, Poser, The Sims 2 and any other game/program that calls for a flat image over a 3D one. I pre wrote this so I could get some advice from friends, so, without further ado... My Semi Realistic Eye tutorial...
You will need the following Effects for this tutorial:
Zoom Blur
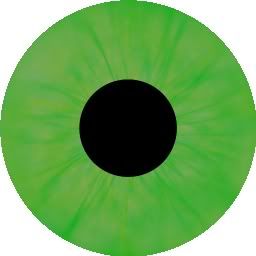
Here is a finished version of the eye:
Of course this is only the basic eye. I have no idea how to do shading etc.
Anyway on with the tutorial...
Start of with a blank square image. Size doesn't matter, but for this tutorial, I will be using 256px2
Choose your first two colors. Keep in mind these are the darkest colors for your iris. I'm going to use #00AE11 and #87AD1F (Copy and paste the HEX codes for these, you will need them later)
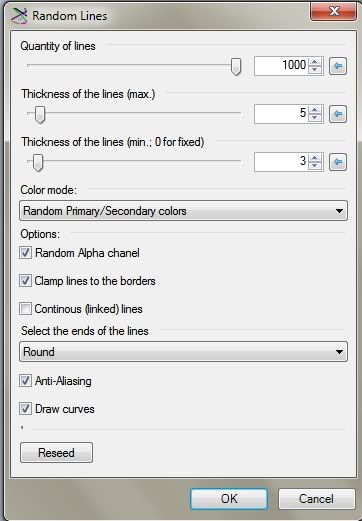
Go to Effects/Render/Random Lines and set it up like this:
Now lighten the colors you are using. I'm going to use #56AD5D and #94AA55
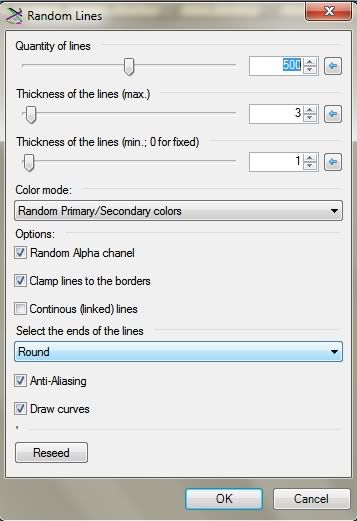
Go back to Effects/Render/Random Lines and set it up like this:
Lighten the colors again. I'm using #80AA82 and #9DA87E
Again go to Effects/Render/Random Lines and set it up like this:

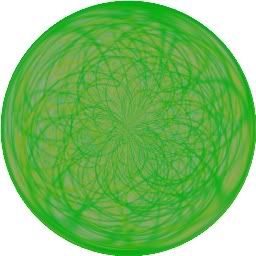
Go back to your original colors and keeping the settings the same this time... do random lines again.
Now go to Effects/Distort/Insideout.
Your image should now look similar to this:
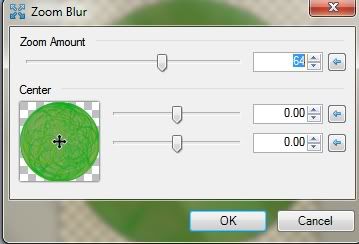
Click the magic wand and set it to global. Click the background of your image and then pres Ctrl + I to invert the selection.
Go to Effects/Blur/Zoom Blur and set it up like this.
Create a new layer. This is your pupil.
With the circle tool, create the pupil. Make sure that it doesnt dominate the eye, but not too small that it underestimates the eye either.\
Go to Effects/Object Align/Align Both to make sure it is centered.
It should look something like this now:
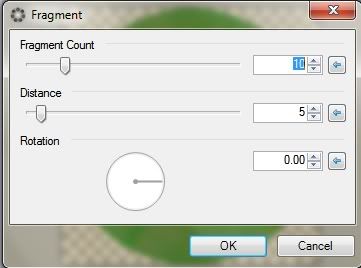
Now go to Effects/Blurs/Fragment and set it up like this:
Create a new layer. This will be the shine on the eye. You can do shine many ways, but I prefer to use dots. The shine is what adds the realism and life to the eye.
So using a white brush, add some shine around the pupil maybe overlapping onto the iris. Its really up to you.
Now go to Effects/Blurs/Average Blur and set it to a radius of 4.
Flatten your image and save.
There you go a finished, semi realistic eye.
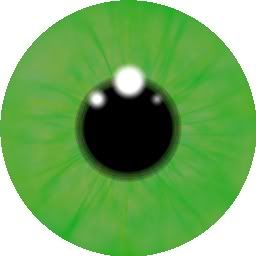
From here on in, you can do what you want with it. My eye is a bit dull, so I messed around with curves a bit and am finishing on this:
Well I hope this tutorial has helped in some way. I remember I used to struggle making eyes like this, and as I fail at painting (Both in real life and digitally) I used to make it with lots of jitter, Polar Inversion and came up with half rate eyes. Now I do this and it is not only easier, but faster once you get the hang of it.
You can see other versions of my eyes using the same technique here in my gallery under "Eyes".
Please post your creations underneath in the replies... I would love to see what you have all come up with.
-
10
-
UPDATE
Added new Section "Eyes"
Added three files to "Eyes"
lol, i actually didn't like IMVU or maybe thats because i didn't understand how it works or so... but i would love to see more textures :-)
IMVU is hard to work around. I think its because instead of moving around with the arrow keys, you press certain spots on the floor, furniture etc...
-
I am so glad to see more people busy with virtual world art and stuff, for a long time I was the only one on this forum who made pictures of secondlife avi's and edited them... Do you take pictures of IMVU avi friends?
anyway, with those hair textures you could open a shop in second life ;-)
great thing you do, I hope to see more of it
Ive tried second life and I can honesty say I dont like it. Yeah, I love taking pics of my friends on IMVU. I often create for them too.
I dont do edits of avatars often, I prefer to just make textures and stuff. If you have IMVU feel free to add me on there, Click here to add me
-
Nice additions to the textures. Love the red one.
xD Thanks... I'm going to be adding some Punk/Goth ones soon as well... and am thinking of adding more to my Fabrics collection too


ToxicDJ's Gallery
in The Pictorium
Posted
Thanks... i have a tut up on them