


Flipper
-
Posts
27 -
Joined
-
Last visited
Content Type
Events
Profiles
Forums
Blogs
Gallery
Downloads
Posts posted by Flipper
-
-
I start with this and duplicate the layers

I then fill in the boxes:

I will then get rid of the grid

As you can see, it has "slices"
I use outline to fill them in

Once I do that, superimpose the grid layer
you can tell that I am not past the grid

Is there a way of reverse outlining so that the outline starts at the "New" edge then goes in X amount of pixels? (image not very readable- red text says outlined edge, Blue text says original edge)

So if I oulined in red I could then cut the red out.
Hmmmm... I guess I could outline the black ?
Thanks!
-
so I have a grid set up. say 10X10 each
I then fill in each square of the grid.
I get rid of the grid, left with 10X 10 squares next to each other separated by 1 pixel
then I do an outline to quickly get rid of the spaces between each square.
now I I have 12 pixel wide line
now I would like to do an Inline (negative outline) to reduce the line back down to 10 pixel (or less ) wide line.
Since it is not exactly a straight line, but rather than a zig zaging line I can't exactly use the pixel selection tool.

-
Hopefully this will make sense.......
Using Anim8er to make a movie sequence of someone walking.
export images as BMP images.
Select the walking guy and delete the back ground
Found that the walking dude is a little high in the picture. ( I want it 8 pixels from the bottom, not the 16 pixels it currently is.)
I will be cropping each picture.
is there a way of selecting the exact same crop area over 200 pictures?
In the mean time I will change the cmaera angle to compensate the height.
Is there a way of using a plug in such as the ALIGN plugin to position the image to a particular point?
-
At the risk of sounding like I am splitting hairs......
I do have a question about necroposting Rule # 11.
Why is it that bad?
If I search for something, and a very old post comes up and I have a question about it, why is it against the rules to post to it. Wouldn't it keep things streamlined? (all things about subject x in 1 post no matter how old). I understand the relevance of this rule on some forums, and for some subjects on this forum. (I see a post about Hitler last entered in 3 April 1944, I think I will ressurect it with me saying Hitler was bad) but this is a how-to forum for the most part. How something worked 2 years ago still applies today (2nd exception to this would be reference to rule #7 - latest software . did latest software fix issue and no longer pertainant?)
Just my opinion, (or maybe I am trying to prove that I read the rules
 )
) -
@ Sarkut...Same concept but your procedure is MUCH MUCH better

-
possibe long term solution:
If all images have same background, Select the triangle with a Rectangle select, tool lasso it, or just erase it with eraser.
pickup adjacent color then paint bucket area.
copy that area, and then paste it into each picture, thus eliminating price.
Next make triangles with prices and save each one.
3rd open new file import picture on one layer and price on second layer.
-
when you "save as" what file format/ settings are you using?
-
Will this work:
Layers > Flip Horizontal
Grrrrrrr.........
yeah, of course.....and flipping vertically then bringing it to the bottom, then flipping hoirizontally again should give me all 4 sides
Thanks, sometimes I get looking in one direction and forget to look at the obvious
-
I am working with an isometric flat drawing

I am wanting to rotate it so it is

Rotating the original unfortunately won't give the second result (would make it a diamond going verically)
I rotate using the selected pixels then I have to resize. The resize doesn't quiet get it (notice the upper and lower corner), is there a way of getting close like I did, then selecting it and paste it so that way it is the say dimensions as the first pic.
-
guess I should double check my spelling......
palette not pallette.
got the plugin thnaks!
-
I have a small picture that I would like to create a custom pallette off of.
Is there a way of importing the colors off of the picture and into a pallette (other than coller picker tool). Is there a way of then sorting the colors within a pallette?
-
-
I have several pictures that when I shrunk them they develop a "ring" of sami-transparency.
I was wondering how I can convert those to their full opacity.
I found using curves+ helped but also converted my full alpha to black and thus caused another step to remove that. Fortunately my image was eassy, I can see how som images wouldn;t be easy in the future.
to clarify...
alpha = transparency/opacity?
full alpha (can not be seen) is value 0? fully opaque value = 255?
so for my application if alpha value <255 and >0 then alpha value = 255
-
Ah ok wasn't sure if you came up with an easier way
-
Wow,
That is excatly what I was looking for.
To give myself credit, my image did look a little but like pdnnoob's but I was so focused on it one way I failed to tryit the way pdnnoob suggested....One of those forest for the trees things.
Thanks for all of the suggestions on the perspective thing, I will have to try them all and descide which works best (or easiest if all have same result)
OK had a chance to play a little and for the life of me I can't get the plane view to match up to yours, I have been able to obtain the same result but would love to get the actual setting to the 2X1 perspective (2 run X 1 rise)
-
thanks I will give that a shot.
Using those settings in Layer Rotate/Zoom tool gives you a perspective plane rather than isometricCan you elaborate on the difference? Is there any plug in that will let you select predefined perspective?( dimetric, isometric, any others that would be used)
-
after doing some homework I found that using layer zoom/rotate gave me the best results of turning a 64X 64 lava image (created using clouds and the "hot" setting of gradient mapping) into an isometric view.
Officially I am using Angle: 45 , Twist angle:90 ,Twist radius: 70, X pan 0, Y pan .3, and zoom .75x
any suggestions are welcome on above settings.
the question is how to get it bubbling. Objective: have a lava bubble break the surface and then pop: 8 frame GIF
tried using bulge, ripple and at least two other distorts, but due to the small size I can't get a desired effect. Doing it large then shrinking tends to just distort it.
I then tried using a 3d object sphere with a bright yellowish Lava skin and was going to have it "penetrate" through the plane of the isometric image, but couldn't get that to work (is there anything that will actually turn this into a 3d plane or will a true 3d program be needed?).
I have exhausted my ability ( didn't take long) and now I humble myself before the experts
-
@ Godzilla very nice an ddestructive.
@KMT I love the shadow and lighting.
Here is my attempt
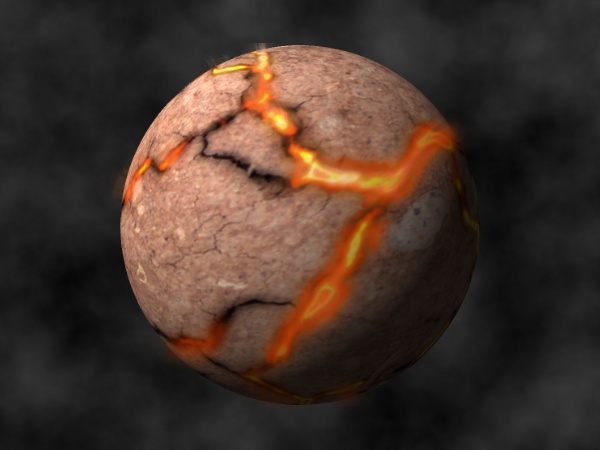
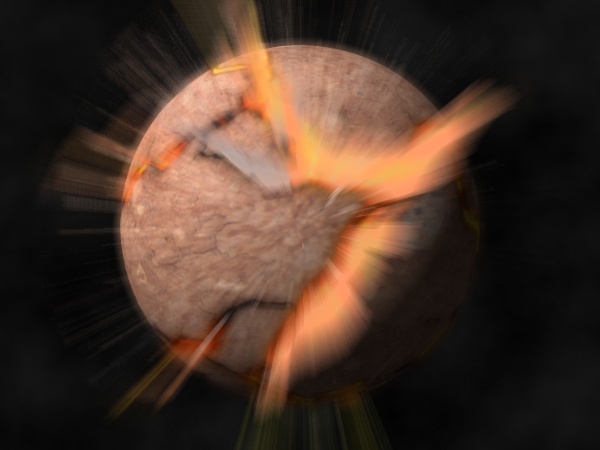
Mercury finally has enough
I did use dried mud shaped onto a 3d object.
-
I don;t care how old it is, this tut is new to me
had to make the gas cap door a circle again. Image from:?
-
First off I tried the mirror over line plug-in but unfortunately it crashes Paint.
What I have is a picture of a Lava stream.

(Yes it is only 32X32)
What I would like to do is make it go around a corner:
My solution so far:
copy image
paste into new layer
rotate layer 90
lasso select diagonally half the top layer
delete
Merge layers
Use clone tool to round of corners

(still only 32X32)
Problem is I need to repeat this 9 times with 9 different images with pretty much exacting results.
(this is an animation sequence)
Is there a script or macros tool (recorder) to accomplish this?
and if so, will it also work with the Quad Reshape? I need to convert these tiles to something like this:
 (yes yet another 32X32 with at least 50% alpha)
Since Quad Reshap doesn't have values for the "handles" I must do it by sight and finesse (I got good sight but the finesse is lacking).
If I do it all in the same session it remembers the reshape but once I close..... must start the reshape process all over. I do try and use a layer to trace to, but it still a lot of trial and error.
-
just downloaded and used the quad reshape . Vey nice. It will make my life so much easier.
One wish list item: coordinate values. I will be converting about 25 32X32 images (turning counter clockwise 45o , then squashing it in half) Since these images will be tiles in another app, they need to fit together. Having a level of precision will be a majore time saver.
Thanks again.
-
That is great, only gripe/wish is a that coordinate value be shown for precise manipulation.
(ok, this probably should be posted elsewhere my apologies in advance)I have got to say that all of these plugins are amazing and that it is only because of your guy's talents and generosity that make PdN the wonderful tool that it is.
I am of the nature that will try higher end (for me) applications, but will do without if I "have" to pay (I have donated in the past for apps). I have a hard time paying for something that a) I deem over priced
 a fair value, but will not use more than once or twice.
 That being said I will be throwing a few bucks out there once I sort out what plugins I have, which ones I'll use, and then who wrote them.
-
Actually I tried that first.
It only changes it ti a diamond with out any depth
Would be great if as selected square with points ABCD at x,y cordinates could be edited to have the points reassigned to different xy cordinates and have the image skewed accordingly
If that cannot be done, then is there a way to apply a skin to an area with a way to set th eangle that it will be applied? (havem;t searched for skins yet will do now.
-
I have a 32X32 Picture. 01.png

Keeping the 32X32 dimension of the picture, I want to rotate and scew the image to resemble 10662.png

I have used some plugins....the closest I got was the 3d object render (which is fantastic), use either top or bottom of the cube and manipulate it .
I have tried doing a search through all the plug ins and was unable to find anything relevant.
I am new to do anything sophisticated as far as graphics go,
if there is not a plug in, then can anyone walk me through how to do this?
This would have come in handy on my first project:new creation.bmp
Keeping a proper perspective on the floor is a pain. Made a second attempt using the checkerboard plug-in then applied that to the 3d cube.


 a fair value, but will not use more than once or twice.

SOTW#245 - A Slice of Pie!
in The Archives
Posted
First attempt. Couldn't resist going pumpkin