


xmario
-
Posts
69 -
Joined
-
Last visited
Posts posted by xmario
-
-
Thanks for the feedback!!
If you are interested in my opinion, I really liked the first ball.
 The second ball has no shadow.
If interested, I developed the glass theme. I won
 a glassy human.
-
Another use the main idea of this tutorial
From this

To this


-
Thanks for using my orb and adding those extra steps at the end. Definitely looks even better now.

Thank you! The outcome will be even better if experiment with Gaussian blur. But it's all so individually.

Eh... It's a great pity that the paint.net doesn't have a free transformation tool...
 it would easy make a transparent human head, if it be...
-
This is great! Thank you Goonfella! I realized what is missing in this tutorial.

Last step.
Create a new layer above.
Select an area on the new layer that covers up the ball.

Use Paintbrush tool and draw a shadow, like so.

Do at the selected area a Gaussian Blur at a 50px radius.

So it looks more realistic

-
^great tut, real simple, heres my go at it
It was just great!
Although you saved on the highlights 
-
How to draw toy dog in paint.net using Gaussian blur
This will be the end result.

Plugins optionally needed:
This tutorial is not difficult, but rather lengthy. There are the links therefore.
This tutorial contains various ways that can be useful for drawing other images using Gaussian blur in paint.net.
There are a few examples of the other pictures drawn in this way.
-
Русская локализация была добавлена в версии 3.5 (http://blog.getpaint.net/2009/11/06/paintnet-v35-final-is-now-available/). Конструктивные замечания по переводу приветствуются, добавляйте в эту тему, обсудим.
Спасибо,
nik
А почему в этой версии два русских языка?
-
nice effect!
no more magic wand!!!
 (maybe not, but still, xD)
Magic wand is more powerful, more sophisticated and more universal tool than this effect....
But it was a good joke 
-
Version 2.0 of my effect «cut color»
1. I changed the color tints defining algorithm.
2. The effect has now the third type of action - removing color as the background.
Illustrative example. Let us suppose that we have a picture with soft edges.

Suppose that we want to change the background color to black. So will look a picture, if you use the "magic wand" tool. Soft edges are lost.

Let's use effect “cut color”. UI have new action «remove color as the background».

The result is below

Add below a new layer with a black background.

-
I agree with goonfella, your's has the best outcome!
Thank you!!
The outcome will be even better if you apply a Gaussian blur and gradients. But it is impossible to write a universal tutorial. It's all very individually. These are some examples that are made only Gaussian blur


-
looks good although we have lots of this sphere tuts.
Yes! At this forum published many tutorials about balls and glass. Because the sphere is a basic element of many images. In the case of this tutorial objective was the glass transparent Green Apple.

How is it done? The basic principles described in this tutorial. In addition I have used other lessons in this forum, which we have lots of this sphere.

-
This tutorial is available as a PDF. Click here to view or download it
How to draw transparent glass ball in paint.net.
Example #1

Example #2

Plugins not needed
 Description of this tutorial in Russian
Step #1.
1.1. Create a new image in paint.net.
1.2. Fill in the background gradient from black to white.
1.3. Create a new layer. Select the oval or circle area.
1.4. Fill the selection with the linear gradient of the dark colors.

Step #2.
2.1. Create a new layer above the layer with the black circle.
2.2. Select the oval or circle area, but smaller than the size of the black circle.
2.3. Fill the selection with the linear gradient. Primary color #0096FF Secondary color #00F9FF.
2.4. Apply effect Gaussian Blur. Radius 2.

Step #3.
3.1. Create a new layer above the layer with the blue circle.
3.2. Draw a white oval.

3.3. Use the linear Gradient transparency mode.

3.4. Select the oval or circle area.

3.5. Delete the selection - DEL.
3.6. Apply effect Gaussian Blur. Radius 2.

Step 4. We’ll make shine
4.1. Create a new layer between black and blue circles.
4.2. Draw a line and a small oval. Use the most vivid color from the colors on the ball. In this case #00F9FF.

4.3. Apply effect Gaussian Blur. Radius 4.
4.4. Apply effect Glow twice. Radius 20.

Step 5. We’ll make shine
5.1. Create a new layer above the layer with a blue ellipse, but below a layer with white crescent.
5.2. Draw an oval. Use the most vivid color from the colors on the ball. In this case #00F9FF.

5.3. Apply effect Gaussian Blur. Radius 10.
5.4. Apply effect Glow three times. Radius 20.

Step 6.
6.1. Just as we did in step # 5, make another shine behind the ball.

6.2. Just as we did in step # 5, make another shine below the ball.

Step 7. Shadow.
7.1. Create a new layer below all layers, but above the background layer.
7.2. Draw a black oval.
7.3. Apply effect Gaussian Blur. Radius 100.
That's all!
 Description of this tutorial in Russian
You can create a new layer above all аnd add an any transparent image. Then you get the magic sphere.

-
But please change your screenshots to JPG or GIF so people with slower internet connections don't have to wait forever to see it

But they are JPG
 Maximum size 30Kb
 -
This tutorial is available as a PDF. Click here to view or download it
How to make glass object
It's a simple tutorial how to make objects from photos to glass like this

or this

Let's start.
1. Take an picture on a transparent background

2. Select the image and apply adjustment «Brightness /Contrast», to make the image more contrast.

3. Apply the effect «Gaussian blur» tо the selected image. Radius 5.

4. Apply the effect «Emboss» tо the selected image.

5. Apply the adjustment «Curves» tо the selected image.


That’s all! You can make the outline clearer if you apply the AA's Asistant and/or DropShadow.

You can change color with the effect Monochrome Ink on Paper.
You can change the background. Set the layer blending mode to «Multiply» in this case.
-
 1
1
-
 2
2
-
-
The effect to cut one color and shades
ZIP: Cut Color Effect
The effect is available in the menu "Effects" - "Color".
Cut Color Effect has parameter «Color to leave». Pixels of a different color are now shown transparent or black and white.
If color has many different shades, you must specify the error in the definition of shades of color. 0 is the exact hit in color, maximum 90.
Example # 1 Recolor
Recolor only a car green

Create a copy of a picture on a new layer and apply the effect "Cut Color"

Now we can use Ed Harvey Effects or Curves Adjustment

Example # 2 Replace the background
The original image

Create a copy of a picture on a new layer and apply the effect "Cut Color", then replace the background.

Example # 3 Black and White background
A color image to black and white background

-
Please advise me:
Can the effect resize the selection??
-
csm725: Sorry, if you don't like translation. But it was not the translation. It was a simplified version of Your tut.
In any case, at the bottom of the description there is a link to your original text in English.
http://paintdotnet.forumer.com/viewtopic.php?f=31&t=32840 Thank you for your tut. It's a great!
-
This tutorial is available as a PDF. Click here to view or download it
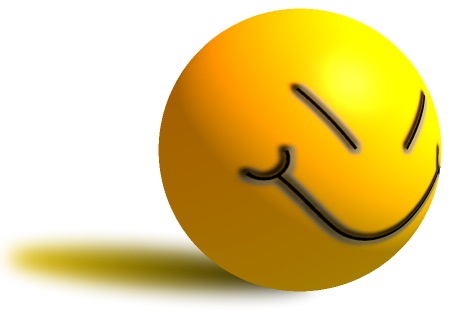
How to create funny 3D smile like this
Plugins needed:
Step #1
Start out with a new canvas, 400x400.
Set colors (Hex):
Primary: ff8800
Secondary: ffd700
Put a linear gradient from top left corner to bottom right.

Step #2 Draw the eye and smile
Create a new layer.
Use Line / Curve Tool to draw the eye and smile in a new layer

Use magic wand tool to select free area around eye and smile lines.
BoltBait Bevel Selection using the default settings

You can remove the effect around the edges of the picture. And you can not do it. Edge perhaps will not be visible.
Merge layers.
Step #3
Apply plugin Shape 3D to create funny 3D smile using the default settings
"Texture Map" = "Plane map".
"Object Rotation": Y =30.
"Lighting" - "Direction": X = 0,75
"Ambient Lighting" = 0,65.

Step #4 Draw a shadow
Create a new layer below layer smiley. On this layer select the area and fill it with black, or gradient.

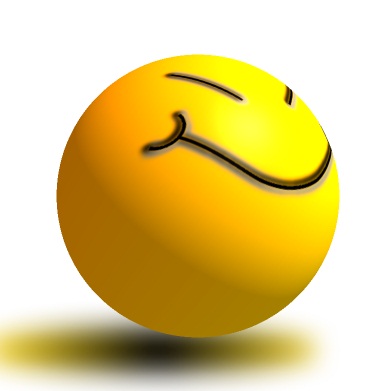
Use Gaussian Blur. Radius 20.
The result was the top. Here is another version.
 Tutorial in English
 Maximum size 30Kb

Transparent glass ball and magic sphere
in Creations
Posted
Wow!! Cool!!
But I would add a shadow to bangles links. It would look more realistic. So it seems to me...