


mindshift
-
Posts
23 -
Joined
-
Last visited
-
Days Won
2
Posts posted by mindshift
-
-
I also couldn't get the clone tool to work, and would get the message:
"Could not use the Clone Stamp because the area to clone has not been set. Use Ctrl+Click to set the anchor point."
My problem was definitely caused by a worn out keyboard. Thanks EER.
-
Check out this tutorial on creating bricks for a wall. http://forums.getpaint.net/index.php?/topic/22546-brick-wall-100-pdn-image-heavy/page__hl__%2Bbrick+%2Btutorial__fromsearch__1 You can turn the bricks on end if you prefer. Ater you've finished making them use Layers>Rotate/Zoom to lay them down. Perspective is a plugin found under Effects that may help also.
-
Try to remove the current background completely using the Magic Wand. Click on an area you wish to remove with the Magic Wand. The selected area is highlighted with blue. Make sure as much of the area as possible is selected, then press the Delete key. You might need to adjust MW's Tolerance (in the area just above the canvas work space), but that is the quickest way to remove the wrinkles, shadows and such. Use the Eraser to remove anything missed by MW. Then replace the deleted area using the Paint Bucket tool. Alternately, you might try painting over the MW selected area with the Paint Bucket tool. The choice is mostly about which method is most efficient and effective.
-
Your link (This One) took me to a blank page that probably used a simple gradient from black to dark gray drawn from top to bottom. That is all I saw.
-
Here is a screen shot of the Rotate/Zoom window with the image below it.
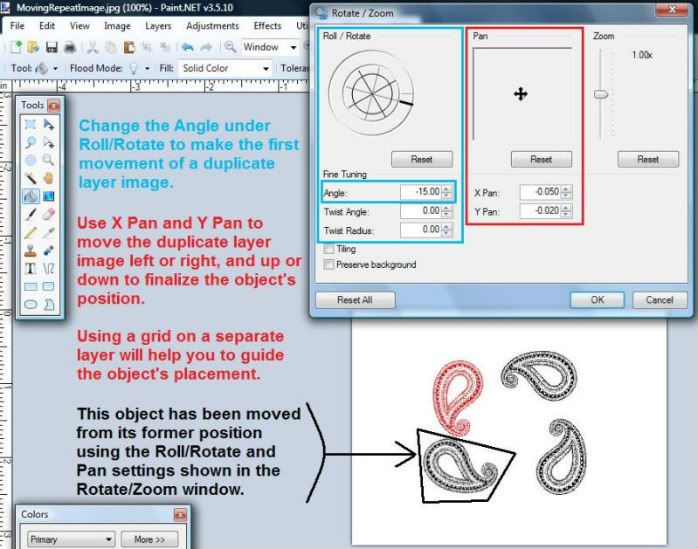
Use Angle to make the initial swing of each layer's object. Any angle can be used. I used 90º increments because it was fast and easy.
Use Pan to move the rotated object to it's final placement. You can go back and forth between the Angle and Pan until you have the object exactly where you want it.
Move each layer's object separately. NOTICE: the Rotate/Zoom window will be set to whatever numbers were used on the previous layer, and the next object will be immediately moved to that point. You can start there, and increase/decrease the degree of angle. This should be fine for your need. Or, click on the Reset button to return the next object to its original location.
-
Make your light blue drop on a layer with a transparent background and slightly off center. Duplicate that layer 3 times so you have 4 layers plus the Background layer. Use Layers>Rotate/Zoom to move each duplicate to a new position. You can add another layer above Background with a grid or circle to align each layer's drop. Here is what I did by rotating 90º. The red paisley is the original.
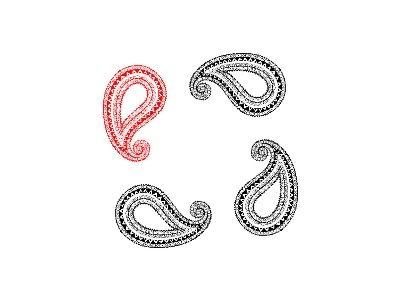
Rotate/Zoom can be used to position an object outside of the original rotation using the Pan X and Y coordinates. It is best to work near the center of the canvas as rotation can move an object completely off the canvas if it is originally near the edge.
-
I understand how if A4 is your standard size paper you would want to change the default, but it would seem simpler to just change the canvas size before you begin a project. Click on Image>Canvas Size and choose centimeters for the Print Size. I think A4 is 297 x 210 mm so enter 29.7 and 21.0. The resolution will appear to change, but is actually only adjusting to the smaller size of the centimeter.
-
Paint.NET is for creating and processing images, not words. I can't speak for every computer/printer set up, but PDN always defers to my Epson Photo printer, giving me only the choice of photo-sized prints of wallet, 4x6, 5x7, etc. It seems you already know you need to use Word or some other word processing program to print out business cards. All of the business card sizes in my Word program are 2" tall by 3.5" wide. Measure yours if you believe it is another size.
Using Word's Insert>Picture>From File I can add an image, but if it has a different ratio it won't fit without being stretched or squashed in some manner. By moving the Left Indent, Right Indent, and First Line Indent markers to the business card edges an image can fill the entire card's width; however, there is still a minute area at the top and bottom of the card that cannot be filled. Other word processors may allow color to every edge, but not Word. I suggest you allow a white frame around the image on the Logo side of your business card.
If you produce the image in PDN you can start with a 4 x 7 inch canvas, or larger, then reduce the final image to fit your card. Just keep the Maintain Aspect Ratio button checked. The more detailed the image is the larger the initial canvas should be. The final image you insert must fit the area allowed by the arbitrary margins of Word. If your business cards are centered on their sheet it is much easier to flip the page over to print your information on the reverse of the logo. I recommend you do one card for practice to see if there are any other issues.
-
Basically you need a brush or brushes to create the layer below the text. Either you should download and convert brushes as shown HERE. Or, you should create your own brush by deleting the white from the PDN background, creating a brush image, then saving it as a .png file to preserve the transparent background. Do this first.
Add a new layer. Type your text, and center it with Effects>Object Align. Name this layer Under Text, or Brush, or whatever. I find it helpful to change the color of the Background to something besides the color(s) of the text and underlayment. Unless you already have a particular text you wish to use, may I suggest JF ROCK available at dafont.com.
Duplicate this layer and name it Text. Return to the layer below. Go to Effects>Tools>Custom Brushes Mini. Custom Brushes Mini along with Smudge and Splatter all open another window that only shows the selected layer you wish to work on. Select the brush you want to use as well as its size and the color you wish to use and stamp or paint over the text. When you have this looking as you want click on OK at the bottom right. If you wish to tilt individual letters, I suggest you select, cut and paste each one into a new layer, then use Layers>Rotate/Zoom.
I made this example by twice outlining the Text in a contrasting color at maximum settings (Effects>Object>Object Outline), then selecting the outline only, and cutting and pasting it to a new layer. I moved this layer below the text, then used Smudge. I then used the Recolor Tool to change the smudged, colored outline to black.

-
I wanted to do the same thing today. The dashes were too close together and too dark. I changed the Fill type from Solid Color to Dashed Horizontal to get more space between the dashes. However, this only works for horizontal lines. The only fix for increasing the space between dots/dashes is to Zoom in 200% and erase every other mark.
-
If you saved your .png cone file without a background, you should be able to Select All, Copy, and Paste the cone into a New Layer over the .jpg background. Open the .png cone file. If it has a white background use the Magic Wand tool to select the background and press the Delete key, then Select All, and Copy. Open or return to the .jpg background file, and click on Edit>Paste in to New Layer. This makes it easier to move the cone around and resize it.
-
 1
1
-
-
Try looking through the Tutorials for an answer to your question. I found this. It is one person's way of painting, which is what I think you are asking about.
-
When you want to slice off a corner of a photo I find it easiest to use the Line Tool to section off the part you don't want. Set the width to 5, and draw a white line completely across the photo. Then select the part you don't want with the Magic Wand tool and press the delete key. You may need to adjust the sensitivity of the Magic Wand so you can completely delete the part you don't want. Then use the Magic Wand to select the white line, and delete it.
The easiest way to fade the edges of photos is to use Fade Edge found HERE But, this only works on a square or rectangular canvas. If you want to fade the edge of an irregular shape use Feather, found under Effects>Object. This is more subtle even when set to 10, so repeat the effect 3 to 5 times, or until you are satisfied. The Feather plugin can be found HERE.
Below is a collage of three pictures. I used Fade Edge on the photos of the blue flowers and the white. The yellow flowers are cut out using the Line Tool, and the edge was softened using Feather. Each was copied and pasted onto a separate layer of a new canvas so I could play with the images until satisfied with their placement. The background was colored with a simple diagonal black/white gradient.

Sorry, I don't have any experience with animated gifs.
-
Just as a note, using paint bucket is fast, but if you notice, it leaves some black pixels along the red edge, so I would recommend using the recolor tool. Also, it appears you have a gradient on the shield there...did you want to keep that?
I made these picture examples because the person who originally asked the question about recoloring didn't understand the written directions given in the first answer. However, by the time I was finishing it was very late, and I used Paint Bucket instead of Recolor. My mistake.
-
Perhaps pictures will help you with the info you were given.
As shown below, increase the magnification of the canvas. Move the scroll bars so you are looking at the top left side of the canvas. Place the pencil tool on the outermost solid pixel of the shield, and look at the coordinates in the lower right hand corner below the Layers box. The first number is the X coordinate. X is the number you want to use for determining width. Move the scroll bar so the upper right of the canvas is visible and place your pencil tool on the outermost solid pixel of the shield.

In the next photo I show the coordinates for my particular canvas; your coordinates may be different! To get the distance across half of the shield follow the math steps on the right side of the picture below. Using the square Selection tool start on the center pixel number and pull to the left so half of the shield is included from top to bottom. Choose the Paint Bucket fill tool and the color you want for that side, then color it. The click the Deselect button. Change to the color you want on the other side of the shield and fill it.

-
I do layout for some homepages where i would love to use this feature, is there a way to make the background transparent?
Thanks in advance
Al
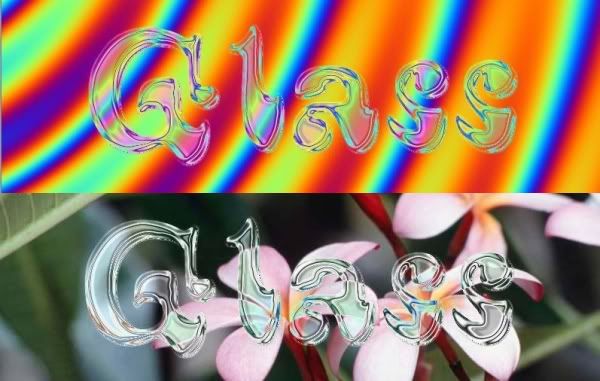
I am thinking you wish to remove the gray background. Another background of any kind can be placed below the glass text, and that background will show through the text. The gray background can then be deleted. However, without a background the text becomes dark gray and loses its transparency. At least this has been my experience. The glass text layer can be copied and pasted as a new layer over another background, but you will need to change the new layer's Blending Mode to Negation to make the text transparent again.
-
I really like this tutorial. Ella, you did a great job of making the tut; instructions are clear, and concise. Glad to see you were able to use the process on a 3D object. After completing the text I used Effects>Texture>Nebulous on the background layer. I especially like the way the text picks up colors from the background layer. Thanks.
As you requested, here is my Glass Text on two different backgrounds, showing how color and pattern show through.
-
I agree with Oma's answer. The tut she listed is good for dealing with the eye area. You should google "black eye" to get pictures that you can emulate. Select the eye area you wish to change, and, on a new layer, play with the colors and blurs till your black eye looks right.
-
Thank you so very much, Oma. That worked like a charm.
-
I have searched to see if anyone has posted about this, but I didn't find anything relevant. After downloading the new version of Paint.NET the Multi Color Gradient tool under Effects>Render will not produce any visible result. The window for this tool opens, and I can change the colors, angle, etc., but when I click on OK there is no visible change to the canvas. I tried deleting the plugin, and re downloading and installing it again, but the plugin still will not work. I had the same problem with the line/curve tool; the squares used to manipulate the line into a curve showed, but the line itself was invisible. Fortunately, this was temporary, and that tool is now working.
Can anyone give me a clue as to what I can do to fix this problem. I am considering deleting version 3.5 and reinstalling the earlier version in order to get back use of Multi Color Gradient. I have Windows Vista, and its updates are current.

Horizontal strip to semicircular arc.
in Distortions and Modifications
Posted
Thank you so much! I have been trying to figure out how to do this forever.