


roguert4u
-
Posts
8 -
Joined
-
Last visited
Posts posted by roguert4u
-
-
Yeah polar transformation could be used
But that requires me to download yet another plugin

they are beginning to slow my computer
thanks for the advice though
-
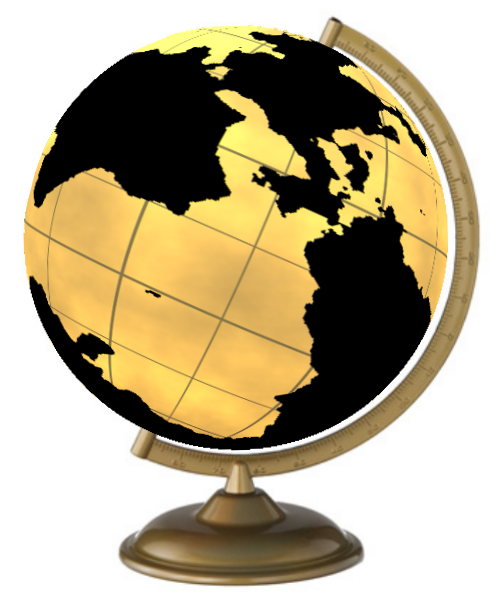
you were right that was wicked
but you know what is even wickeder putting it on a globe
(shape 3D)
heres mine
-
you were right that was wicked
but you know what is even wickeder putting it on a globe
(shape 3D)
heres mine
-
 1
1
-
-
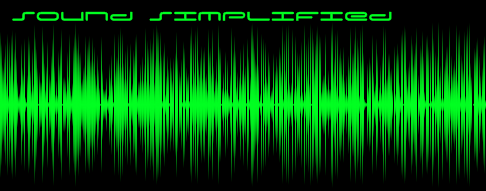
Yeah thats really cool great tutorial
I didnt even think of using jitter when i created a sound wave for my avatar thingy
Thats a great idea
I used gradient bars instead
what i got
-
Yeah thats really cool great tutorial
I didnt even think of using jitter when i created a sound wave for my avatar thingy
Thats a great idea
I used gradient bars instead
what i got
-
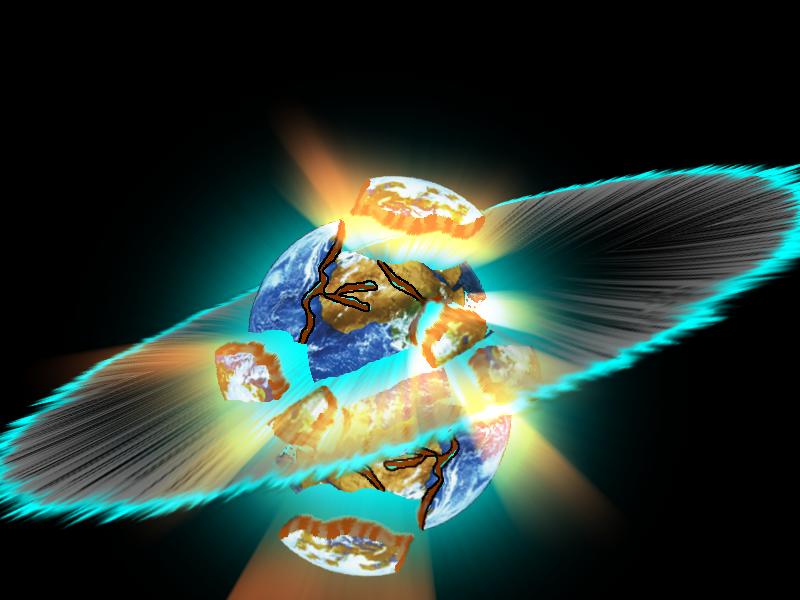
Final Product will look something like this (but i spent quite a bit of time on this one, so perhaps not as good)
Plugins needed
Gradient Bars--found at viewtopic.php?f=16&t=21706
Smudge--also found at viewtopic.php?f=16&t=21706
Stock image of Earth-- found at http://www.earthshope.org/Home_files/ea ... parent.png
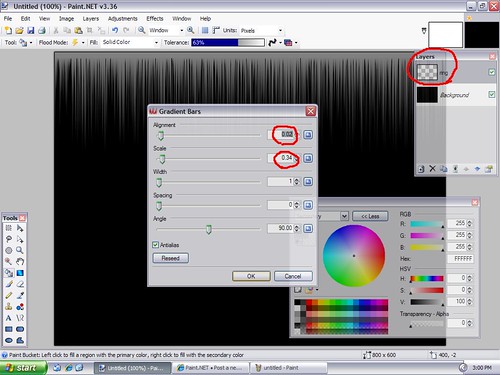
1) Create a new image (800px X 600px), and fill canvas with black
2) Create a new layer, title it ring
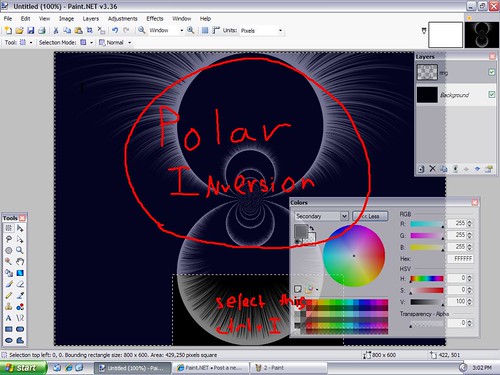
3) Use gradient bars with a primary color 808080 and secondary color FFFFFF (alpha 0) with settings: alignment=.02,scale=.34
4) Use Polar Inversion with default settings
5) Select the lower half of the bottom most ring, invert selection, and delete
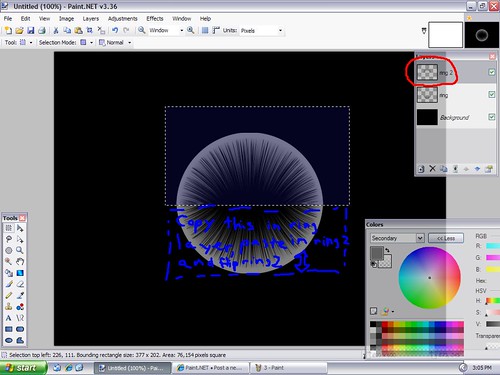
6) Select the bottom half again, move to center of screen, copy it to the clipboard
7) Create a new layer (ring 2) and paste the selection
8) Flip the layer vertically and align the two ring halves, merge the two layers
9) Duplicate the layer and fill the ring with 00FFFF
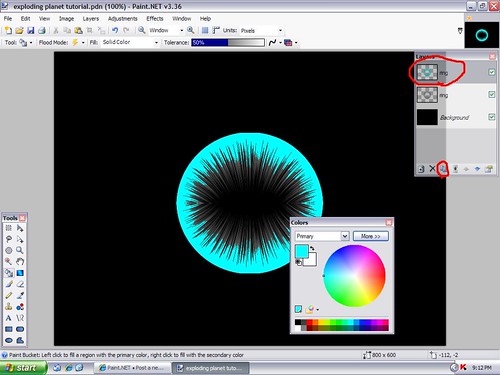
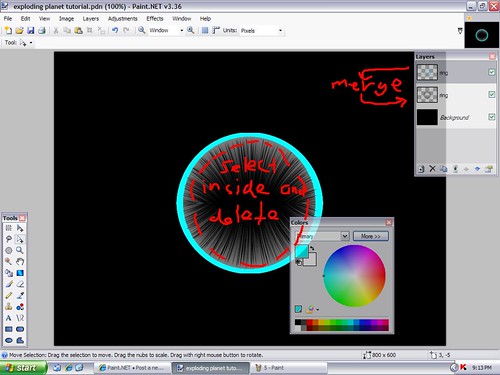
10) Select the inside of the ring and delete, merge both ring layers
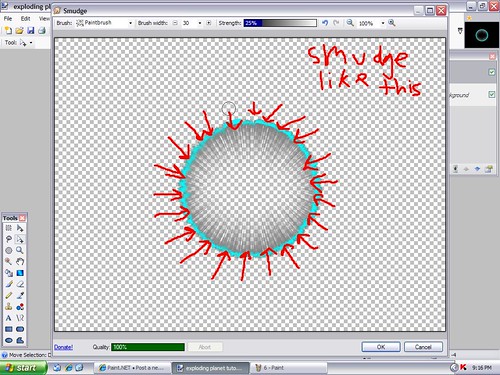
11) use smudge to roughen the outside edge of the ring (size 30 brush, spraypaint brush, strength-25)
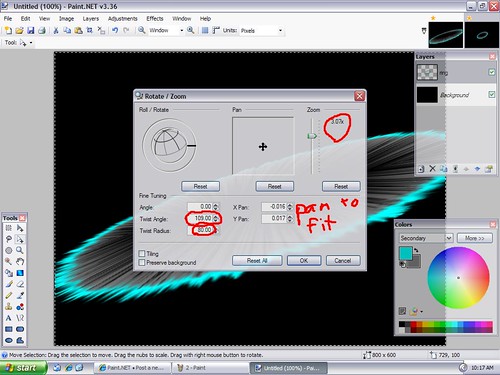
12) Use rotate/zoom to turn the ring into an angled elipse with settings as so: twist angle=109, twist angle=80, pan to center of screen, zoom=3.07
13) Add a new layer and title it earth, add copied image of earth
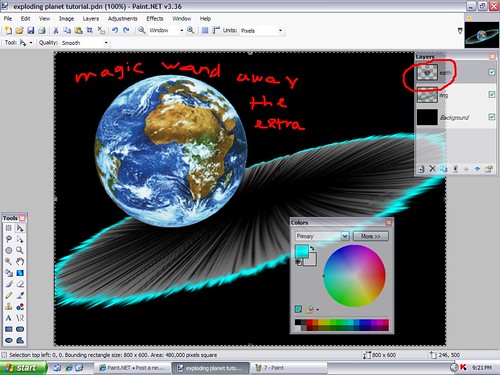
14) Use magic wand (40 strength) to delete the black around the image, leaving just the earth
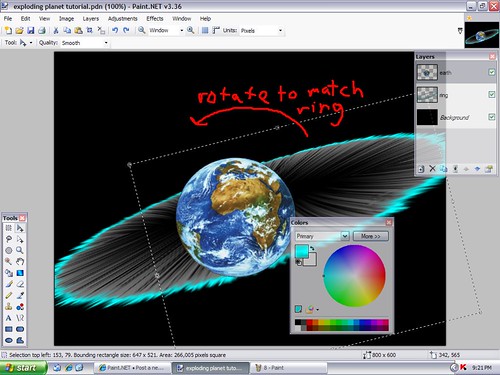
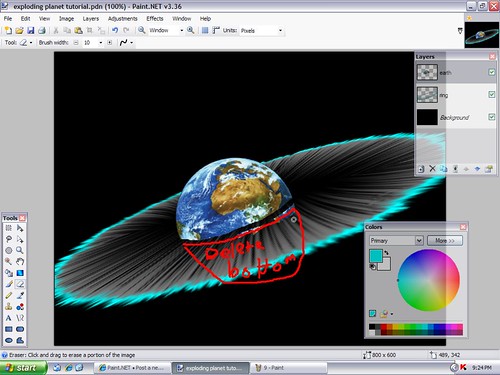
15) adust earth to a size you feel is apropriate, and rotate to be on axis of ring as so:
16) use the eraser to COMPLETELY delete what is underneath the axis of the ring as so:
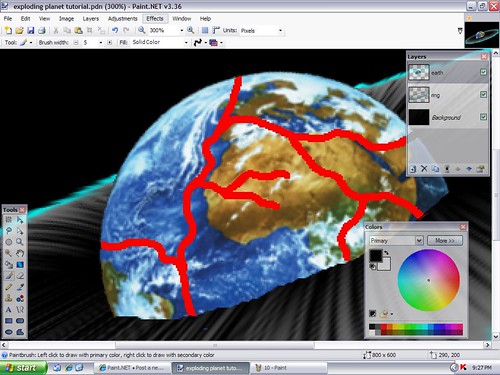
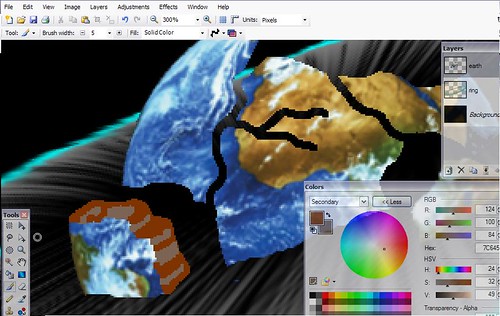
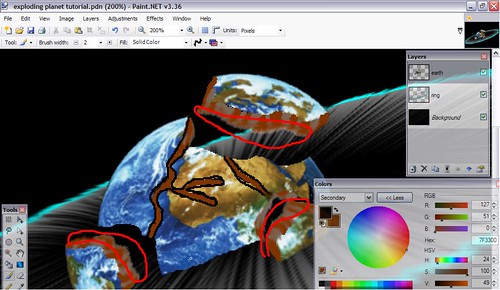
17) use the paintbrush (brush size 5 with color red) to carve the earth into a puzzle:
18) magic wand the puzzle border and delete

19) use the lasso select to select one of the peices and drag it away from the center of the earth
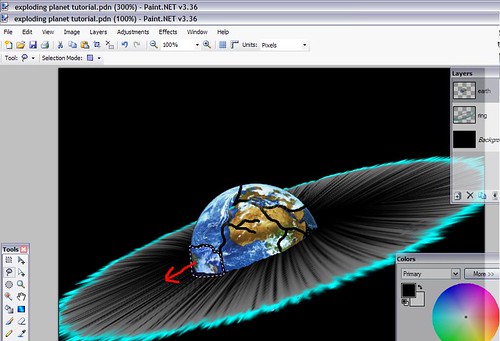
20) repeat step 19 with one or two other pieces
21) use the paint brush (size five, primary 7F3300 and secondary 7C6454) and create the crust under the moved pieces as so:
22) repeat on the other moved pieces
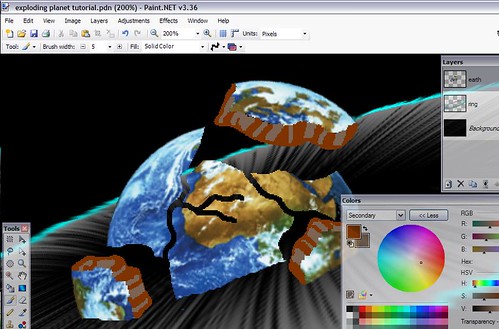
23) also do this the the remaining, unmoved crust
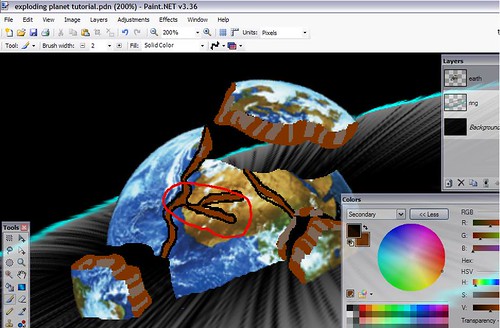
24) fill in the puzzle connectors with the brown (brush size 5) and outline it with black(brush size 2)
25) use smudge ( paintbrush size ten on the crust of the pieces) in the method shown:
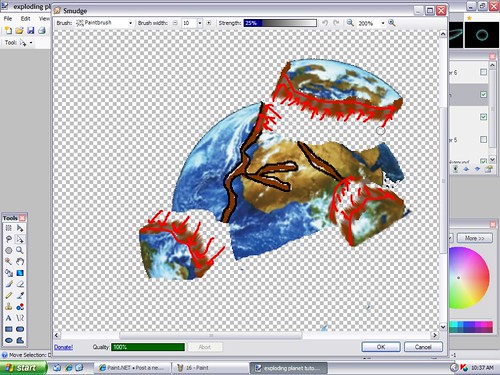
26) repeat on all visible crust
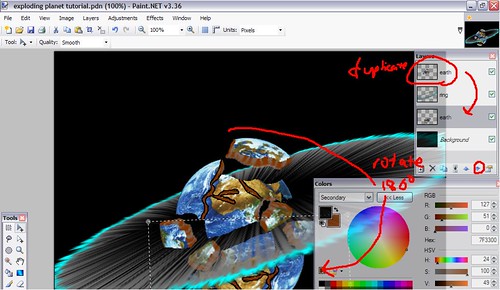
27) duplicate the layer, and move it under the ring layer
28) select the earth and rotate it 180 degrees so it is a mirror of the top earth
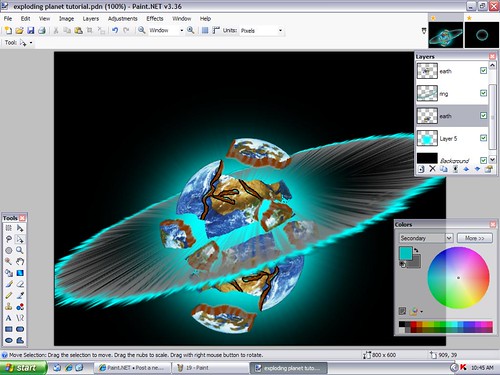
29) create a new layer above the background layer and draw a filled light blue circle in the middle of the earth
30) zoom blur this layer (strenght 100 from the center of the light blue circle) 5 times
additional steps
1) create a new layer on the very top
2) fill in all exploding gaps with a light orange

3) zoom blur this layer (100 strength) twice
4) set the new layers blending to glow
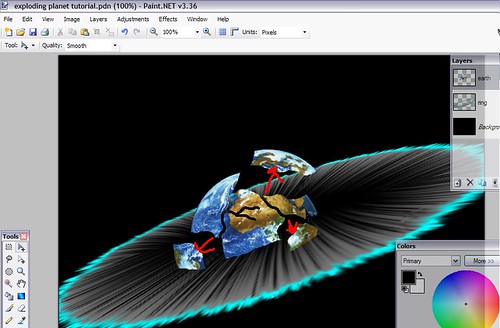
Final
EDIT:
Oh yeah, this is my first tutorial so go easy on me
Comment on what you thought
Post your results, its always interesting to see what modifications have been made
-
This tutorial is available as a PDF. Click here to view or download it
Final Product will look something like this (but i spent quite a bit of time on this one, so perhaps not as good)
Plugins needed
Gradient Bars--found at viewtopic.php?f=16&t=21706
Smudge--also found at viewtopic.php?f=16&t=21706
Stock image of Earth-- found at http://www.earthshope.org/Home_files/ea ... parent.png
1) Create a new image (800px X 600px), and fill canvas with black
2) Create a new layer, title it ring
3) Use gradient bars with a primary color 808080 and secondary color FFFFFF (alpha 0) with settings: alignment=.02,scale=.34
4) Use Polar Inversion with default settings
5) Select the lower half of the bottom most ring, invert selection, and delete
6) Select the bottom half again, move to center of screen, copy it to the clipboard
7) Create a new layer (ring 2) and paste the selection
😎 Flip the layer vertically and align the two ring halves, merge the two layers
9) Duplicate the layer and fill the ring with 00FFFF
10) Select the inside of the ring and delete, merge both ring layers
11) use smudge to roughen the outside edge of the ring (size 30 brush, spraypaint brush, strength-25)
12) Use rotate/zoom to turn the ring into an angled elipse with settings as so: twist angle=109, twist angle=80, pan to center of screen, zoom=3.07
13) Add a new layer and title it earth, add copied image of earth
14) Use magic wand (40 strength) to delete the black around the image, leaving just the earth
15) adust earth to a size you feel is apropriate, and rotate to be on axis of ring as so:
16) use the eraser to COMPLETELY delete what is underneath the axis of the ring as so:
17) use the paintbrush (brush size 5 with color red) to carve the earth into a puzzle:
18) magic wand the puzzle border and delete
19) use the lasso select to select one of the peices and drag it away from the center of the earth
20) repeat step 19 with one or two other pieces
21) use the paint brush (size five, primary 7F3300 and secondary 7C6454) and create the crust under the moved pieces as so:
22) repeat on the other moved pieces
23) also do this the the remaining, unmoved crust
24) fill in the puzzle connectors with the brown (brush size 5) and outline it with black(brush size 2)
25) use smudge ( paintbrush size ten on the crust of the pieces) in the method shown:
26) repeat on all visible crust
27) duplicate the layer, and move it under the ring layer
28) select the earth and rotate it 180 degrees so it is a mirror of the top earth
29) create a new layer above the background layer and draw a filled light blue circle in the middle of the earth
30) zoom blur this layer (strenght 100 from the center of the light blue circle) 5 times
additional steps
1) create a new layer on the very top
2) fill in all exploding gaps with a light orange
3) zoom blur this layer (100 strength) twice
4) set the new layers blending to glow
Final
EDIT:
Oh yeah, this is my first tutorial so go easy on me
Comment on what you thought
Post your results, its always interesting to see what modifications have been made

Exploding earth (doomsday)
in Creations
Posted
Yeah polar transformation could be used
But that requires me to download yet another plugin
they are beginning to slow my computer
thanks for the advice though