


Shadow_n
-
Posts
92 -
Joined
-
Last visited
Posts posted by Shadow_n
-
-
Thats awesome....
a lot better than the other tutorials....

-
alrighty, i'll add that i spose

and i'll add some dancing silhouette brushes aswell....
-
you can just draw it yourself, pretty simple.
-
GET ME AN OLDER VERSION....
Someone know of a link to it?
-
Its land, its spose to be aliased =] Its spose to look jaggedy and stuff....
When i featherd it it didn't give me the effect i wanted
-
Its not you, Im getting an ierror when i try to brush, it opens alright but as soon as you put the brush to canvas, KABOOM!!!!!!
But i had an earlier version that worked fine....
Exception details:
System.ArgumentOutOfRangeException: InvalidArgument=Value of '-1' is not valid for 'index'.
Parameter name: index
at System.Windows.Forms.ListBox.ObjectCollection.get_Item(Int32 index)
at CustomBrushes.CBDraw.listBox1_DrawItem(Object sender, DrawItemEventArgs e)
at System.Windows.Forms.ListBox.OnDrawItem(DrawItemEventArgs e)
at System.Windows.Forms.ListBox.WmReflectDrawItem(Message& m)
at System.Windows.Forms.ListBox.WndProc(Message& m)
at System.Windows.Forms.Control.ControlNativeWindow.OnMessage(Message& m)
at System.Windows.Forms.Control.ControlNativeWindow.WndProc(Message& m)
at System.Windows.Forms.NativeWindow.Callback(IntPtr hWnd, Int32 msg, IntPtr wparam, IntPtr lparam)
------------------------------------------------------------------------------
-
Ah yes, my pdn crashes every single time i try to draw....
It loads up the brushes then when i click on one, KABOOM.
and yes, i am aware that i just posted this in the wrong place... my bad
-
It doesn't look to bad actually, minus the clouds

I just downloaded some Custom Brushes from deviant art, Just searched for cloud brushes and picked one that i like.
You need the custom brush plugin, viewtopic.php?f=16&t=23093.
and ABR Viewer to convert them all.
Pretty much just look here viewtopic.php?f=16&t=23093
It explains how to install the brushes etc.
and get your brushes from here http://javierzhx.deviantart.com/art/Clo ... s-34277964
Once you have everything installed and you have converted your brush pack to png's
put the png's in
>>My Documents\Paint.NET User Files\Custom Brushes
And you should be able to find custom brushes in the effects menu. So i hoped that helped
-
Yeh, no problem...
I'm just hoping i dint skip anything when i recreated it
-
This tutorial is available as a PDF. Click here to view or download it
Suspended Land Vector
Ok, So heres What we will be making
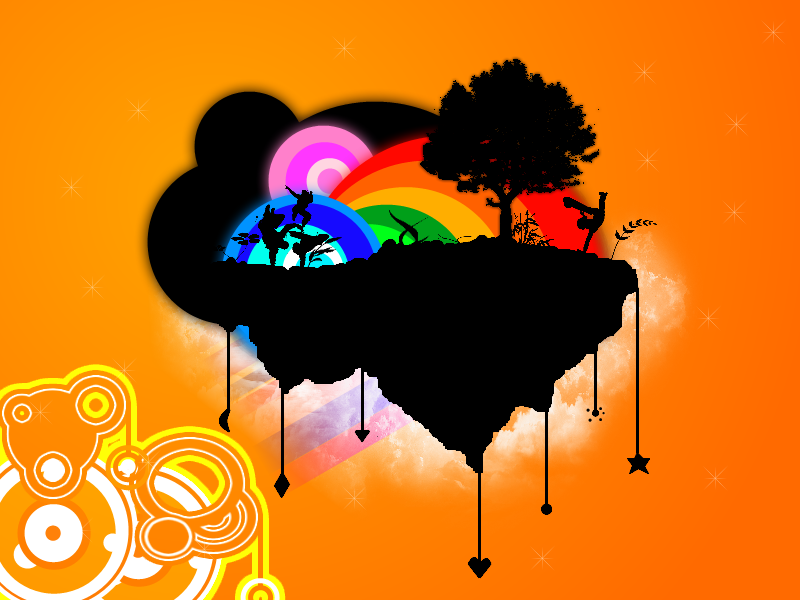
It's not going to turn out exactly like this, i spent a lot of time on this one
But i'll show you how to make something similar it pretty effortlessly
My first tutorial.
Pluginsneeded
Custom Brushes - Found here <!-- l --><a class="postlink-local" href="http://paintdotnet.forumer.com/viewtopic.php?f=16&t=23093">viewtopic.php?f=16&t=23093</a><!-- l -->
Align Object - found here <!-- l --><a class="postlink-local" href="http://paintdotnet.forumer.com/viewtopic.php?f=16&t=4900">viewtopic.php?f=16&t=4900</a><!-- l -->
Stocks Needed
A tree (google image search for "tree clipart")
-->Alternatively: Tree Brush Pack <!-- m -->http://horhew.deviantart.com/art/Comple ... k-22839764<!-- m -->
Some people jumping or dancing or doing what ever
-->Alternatively: Dancing Silhouette Brush Pack <!-- m -->http://erichilemex.deviantart.com/art/D ... oodonly=24<!-- m -->
Ok, So lets start shall we?
1.Background.
Select a nice orange colour as your primary colour and a slightly darker colour as you Secondary colour.
Select Gradient
 and drag like so.

2. Stars.
Create a new layer, Call it stars
Start with a short line in the middle of the page (brush size 2) Then use Align Object to get it in the center.
Do a center'd Motion blur, 0 degrees and 50 power :MotionBlur: . Duplicate the layer, rotate it 90 degrees and Center it. Flatten the two layers.

Duplicate the layer again and open up layer rotate/zoom. Zoom to about 65% and rotate it 45 degrees. you get should a result similar to above.
Depending on how big you've made your stars you may want to scale them down.
Now copy and paste them randomly around your page, emphasis on randomly.

3. Drawing the land.
Make a new layer, Call it land.
All you need for this step is an unsteady hand.
Choose the paint brush tool
 size 2
And draw your land.
You want the top to be reasonably flat, not flat, but almost flat.
and you want the bottom to be irregular, no curves just some bumpy lines.
And you should come up with something similar to below.

4.Roots
Make a new layer, Call it roots.
Draw some straight lines down from the bottom of your land, preferably from the lowest points (where it dips... just look at the image....I don't care enough to explain verbally
)
Make them random lengths (not to short)
And on the bottom of your lines draw some shapes, I don't care what you put.
Hearts, Flowers, diamonds or what ever you think looks cool.

5. In this Step your going to need your stocks (the tree and the people)
Create a new layer, Call it trees
Copy your stock image of your tree (cut it out if its not already)
Adjustments > Brightness/Contrast

Set brightness to -100 and contrast to 100 (if your render has little bits of white on it, Open up curves and drop the luminosity to as low as it gets.)
Position the tree where you want it and repeat with your people or other such stocks.

6. Sun colour thingos
Create a new layer underneath your ground layer, call it sun.
Basically your going to draw a big circle then draw some more circles inside of it of all different colours till you get something pretty.
Duplicate your layer and put it below your sun layer and run Gaussian blur at about 40, just to give it a bit of a shadow appearance, Do what you did to your tree layer and make the Blurred layer dark.
Merge this layer with your sun layer. Duplicate it again and Make it dark (just like you did with the tree 😉 ) and move it somewhere on one of the sides of the colorful sun lines like in the image below.
Now, just go back to your sun layer and use glow.
7. Now, you will need the custom brush plugin for this part and some cloud brushes
eg: <!-- m -->http://javierzhx.deviantart.com/art/Clo ... s-34277964<!-- m -->
Now create a new layer underneath your ground layer, name it clouds.
Brush with your cloud brushes around the ground, we don't want any clouds in the middle of nowhere just around the bottem of your dirt.

8. Lines
Create a new layer named lines.
Move it under your cloud layer but above the star layer.
and draw some lines diagonally up.
These lines need to be of random widths and random colours. Don't make the colours to bright and they are just suppose to be an add onto you background.
Use the gradient tool on transparent :AlphaChannel:
and use it on either end of the lines to give an even faded out look.
and your done. Congratulations

If my version, I've added some floral brushes and drawn some vector-ish circles down in the corner
nothing to complicated, so fell free to add what you like.
Keep in mind this is my first tutorial and it was requested
so yes, If you have any questions or your find any mistakes or anything you want cleared up or you find something ive missed, just tell me and ill fix them up for you.
Cheers,
Feel free to post your results.
-
-
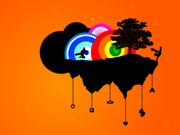
Something I made after i looked at a few other designs

No brushes except for clouds
Stocks include tree, leaves and people
-
Looks mad....
What brush packs are you using?
-
I had a tablet pc...
Worked a charm... and because i had xp tablet edition pressure sensitivity worked fine
-
haha, when i first started i just made random lines and then spammed the effects like crazy to create funny looking things...
-
I have no idea what you want...
Post an example of what you want changed and perhaps someone could help
-
^^ its true...
I opened up ps before i started using pdn...
looked at ps and couldn't find the paint brush tool...
pdn was installed on our school computers so i downloaded it for home and now im happily using it
and now when i open up ps i understand a lot more about curves and the effects etc;
-
I'm going to forward the the canvas starting colour be transparent...
-
-
Theres some reasonable work there...
Some pretty repetitive effects but not to bad
-
I'm sorry everyone, but my way is better.... xD
Make 2 layers
Put your image on one layer and your text on the other.
Get the magic wand and highlight the area around the text
click onto the other layer and click delete...
and tuda
-
Just throwing this out there...
but i can see where the never ending desktop thing ends....
-
There we go, I added another sig =]
-
I've featherd it a few times... i just cant get it to not look so edgey...

 and drag like so.
 size 2


Custom Brushes Plugin 5.1.5
in Plugins - Publishing ONLY!
Posted
IT WORKS>... finally =]