


brake
-
Posts
16 -
Joined
-
Last visited
Content Type
Events
Profiles
Forums
Blogs
Gallery
Downloads
Posts posted by brake
-
-
9 minutes ago, Pixey said:
You are welcome @brake
") I just edited step one, as I forgot to say "cut/paste".
I just edited step one, as I forgot to say "cut/paste".
I'm sure you will get the hang of it 👍
Yes, I will need a lot of practise, as I am really bad with image editing and stuff like this. Maybe next year, this time around I will be able to say I've done it
Currently trying to learn other things as well.
Thanks again. 😺
-
Hello, I've been trying to learn and better myself with some of the Paint.net's features, one of which is background/object removal.
I found an image that is relatively easy to clean (though not the easiest). However, after cleaning the background I was left with the problem of the grass straws covering the boots and the pants of the person (as you can see from the image below). I did use the Clone Stamp tool, to remove the grass straws but it became a mess - it may not be as visible at first glance (or it is for the experienced) but the boots kind of lost their different color tones, became darker/brighter in some areas, as well as looking as they have some sorts of spots or I don't know how to call them.
1. I used the magic wand and the eraser tools to remove and clean up the background. Any better way to do that for this particular image?
2. Is there an absolute best way to clear the boots and preserve their color shades, as best as possible? Even if I have to use multiple tools and/or effects.
3. Another thing is the embroidery on the left leg - any way I can preserve that, when removing the straws?
I am just interested in learning to give the image the best possible quality, when removing background/object.
Providing the original image, as well as edited one.
Your help would be greatly appreciated.


-
20 hours ago, Pixey said:
Well, a bit fiddly to do and certainly gives the meaning to 'photo shopping' as it will require a few extra images.
I have done a very quick try - with the cat, to give you the gist.
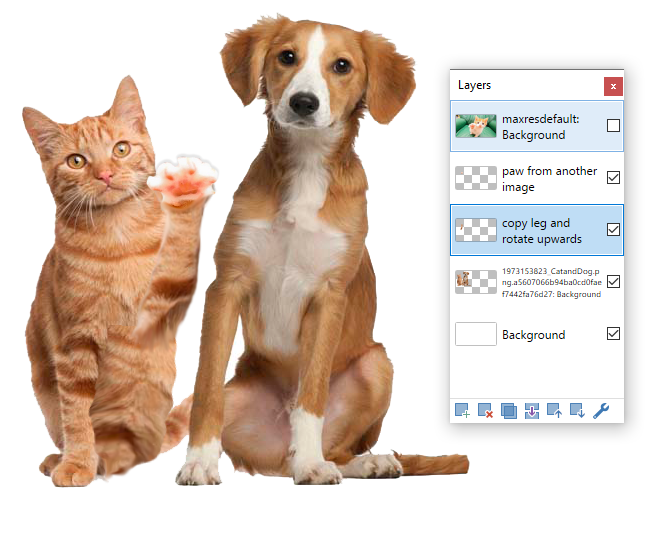
1. With the Lasso select tool, select the cat's left leg and paste
into a new layer. Rotate the leg upwards.2. From another image with a cat with its paw upwards, select the paw
with the Lasso Tool and paste into a new layer.3. With the Lasso Tool select a selection of the cat's chest hair, to use as filling for the empty space, and
paste into a new layer.4. With the Liquify Tool push the edges outwards to close any gaps.
5. When finished flatten.
Of course the same steps for the doggie as well
Great job Pixey!
My result is nowhere near yours, especially with the liquify tool. I will need a lot of practice.
Thanks a lot. I appreciate your help.
-
 1
1
-
-
Hello,
I am interested in making the cat and the dog in the attached image high-fiving each other or to somehow move their paws in such way as if they are high-fiving.
Is there a way to do that?
I will be really grateful if anyone can help me with that.
Thank you.

-
Hello there!
I just installed Linux on my second computer and I would like to use Paint.net on it too. Is it possible to install Paint.net on Linux? If it is, how to do it and would there be any problems?
I do have the paid version and I would also like to know if that license can be trasnfered on the second machine, so I can receive automatic updates.
Another thing I would like to ask is whether it's possible to have the licensed/paid version without having to log into my Microsoft store account etc? I would be happy to just download and instal the program and use some sort of activation/license code, so I don't deal with the Microsoft store.
Any help would be appreciated.
-
I'm not sure which links of mine weren't working for you, they all seem to work for me. If there is a plugin you are interested in, you can find all plugins in the plugin index (which is in the plugins section of this forum). http://forums.getpaint.net/index.php?/topic/15260-plugin-index/
I didn't express myself correctly. It doesn't work when I trying to make text links myself. The code seems a bit different that the one I am used to.
I guess there is a bit difference for every site.
-
My tip for this plugin: Try following values:
Blur radius: something under 5 (depends on the image/object-size)
Min: ~100-255
Edge color/middle color: source
All other options as usual
Short demonstration of the effect in the marked left side of the image:

Thanks for demonstrating and explaining the the plugin.
I was messing around with that effect. It is really cool and handy.
-
Hello Cc4FuzzyHuggles !
Yes that is the video tutorial I used.
Also thanks for taking time and putting a detailed guide on how to make the image look better. I will start practising right away.
And by the way the ''nlink=" didn't work for me. At least it doesn't open anything when clicking on the text link.
-
Not really adding anything, but only echoing what Cc4FuzzyHuggles and Iron67 said, but it appears likely to me that the problem is that the areas being colored are on white layers, so the edge pixels are anti-aliased to white. That happens because the edge pixels are partially colored and partially white. As Cc4FuzzyHuggles suggested, the solution is to place the areas to be colored on transparent layers rather than white layers. That way, when they're colored, the edge pixels will be the color used, but partially transparent.
Hello MJW !
I am sure I did the first image on transparant layers.
The problem is not just white pixels. The second time I did the first image it was a bit better but there were still some dark pixels from the color at the edges, which makes it look like the darker color has gone out of it borders and into the lighter one. Or the opposite. And the color not being smooth and clear.
-
No, that has no effect. Then it is like Cc4FuzzyHuggles wrote. You have to work with every cutted piece or object in his own transparent layer without background color or you will find remnants of these unwanted color on the edges, if you cut out.
A good plugin to edit those bad edges is Tweak Transparency V2.
Thanks for referring the plugin.
I will definitely try it and see how I am doing with the other tutorials.
-
Hi again. I remember doing that green disk tutorial a while back and, if my memory is correct, the use of AA's Assistant would have helped with the edges.
I think you used this tutorial for the green orb and the person only used one layer. Not a good idea, as @CC4 says ....... use more layers and use AA's Assistant.
Perhaps this tutorial on our forum would be of interest for you as well
 .
.Hello Pixey !
Thanks for replying once again !
Yes, for the orb I used the tutorial You linked. Also thanks for the tip and the link to the professional tutorial on the forums. I can not even compare the one with the orb I did with the Transperent glass ball and magic sphere tutorial. I will definitely try it.
I also went through the tutorial of the first image once again - http://i.imgur.com/OxKsEWn.png?1
Thanks again. It is greatly appreciated !
-
Hello.
I don't know what you have done or not done, so I will just throw out some ideas.
Be sure you are making your icon on it's own layer. Don't draw stuff on a white layer, then delete the white, instead, draw on a transparent layer. You can learn about layers from paint.net's help document by pressing f1 in paint.net. Here is a direct link to the layer's page for your convenience : http://www.getpaint.net/doc/latest/LayersWindow.html
If layers aren't the issue, then perhaps something is set to a pixeling setting? (as IRON suspects)
In the tool bar, while you have the shapes tool or other drawing tool active, look at the Antialising, you want it enabled (enabling it for one tool I think enables it for all tools). Also, look at the selection clipping mode, I think you might want the round circle, not the square box. And, switch to a move tool, make sure you have bilinear chosen, not nearest neighbor.
Also, the feather plugins and AA's assistant can help a lot if you make each part/color of the image on their own layers.
Suggestion :
If you just can't seem to get away from rough edges using selection tools, then an alternative to selection tools is the Alpha Mask Plugin.
Here is an outdated video that shows selections vs the alpha mask plugin, however, I don't suggest using the plugin the way the video does, as they over complicate things.
If you use the plugin, simply...
1 Add a new layer
2 Make your black shape on the new layer
3 Select all (ctrl + a) and copy (ctrl+c)
4 Turn your black shape's layer off, click on the object that you want to cut something out on, and run the alpha mask plugin.
Hello Cc4FuzzyHuggles !
And thanks for Your reply!
I made sure to use Transparent Layer ( at least for the second image )
Antialiasing is as enabled. Also Selection Cliping Mode is set to Antialiased selection quality. And the Quality is set to Bilinear.
I don't know what else might be the reason. I guess I can not learn that in one day but it will happen in time with a lot of practise.
One thing I noticed was that if "Shapes Mode" is set "Draw Filled Shape" I could not use "Line/Curve" to draw with - at least it doesn't add any of the chosen colors.
Also thank You for the tips, the links and Your help ! They are greatly appreciated and I will try to make the best use of them.
And I have a lot more to learn and to practise.
I tried to do the first image one more time and it turned out to be just a bit better - http://i.imgur.com/OxKsEWn.png?1
-
What you see at the edges of an icon object, are the consequences of a lack of anti-aliasing. This happens either when you create the form or when changing the image size.
In the first case you have to pay attention to the respective tools to use with antialiasing enabled. Otherwise you have to rework subsequently by corresponding effect plugins.
In the second case you should have the image resizing always on "Best quality" adjust.


Hello IRON67 !
And thanks for Your reply !
I have Antialiasing enabled. Also my image resizing is on "Best Quality"
The only thing I noticed I have changed was "Display Pixel Grid When Zoomed", but I don't know if it may has any effect on the image quality, other than making the pixels more distinctive when zooming in.
I may have done something without noticing ( even though I tried to check the tools and the options the tutor is working with - I am specifically refering to the first image ) and am certainly missing something.
I gave the tutorial a second go - http://i.imgur.com/OxKsEWn.png?1 and it turned out to be just a bit better but with the same result.
-
Hi Brake and Welcome to the forum
 .
.Could you possibly post an image for us to see the problem please? It would help us to determine what is happening. It could, quite possibly, be that you are not getting rid of the white in the image you are cropping, and that can easily be remedied by using the AA's Assistant.
To upload an image for us to view, it's usual to have the image posted to an outside storage site like Photo bucket or Imgur, and then copy the URL and post it into your post. But, if it's quite small then you should be able to use the Attach Files if you click on the More Options in the post area.
Hello Pixey !
And thanks for Your fast reply . It is greatly appreciated !
The first image in its normal size - http://i.imgur.com/j9ZQmcN.png?1 and zoomed - http://i.imgur.com/v8uPoq8.png?1
The second image in its normal size- http://i.imgur.com/UflO8lG.png?1 and zoomed - http://i.imgur.com/seO7Raf.png?1
I am still learning to work with the program. I was watching a tutotial and did the exact icons the tutors did. So none of the images are my idea.
The icon on the first image I did today, and the one the tutor did didn't have the white areas as mine does.
I would say I did everything step by step, but obviously am missing something.
Even without zoomiing the icons the white areas around the edges are clearly visible. Which draws away the focus from the beautiful icon to those seemingly unprofessional and unpolished edges. I would like to learn to make them better.
Thanks In Advance !
-
Greetings
I am pretty new to programs such as Paint.net
I have done some tutorials on the basics but I still have a lot more to learn.
Creating and editing images with Paint.net can be really fun and very often - hard and frustrating.
There are a lot of things I would ask help for, but there is one thing particular I am stumbling upon over and over again ( whether editing and image like cutting a certain part of it or creating something simple of my own) - white pixels appear at the edges of images/icons ( whether at the edges after adding a shadow or after creating and putting a color to an image/ icon etc ).
I have watched tutorials where other people create and color their own images and there are no white pixels at the edges.
I tried to do the same and I failed.
I will be grateful on any help on how to create images with clear coloring.
Thanks !


Best Way To Remove Background/Obect For Finest Results
in Paint.NET Discussion and Questions
Posted
Thank you Pixey! It took me some time.
I haven't tried PS Plugin and Wire, as I wanted to see what can I improve with the Clone Stamp. But I will try them later today.
The thing is the Clone Stamp always leaves a trail - more or less. I did try it with 0% hardness and darken. I did use the Clone Stamp on the embroidery as well, by placing the marker on the one on the other leg - it was very difficult because both embroidries really differ in shape (not because of the folds on the pants). So along the Clone Stamp, I had to use the color picker for the embroidery and try to replace the lighter color of the straw with a similar ones on the embroidery.
Including the first image from the post as well as the second one I've just tried to cover for the Clone Stamp part. I didn't try as much to cover the straws at the very ends of the boots on the second picture - wanted to try and focus on the main part of the boots.
1. It's all still a mess but do yo notice any improvement from the previous one?
2. Also, any technique to practice with the Clone Stamp? - other than the practice itself?