


ArgusMagnus
-
Posts
69 -
Joined
-
Last visited
Content Type
Events
Profiles
Forums
Blogs
Gallery
Downloads
Posts posted by ArgusMagnus
-
-
Has anyone adapted this now? I might do so otherwise.
How Kernel Is Mapped to every color in the Image
[Above Left, Above, Above Right ]
[Left, POI (point of interest), Right ]
[below Left, Below, Below Right ]
Values Set in Kernel
[A,B,C]
[D,E,F]
[G,H,I]
Color = A * (Color Above Left) + B * (Color Above) + C * (Color Above Right) + D * (Color Left) + E * (Color POI) + F * (Color Right) + G * (Color Below Left) + H * (Color Below) + I * (Color Below Right)
Color = Color / Divisor + BiasI might be mistaken, but for mathematical correct convolution, the kernel would be flipped two times around the middle row and column, no? Might be even more confusing this way though. (And many often used kernels are symmetric any way)
-
Download: https://forums.getpaint.net/topic/32337-argusmagnus-plugin-pack-20181019/
(Copy the file "ArgusPDN.FFTEffects.dll" to the "paint.net/Effects" folder)
This Plugin contains 4 effects related to Fast Fourier Transform and Signal Processing in the Frequency Domain:
1. Transform->Fast Fourier Transform: Transforms either intensity image or one of the channels (R,G,B ) to and from the frequency domain. The transformed image contains the magnitude information in the R and G values and the phase information in the B value (which basically means: don't change the B value of any pixel too much are at all if you want to get a meaningful result when transforming back).
If you want to get a meaninful result when transforming back, there are two limitations: 1. Don’t change the B component (the phase information is important), 2. Non-rectangular Selections won’t work.
2. Signal Processing->Low Pass Filter: The same as using the transform effect, removing (setting to black or transparent) all pixel outside a rectangle around the center and transforming back only this is faster, more accurate (less information is lost) and easier to control
3. Signal Processing->High Pass Filter: The same as using the transform effect, removing all pixels inside a rectangle around the center and transforming back (again, faster, more accurate, easier controlled)
5. Signal Processing->Band Pass Filter: Combination of Low and High Pass Filter.
Example: FFT

Example images (high pass filtered, adjusted and blended together):


The plugin actually uses the FFTW library (fftw.org), I have not written the transformation code myself (mainly for performance reasons)
-
 1
1
-
-
So here is what I have done so far: https://onedrive.live.com/redir?resid=429F16CCEF18E484!336393&authkey=!AOpTQOahVbphCCI&ithint=file%2czip
The dll contains 4 effects:
Transform->Fast Fourier Transform: Transforms either intensity image or one of the channels (R,G,B ) to and from the frequency domain. The transformed image contains the magnitude information in the R and G values and the phase information in the B value (which basically means: don't change the B value of any pixel too much are at all if you want to get a meaningful result when transforming back).
Signal Processing->Low Pass Filter: The same as using the transform effect, removing (setting to black or transparent) all pixel outside a rectangle around the center and transforming back only this is faster, more accuratly (less information is lost) and easier to control
Signal Processing->High Pass Filter: The same as using the transform effect, removing all pixels inside a rectangle around the center and transforming back (again, faster, more accuratly, easier controlled)
Color->Reverse Blend: Has nothing to do with the above, is simply in the same assembly.
Be aware that these 3 Effects won't work on non-rectangular selections. For the Transform->Fast Fourier Transform this cannot be changed. For the Signal Processing Effects, this is a bug and will be fixed in the future.
The plugin actually uses the FFTW library (fftw.org), I have not written the transformation code myself (mainly for performance reasons)
-
Thank you all for your responses!
I think I need to clarify a bit: I actually face two problems:
1. I need to store a complex number (2 floating points) in 32 bits because in the end, the destination surface will only hold 32 bits per pixel, passed as a ColorBgra structure.
2. The resulting image should still be meaningful to the user. Because of fhis, using the alpha channel is not a good idea and Im basecally left with 24 bits in Problem 1.
For problem 2, HSV would be ideal. Representing the magnitude as brightness and the angle/phase as hue would make perfectly sense. However for Problem 1, HSV is less than ideal. You are right, if I do the HSV conversation myself, I can end up with a wider range of values than when using HSVColor.FromColor, but at some point I will have to convert it to an ColorBgra structure to write it to the destination surface. At that point, the Value channel must be squeezed into one byte. This is better (256 instead of 101 discret values) but I don't think it's enough. (I will test it however)
What I currently am doing is saving the phase to the blue byte and the magnitude to the r and g bytes (16bits -> 2^16 discret values). The result is not as good as HSV to the eye, but it still has the tendency that pixels with higher magnitude are brighter, which makes sense.
I confused the byte ordering in the first try, that's why it didn't work then.
I will post the dll/code to test shortly

-
Sometimes when I run paint.net from Visual Studio to debug my plugins, every now and then it gets really slow. And if I use a tool such as the brush in one of these moments (e.g. after opening a large png file) I get an exception. This happens independent of my plugin, if the plugin code is never run.
Exception:
System.OperationCanceledException was unhandled by user code
  HResult=-2146233029
  Message=Der Vorgang wurde abgebrochen.
  Source=PaintDotNet.Base
  StackTrace:
       bei PaintDotNet.ExceptionUtil.ThrowOperationCanceledException() in d:\src\pdn\paintdotnet\src\Base\ExceptionUtil.cs:Zeile 221.
       bei PaintDotNet.Rendering.ContentRendererBgra.ThrowIfCancellationRequested() in d:\src\pdn\paintdotnet\src\Core\Rendering\ContentRendererBgra.cs:Zeile 65.
       bei PaintDotNet.Rendering.ContentRendererBgra.RenderComposited(ISurface`1 dst, PointInt32 renderOffset) in d:\src\pdn\paintdotnet\src\Core\Rendering\ContentRendererBgra.cs:Zeile 184.
       bei PaintDotNet.Rendering.ContentRendererBgra.Render(ISurface`1 dst, PointInt32 renderOffset) in d:\src\pdn\paintdotnet\src\Core\Rendering\ContentRendererBgra.cs:Zeile 117.
       bei PaintDotNet.Tools.BitmapLayerToolLayerOverlay`2.OnRender(ISurface`1 dst, PointInt32 renderOffset) in d:\src\pdn\paintdotnet\src\PaintDotNet\Tools\BitmapLayerToolLayerOverlay`2.cs:Zeile 44.
       bei PaintDotNet.Canvas.DocumentLayerOverlay.Render(ISurface`1 dst, PointInt32 renderOffset) in d:\src\pdn\paintdotnet\src\PaintDotNet\Canvas\DocumentLayerOverlay.cs:Zeile 78.
       bei PaintDotNet.Rendering.PassThruRendererBgra.Render(ISurface`1 dst, PointInt32 srcOffset) in d:\src\pdn\paintdotnet\src\Core\Rendering\PassThruRendererBgra.cs:Zeile 40.
       bei PaintDotNet.Canvas.DocumentRenderer.Render(ISurface`1 dst, PointInt32 renderOffset) in d:\src\pdn\paintdotnet\src\PaintDotNet\Canvas\DocumentRenderer.cs:Zeile 77.
       bei PaintDotNet.Canvas.DocumentRenderer.OnCopyPixels[TBitmapLockData](TBitmapLockData dst, PointInt32 srcOffset) in d:\src\pdn\paintdotnet\src\PaintDotNet\Canvas\DocumentRenderer.cs:Zeile 133.
       bei PaintDotNet.Imaging.BitmapSource`1.OnCopyPixels(Nullable`1 srcRect, Int32 bufferStride, Int32 bufferSize, IntPtr buffer) in d:\src\pdn\paintdotnet\src\Core\Imaging\BitmapSource`1.cs:Zeile 28.
       bei PaintDotNet.Imaging.BitmapSource.CopyPixels(Nullable`1 srcRect, Int32 bufferStride, Int32 bufferSize, IntPtr buffer) in d:\src\pdn\paintdotnet\src\Core\Imaging\BitmapSource.cs:Zeile 73.
       bei PaintDotNet.Imaging.Proxies.BitmapSourceProxy`1.CopyPixels(Nullable`1 srcRect, Int32 bufferStride, Int32 bufferSize, IntPtr buffer) in d:\src\pdn\paintdotnet\src\Base\Imaging\Proxies\BitmapSourceProxy`1.cs:Zeile 87.
       bei PaintDotNet.Imaging.ClippedBitmapSource`1.CopyPixels(Nullable`1 srcRect, Int32 bufferStride, Int32 bufferSize, IntPtr buffer) in d:\src\pdn\paintdotnet\src\PaintDotNet\Imaging\ClippedBitmapSource`1.cs:Zeile 69.
       bei PaintDotNet.Imaging.Proxies.BitmapSourceProxy`1.CopyPixels(Nullable`1 srcRect, Int32 bufferStride, Int32 bufferSize, IntPtr buffer) in d:\src\pdn\paintdotnet\src\Base\Imaging\Proxies\BitmapSourceProxy`1.cs:Zeile 87.
       bei PaintDotNet.Imaging.CancellableBitmapSource`1.CopyPixels(Nullable`1 srcRect, Int32 bufferStride, Int32 bufferSize, IntPtr buffer) in d:\src\pdn\paintdotnet\src\PaintDotNet\Imaging\CancellableBitmapSource`1.cs:Zeile 107.
       bei PaintDotNet.Imaging.Proxies.BitmapSourceProxy.CopyPixels(Nullable`1 srcRect, Int32 bufferStride, Int32 bufferSize, IntPtr buffer) in d:\src\pdn\paintdotnet\src\Base\Imaging\Proxies\BitmapSourceProxy.cs:Zeile 83.
       bei PaintDotNet.SystemLayer.Native.x64.Imaging.CBitmapSourceCcw.CopyPixels(CBitmapSourceCcw* , WICRect* prc, UInt32 cbStride, UInt32 cbBufferSize, Byte* pbBuffer)
  InnerException:
-
Never mind, I think I found an acceptable solution, I'll post a test plugin soon :-)
-
1
-
-
Update: Ready to be tested
So here is what I have done so far: https://onedrive.liv...ithint=file,zip
The dll contains 4 effects:
Transform->Fast Fourier Transform: Transforms either intensity image or one of the channels (R,G,B ) to and from the frequency domain. The transformed image contains the magnitude information in the R and G values and the phase information in the B value (which basically means: don't change the B value of any pixel too much or at all if you want to get a meaningful result when transforming back).
Signal Processing->Low Pass Filter: The same as using the transform effect, removing (setting to black or transparent) all pixel outside a rectangle around the center and transforming back only this is faster, more accuratly (less information is lost) and easier to control
Signal Processing->High Pass Filter: The same as using the transform effect, removing all pixels inside a rectangle around the center and transforming back (again, faster, more accuratly, easier controlled)
Color->Reverse Blend: Has nothing to do with the above, is simply in the same assembly.
Be aware that these 3 Effects won't work on non-rectangular selections. For the Transform->Fast Fourier Transform this cannot be changed. For the Signal Processing Effects, this is a bug and will be fixed in the future.
The plugin actually uses the FFTW library (fftw.org), I have not written the transformation code myself (mainly for performance reasons)
I made these playing with the High Pass Filter:
Original Post:
I wrote an effect which calculates the FFT or the IFFT from an image. This works fine. The idea is to get the FFT from an image, modify it in frequency domain and convert it back using IFFT to get some cool effects.
But here is my problem: The result of an FFT are complex numbers (magnitude and phase information) and I'm not sure how I should encode this information into the 32bits per pixel paint.net offers me.
At first set the destination pixel in HSV space: Saturation = 100, Value = magnitude (capped at 100) and hue = phase. This gave some intersting looking results when converting back (IFFT), kinda like the pencil effect. But having only 101 (0-100) discret values to describe the magnitude results in data loss: either I cap the values at 100 or I scale the whole spectrum to [0,100] which results in loss of information (typically, there are many low values (~1-100) and a few very high ~70'000)
So my next approach was to simply store the magnitude in 3 bytes (a, r and g component, scaling magnitude range to [0,0xFFFFFF]) and the phase in one byte (b component, scaled to [0,255]) which "works", transforming forth and back gives the original image (without noticeable data loss), BUT working with the FFT in this representation proved to be less than ideal (not intuitive).
Has anyone a good Idea how I could represent the complex number as Color? Ideal would be a reprensentation where one could modify the magnitude without changing the phase. (This is the problem with the second option)
Example Image 1 (HSV, capped at 100, top: Original, middle: FFT, bottom: IFFT)

Example Image 2 (bgra method, top: Original, middle: FFT, bottom: IFFT)

-
1
-
-
I've uploaded an update.
Changes:
- I removed the "Use standard Deviation * Tolerance as actual Tolerance" Checkbox since that was a pretty much useless feature.
- I implemented another algorithm to calculate the mean color and standard deviation in one go (should speed up the processing a little if "Dominant Color" is selected).
- The "Image from Clipboard" options now only shows up in the "Background" DropDown if there actually is an image with a matching size on the clipboard.
I had issues with the copy to clipboard feature (my guess is due to multiple threads interfering with each other) and changed a few things there as well. I wasn't able to reproduce the error after the changes (sometimes, just an empty image was copied to the clipboard) but I'm not 100% sure it's fixed.
I have put it under Effects->Color, thanks for the suggestion.
I have upgraded to Windows 10 and Microsoft Edge today but no change there, this forum and Edge don't do well together either..
-
1
-
-
I never said anything about writing outside the selection :-)
Of what I have seen and confirmed through testing so far (not 100% sure) the OnRender method is called by the PDN system in parallel, the body of the OnRender method is usually just a loop which calls the Render method for every rectangle in the selection, regular for-loop, nothing parallel.
As a reply to your side comment: The PDN system has no way of knowing how long a plugin effect will take to compute, it cannot know if the calculation will take the same time for to different rois even if they contain the same amount of pixels, and in general the calculation times for two rois will be different. So if it just runs the calculation of 4 rois in parallel on 4 threads (on a 4 core system) odds are that 1, 2 or 3 threads finish before the 4th and have to wait idle for the last one. That's one of the reasons workload is split into more parts than available cores.
-
I don't Need it right now, I found a better Workaround, but just out of curiosity:
Would it be alright to use a reflection "hack" to Change something in my own effects IndirectUI? (e.g. Setting a Checkbox to false when the Dialog is shown Independent of the last token)
-
Yes, your code is processed single threaded, but this is because you do the calculations and Rendering to the temporary dest Surface in the OnSetRenderInfo method (or more precisely, you call your Render method from the OnSetRenderInfo method) which is called single threaded as far as I know. I guess the only reason to use the temporary Surface and then copy it to the dst in the OnRender method and not directly write to the dst Surface is to not break the rules which state that you may not write to dst outside the scope of the OnRender method.
I think this is a rather ugly solution and I wouldn't recommend it, but then again, I'm new to paint.net plugin development and I don't know what the old foxes here or the developers of paint.net recommend, so don't give too much weight to my opinion :-)
If you pass the EffectFlags.SingleRenderCall to the constructor you could move your whole calculations as they are now to the OnRender method and eliminate the Need for a temporary Surface.
-
Hmm, this is quite dissapointing, but thanks for the Response.
-
It's definitively better to use a struct, but I don't think things like that are going to make a difference noticeable for the user.
I have never really used CodeLab, but doesnt the current code already run in parallel? The code in the Render method just Loops over the Pixel in one Rect but in general a selection consist of many rectangles and many calls to Render with different rectangles are made parallel by paint.net, no? If so, if the nearest edge of a Pixel is in a rectangle other than the currently processed, this code will not deliver the expected result.
Again, I have not much knowledge about CodeLab, but I think you should do this in Visual Studio, it would be quite easy I think. I did something very similar in my Reverse Blend Plugin, where I also needed to calculate Information from the whole selection (in my case the average Color) before rendering the result. I called the PropertyBaseEffect constructor with the EffectFlags.SingleRenderCall flag and parallelized the process myself. If the algorithm allows it, this is an easy Task in C# (using e.g. Parallel.For). And you're algorithm could be processed in parallel withouth Problems I think.
One last Thing about List<T> and the like: These classes manage internal Arrays and resize/reallocate them if needed. If an item is added, but the internal Array is already "full", a new, larger, Array is allocated, the elements from the old Array copied and then the new item is added. If you use These classes in a way in which they Need to resize often, this can be time consuming since every time all the old elements Need to be copied. So if you know how much items you are going to have in the list or if you at least can make an educated guess (better too many than too few, Memory is seldom an issue), it's better to initialize it with the new List<T>(int capacity) constructor.
edit: I just took a look at the whole solution, Forget the second paragraph
edit2: I wrote a quick template to Show what I meant, I hope you don't mind. This won't work out of the box, you Need to Change the commented sections in the OnRender Method.
-
1
-
-
Is there a way to control the values of the properties in an IndirectUI Dialog beyond the initial Setting?
Specifically I want one Checkbox to always be unchecked when the effect Dialog opens, Standard behaviour however is that the Checkbox retains the value it had the last time the effect was used. I have tried many things but I couldn't figure out how to do this. I would really appreciate some help.
Regards
ArgusMagnus
-
I know, I tried that, the Problem is that if I click on the "Link" or "Image" Symbol the window Pops up where I can enter the link to to Image on imageshack but I cannot click OK nor any other button, I can't even Close the window, I have to reload the page. And if I just try to insert the link as plain text (Ctrl+C, Ctrl+V), nothing happens.
-
You're right, thanks for the Feedback. I've updated the code and the dll
-
Effects->Colors->Unblend
Download: https://forums.getpaint.net/topic/32337-argusmagnus-plugin-pack-20181019/
(Copy the file "ArgusPDN.Unblend.dll" to the "paint.net/Effects" folder)
This effect is basically the reverse Operation for the normal blend Operation.
From the current selection and a Background Color (Primary Color, Average Color or "Dominant Color" <-- this is experimental, take a look at the code to see what it means^^) a foreground Image is calculated so that every Pixel has to lowest possible Alpha (highest Transparency) under the condition that the result of a normal blend of the foreground and the Background Color is again the original Image.
I mainly use this effect to remove the "white" background of scanned sheets or to remove background from an image (e.g. Logo) which is blurred/contains gradients from the image to the background.
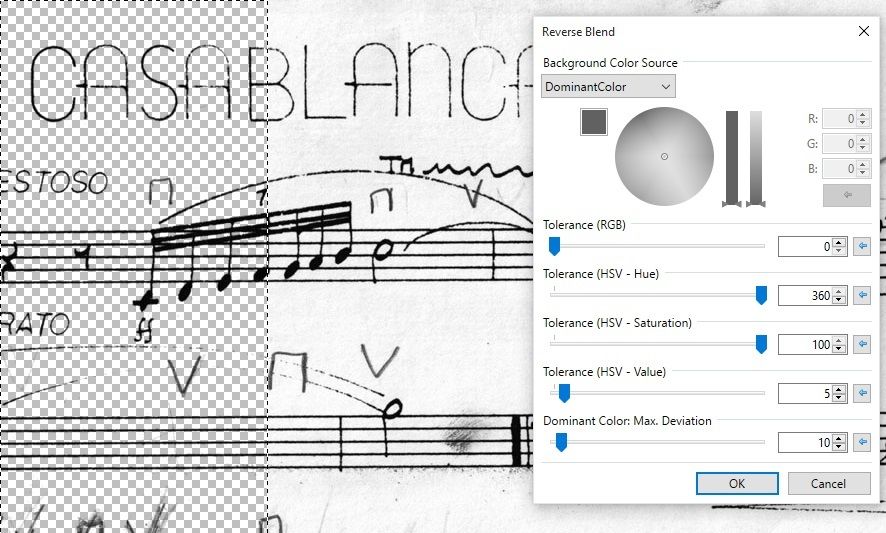
This effect is only revertible in the sense that blending on the Background Color accurately restores the original Image as Long as tolerance is Zero.
Possible improvements in the future include: Different tolerances for Color channels (R,G,B ), Somehow Show the results of GetAverageColor and GetDominantColor to the user.
I didn't really know, where to put this. Currently it's under Effects->Reverse Operations->Reverse Blend. If you have a better idea, feel free to share it ?
I wrote this Plugin some years ago, but never published it. I got reminded of it when I did something similar in another Project.. and here it is..
v1.2
- Compete UI overhaul
- Added HSV Tolerances
- New Backgroundcolor Sources: Average color and Dominant color of image from Clipboard
v1.1
- Removed Copy to and from Clipboard options (they were buggy)
- Changed rendering (render progress is now reflected in image)
v1.0
- Initial Release
-
1
-

Initializing IndirectUI Control Range to Canvas Dimensions?
in Plugin Developer's Central
Posted
I don't know about CodeLab, but it can be done in VS in the OnCreateConfigUI method, just pass the values when creating the properties. You can get the values from EnvironmentParameters.SourceSurface.