


colintso
-
Posts
4 -
Joined
-
Last visited
Posts posted by colintso
-
-
-
i've been fiddling around with Paint.NET, then one day, i decided i wanted to make myself look cool, so i changed this:
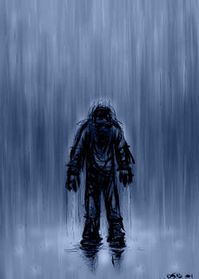
 into this
the guy u see there is me

Plugins:
Outline Object
Color Tint or Color Filter
Darken
Step 1:
Get a good photo thats cool.

*Note you might want to touchup the photo first by following this tutorial - How to Airbrush like a Professional (let's try this again)
Step 2:
Use the Magic Wand and/or Lasso Tool to select the person you want to have the effect to be focused on.

Step 3:
Crop the image along with yr selection (Ctrl+Shift+X)

then use the feather tool withe the true feather option on to soften the edges (the default setting should be enough:

Step 4:
Look for a picture with rain against a solid background, i used the top bit of this pic:
Paste it onto a new layer of your Paint.NET project
Step 5:
Apply the ink sketch effect on the rain layer on full ink outline and none on colouring

then delete the white bits by using shift+magic wand on the white bit:

Cool eh?
Step 6:
Apply the Ink Sketch effect on the person layer and remove the black/white background:

Step 7:
Invert the colours of the rain layer and apply the Colour Tint effect on the rain, i chose green. You can adjust the colour further by using the hue/saturation and brightness/contrast function:

Step 8:
Make a new layer and move it to the bottom. Fill it black. Then outline the person using the outline effect with white with 0 softness. Put the rain layer on overlay.

Step 9 (long step):
To make your coat/clothes black, select the coat with the magic wand/lasso tool, copy it onto a new layer on top of the original and invert the colours (ctrl+shift+I)

Then use the darken effect in Adjustments

then sharpen it twice on full:

then outline it with a neon green

then you might wanna get rid of the bit of the outline where the coat and the head overlaps:

Recolour the white outline into the green previously used on the coat on the person layer (i also readjusted the brightness of the green rain here):

Step 10 (almost Done!):
Duplicate the rain layer and put it on top of the black background layer on the normal setting and darken it using the brightness/contrast function:

And there you have it! Your very own MATRIX poster of yourself!
-
i've been fiddling around with Paint.NET, then one day, i decided i wanted to make myself look cool, so i changed this:
into this the guy u see there is me

The Matrix Effect (Long Tut)
in Tutorial Graveyard
Posted
ty mate