


avim1968
-
Posts
137 -
Joined
-
Last visited
-
Days Won
1
Posts posted by avim1968
-
-
The letter key can be repeated to cycle through each of multiple plugins in the submenu.
EG
Alt (C,R) enter or right arrow opens the Effects > Render submenu. And now
Mx1 = Mandelbrot Fractal
Mx2 = Multicolor Gradient
Mx3 = Mandelbrot Fractal
Mx4 = Multicolor Gradient
etc...
Enter starts the highlighted plugin.
Hi Ego
Yes I know this and use it :-)
but still its too much keys and if you click one more then needed you must
use the mouse or arrows to fix. all this key pressing kind of takes the idea of "fast shortcuts" away :-(
why not make it easy for people and narrow the number of multiple/menus and clicks needed
to reach your UltraCool Pizza plugin :-)
Avi
-
I don't like the idea of multiple locations for plugins. It leads to this:
Newb: "Hi. I'm new. I downloaded EER's UltraCool plugin and installed it. Now I can't find it."
NearExpert: "It's in the Effects > Pizza submenu"
Newb: "No it isn't".
EER: "Check which version you installed. It's either in the Effects > Pizza submenu or the Effects > FtangFtangOleBiscuitBarrel submenu."
Repeat this conversation for every effect in every tutorial

Hi Ego
In which language " FtangFtangOleBiscuitBarrel" = "Favorites" ?? :-) :-)
there would be only TWO options to look in under the effect menu.
ether the normal/regular plugin location OR under Effects -> "Favorites".
so your UltraCool plugin can be under the main Effects menu -> Pizza OR under Effects -> "Favorites" -> Pizza.
and no other place .
Also if a one writes/wrote a tutorial it can add at the top a remark that that if you installed the regular plugin use
the normal menu and if you installed the "Favorites" version the plugin would under the "Favorites" sub menu.
no need to make so many changes in the tutorials.
I also think (as SAND33P) that there are people that don't know how to "code" so it should be up to the original coder
if its a non public code to add that "Favorites" option. and if its an open code, then the 1st person
who adds the "Favorites" to the public code would also add a link to it .
Its not a big deal and it would help many of the users here.
Avi
-
OK, here's a solution for you: Create your own favorites menu.
You can do this for any plugin where the source code has been published. Simply recompile the plugin using CodeLab and specify "!Favorites" or "~Favorites" as your menu.
(Using "!" puts Favorites at the top of the list and "~" would put it at the bottom as the list is alphabetized.)
By giving it a unique DLL filename, you can run both copies of the plugin (original menu and favorites menu).
Hi bolt
Nice idea, i never thought of recompiling/changing the plugin code.
However I do want to take your idea a step forward , and maybe have a new standard added to plugin
coders and have then add a 2nd version of their plugin (only if they want) that would be under
a sub menu called "favorites".
this way people who use their plugin allot would be able to install the 2nd version that goes under the
"favorites" sub menu, and all others can use the regular version under the plugin menu.
I'm going to implement this and have two versions in the plugin i'm currently working on.
I think this would solve this issue where all sides are winners :-)
what do you think ?
Avi
-
 1
1
-
-
I deal with the overload of available plugins by simply not installing EVERY SINGLE PLUGIN EVAR!
I think i remember spotting something of the like somewhere around the forums, where there is another sub menu, like 'Artistic' or 'Blurs'. One that is called 'Favourites' and you can choose your favourite plugins to put into it in the Effects folder in program files? Any way to do this?
(Maybe in PDN 4 a way of doing this in the software, maybe right click on the effect to Uninstall, Add To Favourites etc)
^Pretty good idea :O
Hi SAND33P / BoltBait
I too think that such "Favorites" sub menu should be a part of the main effects menu even on the top.
I know we already had a desiccation about this subject few months ago, I asked for this feature also. (i can't find that topic ? )
this is not a problem of too much plugins installed, but more of an easy way to get to your Favorite plugin
faster then search for it on the menu.
like the plugins you use most would be there.
Rick and Ego provided the keyboard short cut keys as an answer, which does not work all the time since there are many
plugins with the same start letter. :-(
also the menu location is coded into the plugin and Rick (i think it was him) said that it would need to add code to support it
from elsewhere (if at all) and he is currently working on 4.0 and would deal with plugins in 4.x .
I can also add an out of the box idea that might make it , with Rick ;-) (i guess 4.x)
sort the plugin menu items , via their last usage.
meaning that the more we use a plugin effect, the closer it would be to the top of the effects menu.
saving us the time to search for it all the time.
what do you think ?
Avi
-
If freeform shape was removed, the alternative would be to select the area with the lasso selection, then press backspace to fill with the primary color. Since selections will have anti-alias capabilities in v4.0, this would be almost exactly the same as freeform shape is now, and it would only be one keystroke extra.
I say go ahead and remove it. Keeping it will just be redundant
Hi
selections is not the way to do what i do, also mostly because the selection tool makes selection lines (like ants) and it makes
it hard work with in small places and delicate traces.
also why use the selection if the free form tool already does it better filling the area as i go ?
I think this tool is good and should be left in the Paint.Net tools arsenal :-)
Avi
-
@Avim could you explain why you use the freeform rather than the paintbrush tool to trace an image? I am wondering if I am using it wrongly.
HI minners71
I'm on a tight timeline to finish a project, so I don't have much time to search for an example I have somewhere.
so I ask your forgiveness.
I can give you general idea of when i use it.
1st of all I use it in "filled shape mode" and when I need to fill or create an outside/inside template/mask of a shape/area in an image
with irregular shape and get into the small "cracks" and around other objects with ease., using this with a little planning
automatically fills the shape with the foreground color.
this save me the time to fill that shape using fill bucket that does not help or using the other shapes/brushes
to fit the irregular shape i need.
its kind of hard to explain since it's per image and shape complexity in the image.
also I use the lasso selection tool in the same way to get an accurate selection of the irregular shape if needed.
again the main use is with the fill option selected and not just to "trace" with a regular line.
one more place i use it when I work with the pen tablet , to trace a shape/image out of a paper placed on the tablet.
Avi
-
Hi
Yes it is an amazing picture Bolt :-)
I used to do pictures like this few years ago.
(but they were NOT as good and "out of the thinking box" like this one! )
however I always used a stand and markings to place the
camera in the same spot every time.
Avi
p.s.
now days a friend of mine uses HD webcam with cellular network and software to take pictures
at intervals from minutes to weeks.
-
@avim I do a lot of image mods and cutting out of images and have never used it,I prefer to use the line tool and alphamasking ( once you use these tools you will wonder how you managed without them
 )
)Hi minners71
I'm sure that everyone has his own opinion about everything ;-) and we all use the tools in a way which is good for us
learning more uses from others or experiences as we go forward.
I'm using alphamasking too but there are differences in what you can do with each tool.
For my some/kind/type of work I do, the freeform tool works best.
and for other kind of images/work other tools/plugins work better.
I hope that Rick would keep it :-)
Avi
-
Hi Rick
I use it many times when I work on images that i need to trace and they have strange/irregular shapes.
or when i need to create a mask area around something or fill an area that needs delicate touches .
its a good tool saves the need to use the "lasso selection" then fill.
it gives online view of the area you work on.
Please keep it 10Q.
Avi
p.s.
From what it looks , I'm one of the few who uses it, but I can say that after you know how and when to use it,
you would think how you did things without it ;-)
p.s.2
Working with image manipulations, makes this tool very useful.
-
Hi
You can do what my friend did.
He moved from XP to OSX , so he used a software called VirtualBox which is free
he installed it on his OSX and made a virtual machine out of his old XP harddrive.
Now he has a faster XP and he continues to run Paint.Net on the virtual XP machine.
if you don't have a windows machine., you can install one from a CD directly to virtual box
Avi
.
p.s.
it works great and when using full screen you have a d@@m fast XP on the new OSX :-)
-
Hi Rick
Don't "Dock" your great Paint.Net ship, keep sailing forward , there are many of us that provide you with the wind power
needed to push your new ship forward! :-)
No time to dock now, full steam ahead.
Avi
-
Hi
One more thing think about is the paper you are using, it must be one that would allow two sided image printing.
Images (unlike regular color text) produce/use allot more of ink that is soaked by the paper. if the wrong paper is used and the print is
not dry then you would get a mess both in the images and in the paper.
In my case it once even caused the paper to tare and jam in my HP printer.
Avi
-
Hello meows
Welcome to the forum.
to answer your question , you can try this plugin
http://forums.getpaint.net/index.php?/topic/20976-fill-from-clipboard/
Avi
-
I prefer the "globe thingy"
 Roll Control is too much of a NASA-like name thingy.
I 2nd that too "globe thingy" sounds much better :-)
Avi
-
I added a layer, then theres no way to add any picture in new layer. If I import from file, it makes a new background .layer. But I want to make a new layer as forground and insert picture in it.
Hi tanvirtonu1
Welcome to the forum :-)
when you use "Import from file" it places the image in a "new" layer as the top layer (most forground layer) , and just add the text ":background" to it
which you can rename using the layer properties.
If you already have a new layer you can do as Noswad said :-)
Avi
-
Hi
working with many plugins, causes the effects/adjustment menus to be very big/crowded/long which makes
finding the right effect you need for your job, hard to locate and you need to remember where it was.
which takes time, also there are few plugins with the same name and functions so you would have
a duplicated effects.
I used to work like this, but it was too hard for me to remember where everything was (old age memory problems)
so with few ideas from people here in the forum , I have made few changes which I think would help you too.
1. get all the plugins you want or find as you wish ;-)
2. place SOME of them in the effect directory and check them out.
if you like the plugin place it in a folder (name it "good/useful effects")
3. remove those plugins and place new ones, then repeat step 2 until you filter all the plugins you have.
4. I have created a number of effects directories and sorted the plugins I liked by the type of
effect and the type of image/project it would be good for.
5. each time i want to work on a project I replace the plugins in the "effects" directory with the effects
in the directory that I would use in that project.
(some plugins are found in a multiple directories)
6. I have a directory with all the plugins, which is used only to find an effect , then i copy it to the right directory.
I think that this is the way to go, and it helped me allot with my work.
take into account that every change in the effects directory would need to restart Paint.Net.
so adjust the directories content as you need 1st.
Avi
p.s.
I have asked long ago in the forum to enable a "Favorite" sub menu under the effects menu where
one can drag and place the effects he uses most. saving the time to look thru all the menus time and time again.
but this is currently low in priority (if at all)
it might even be linked to a "Favorite" directory under the effects directory but this would need more changes
maybe even to the plugins too as i was told , so i guess it is even lower in the list :-)
However Rick said some where he would deal with plugins after 4.0 is out :-) :-) :-)
-
1
-
-
Hi
does not effect the program running, it just takes few more sec. to load all the plugins, if you really have many
of them as I do.
Avi
.
-
Hi
well as long as we are having fun, I have something I worked on too sometime ago. (something like what Ego made)
but I have added few more options.
1. LOCK icon, if colored red means layer is locked and no editing can be done on that layer.
2. when pressing the properties icon, it would open a slider window next to the layer, with the layer properties on it.
(kind of what Ego did ;-) )
3. AUTO # - when enabled , it adds an increment number to the duplicated layer name.
like Background#1,Background#2 etc...)
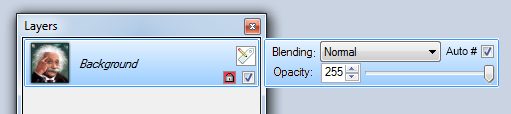
Avi
-
-
This kind of talk understandably gets Rick riled. You have no idea of the inner working of Paint.NET so please don't presume that it would be "easy" to implement.
Another thread followed much the same pattern as this one. I suggest you read Rick's post here: http://forums.getpai...ng/#entry375807 and re-read his post here: http://forums.getpai...er/#entry373877
Hi Ego/Rick
I meant no Disrespect nor wanted to "annoy"/"anger" (had to check what "riled" is) , I think Rick is doing a great
job (I learned allot from him even PM him about it :-) )
I read the posts you said , and I learned thru them more from Rick answers on how Paint.Net works and it pushed me
to learn more things myself, since his answers (even if i didn't agree with them some time) are great and
to the point ! :-) :-)
There is a great saying "what you see from here, You don't see from there" meaning when I say something
I don't see the big picture that Ricks see as a developer and that (his) point of view is revealed when
he answers the posts.
it makes one see how great minds think/work - (Including you all here when you answer)
thank you all
Avi
p.s.
I'm think that as long as the talks are not heated or go personal or disrespectful , they are ok.
even if we disagree or see things different which is good.
p/s/2
I also learned thru the years that when management and/or marketing asked for "simple/small things"
it took us weeks to implement ;-)
.
-
If you need to keep your primary color, right click to use the secondary color.
If you need both, you can save the primary and/or secondary color in the color palette temporarily while you are looking around for color values
Hi pdnnoob
yes I need both colors and your idea does work , however as i said i need to compare
the color values so if i place then in the color palette i wont be able to see their values.
so I still think that being able to see the value numbers of the pixel below the picker
change on the screen would be the solution.
I also think its not such a bad idea or hard to implement. (just like the x,y of the cursor at the bottom)
as i write my plugin now i read the pixel data all the time and know its values.
i guess Paint.Net color picker also knows those values before the click (Rick?) so it can show the numbers some where on the screen.
so, show the numbers before the click, select the color only when clicked.
try to think of it as more info to the end user .
Avi
p.s.
I know the pen and paper workaround ;-)
-
You can achieve the same thing by holding the mouse button down and watching the numbers in the Colors window.
Hi Pyro
Yes this works 10x :-)
but I lose my primary color since a click has selected/picked a new color :-(
I need to compare the color I want to the current color/numbers I'm using (primary color)
I still think that using that empty space in the toolbar is a better solution.
this way the user can compare between the two sets of numbers.
However maybe (as a compromise/combine our answers) ,
a small small change to the color picker tool can be made ?
Have the colors change in the color box whenever the user selects the tool
without the need for a mouse click.
then only if the user reaches/see the color/RGB numbers he need , he can click the mouse and
only then that color would become the primary color.
moving the tool outside the image border or deselecting the tool would restore the original
primary color.
Rick?
thank you
Avi
what do you think ?
-
Hi All
I would like to request a feature that would help picking the right color on the 1st mouse click
when working with images that have many colors and shades etc...
.
Today we need to move the mouse over the pixel and click it to select the color
under it and make it active, only then we get the RGB/HSV/Alpha info about it.
and if its not the correct pixel info we need to select again. etc...
to make the color selection faster and more accurate on the first click
and also enable us to select directly only the pixel with RGB info we want.
It would be great to have online/active display of the Color and RGB/HSV/ALPHA information on the pixel
under the color picker , in the toolbar like in the picture i have added.
this would make color selection easy and with less clicks on the mouse.
just move the mouse over the image, look at the color and select the color you need.
the data can be placed anywhere, I just placed it there since its connected to the tool.
What do you think ?

Avi
p.s.
This would be great to have on other tools, like the (Magical) Fill Bucket so we can select
the color we want to fill with other color etc...
or the Magic Wand selection tool to select the color with the RGB info we want.
-
Ha! I actually started calling it the "Fill Bucket" when I was working on it. The keyboard shortcut is 'F' and the association just stuck ... even started using that term when showing it to some friends, who had no idea what I was talking about at first
 (they quickly figured it out)
Hi Rick
Its your program so you can call it as you "Fill" ;-) (i.e. "Feel")
But I think its still magical! so I have made an icon for it based on your Magic wand button.
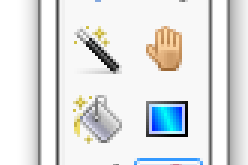
maybe you can use it as a new fill icon.
I would love to see you implement your active selection idea.
Avi

 Roll Control is too much of a NASA-like name thingy.
Favourite Effects Menu
in Paint.NET Discussion and Questions
Posted · Edited by avim1968
Hi Jim
NO insult taken :-) and never from some one like you or others here in the forum!
I don't agree with what you wrote about the tutorials, I think you made it bigger deal from what it is.
and i'll tell you why.
1. we are talking about a very simple change , even a newbie would make the connections
look under "favorites" sub-menu, its not like going to long unknown sub sub menus.
people can make the small adjustment.. and some time pointing them there would be
just as good.
2. I have written many tutorials and guides and manuals in my life time, both software and hardware
and others. do you think that I or any one else rewrote all those papers since a new version came out
or a new and better way to do something or new instructions from the factory or developers ?
well I NEVER did , all that we have done was add a paper in the begining of the paper
saying what is new, what are the changes that need to be taken from now, what are the new
program tools added , what are the menu changes etc...
I can tell you that i Never got any complain back about this.
so such a small change of where to look for a plugin should not be beyond the reach of any one
and wont be so confusing as you say :-)
even if you look thru this forum you would see changes are made all the time and people coop with it :-)
and would get the idea after the first time they ask the question here in the forum.
This change would make peoples work simple and much faster.
No one would push coders to make changes to their plugins "right now" or at all.
just like you get some new things in new versions/release of software.
New changes takes time to make their way into the main stream .....
Avi