


jim100361
-
Posts
860 -
Joined
-
Last visited
-
Days Won
14
Posts posted by jim100361
-
-
PDN uses the system fonts. So installation of the new fonts would go into Windows/Fonts directory.
-
You can't. All you can do is delete the text layer and create a new one.
-
Great tutorial - very realistic looking!
...and of course kudos to Welsh!
-
I'm not entirely sure you can as PDN is not a word processor, but an image editor. This isn't so much a statement about the obvious, but rather more about function. A word processor has page breaks. As I say, "I'm not entirely sure..." Having 2 images open at the same time on separate canvases (especially since you're dealing with 2 different file names) would be like having 2 different documents open simultaneously. The only possibility I can think of is to have both images on the same canvas. Try doing this as described in this link:
http://forums.getpai...d-after-images/
However, once this is done, I don't know that if you print it, whether or not the Windows print manager will recognize the double canvas size as a separate page or whether it will try to shrink them down so they both fit the same page.
I can only offer it as a suggestion to try, not a guarantee.
EDIT:
Worst case scenario, try importing/pasting your image into a word processor. You may need to adjust margins and resize to get the proper output to your printer.
EDIT 2:
If you end up using the last method (printing from a word processor), keep in mind that depending on the layout of the image, you may also need to adjust the page setup under the word processor to be 11x8.5 (landscape) vs 8.5x11 (portrait) in order to get it fit properly and print full page.
-
OK I've been reluctant to use this as I was concerned about inadvertent changes. I've seen others recommend this plugin several times, especially to delete a color. So for those of you who have used this, correct me if I'm wrong... in the first example picture on the first page of this thread where the grey background existed and was replaced w/transparency, wouldn't it replace that same grey color if it exists even in small bits on the same picture elsewhere? Essentially like using the magic wand in flood mode?
-
Read this thread here, it's essentially the same procedure:
http://forums.getpaint.net/index.php?/topic/25543-i-just-cant-figure-out-how-to-do-this-some-help/
-
I like the ceramic ball race piece. Pretty cool!
-
Here's something else to consider adding to your bag of tricks:
...and you're welcome, glad I could be of assistance.
-
Uploading doesn't work. You need to link to it using the img tags. Read this page:
http://forums.getpai...es-and-avatars/
Edit: Sorry - I didn't read it thoroughly.
-
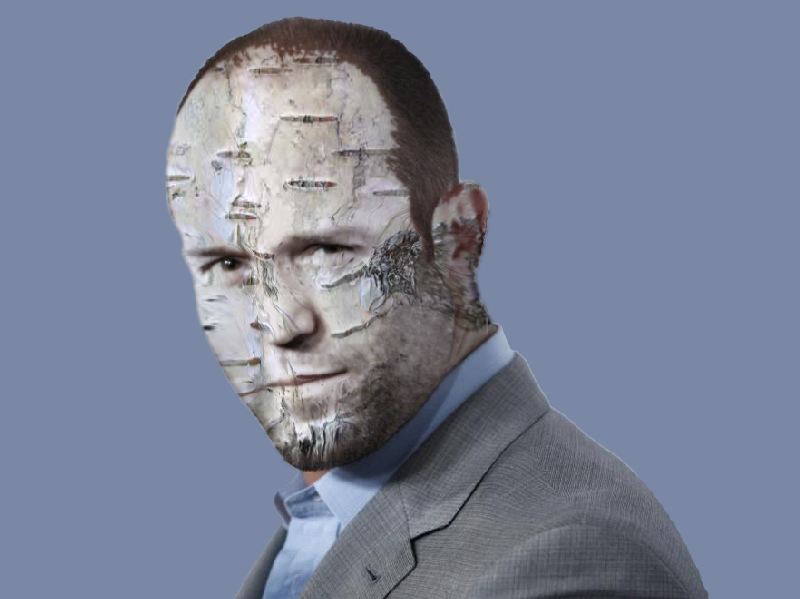
This is just a test image I did using the technique described. I didn't fully warp the whole texture. Primarily it was done around the eyes, nose, and mouth as I was just trying to get a feel for the technique:
-
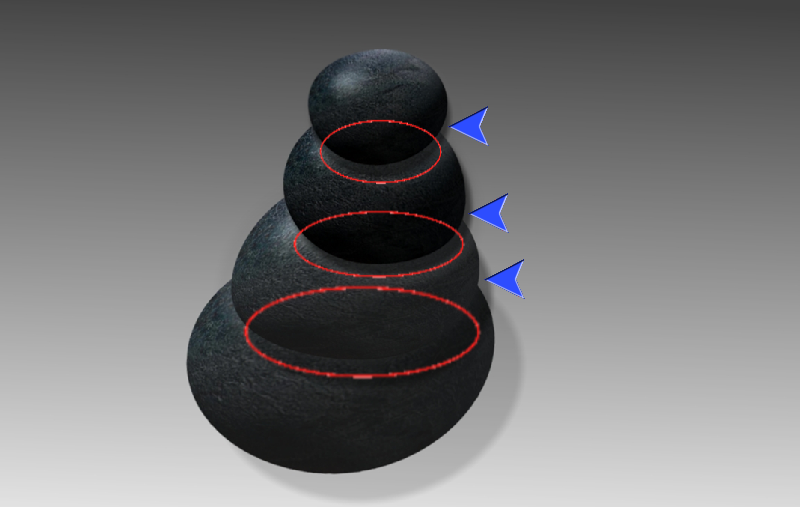
Compare yours to Ella's and you'll see the shadows are more constrained to the surface of the stones (roughly designated by the red ovals) below each of them, don't overlap into the background (designated by the blue arrows) and are darker.
You've got the right idea. A little polish and you've got it made!
-
The alternative method is to add an additional transparent layer beneath each stone's layer, draw a filled ellipse, and then apply the guassian blur. You may need to play with the size of the ellipse and blur to get the right feel.
-
One each layer use the drop shadow plugin
-
I've just tried lowering the opacity of the layer to be warped (using BB's transparency adjustment).
Then you can see the background better whilst warping.
When finished use the 'transparency' adjustment (plug-in), to reset to opaque.
And thank you Pyro for the brilliant plugins!
(would it be within the plugin rules to access the layer transparency setting or make it adjustable within the plugin?)
I've toyed with your suggestion, I think it's gonna work! Thank you for your help and also to all you folks who've made these plugins, thanx again!
This is gonna really open up a whole new world of possibilities now that I believe I'm on the right track...!
-
Ditto. Great tute. Nice finished look. TY
-
Thanks for your help. I'll "give 'er the ol' college try" when I get my next opportunity (I'm away from home currently).
-
As an example, I was hoping to use the grid warping to reshape a texture that would match an object on the background. Let us say that for example, I wanted to use tree bark and reshape and contour it match a picture of my face/head. Areas toward the center of the face would need to be pulled in towards the nose for example and other areas around other features. The texture would need to be manipulated separately, but as I'm doing so need to see the canvas so I know where I'm at.
EDIT:
I've tried getting this effect w/alpha displacement, but I was unsuccessful. But either the liquify or grid warping should be effective as well if seeing the canvas were possible while trying to manipulate the texture layer.
-
Thanks, I'll try to keep that in mind and give it a try.
-
The instructions I provided resized the background so it was the same size as the image with the text. If you follow the instructions from the beginning you won't have that problem. I'm currently responding from my phone so I can't show you at this time how to fix where you are at right now. So my recommendation is to start over.
-
You can remove the white background the same way: Use the magic wand, click on the white background and press the delete key on your keyboard.
-
See my modified post above.
-
OK, I'll see if I can't quickly put something together for you. In the meantime, I still suggest you remove your e-mail address. It would be better not only for you but for others who come here with your same question to see what the answer is, so we'll stick with replying to your question here.
EDIT:
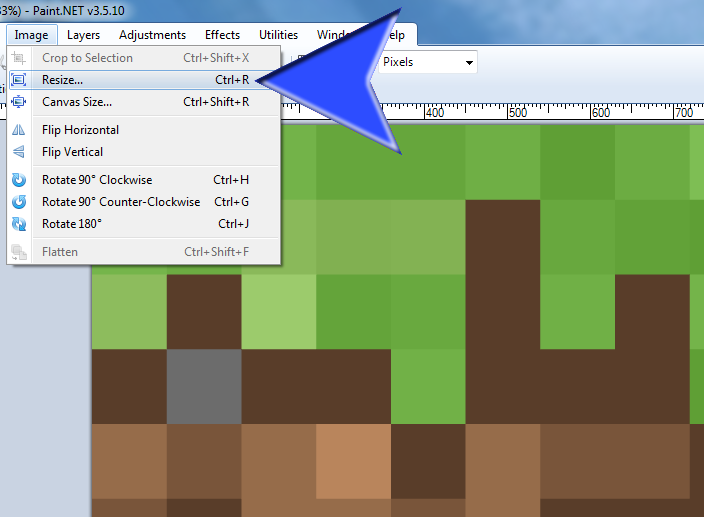
1.) First open up your colored background.
For the sake of these instructions, I will show you how to resize the background so it is the same size as the image containing the text.
2.) With your background image open, go tot he menu under "Image" and select "Resize"
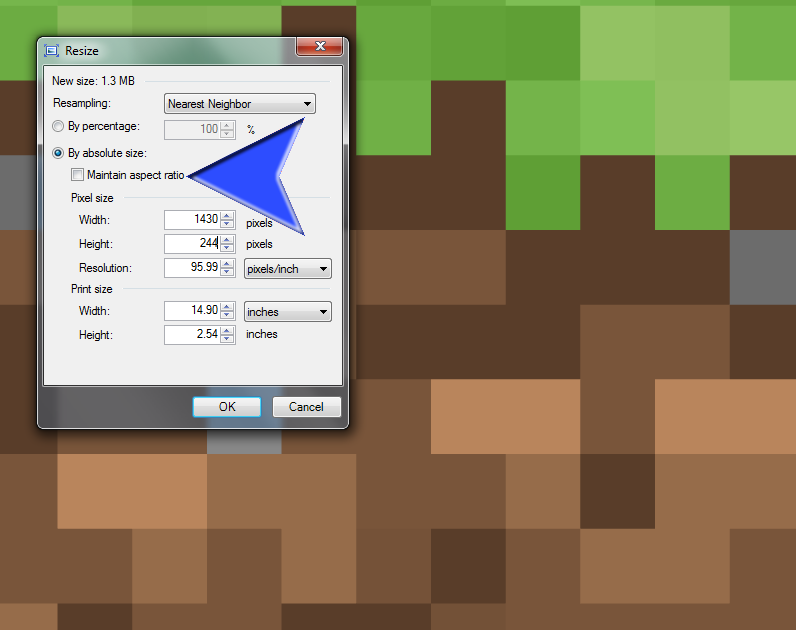
3.) Remove the check mark in the block next to "Maintain aspect ratio" and change the values in the Width and Height fields as shown (these are the same values for the text image you have that I downloaded). Then select OK.
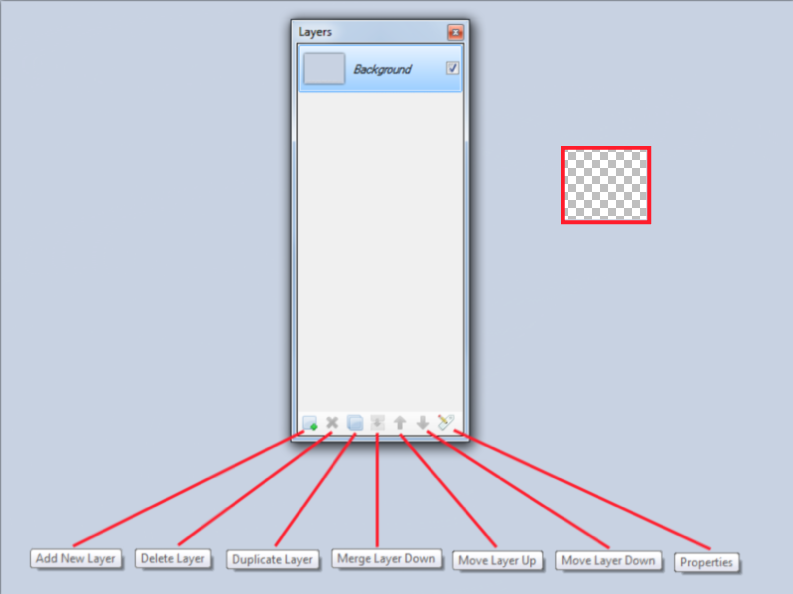
4.) Next go to the menus again and under "Layers", select "Import From File..."
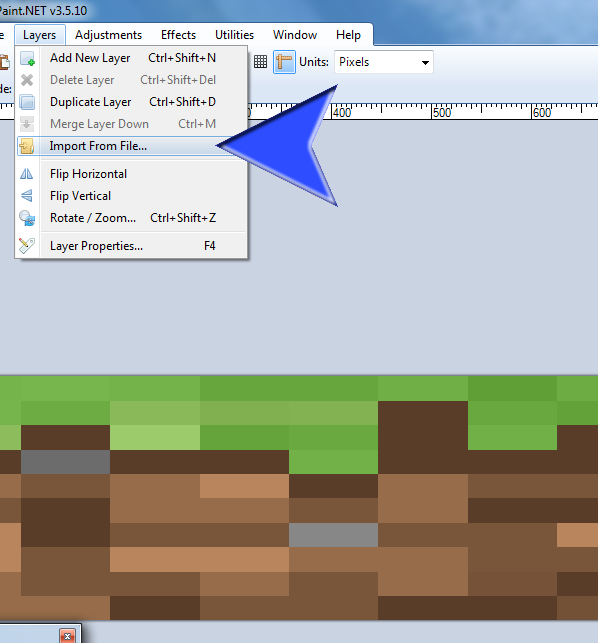
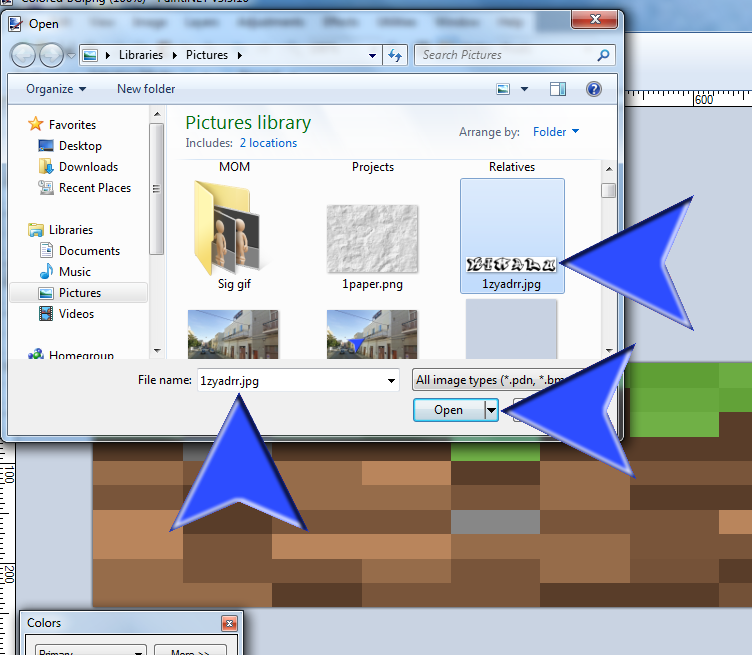
5.) Find you're text image and double click on it and click on "Open"
6.) Next select the magic wand
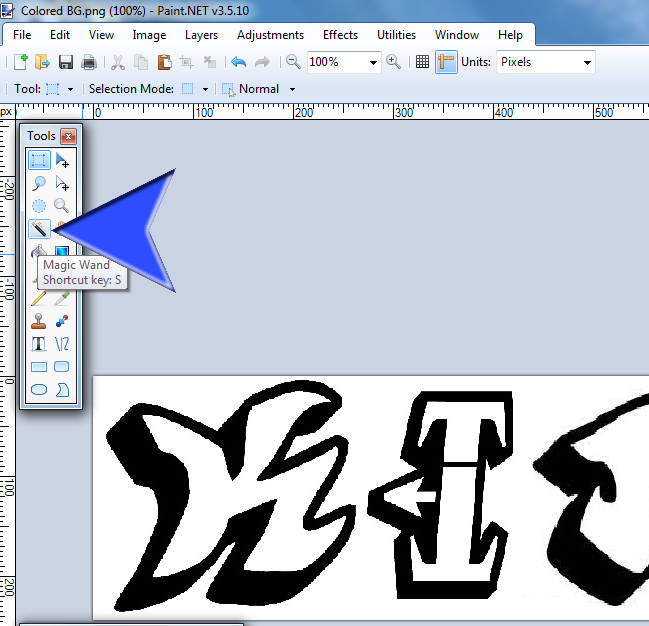
7.) With the magic wand selected, click on the inside area of one of your letters (it should turn to a light blue indicating you've selected it).
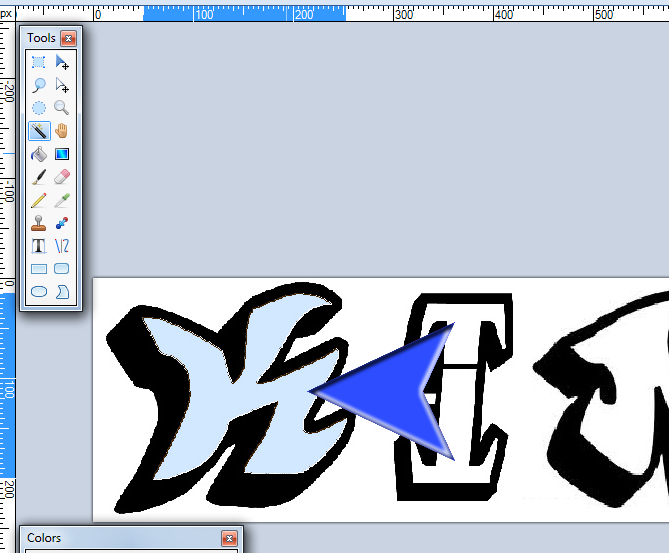
8.) With your selection made, press the "Delete" or "Del" key on your keyboard. This will delete the selected area from your image and thus show the backgound beneath it.
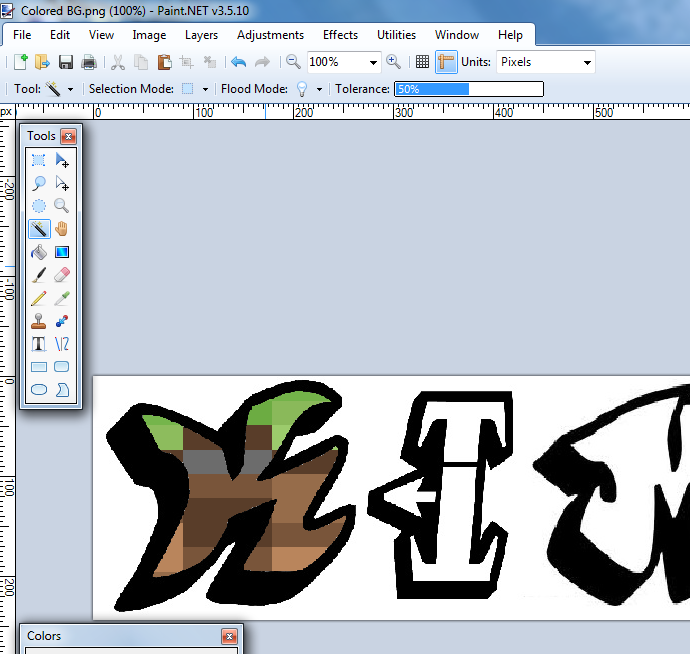
9.) Repeat steps 7 and 8 for each letter.
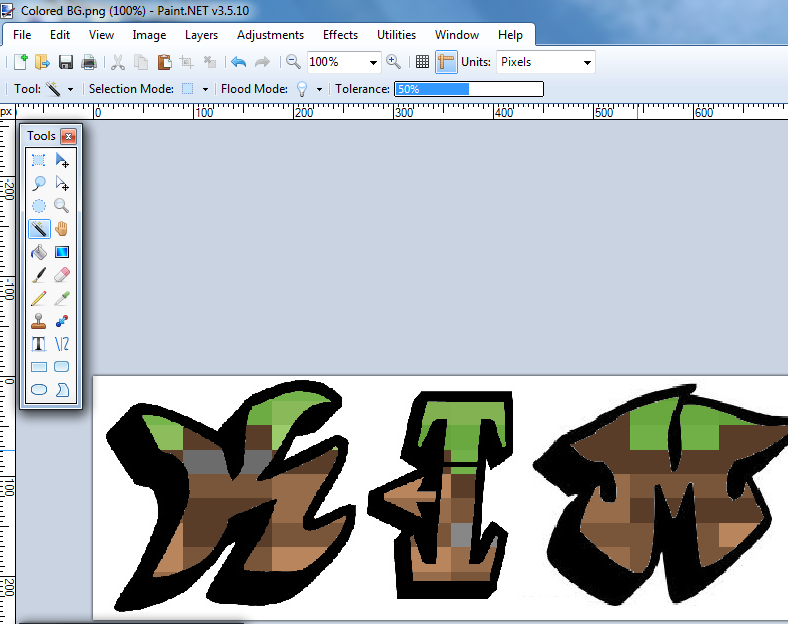
10.) When you've done each letter click on the "Merge Layer Down" button in the Layers pane and save your image.
-
 1
1
-
-
First, you want the colored picture on a layer on the bottom. The text should be on a layer on top of that. Next with the top layer active (if not already highlighted, click on that layer in the layer's pane), use the magic wand on the inside of the text. Now with the inside selected press the delete key on your keyboard. Repeat this for each letter.
Additionally, after you've deleted the inside area of each letter you might find it necessary to clean it up a little bit. Use the AA Assistant once or twice.
Let us know how this worked out for you.
P.S. You may wish to modify your post to remove your e-mail address. You don't know who might be lurking and find it an opportunity to flood it with spam.
-
I know the below images aren't anything new for folks who have visited and are familiar with my gallery, but for the sake of those individuals who haven't and are visiting this thread I thought I'd illustrate (and hopefully inspire others into) taking the basic technique of this tutorial to the next level:


docking toolbars
in Paint.NET Discussion and Questions
Posted · Edited by jim100361
Rick, don't let the high and mighty get to you. There are a lot more of us who truly appreciate your efforts than not.
EDIT:
Dude, I'm not kidding!