


minners71
-
Posts
731 -
Joined
-
Last visited
-
Days Won
9
Posts posted by minners71
-
-
I see there is plenty of confusion on the new rating system and I can see why,points and a rating sysytem just seems a bit dumb. Surely it should just be the rating system out of 5 stars with each voter adding up the score as he or she goes.
ie. Voter one - I love image 1 and give it 4 stars
Not so keen on image 2 and give it 1 star
(No need to add who won as its obvious )
Voter 2 - Image 1 is fantastic I also give it 4 stars
I also quite like image 2 and give it 3 stars
Score so far Image 1 - 8 stars
Image 2 - 4 stars
(and so on until one voter gives enough stars to take the tally on one of the images to 20 at which point that image is declared the winner and a new battle can start )
-
As Welshblue said the tool you want is the one on the top left of the tools menu or you can press 'S' once to quick select it. Further presses select 'LASSOO','ECLIPSE SELECTION'and'MAGIC WAND'
-
If you want to copy the whole of the active layer you can press CTRL+A ( this selects all ) and then CTRL+C.
-
Yes it can,exactly as described in the article.
-
OK I will make it so.
-
^Try not to think about the connecting line when using it and think of it more like the paint brush tool.

Take the following example. You want to copy the red circle but not the blue one, the rectangle selection will be no good for this and lets pretend for this example that the eclipse selection doesn't exsist. With the lasoo selected place your cursor somewhere on the green line ( here just for a visual guide )and trace all around it,once completed it anything inside will be selected. You can then paste this into a new layer or project.
-
 1
1
-
-
OK a tut it is ( although what I have already done could be called a tut ) and I will try to flesh it out a bit.
-
Nice start to your gallery Drew
 now comes the hard part maintaining it
P.S I think the glass box with the PDN logo was one of Helens tutorials.
-
What do you find hard about it NN ?
-
If more people request it or feel that it should be then maybe I will do one.
-
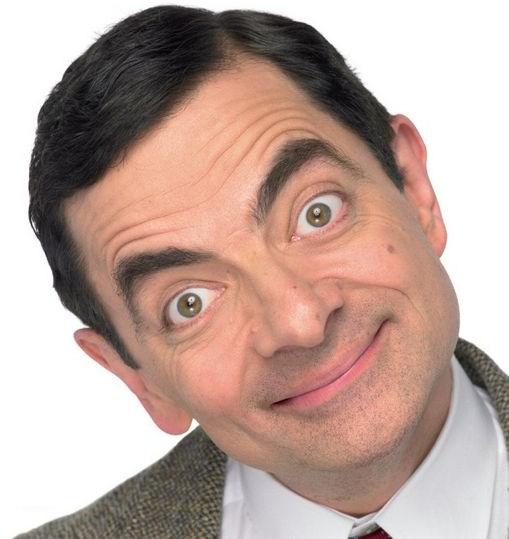
Yep and it's a lot easier than you think.
Find the two images you need on google and click on the "Full size image" then right click with the mouse and select "Copy image"
Now start up PDN and select FILE>NEW this will open up a canvas at the correct size for the image you just copied from google then press CTRL+V to past it in
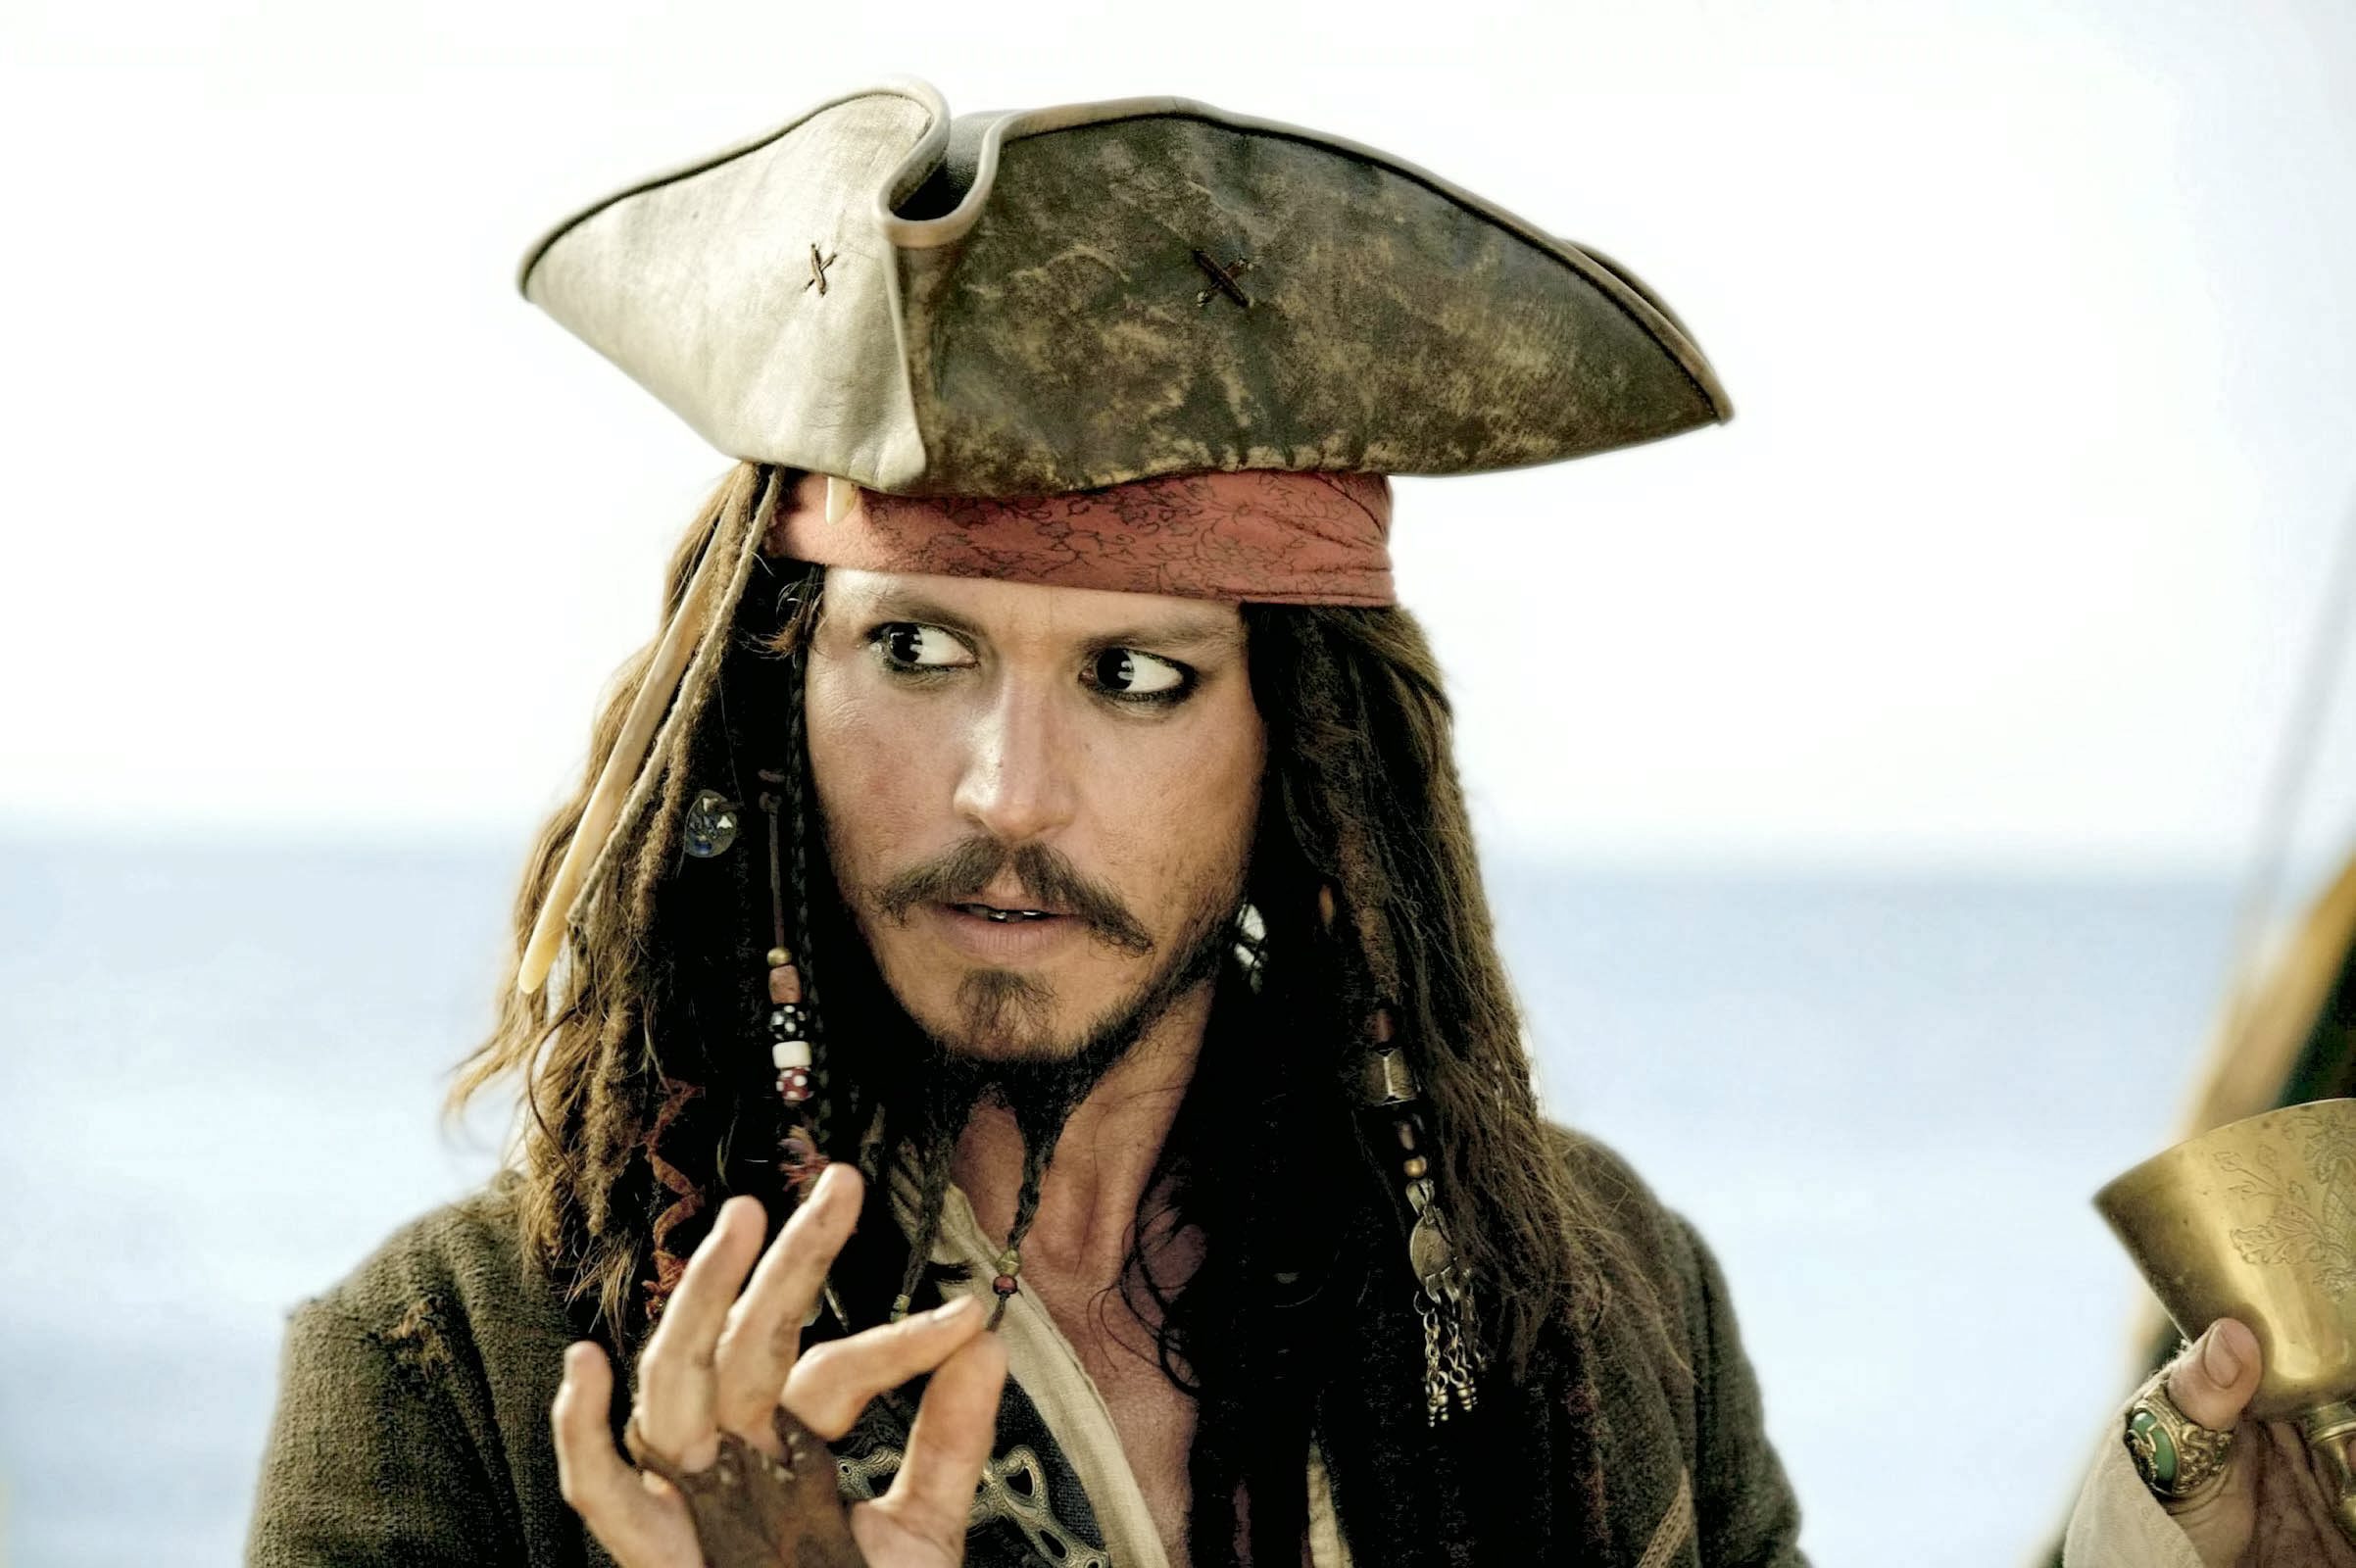
For Jack sparrow I used this one then resized it by 50%
http://static.tumblr...40308358415.jpg
Now do the same for this image of Mr Bean
http://images3.wikia...oliday_ver5.jpg
Now you can use LAYERS>ROTATE ZOOM to put the Mr Bean imag straight,then using the lasoo tool draw round his face something like this
Note I used the paintbrush so it shows up easier, you can also do this and then use the magic wand tool and click inside the outline. Whatever method you use then press CTRL+C to copy it.
Now go to your Jack Sparrow image and add a new layer then press CTRL+V to past in the face of MR BEAN. Using one of the corner nubs resize it by holding down the SHIFT key and the left mouse button and position it over Jacks face it may help to make this layer slightly transparent so that you can line up the eyes correctly and you may wish to flip the layer horizontally to get a better fit LAYERS>FLIP HORIZONTAL
Once you have the image where you want it you may need to erase small parts that are not needed on this example some of Mr Beans face went over the bandana so I erased them. You then need to feather Mr Beans face using EFFECTS>OBJECT>FEATHER at 10 and then repeat it again at 10 this helps the face blend in now you just need to match the colours up by using ADJUSTMENTS>HUE/SATURATION
this is what I got with about 5mins work.
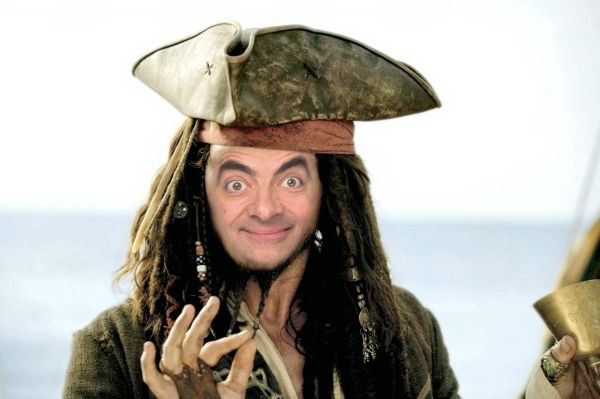
Feather plug-in can be found here http://forums.getpai...?showtopic=2140
-
@Avim could you explain why you use the freeform rather than the paintbrush tool to trace an image? I am wondering if I am using it wrongly.
-
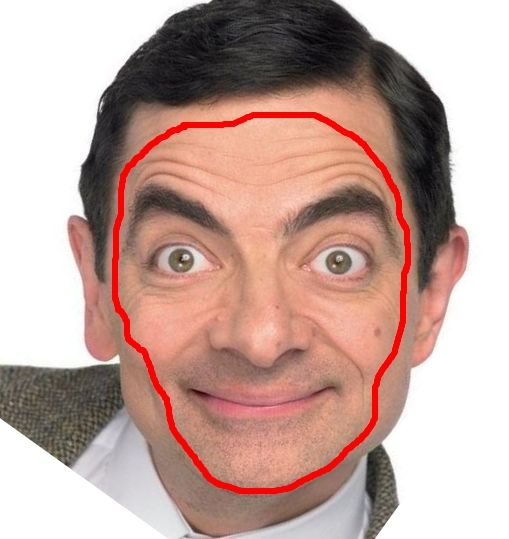
Here's one from me, havent linked to stocks used as it is quite obvious ( the balls ) but if you feel I need to then I will.

-
You have to remember as you cannot update your entries in the sig of the week comp most entries came in at the last minute.
-
The following pic should help.
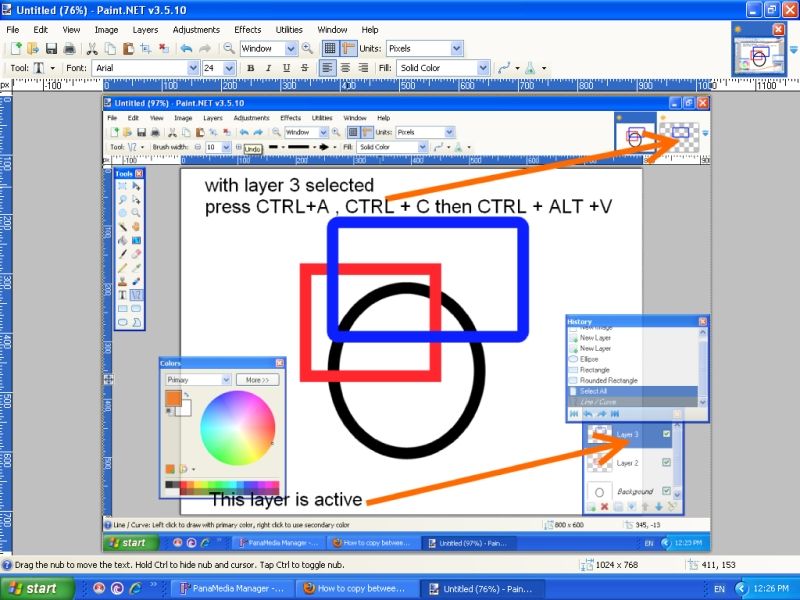
Make sure you have the correct layer selected in the case above I wish to copy the blue rounded rectangle so I click on layer 3 in the layer window ( where the bottom orange arrow points )
Then press CTRL+A ( this selects all ) CTRL+C ( this copies ) followed by CTRL+ALT+V ( this pastes into a new project as shown where the top arrow points, you can then select each project just by clicking on them )
-
Nice job Drew simple and clean but I feel that Chimay's is just that bit better and more like a traditional sig with a nice blended design and great text placement.
Drewdale -2
Chimay -2
-
I will have to go with Rafroller nice and simple ( sometimes that's best )
@Penguin I cant seem to make out any of the text on your's which is a big no in a sig

Penguin - 0
Rafroller - 3
Rafroller wins.
-
^Never realised they were plug-ins been using them for soo long.
-
Off topic a bit but just re-read mine and welshy's tiff a few posts back and I wish to apologise. I was going through some stuff back then and I wasn't the easiest person to get along with and think I probably should of kept off the forums at that time. So if you are reading this welshblue sorry
-
1
-
-
I second yellowmans post,great spacescape for your first post
It's made me want to make another one. -
Tough one,
NN79 has no border something I'm not too keen on, where as Drew has an overly big border something else I don't like.
Think I am going to have to go with NN79 on this one for the shine and 3D effect.
NN79 - 2
Drewdale - 0
-
If something doesn't work it may be that you have a selection active try pressing ctrl+D to deselect then try again. As for the bucket not filling fully mess about with the tolerance settings, its at the top in the middle 50%normally works fine.
-
Open up paint.net and press ctrl+a then hit delete on your keyboard (this gives you a transparent background)
Now select the text tool by pressing "T" and write your text.
Now go to EFFECTS>OBJECT>OUTLINE OBJECT ( I have 2 versions one with a chinese symbol and one that looks like a eye ) and choose your colour and thickness.
-
^yep would be better if we could see it in action as we are using it but still one of my fav and most used plug-ins.

Image Battles - discussion
in Discussion
Posted
^Its not exactly rocket science is it,lol.
This is though
where is the momentum of the rocket at time t=0:
and is the momentum of the rocket and exhausted mass at time
  :
: 
and where, with respect to the observer: is the velocity of the rocket at time t=0
  is the velocity of the rocket at time
 is the velocity of the mass added to the exhaust (and lost by the rocket) during time
 is the mass of the rocket at time t=0
  is the mass of the rocket at time
The velocity of the exhaust in the observer frame is related to the velocity of the exhaust in the rocket frame
  by (since exhaust velocity is in the negative direction)