


Kayreeed Caliburn
-
Posts
64 -
Joined
-
Last visited
Posts posted by Kayreeed Caliburn
-
-
How do I find the flow if the render's looking forwards? Not towards an angle or anything, its looking directly at you?
-
what is median blur?
can't find it
-
Huh. True eh. Thanks for replying.
-
For Step8a, whats the intensity and colour saturation?
-
Make sure you added the new layer before you use the gradient tool. Other than that, you appear to be right on track. Just open up the layer properties and pick a layer blend mode that looks right. After that, use the alpha mask plugin to remove the extraneous portions.
So...what did you do at step 7c? How did you cut the shape?
-
my bad...I forgot to mention that it was a plugin. you will need the alpha mask plugin to do this.
I'm stuck on 7c. And will you please make it more clear?
http://i1227.photobucket.com/albums/ee421/Kayreeed/Untitled.png
-
Step 7a was where you made your alpha mask. I wonder, though, if you are trying to make this on a white layer rather than a transparent one...
The whole thing is transparent, and how did you cut out the shape using the alpha mask?
-
That is what the alpha mask was for.
Yeah but how do you use it to cut it out? Use line/curve to do it? I tried and it doesn't show up along the edges
-
Is there a quick way to cut out the shape of the blade?
-
My bad...emboss is supposed to be on the sword layer. The one with the visibility unchecked is your alpha mask which, at this point, could be deleted (but I wouldn't just yet...just in case)
The only place where I see your primary/secondary colors being an issue is for the gradient. In that case, you want the middle to be white.
So I flatten the image without checking the visibility?
-
Here's a paint.net translation of the tutorial:
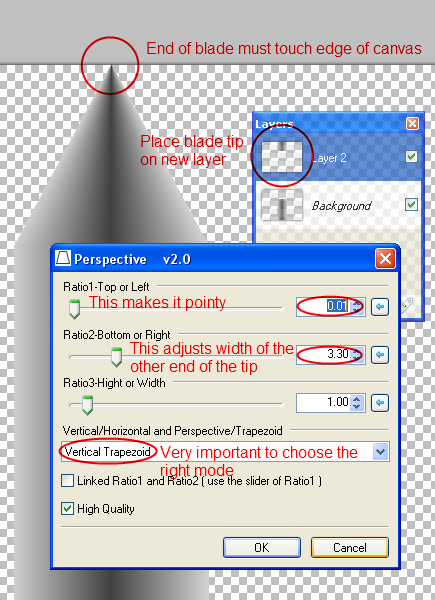
1-3. no change --Make sure the end of the sword that will be pointy is right up against the edge of the canvas. Scroll down for details.
4. use perspective plugin to duplicate the effect
5-6. replace with flatten image, then "invert colors"
7. This one, I will split into a few steps some sub-steps removed
a. Make an alpha mask of your blade. By this, I mean duplicate the layer and use "brightness/contrast" to make it completely black or white, then hit "ctrl+a" then "ctrl+c" and uncheck the layer visibility. You may wish to save this in a different file just in case.
b. Run "emboss" on the layer from whatever angle you wish, then use the alpha mask plugin with "paste from selection" checked.
c. (Optional) Add a new layer on top and make a circular gradient from white to black. Try to offset this slightly from the middle of the sword, and make the outer edge reach at least the end of the sword. Use the alpha mask from before to cut it into the shape of your sword, then play with the layer blend mode a bit.
d. flatten image
e. Use the AA's_Assistant plugin twice to remove the ugly outline around the blade.
8-8a. no change. Make sure you use the alpha mask on the layer you ran motion blur on. Also, 25% opacity is approximately 64 in the paint.net layer properties window.
9-10. You will be making your line on a white layer rather than on a transparent one. Blur the line slightly if you wish. Run emboss from 90 degrees. Play with the layer properties some more. I would try glow or overlay as layer blend modes. Lower the opacity as desired. Use the alpha mask again to remove excess materials.
11. no change
12. Flatten image
13. If needed, run the AA's_Assistant plugin again
You now have your blade!
I really didn't like the handle in the tutorial, so I won't post a translation unless you really want it.
EDIT: I wrote this without testing at all, so if anything doesn't look right, let me know and I'll find a solution

EDIT2: Removed some extra steps and edited some steps to remove confusion. Changes are in red.
Is the emboss on the visibility unchecked layer?
And is black the secondary colour or the primary and vice versa for white?
-
Also, I removed some steps in the tutorial that didn't need to be there...
example of what I came up with using my translation+a few tweaks:
http://i758.photobucket.com/albums/xx228/pdnnoob/swordexample.png
I get it now..I keep on changing Ratio2 instead of Ratio1..Thanks a lot!
-
Sorry about that...that wasn't the plugin that I intended to reference, but as it turns out, it works a ton better!

What you will have to do is move the sword so that the end is up against the right or left edge. That way, after you cut the tip to a new layer, you can set the plugin to "horizontal trapezoid". All this plugin will be for is getting the angle right and sharpening the tip. You can adjust it to fit afterwards using the move pixels tool.
One thing to note is that the plugin will only work properly for you if you have your blade centered vertically. There is a plugin for this called "Align Object" that I would highly recommend downloading. I don't know what I would do without it

I can't get it to pointy?
-
Ok. I'll try it.
-
Please can you give me some guidelines to how to use the perspective plugin? I'm totally stuck.
-
Or the image disappear altogether...
-
I don't understand the perspective plugin. I changed the all the ratios and the image hasn't changed?
-
When I said I want to make the blade I want to make one exactly the same
-
I know that tutorial, but it doesn't fit...I want the middle line on the blade
-
http://www.dwphotoshop.com/photoshop/SwordTutorial.php
That is the link to the tutorial, and I want to make the blade (exactly the same), but apparently PDN doesn't have the "Lighting Effects" thing. So is there a way to achieve that?
-
I don't think so because I tried
-
They should look like they are scars or sratches
-
I typed some random words on another layer (arm below words). What I want is like the words are "etched in" to the skin of an arm, like scars. Is there a way to achieve this? I'm currently doing a project
-
I'm looking for dried blood stains, and they look a bit like rust as well


Ed Harvey Effects v 5.0 (2022-12-24)
in Plugin Packs
Posted · Edited by Kayreeed Caliburn
Does the zip file contain dll files? I extracted the zip file and it only contains a pdb file?