

Red ochre
-
Posts
3,018 -
Joined
-
Last visited
-
Days Won
125
Posts posted by Red ochre
-
-
-
Effects written with codelab can call built-in effects such as Gaussian blur, however I think what you want is something like Scriptlab, unfortunately that is obsolete.🙁
-
 1
1
-
-
Spoiler
 using (Graphics graf = new RenderArgs(dest).Graphics)
                            {
                                graf.Clip = new Region(rect);
                                graf.SmoothingMode = System.Drawing.Drawing2D.SmoothingMode.AntiAlias;
                                using (GraphicsPath botface = new GraphicsPath())
                                {
                                    botface.StartFigure(); botface.AddLines(basecorners); botface.CloseFigure();
                                    using (SolidBrush solidtestbrush = new SolidBrush(bfcolt)) { graf.FillPath(solidtestbrush, botface); graf.DrawPath(new Pen(bfcol), botface); }
                                }//end botface block
// another five faces done here in the real code
}//end graf block

// This is one of the many rectangles drawn in my Cuboids code (done in Visual studio not codelab). 'botface' means bottom face of a cube (not an insult;-)
// Note:'dest' is surface which gets copied to 'dst' you'll prbably write straight to dst after copying src to dst.
// I place Graphics paths, Brushes and Pens in 'using' statement blocks so they get disposed when no longer needed.
// Otherwise you could run out of memory if you forget to seperate Dispose statements for everything created.
// basecorners is an array of 4 PointFs calculated before creating the graphics stuff.
Hope that helps... I've found it better to use 'using' statements to ensure graphics objects get disposed of.
-
 1
1
-
-
Good result @Welsh Yellow Cheddar
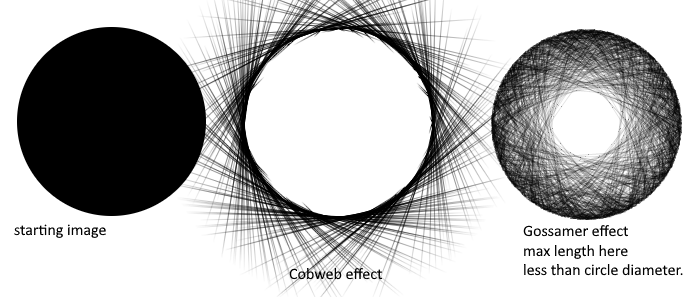
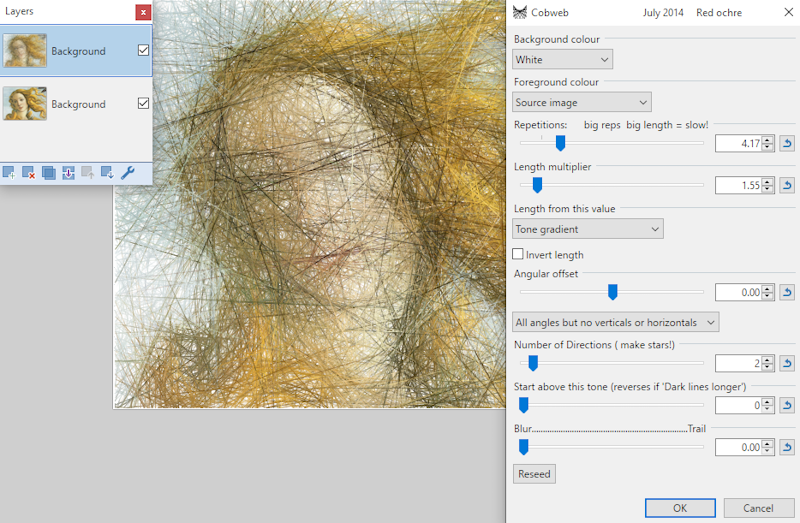
Cobweb: This draws lines (or stars) based on the direction of how the tone of the image changes (tone gradient)... Draws tangents to any obvious lines on the source image.
Gossamer: This works in two stages - first it finds points (shown as red dots on a black background. Aim to get a recognisable image at this stage but not too many dots).
Second stage (remember to check the box) will join these found dots with straight lines.The only way to really understand these effects is to play with them!. Start with something simple eg. a black circle on a white background.
Good luck!
-
Use coloured cotton?😉
-
1
-
-
-
-
Hello @MmmmMMMmMM
The built-in line curve only has 4 control points, however the Shapemaker plugin here allows curves to be chained together and many other options too.
It can be a steep learning curve but is well documented.
My BeznCurve plugin is a simpler alternative with 6 control points. here-
 1
1
-
 1
1
-
-
I would recommend:
1. Camera lens distortion (kb_lens) to correct the camera distortion then
2. Quadrilateral Correction to make the poster rectangular.
Both are normal zipped files that windows can decompress.(I use this method when photographing paintings slightly from the side, to avoid shine from the oil paint surface).
Apologies to @evanolds
-
😄 Apologies @Pixey & @lynxster4... well it was both of you keeping both comps going!
-
-
This plugin may help too Text Distortion
-
Just about to say it's working for me 😉
-
1
-
-
3 hours ago, LWChris said:
the examples seemed way too complex
If you scroll down to my post on the 14th of September 2016 there is a screenshot of the settings for a simple loopy line.
Hope that helps
-
-
Hello @Hakanai - welcome to the forum.
Codelab is the best place to get started and there are tutorials here.
More advanced Visual studio plugins are discussed in Plugin Developers Central.-
2
-
-
Feathers OotF:
Apologies for not voting!... I considered ALL the entries of a very high standard and couldn't decide which I preferred... love the different approaches.
I did have a quick attempt at this (not very convincing - so did not submit). I greatly admire the results you have both achieved!👍-
1
-
 1
1
-
-
Interesting question and informative answer.
If you cannot add internal R.A.M., adding a quick 'thumb/flash drive' memory stick via U.S.B. and setting it to 'ready boost' sometimes helps.
In this particular case (with simple gradients), possibly worth investigating an S.V.G. editor too (e.g. Inkscape - free), for smaller file sizes, might be an alternative?. (I know, heretical!).
Only rough thoughts... personally I find working with vector graphics challenging to say the least!
-
Step 6: Ctrl + shift + V should work. (Creating new transparent layer to paste into).
By pasting into the same layer, the new pasted image is overwriting the existing line, and when resized the copied transparency is replacing the existing line and showing the white background beneath. I don't think it is a bug.
@tieTYT I am confused by your gif video - why is 'Windows features' open?
-
Not sure about the 'based off image' bit but Gradients galore can do dithered gradients.
In my pack, link in sig.
-
1
-
-
I think Vanishing Trails may help here
Though for a small number of repeats as in your image it may be easier to just use duplicated and resized layers.
-
1
-
-
Thanks for hosting @Pixey, thanks @lynxster4 and those that voted.
Pity there weren't more 'competitors' and entries though!
-
1
-
-
4 hours ago, HenryH said:
Since i'm just panning in the Horizontal direction,
this should be a Loss-less distortion, and i feel like i shouldn't have to specify Quality at all.
If you are ONLY moving/tiling your image horizontally by an integer amount then 'quality' (sampling) is probably irrelevant.'Nearest neighbour' is correct.
If you are moving/tiling your image horizontally and vertically by a non-integer amount then the surrounding four pixels must be used. The new pixel is somewhere between the known ones.
Rotating the image within the plane is probably much the same, four pixel sampling should suffice.NOW - if you are tiling AND tilting your image, the apparently distant pixels, on the 'horizon/vanishing point', will be an an average of the whole image!!!!!🤪
That means a tilted, tiled surface has to find the average colour of the whole image for every pixel on the 'horizon'. So the effect could take days to process a large image!
(Yes, there are always techniques to be more efficient - but often slower and buggier than the simple approach).I wanted a higher quality way of tiling/resizing/tilting so wrote the plug-in 'Aardvark' (in my pack) - I was greatly helped by @MJW
At the time it was written, 'Rotate and Zoom' was less powerful.
There is a trade-off between 'quality' (how many pixels you process) and speed, especially for tilting. Many things in life have analogous 'trade-offs'!If doing pixel art then @MadJik's panelling is your best option.
For most uses the built-in 'Rotate and Zoom' is good.My 'Aardvark' (and @MJW's) plug-in has sampling of up to 21 when tilting, which means a 21 * 21 square, at times, 441 pixels being sampled just to get the correct value for each new pixel!... that's why there's a slider - to allow a rough setting of the controls, to preview results, before committing to a high quality render.
* IMPORTANT: The link to the 'Aardvark' plug-in is in my pack (link in sig), but you really should get used to using the plug-in index!... it is a useful/enjoyable way of discovering useful effects.
-
1
-
1
-
-
Layers/Rotate and zoom, built-in and at least two plug-ins in the index too.
-
1
-


Cross Hatching From a Black And White Smooth Shaded Drawing
in Paint.NET Discussion and Questions
Posted
Scribble (in my pack, link in sig) may help?