


afcdon
-
Posts
22 -
Joined
-
Last visited
Posts posted by afcdon
-
-
-
I would like some ideas for how to create the thread of a screw as in WelshBlue's work here on a spanner (Spanner.jpg).
There is a tutorial on creating a screw head only.
Have made a couple of attempts, but have hit a brick wall

-
A big welcome to you ActiveBiz and thanks for the great comments.
-
Try out the BoltBait's Bevel selection plugin - that will give a raised effect with shadow on 2 sides of the rectangle
-
The alpha mask step is not working for me - see this link. I am getting a completely transparent Text layer - have tried twice and can't see where I'm going wrong.
-
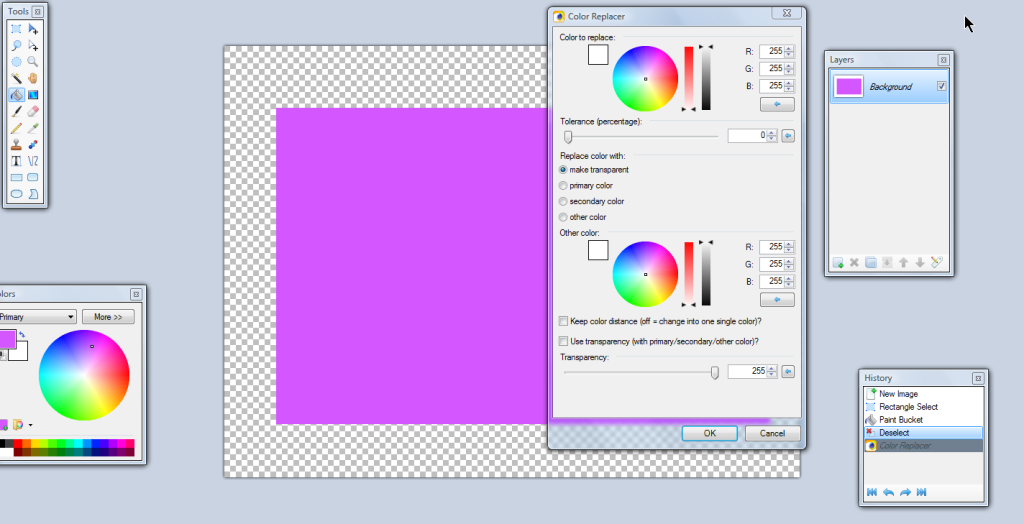
One plugin to try is Color Replacer - download from here My link
See the following screenshot for the setting you need to change your white background to transparent.
http://i1193.photobucket.com/albums/aa341/afdcon/colorreplacer.png
-
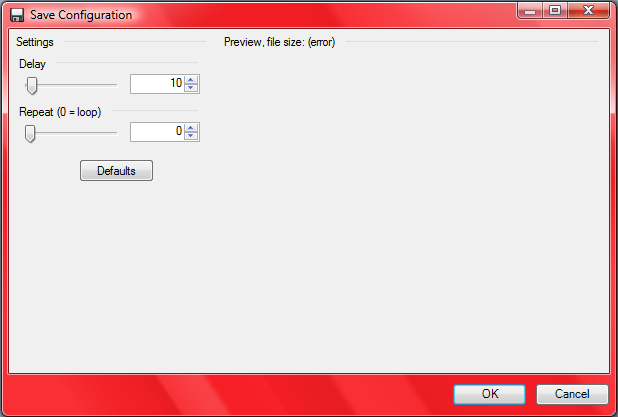
Alright ... now, it is letting me select .agif and .apng as save types, but whenever I try to save it, it gives me THIS
I haven't used the plugin, but I suspect the Delay option can be specified to adjust the speed of the animation and the Repeat Value if the animation needs to loop (value of 0 = no loop).
Hope th at helps
-
Ooohh ... thanks for the help. Really appreciate it~
Edit: Okay, now I have a couple more problems; it isn't letting me save the file as a .agif, and I don't know how to add the Plug-In.
For installing plugins see this link. When you have installed the plugin, I suspect then you will be able to save file as .agif
-
Please don't think you are not smart enough for this forum. It is a great place to learn lots of stuff about PDN and it does sound like there is a learning curve for you. I speak from experience - my first experience with layers was with Photoshop and it bamboozled me and then when I found PDN it took a while for the layers concept to sink in and, of course, now I understand it I can't believe I didn't understand it in the first place
. Bottom line - stick with it. Try a google search for "paint.net video tutorials" - this could be a good way for you to get to a level where you do understand more of the postings on here. Second, get understand how to install and use some of the plugins and use some of the Newbie Tutorials to increase your confidence in using the software.....and do please remember to give descriptive titles to thread you post.
-
You may want to look at the following plugins - Circle Text http://forums.getpaint.net/index.php?showtopic=16347 and Wave Text http://forums.getpaint.net/index.php?showtopic=16634.
When installed they will appear under Effects >> Text Formations
-
The short answer is no. PdN isn't a web design program. However, it can be used alongside other programs to assist you put together a website - e.g. I use Serif WebPlus software and manipulate images in PdN
-
Did you read the rules? http://forums.getpaint.net/index.php?/topic/12139-tutorial-replying-guidelines/
-
Download the plugin here http://forums.getpaint.net/index.php?showtopic=13003.
It will appear in the Adjustments menu.
-
Art,
To get text in 1/2 circle, used the Circle Text plugin.
On background layer I have created the outside layer of text - in the UI, Angle of Arc set to 180; Angle of Start -90 and Clockwise ticked. Radius set high - play around with setting.
Created a new layer - screenshot2 - created the next inside layer of text - in UI same settings as before, except Radius value reduced.
Then used Elipse tool to create circles - on new layer - setting brush wide as appropriate and using Object Align to centre.
Created new layer and created 1st text inside elipse - settings as before but reducing Radius.
Final text - "Distinction" - into another new layer - unticked Clockwise and adjusted settings until happy.


-
You could have a look at the Random Lines plugin - http://forums.getpaint.net/index.php?showtopic=7630
Use 'Select the ends of the lines as' -- Triangle.
However, depending on what you are trying to achieve, this could become very tedious - moving them into position you require, rather than the random nature.
-
Art,
See attached which shows text at top,bottom, left and right of circle - screenshot shows I used separate layers for each item of text (e.g. 'top' text, 'bottom' text, etc). I used the ellipse tool to draw my circle - on it own layer.
You can move text to be outside the circle when using the Circle Text plugin by adjusting the Radius slider. Also use the Clockwise tick box, to alter direction of the text.
With regards to curving text at start and end of sentence, I can't think of a good solution.

-
Art,
I think this is what you are after.
I used the Circle Text and WaveText SUI plugins
Play around with the settings and I'm sure you will get the effect you want.
-
Yanin,
This is a Window permission (nothing to do with Paint.NET). If you are logged onto the PC with admin rights just click on the Continue button, when you are prompted to copy. If not an admin on the machine, you need to speak to the person who is.
-
Thanks for that Sarkut
 Have managed to recreate.
 -
Put each item of text on a new layer - then if you need to erase the text you can do so by deleting the layer. Paint.NET is not an object-based program.
Alternatively, download the Editable Text plugin
http://forums.getpaint.net/index.php?showtopic=10056
which gives you the ability to re-edit text on a separate layer
-
Hi, this might be a big ask and I feel a bit stupid posting this.
Can anyone tell me what effect I might have used on the attached (on the orange/brown rectangle)?
I did a gradient fill of the rectangle and then a Drop Ripple and then I can't remember what I did - tried reproducing but to no avail - and I like the effect.
Lesson learnt - make notes as you go along.


Another how-to question: Wet Sand
in Paint.NET Discussion and Questions
Posted
To add the borders around the text - which plugin do you suggest using?
Thanks in advance