


Neil Cassidy
-
Posts
71 -
Joined
-
Last visited
Posts posted by Neil Cassidy
-
-
I knew that anonymous functions existed, but could never really find a good excuse to use one in an object-oriented context. This is definitely a case where it makes a lot of sense! Thanks for the tip.
-
Sorry to anyone who's been waiting! At long last, here's a version that polls IsCancelRequested. I'll put the download in the first post in a second. Just a few lines of code added, and it should cancel much faster. I haven't tested it exhaustively, but I was able to cancel a 10-cluster run on a 6 megapixel image within about 7 seconds. The previous version takes far longer to cancel (at least 40 seconds) because it has to complete the entire clustering run before it gets a chance to "quit". This makes me very happy, and I hope it makes others happy too. Thanks very much for adding the property, Rick!
I could probably improve the cancellation granularity even further by more careful placement of the polling code, but I'll save those improvements for the rewrite that I'm working on, which should have significantly better performance anyways... some tests that I ran a couple weeks ago were very encouraging. I'll try my best to get it done this weekend - most of the difficulties that I'm experiencing have to do with design stuff rather than the algorithm itself.
-
Thanks for this, Boltbait! It's useful in and of itself as a single consolidated way to make a number of adjustments, and the source code is a great example of how to compose effects (and by composition, I mean function composition).
-
Yeah, that's pretty much the idea, but (from memory) I think it attempts to ensure that the Laplacian matches up between the luma and chroma channels, rather than the gradient. And it uses YCbCr, which is a very popular linear color space - SDTV, HDTV, JPEG, and probably tons of other things use it, mostly because it facilitates downsampling of color information while leaving intensity information roughly unchanged.
-
These techniques are really interesting! I hadn't read the papers before.
Sometimes I manually inpaint simple things by selecting the void, filling it with the average color of some small surrounding region, and then running a small-radius Gaussian blur over the void iteratively until it seems to have converged. This is roughly equivalent to solving the Laplace equation over that region with Dirichlet boundary conditions... it ensures that the levels are smooth over the inpainted region, but the solution doesn't really respect what's "going on" at the boundary. *
That's about all I can remember about partial differential equations, so understanding the one described in the first paper is a little tough. The most I can figure out is that, since the image will be constant at the steady-state solution (∂I/∂t = 0), the gradient of the Laplacian of the solution will be orthogonal (dot product of the two terms = 0) to the isophotes (curves of equal luminance). So the Laplacian of the intensity surface will be constant along the isophotes... but I'm having a tough time determining what exactly this means in terms of how it determines the structure of the final image... best guess is that it enforces constant "sharpness" along the isophotes, so that a crisp edge doesn't fade into a soft one or something.
* Incidentally, it also happens to be one of the obscure cases where differences between "true" and "triangular" Gaussian blurs become apparent!
-
This happened to me as well! I edited a photo in Paint.NET, sent a copy to my girlfriend (via Windows Live Messenger), and on her end the thumbnail still displayed the original image. Refreshing the view didn't change it.
Forgot all about it until I read this. Couldn't fathom how it could have happened, I didn't even know that the thumbnail was attached to the image file itself. I can't remember exactly how I fixed it, but I know that I nuked the Windows thumbnail database at some point. You can do that by running "Disk Cleanup".
-
This sort of thing is impossible in general (lots of rants on the internet about the infamous CSI "Enhance Button"), but in this case, one can enlarge the image and then sharpen up the edges by using some sort of local or global contrast enhancement. Tanel made a "Local Contrast Enhancement" effect, global contrast enhancement can be achieved by playing around with the left-hand slider in the built-in "Levels" adjustment. There are probably other ways to do it, but I can't think of any off the top of my head.
-
I saw an FFT-based technique like that in an "image processing cookbook" that I found somewhere. It was intended for removing noise, by presenting the power spectrum as a canvas and allowing the user to zero out parts of it. Pretty cool.
If you're interested in developing a simple inpainting plugin, you might start with a method due to Efros and Leung (c. 1999?) that resamples small texels. It's pretty slow, but it's simple, and yields excellent results for small gaps in my experience. I think one of the authors has a fairly comprehensive website about the method, including papers and links to related research. The only really heavy artillery you'd need would be a way to sample from a Gaussian distribution, but there are plenty of relatively easy ways to do that, particularly http://en.wikipedia.org/wiki/Box-Muller_transform.
I was going to do something like this, but I had already worked with the Efros-Leung technique in the past, and wanted to try something different. I eventually gave up on the idea mostly because any conceivable interface would be tough to either develop or use.
-
OK, this didn't turn out as well as I had thought. I was thinking that template matching would be sufficient for finding the images to replace. Turns out that it has a pretty tough time resolving the precise location of the pattern, and it also runs very slowly. It might be possible to speed it up by working at multiple scales and pruning at the faster ones, but I'm not sure how accurate this would be.
There are other methods for doing the recognition part, but some are patented (i.e. SIFT) and most are still quite complicated.
I think I'll have to put this idea on the back burner for now, sorry about this! I have to figure some other things out before I can code up the whole thing. Time willing, I should be able to put something together eventually.
-
Perhaps you're looking for the "Transparency" plug-in that's part of BoltBait's pack? It'll allow you to change the opacity of the selected part of a layer. viewtopic.php?f=16&t=22819
-
BriDog, some page that I found (http://www.planetavp.com/modmaker/modmaker2.html) suggests that a tool called DEdit can import/export Lithtech textures or skins in TGA format, which Paint.NET is certainly capable of working with. I don't know what this tool is, seems to be a level editor. Perhaps you already have it. You might try starting there!
-
This is actually a pretty basic pattern recognition problem! Your idea is really interesting actually, I've never thought of running a "find and replace" operation on an image. I can certainly code up a plug-in that does this without much trouble. I have a couple of other things on my plate at the moment though, how soon do you need it?
-
Kris, I'm definitely not going to optimize this effect for the 800x600 images that I might be able to fit into a decent-sized L2 or L3 cache. I can't control what images users want to run it on, and so I should probably be making performance acceptable for the largest reasonable size, which is roughly on the order of the 40MB images that my camera shoots. Anything around that size can't possibly fit in L2 or L3, and it's pointless to try to make it happen. I'm quite interested in using the effect on images that large, actually. I'm never going to achieve that if I spend my time on tedious low-level optimizations.
Thanks for getting me thinking about cache utilization though. I believe that I've come up with a suitable change to the underlying algorithm that will allow this effect to make full use of any cache, just have to implement it now.
Major update coming soon!
-
It's a textbook actually! Imaging and computer vision stuff. I'd highly recommend borrowing it if you're interested in this sort of thing.
This effect is not really intended to isolate objects... as I mentioned in the first post, it's supposed to cluster similar pixels together. The similarity measure is squared distance in a six-dimensional space that consists of color and location variables (and I might add texture descriptors too). There are much better ways to isolate objects, actually. Wikipedia has a pretty good description of the overall goal of image segmentation (and of many techniques) on this page.
If I were to just use the color variables, this effect would perform color quantization, which is what you're thinking of. If I were to just use the location variables, the effect would return what's called a centroidal Voronoi tessellation (a tiling of the plane into cells based upon a set of points called generators, such that all points in any given cell are closer to their own cell's generator than to any other cell's generator, and each cell's generator is also its centroid).
You can see something very close to either result by biasing the effect all the way towards color or location, respectively. Try biasing all the way towards location when operating on a manual selection - it will partition the shape into cells and fill the cell with the average color of its members. The color information still has a bit of influence at 0.99, so there will be a little "noise" in this version. Example:

If you play around with the number of clusters when you run it with bias 0.99 on geometric shapes, you can get some neat results:

At intermediate settings, it essentially interpolates between color quantization and construction of a centroidal Voronoi tesselation. With moderately high bias towards location, you get a tesselation with fuzzy edges that are sensitive to the original colors. With moderately high bias towards color, you get a somewhat location-sensitive color quantization. This is by clustering in all dimensions simultaneously, weighting some more heavily than others by an amount that depends upon the bias selected by the user.
You might be onto something here, zarathoustra... although I don't intend to remove the ability to cluster in all dimensions, I'm not using the 0.0 or 1.0 ends of that bias slider right now... I could write some fast code based on small integers to perform strictly-color or strictly-location segmentation, and occupy the extreme ends of the slider with that.
Or better yet, I could fork that stuff off into two different effects and put all of them in a Segmentation sub-menu... one based on color, one based on location. That would allow easy access to a couple of faster effects for what some people might think of as the most interesting uses, and I'd still be able to chip away on a "deluxe" version, which ideally is going to automatically select the bias. Probably by some simple method like standardizing the dimensions, which would give me a decent excuse to find/write some C# matrix inversion code.
Anyone have any thoughts? Do you make use of the fine-grained control offered by the bias slider, or can I replace it with an automatic method? Do you ever use the palette creation option with the bias set to anything other than 0.01? Would you like to see a few specialized segmentation effects instead of a single catch-all effect?
-
Hi Kris and zarathoustra! Thanks for the tips, I appreciate that you took the time to look at the code and write a post.
Kris, some of the optimizations you mentioned are definitely low-hanging fruit, namely #5 and parts of #1. The method that you propose in #2 is dangerous in general, though... it's a classic example of a numerically unstable algorithm, and you can get an arbitrarily bad result when running this on large input sets.
Regarding #3 and #4, I'm not sure whether it will actually improve cache utilization much - the working set can't really be expected to fit in L2 or L3, and the various intermediaries should be detecting this trivial access pattern and prefetching. Actually I'm currently saving roughly 100-1000 unnecessary conversions and multiplications per pixel by caching the results of that small computation in main memory. I think that most of my gains here are going to come from storing the input data in structs, but I'll certainly re-evaluate this after I've made some changes.
zarathoustra, using the location information seems to be a pretty standard thing to do - see Forsyth & Ponce 2003, pp. 313-317. I actually intend to add texture information when I get a chance, but using a bank of Gabor filters is probably too heavy, so I'm still thinking about other ways. Combining two cluster centers when they become too close is not really going to be helpful because the algorithm is constantly trying to separate them. It is a clustering algorithm, after all.
You did allude to something else that I've been looking at, though... I can't find any papers which discuss or evaluate a technique like this, but I think that I might dramatically speed up the overall clustering by first clustering a small proportion of the pixels (say, the top left corner of every 4-pixel square) and then propagating the labels to nearby ones, a multiscale approach of sorts.
Frontcannon, no problem. I hope it helps. Looking forward to seeing the results!
-
No problem MJW. You might be right about using volatile. Although the language specification only refers to reordering optimizations, MSDN does say that single-threaded optimizations won't be performed on volatile variables, and I suppose that from the point of view of a single thread, that particular optimization might be permitted, as risky as it seems. Some similar code is claimed to be correct in this MSDN article, namely Figure 7, which suggests that the optimization in question won't be performed... but who knows. In the course of reading about this, I've seen many different solutions to this problem which take into account subtly different assumptions.
At any rate, the memory barrier solution that I suggested earlier may or may not be sufficient to prevent the computation from occurring twice, depending on whether or not the second if-test could be removed. It might not even synchronize properly on some systems without a second memory barrier before the first if-test, and this may be inefficient. For the sake of brevity I won't get into any of the details. I've edited some of my posts above to make this a bit less confusing for readers.
So that essentially leaves volatile as the only optimized solution that's not in doubt for some reason. It's worth noting that the author of that article suggests either avoiding low-lock techniques altogether or assuming the weakest memory model possible (mark everything volatile when in doubt). After all of this confusion over a small optimization, I think I might keep this in mind!
-
Hi MJW, hope all's well with you!
I'm pretty sure you would have to lock on the static variable on every access (or declare it as volatile) if you wanted to ensure that all threads would have the same view of it at any given time. I agree that making that variable static is unnecessary. It doesn't need to be static to ensure correctness of the computation, only private.
verdy_p, I think that making it static is an error in this case, because its fields are used to store the result of the computation, and a flag indicating whether the computation has finished. As Tim! suggests, one might just reinitialize this variable's fields in OnSetRenderInfo. Or one might use the "reset button" approach that you described. Both of these solutions require that we run some piece of code that executes exactly once every time the effect is run to fix the problem... which is exactly what this segment was intended to do in the first place. I feel that using a static variable to store the result of a computation is perhaps a questionable thing to do when the result is only intended to be used by a single instance of the effect class.
Edit: scrapped a bunch of stuff because it may or may not be correct.
Some references:
http://www.bluebytesoftware.com/blog/20 ... orNET.aspx
-
Yeah I tend to adjust Magic Wand to 35% tolerance when I'm trying to pick out a certain region. Segment Image might be able to help you with this as well, link is below. I suggest starting with a moderate number of regions (around 10-20) and setting the bias to 0.75. You'll want to copy the image onto a new layer before running the plug-in, make the selections there, and then toggle the visibility of the segmented layer to see how well it's fitting. Use Magic Wand at tolerance 0% to select the segmented regions, hold Ctrl while clicking to select multiple regions together.
-
Thanks for your kind comments everyone, I really appreciate them!
I'll put some effort into making this effect faster. I've identified a few potential improvements:
-
[*:2xo79k34]Adding additional dimensions to help the effect to distinguish different types of texture should make the clusters easier to separate, possibly improving performance as well as accuracy.
[*:2xo79k34]I'm currently using Lloyd's k-means algorithm, with the k-means++ improvement due to Arthur and Vassilvitskii (2007). There are some other k-means algorithms out there that might provide better performance without requiring too much extra memory.
[*:2xo79k34]I'm currently stopping the clustering if no points were swapped to another centroid, or if the total number of iterations becomes too large, or if the maximum amount that any centroid was shifted is too small. Then the effect returns the current best result. I intend to add a stopwatch-time stopping criterion that will optionally cut off the improvements after a few seconds or so, to make previews easier.
[*:2xo79k34]I can parallelize the most important bottleneck - calculating squared distances to assign points to centroids, which currently takes up 80% of the effect's running time on my Intel T8300 machine.
-
-
Whoops! You're correct about the memoization, of course. I should have checked the GaborFilterKernelWithEnvelope class before posting. Sorry about that.
Thanks for the paper reference. I don't think I'll be reading it though, $19 for 6 pages is pretty steep. Are you aware of any literature that discusses applying the horizontally (or vertically, or diagonally) oriented filter to a resampled version of a rotated image? That would seem to be an easy way to take advantage of separability. The resampling might attenuate high frequencies or introduce other artifacts, however. I performed a quick test with bilinear resampling and a 15 degree rotation. Artifacts were quite apparent at wavelength = 2, but I was unable to distinguish the two results at wavelength = 8. Maybe the results at short wavelengths would be better if a superior resampling method were used.
This is conflated with another issue, though. At wavelengths under sqrt(2), since you're sampling only one point for each cell of the filter, the filter itself is aliased for some orientations. In cases where it's not aliased, the sampling may still produce an inaccurate estimate of the integral of the kernel function over the cell, because the curvature can become fairly strong in the direction of the sinusoid near the peaks and troughs. You can obtain a more accurate estimate of the integral by oversampling.
Hope this helps! Thanks again for releasing this update.
-
This is a great improvement over the last one! A couple of performance notes... Is the filter kernel separable? You might be able to get it down to O(sqrt(n*m)). I recall reading in several places that it can be separated, but perhaps this only applies to the sine and cosine filters. Also, you should probably memoize the kernel...
Thanks for improving this and publishing it here. I'm hoping to add stuff to Segment Image that takes advantage of texture information, and this will be helpful. I assume that reversing and adapting it is OK?
-
Edit, 22-01-2010: Segment Image 1.1, a small update. It's now much easier to cancel the effect before it finishes running! See bottom of post for download.
Hi everyone,
Hot on the heels of #2, here's my third plugin, "Segment Image". I wasn't actually going to release this - it was originally a Code Lab experiment that I threw together a few days ago. But it's proven surprisingly useful, so I thought I'd port it to Visual Studio, clean it up, and post it here.
This effect performs what some might call "automatic image segmentation by clustering". It analyzes the pixels of the image and arranges them into several groups, trying to ensure that each group's pixels are relatively close together in the image and have roughly the same color. So the effect helps you to break up an image into its constituent regions. It also helps you to find a small color palette that matches an image.
The UI allows you to specify the number of groups that you'd like the effect to look for, the relative influence of the color variables and the location variables, and the type of output that you'd like to see. If you leave the checkbox unchecked, the effect will fill each pixel in a group with a representative color for that group. If you check it, the representative colors of all the groups will be displayed as a set of horizontal bars over the selection.
Image segmentation
Start out with a guess as to the number of clusters in the image. If adjacent parts of your image that should be distinct seem to be stuck together in one cluster, move the bias slider to the left by a small amount. If adjacent parts of your image that should be one continuous cluster are split into several clusters, move the bias slider right by a small amount. This is the preferred way to fix any issues with the clustering, but if there really do seem to be too few or too many different clusters, adjust "Number of clusters" up or down by 1 as appropriate. Repeat this until the result looks good. Then check the "Higher quality" box.
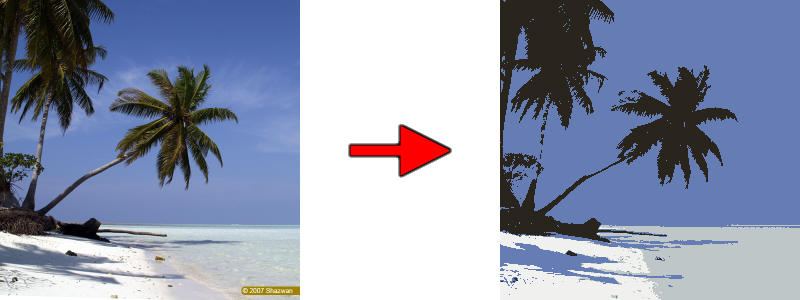
Around 10 clusters, bias somewhere near 0.5, "Higher quality". Some clusters were merged by selecting them with Magic Wand (global fill mode, tolerance 0%) and then running Average Color (HSL). Original Image
Palette extraction
Check the "Display palette instead of segmentation" box. Move the slider all the way to the left. If the palette doesn't seem to contain enough colors, increase "number of colors" by 1. If the colors in the palette are a little too distinct, you can also move the slider a little ways towards the right. Repeat this until the result looks good. I saw while writing this post that jxp has released a plugin that saves the colors in the image as a palette file, so you might want to use that as well!
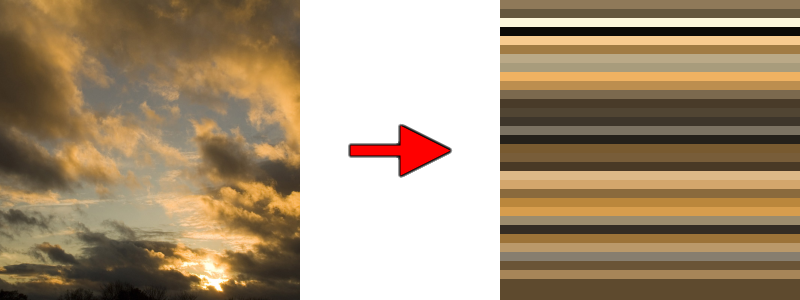
32 clusters, bias 0.01, "Display palette...", "Higher quality". Original Image
General
Be careful with the sliders when you run this on large images. If you push the bias too far to the left or right, or increase the number of clusters too much, it could result in the effect running for a very long time. This was the only major issue that I encountered in my testing, so I incorporated two safeguards that should prevent the clustering algorithm from running on forever. They can be relaxed somewhat by checking the "high quality" box. If you tell it to find 32 clusters in a large image, you'll be waiting for a very long time. I tested a 39 megapixel image with two clusters, and somehow, it did actually manage to return a result. It took 2.8 GB of memory to do it, and it sucked up an entire CPU core for about five minutes. You've been warned! Please remember to save your images. Use this effect at your own risk.
As usual, thanks to Rick Brewster, Tom Jackson, and Boltbait. Without Paint.NET and Code Lab, none of my plugins would exist. To install, simply unzip to your Effects folder. I'd be glad to clean the source up for release, if anyone would like to see it. Feel free to use Reflector to reverse/adapt it until then. License (MIT) is included in the archive. Enjoy!
You can find Segment Image in the Effects > Color menu.
Version 1.0 was downloaded 414 times.
-
 1
1
-
-
Update: Performance and stability fix, see post below for details!
Hi everyone,
Here's my second plug-in, "Average Color (HSL)". The original idea for this plugin is due to phrebh, who brought this up in the other thread. It's based on the observation that averaging the color of a selection might make more sense in a color space that better reflects human perception of color than sRGB does. I would have used CIELAB, but an average of valid sRGB colors in CIELAB space won't necessarily yield another valid sRGB color.
The following examples demonstrate how this effect differs from a comparable plugin that averages the RGB values directly, Average Color of Selection. I ran each effect on twelve different blocks of each image.
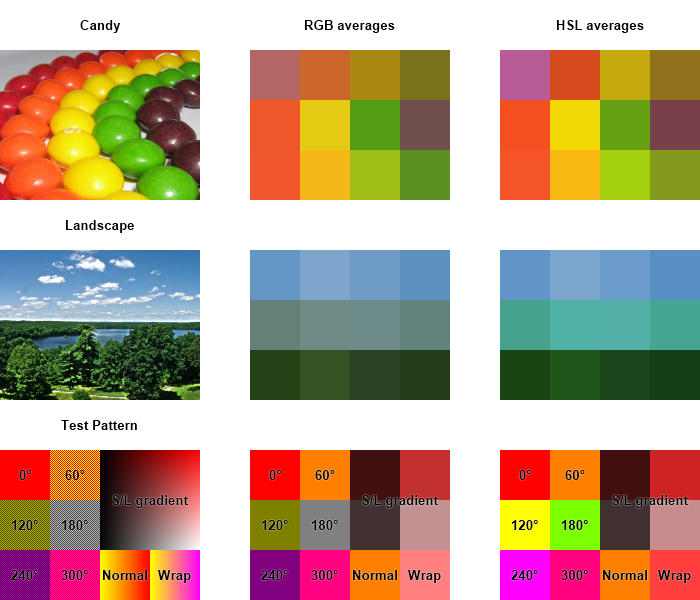
Image attribution: Candy, Landscape. The pixels on the left half of the test pattern are all fully saturated.
Many thanks to the following people for helping to make this plugin possible: Rick Brewster, Tom Jackson, BoltBait, Sepcot, phrebh, and MJW. As usual, install by copying the .dll to your effects directory. License (MIT) is included in the archive. Enjoy!
I'll be glad to release the source if anyone would like it, but the project is a little disorganized right now, so I'll have to clean it up first. Let me know...
Version 1.0 was downloaded 369 times.
-
"Signed Difference" works great, APShredder. Thanks very much!

Average Color (HSL) v1.1
in Plugins - Publishing ONLY!
Posted
Updated. A really bad memory leak has been fixed! See first post for download.
I was preallocating a large arraylist to avoid dynamic expansion and associated heap fragmentation, but instead of doing this only once, I was doing it for every region of interest. So I was using the effect on some large non-contiguous selections this morning, obtained by using Segment Image and Magic Wand, and got some out-of-memory errors. I fixed it up immediately and did a little refactoring.
It shouldn't run out of virtual memory anymore, and performance is greatly improved (although still not optimal).
Other changes:
- Effect has been moved to the "Color" sub-menu.
- Analysis stage has been moved to OnSetRenderInfo method. The double-checked lock + memory barrier hack isn't necessary unless the effect is built in Code Lab.
- Instead of scanning over the selection's bounding box and using the IsVisible test to determine whether a given pixel within the box is actually selected, it now scans over the regions of interest directly, which also improves performance.