


Remii9512
-
Posts
70 -
Joined
-
Last visited
Posts posted by Remii9512
-
-
The best plugin ever, in my opinion. Very handy indeed, I use it almost every time i start up Paint.Net. Great job you did there.
-
SCIENCE PROJECT MAKING DRAGONS????
Where do you live!
Lol, we were actually supposed to design a creature that could live on another planet.
And he was born

-
And, Sharp, that looks like an awesome starscape tutorial you have there. I'll combine them with one of my planets soon.
-
Thanks, guys, and I'll make sure to antialias in the future.

<EDIT>
Done editing, now you guys can have a giant page of mediocre pictures only when you want to.

-
Lolz.
And I'll enter with my current sig, below.
FIGHT
-
Stone - 2
St1cki3 - 3
#Winner St1cki3
I just love the blue colors and simplicity
And with that, I enter with my sig:

-
Hai thar.
I'm Remii9512, or more recently known as Intervention (Inter_vention when the first is taken) and I've been in PDN for a while now. I've made some various stuffs, so I decided to finally get some proper feedback on my pictures.

By the way, all images have a stict 800x800 limit. Just making you admin/mods' life easier.
So, here you go. (And by the way, I'm loving these new emoticons
)CHANGELOG:
Hidden Content:09/26/10: Posted.
09/27/10: Added hidden BBcode stuff.
09/27/10: Added LG Neon ad mockup.
 Hidden Content:
First off, my favorite subject: Space-scapes. (In case you dont remember, the caption for each picture goes below it.

My first spacescape, evar. I know, it looks bad.
But just wait till you see the next.
My second, and best spacescape ever. This has been my wallpaper for, what, 5 months now.

Third spacescape. Meh.

LLLEEEEEEERRRROOOOOOOOYYYYYYY

Just made this, like, 5 minutes ago. Followed two seperate tuts for the planet and the ring.
That's it for spacescapes (for now).
 Hidden Content:
Now for userbars!


And, yes, these have the names Intervention on them, because the forum I use these sigs on I have my name as Intervention.
(Yes, I switched from Remii9512 (Club Penguin) to Intervention (Pure awesomeness).)
 Hidden Content:
Now, eh, miscellaneous stuff.

Probably one of my favorite creations OF ALL TIME. (DUN DUN DUNNNN)

Oh yes I did.

Yeah, did this for a science project. My friend drew it, and I scanned it, outlined it, and colored it.

Because I felt like it.
Well, that's it for now.
In order to avoid this big wall of text and images, can someone give me the BBcode or whatever for hidden items?
Thanks, and feedback is demanded appreciated.
-
L3ron: 1
cooltew: 0
L3ron, I like yours. Matrix ftw! The quote is kind of hard to read, though.
-
Why'd the forums have to be moved? I've lost all my favorites, a page and a half full of valuable tutorials I really needed. Is there a way I can get them back?

-
Oops! Probably should list that. Thanks!
-
Being ignored ftw?
-
-
Following This tutorial, wouldnt is be fantastic to have a Plugin that does that?
Frankly, all it does is RGB one layer red and one blue, and shift them a couple pixels to the side. That plugin could have a slider to change how far left or right they go, and maybe a check box to crop the image to the 3-D'd dimensions.
W-what? Don't look at me. I can't do it.

Can you???

-
Fantastic!
-
You're welcome.
-
Hrm, weird... I'll resize them again.
-
Better resize them before he gets MAD.
-
Wow. Beautiful. I just have to try it.
-
Sorry, I'll resize them right now.
EDIT:
Done. Sorry!
-
This tutorial is available as a PDF. Click here to view or download it
Hey, guys! This is my first tut. I decided, if it was going to be easy, where better to put it than the Newbie Playground! (Right?)
So, you want to make some clouds. For random reasons, maybe, or just a nice sky. Whatever you want. But, ISSUE: Darn, the Cloud render (Effects -> Render -> Cloud) just doesn't give a cloudy feeling, eh? Well, I know what to do! Follow this tut!
You'll get the right clouds YOU need in no time. First, you'll need something called a plugin. That's an effect or render made by a user that you can use in Paint.Net.
The Threshold plugin is part of Ed Harvey's plugin pack -
https://forums.getpaint.net/index.php?/topic/18811-ed-harvey-effects-v-35-2012-02-13/
Wanna know how to install plugins, too?
So, onto the real work. Paint.Net wasn't made just for text, you know!
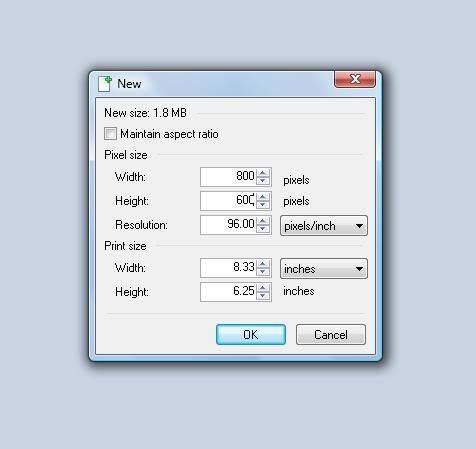
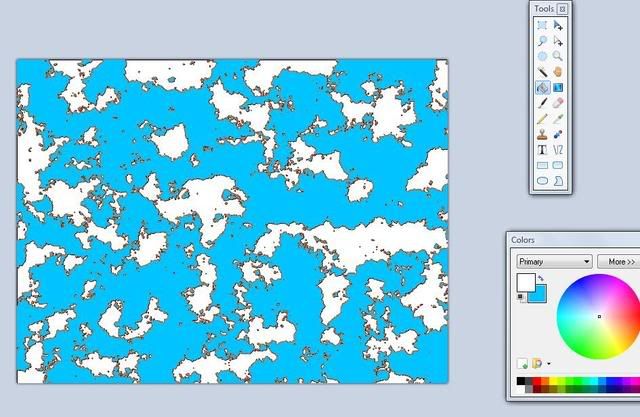
First step. An emotional milestone. The first step of fantasticalness. You open Paint.Net. Gasp! Is that Paint.Net? Wow! Now, go to file -> new.

Great! Now, select your region size. My personal favorite is 800x600, but you can put whatever you want.
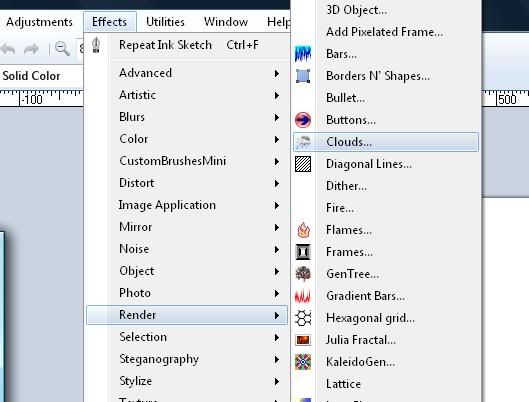
Awesome! Now, let's get to work. Go to Effects -> Render -> Cloud and that will bring you to a proportions menu. (You won't have as many buttons as I do, but once you learn how to install Plugins, I bet you'll have to scroll to get to B's!
We're on our way! Now fiddle around with the cloud settings. Your original color setting will be black and white, but that's exactly what we need.
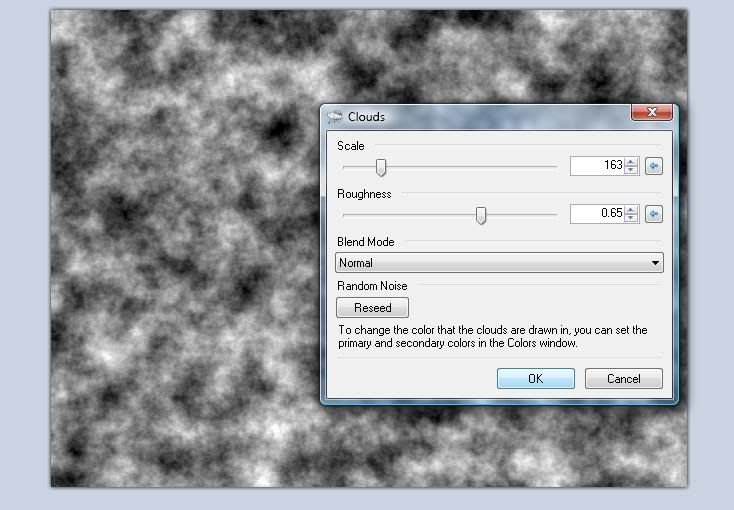
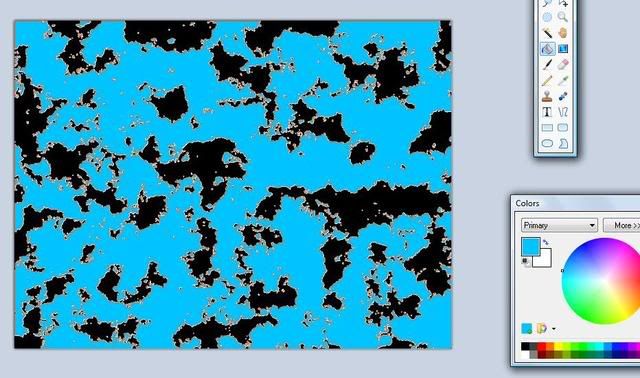
Cool! Now you have what a lazy bum would call 'stormclouds'. But, see the lack of detail? Pssh, I bet we could do better, huh? Now go to Effects -> Color -> Threshold. Here, you can adjust how many or how few clouds there will be. Oooh!

Almost done! Now take the Magic Wand tool and set the tolerance to something around 50 and put it on Global mode. Select the color you want the sky (not the clouds) to be. So all that color should be selected! So that's why they call it the MAGIC (Oooh) wand tool.

Just a few more steps! Select the Paint Bucket tool :PaintBucketTool: and put the color (in the color wheel) to a sky-blueish-cyan color. Then click anywhere in the selected reigon. Wow! Now you have a sky with blocky, black clouds. But we're not done yet; bear with me!
Now, like you did back there to select the sky, now select the other color; the one you want the clouds as. Then have the color as white, gray, or whatever color you want the clouds to be. Now, like you did last time, fill the clouds with that color.
Now we have something close to a sky. But the clouds are too blocky. So, what do we do? We use my trusty sidekick, Gaussian Blur! :GaussianBlur: First of all, deselect by clicking outside of the box with the magic wand tool. Found in Effects -> Blurs -> Gaussian Blur, Slide my little friend to what you find appropriate.
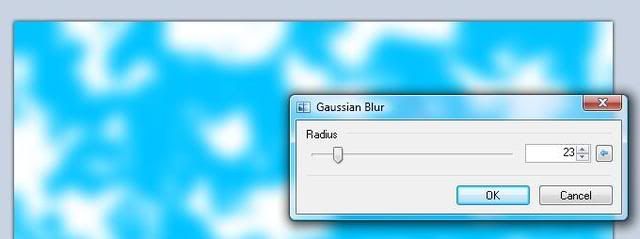
And-bingo! Right on the spot! You have your handy-dandy clouds! Note, you can make way different clouds and skies with different colors! Awesome, right?
If there are any problems with this tut, please post them and I will fix it immediatley.
-
Wha-! HAX!
Man, great tut. Gotta try this sometime.Btw, nice headphones.
-
Ash has done it again. Another effect that has been plainly exposed in front of our eyes, yet so blind to us, has been revealed. Well done.
-
When I first saw this, I thought, "Planet Texture". Mustafar, anybody?
-
True. But then again, how else do we find things?


Remii9512 (Intervention)'s Gallery!
in The Pictorium
Posted
Bawmp(?)