


APShredder
-
Posts
1,318 -
Joined
-
Last visited
Posts posted by APShredder
-
-
If you have a question about a plugin, post your question in the thread for that plugin, instead of making a new thread. Hope this clears things up. :wink:
-
Thanks CMD! They do look pretty close, if I do say so myself.

-
 WOW! That has to be the fastest sticky I've ever seen! Thanks David!
-
NOTE: This plugin is incompatible with Paint.NET v4.3+. Use the newer version of the plugin instead:
BlendModes Plus
Have you ever wished that Paint.NET had more blend modes like some of those "other, more expensive" image editors? Well now your wish just came true!
 And now just for the low price of
 $500FREE!
This plugin can be found in Effects --> Tools --> BlendModes Plus.
Basically, all you have to do is open the plugin, load an image, and choose your blend mode. Right now the current blend modes available are:
Normal
Additive
Average
Blue
Color
Color Burn
Color Dodge
Cyan
Darken
Difference
Divide
Exclusion
Glow
Grain Extract
Grain Merge
Green
Hard Light
Hard Mix
Hue
Lighten
Linear Burn
Linear Dodge
Linear Light
Luminosity
Magenta
Multiply
Negation
Overlay
Phoenix
Pin Light
Red
Reflect
Saturation
Screen
Signed Difference
Soft Light
Stamp
Vivid Light
Yellow
And even though this list is kinda long, I plan to add more blend modes before long.
Blend Mode Descriptions:
Here is just a quick rundown of what all the blend modes do.Hidden Content:Here are the to images I'm going to use.
http://i792.photobucket.com/albums/yy207/APShredder/yhsjjie-51.pnghttp://i792.photobucket.com/albums/yy207/APShredder/yhsjjie-52.png
Normal
http://i792.photobucket.com/albums/yy207/APShredder/yhsjjie-52.png
I don't think this mode needs much of description. The final image is the blend image.
Average
http://i792.photobucket.com/albums/yy207/APShredder/yhsjjie-53.png
This mode is good for blending two images together. Nothing special.
Blue
http://i792.photobucket.com/albums/yy207/APShredder/yhsjjie-54.png
This mode replaces the blue channel of the base image with the blue channel of the blend image.
Color
http://i792.photobucket.com/albums/yy207/APShredder/yhsjjie-55.png
This mode replaces the hue and saturation of the base image with the hue and saturation of the blend image.
Cyan
http://i792.photobucket.com/albums/yy207/APShredder/yhsjjie-56.png
This mode replaces the cyan channel of the base image with the cyan channel of th blend image.
Divide
http://i792.photobucket.com/albums/yy207/APShredder/yhsjjie-70.png
Grain Extract
http://i792.photobucket.com/albums/yy207/APShredder/yhsjjie-71.png
Grain Merge
http://i792.photobucket.com/albums/yy207/APShredder/yhsjjie-72.png
Green
http://i792.photobucket.com/albums/yy207/APShredder/yhsjjie-57.png
This mode replaces the green channel of the base image with the green channel of the blend image.
Hard Light
http://i792.photobucket.com/albums/yy207/APShredder/yhsjjie-73.png
Hard Mix
http://i792.photobucket.com/albums/yy207/APShredder/yhsjjie-58.png
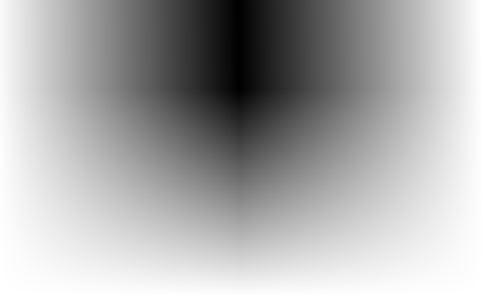
This mode causes the resulting image to either be black, white, red, yellow, green, cyan, blue, or magenta.
Hue
http://i792.photobucket.com/albums/yy207/APShredder/yhsjjie-59.png
This mode replaces the hue of the base image with the hue of the blend image.
Linear Burn
http://i792.photobucket.com/albums/yy207/APShredder/yhsjjie-60.png
This mode will always make you image darker.
Linear Dodge
http://i792.photobucket.com/albums/yy207/APShredder/yhsjjie-61.png
This mode will always make you image lighter.
Linear Light
http://i792.photobucket.com/albums/yy207/APShredder/yhsjjie-62.png
This mode is similar to Linear Burn except the blend image is more noticeable.
Luminosity
http://i792.photobucket.com/albums/yy207/APShredder/yhsjjie-63.png
This mode replaces the luminosity of the base image with the luminosity of the blend image.
Magenta
http://i792.photobucket.com/albums/yy207/APShredder/yhsjjie-64.png
This mode replaces the magenta channel of the base image with the magenta channel of the blend image.
Pin Light
http://i792.photobucket.com/albums/yy207/APShredder/yhsjjie-65.png
This mode causes light parts of the blend image and dark parts of the base image to show through.
Red
http://i792.photobucket.com/albums/yy207/APShredder/yhsjjie-66.png
This mode replaces the red channel of the base image with the red channel of the blend image.
Saturation
http://i792.photobucket.com/albums/yy207/APShredder/yhsjjie-67.png
This mode replaces the saturation of the base image with the saturation of the blend image.
Signed Difference
Stamp
http://i792.photobucket.com/albums/yy207/APShredder/yhsjjie-68.png
This mode is good for applying textures to images.
Yellow
http://i792.photobucket.com/albums/yy207/APShredder/yhsjjie-69.png
This mode replaces the yellow channel of the base image with the yellow channel of the blend image.
The UI:
http://i792.photobucket.com/albums/yy207/APShredder/yhsjjie-75.png
And of course, all questions, comments, suggestions, and crash logs are welcome. 😉
Plugin Log:
3/24/10 - Organizer updated, multiple blend modes can be selected and moved at once.
3/13/10 - New blend modes added. (Additive, Color Burn, Color Dodge, Difference, Glow, Multiply, Negation, Overlay, Reflect, Screen)
Maximum and Minimum renamed to Lighten and Darken.
Organizational system added.
2/27/10 - New blend modes added. (Exclusion, Maximum, Minimum, Phoenix, Soft Light)
11/8/09 - Fixed some bugs.
11/8/09 - Copy From Clipboard Added, New blend mode added (Signed Difference)
10/30/09 - New blend mode added. (Vivid Light)
10/27/09 - New blend modes added. (Divide, Grain Extract, Grain Merge, and Hard Light)
10/25/09 - Plugin taken out of beta.
10/22/09 - Checkbox added to switch "layers".
10/21/09 - Beta version of plugin uploaded.DOWNLOAD: BlendModesPlus.zip
-
 2
2
-
 1
1
-
 2
2
-
-
You could try cutting out the image, putting it on a new layer, and then changing the backround layer to black and white.
-
Have you taken a look at this thread yet?
-
Try using the Extract Color plugin. :wink:
-
Are you sure you didn't use Outline Object?
-
Did you change :AllColorChannels: to :AlphaChannel: while using the gradient tool?
-
Like this?
For a gradient like that, draw a reflected gradient like in my above post, and then on a new layer draw a regular gradient and change the blend mode to screen. :wink:
-
You mean like this?:

When you're using the gradient tool just change :LinearGradient: to
 .
.For more info on gradients try the help documents.
-
Have you tried using Conditional Hue/Saturation?
-
Oh, I get it now. Thank you!

-
Are you sure about that? Because I can only chose HsvColor.FromColor(), which doesn't help me. :?
-
While writing my latest plugin, I've run into a bit of a problem. I needed to work in HSV color space, which I managed to do, but now I need to convert the HSV colors back into RGB colors. I've tried pretty much all that I can think of to convert back to RGB, but to no avail. I think I saw a method floating around here before to convert HSV to RGB, but now I can't find it.
 so, hopefully someone else knows where that method can be found, or someone knows how to convert HSV to RGB. Thanks in advance.
 -
You can just use the Grid Maker plugin to make a grid on a new layer, and then move it behind your current image. :wink:
-
So you just want to make the picture grayscale? Just hit Ctrl + Shift + G, or go to Adjustments --> Black and White. :wink:
-
Thanks! I never really thought of using Conditional Hue/Saturation to do this, but oh well.Very nice, I like it(Though I think Conditional Hue/Saturation can already produce something very similar to this)
Great job anyway

Yep. Turns out all I needed to do was copy the code from the original gradient control into a new control class and remove the top color and bottom color code.So you eventually fixed the gradient control problem? -
Extract Color
What does it do?:
It allows the user to change an image to grayscale, while keeping a certain color range in color. In other words, it automates this tutorial. :wink:
The UI: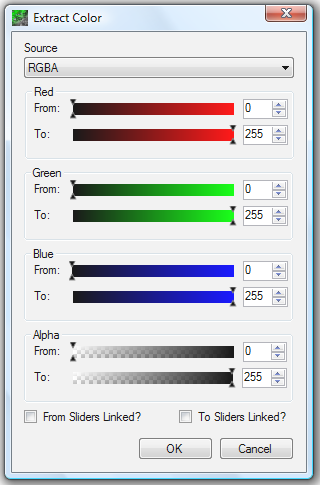
Examples:
(Sorry about the low quality .gif )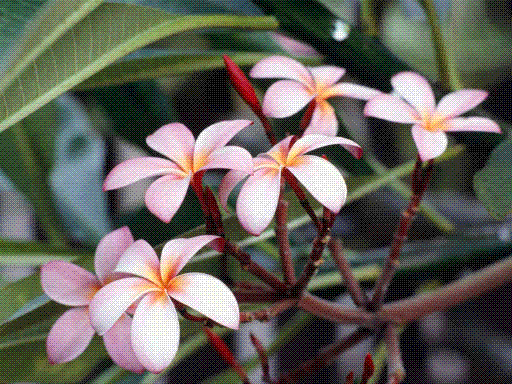
Updates:
10/3/09 - Plugin uploaded. -
Thanks oma! I'd be honored to have my plugin used in one of your pictures.
Also, the plugin has been updated, so that the image changes when the file path is changed.
-
Well, I don't know if there's an easier way, but your best chance would be to try ScriptLab's Batch Processor, but I don't know if that handles resizing. :?
-
OK, I think I knwo what you want to do. First, you should use the Rectangle tool with a fixed ratio like before, then once you get a selection you like, click Crop to Selection ( :Crop: ), and then finally go to Image --> Resize and change your image to the size you want. Hopefully that works. :wink:
-
While using the rectangle tool(
 ), click on were it says "Normal" twice. It ahould now say "Fixed Size". Then just enter the size you want and click anywhere on the canvas. :wink:
 -
Is this plugin what you need?
 WOW! That has to be the fastest sticky I've ever seen! Thanks David!
 And now just for the low price of


 .
. ), click on were it says "Normal" twice. It ahould now say "Fixed Size". Then just enter the size you want and click anywhere on the canvas. :wink:
BlendModes Plus v2.3.5 (3/24/10)
in Plugins - Publishing ONLY!
Posted
Thanks everyone for your support and suggestions!
@Illnab: I'm trying out your suggestions right now, but I think I might just keep it like I have it for now.
@pyrochild: D'oh! I don't know why I didn't think of that. That'll be a great improvement for this plugin Thanks!
EDIT: Just uploaded the version with the checkbox that switches the "layers".