


arik-so
-
Posts
56 -
Joined
-
Last visited
Posts posted by arik-so
-
-
great tutorial!

-
What I meant, it's not built-in. And, it's not perfect. I find the feather plug-in better.
By the way: does nobody want to actually try out this tutorial? I quite hope the result would be worth it.
-
Thanks. And yes, you're right. What a pity it is, by the way, that the Paint.NET team hasn't made an own antialias plugin yet. It's one of the most essential tools to smooth images. But the feather plug-in is okay^^
-
Not for an animation.
-
Amazing. Real wheel. Splendid reflection.
The shadow doesn't look too realistic, though.
-
Looks good :wink:
The drink isn't aligned very well, though. :idea:
-
Great job! Looks ... cute

-
Amazing stuff, yellowman. Really. :o
-
No problem
, you're welcome 
Thanks for the comments, folks!
-
@nanettealsop: I think you maybe just miss the part where it says, "Now skip to Part 2". But I'm not sure. Maybe you could upload the image of the PDN history window.
PS: I've uploaded the XML now.
-
I continue to agonise over this tut! I think I get into trouble with the magic wand. And where did that teeny egg appear from in the middle? Must be the alien touch :wink:
Tell me, where exactly does the egg stop being like the like my given screenshots? Very clearly, it's a rendering problem. When you apply those values in Shape3D, you must make sure EVERYTHING is like in the image. And you know what? I'm gonna upload the egg XML for Shape3D in a zip-file. I dare hope I won't have to integrate a MiniTut on how to use XML files for Shape3D, but that you will figure it out yourself.
If anyone fails to load the XML however, I will gladly share this knowledge :wink:
By the way: despite your egg lacking lighting, it looks pretty interesting. I daresay amazing
@zephyros: nice chocobo egg !
-
ah, just keep trying, mate
-
No , I don't think so I think I made the egg shape first then added the text .. Hey I showed them to a few people and they loved it so it's all cool either way .
Well, it's all a matter of taste, isn't it, after all? ^^
@ rtargo: Thanks. Your egg looks by far better than mine. Yours is ... :o
-
thanks!
looks... interesting. The text doesn't seem to be part of the egg, though

You don't have a broken egg, so... did you merge the text layer with the texture before running Shape3D? I think not, but if you have, ... then it's just the colors.
-
hey, nice job man.
I would prefer doing your way for a nicer,
and a cleaner look. Just don't listen to those people,
this is awesome.
Thanks.
@Yellowman:
OK. I'll download the plug-in and then edit this post to show the images.
Here you are:
(Ups, by water reflection, I meant wet floor reflection, be assured that that's the plug-in I used, water reflection makes it look like water (obviously
 ))
))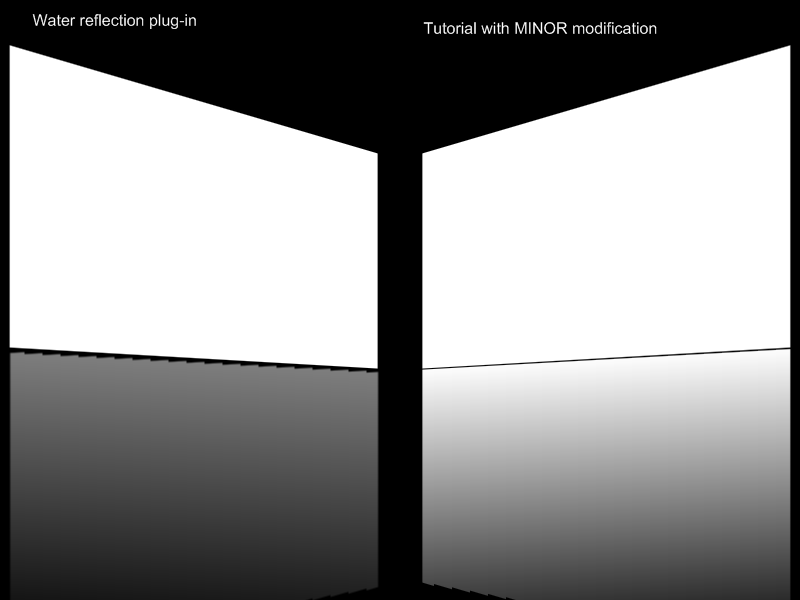
I've the point about adding transparency gradients, and the minor modification is that I moved the reflection up a bit, so there isn't that space left. Something I recommend you doing, too ^^ )
As you see, some kind of columns are hinted at the bottom of the reflections. (I blame it on the poor quality of the reflection and gravity plug-ins, or at the absence of a quality selection menu.) Now I come to think of it, I recommend feathering (something I've evidently missed doing or pointing out, so better read the whole thread of tutorials
) -
There is one thing I must add:
If there is something that you want to reflect, and it does not reach the top, then simply do it like I've shown you in "Adding transparency gradients": make a new layer, make a filled box there, duplicate the layer, merge it with the object you want reflected, not yet flipped! Then merge this with the layer where it is flipped, run gravity, ...
-
Come on, the first pic looks realistic, and the second one is awesome!
Here my attempt at realism:

It's supposed to be a... well, if you find out, then it is realistic
-
Yeah
I haven't yet discovered the way to achieve that look... but I will.
-
Thanks.
And it's just one plug-in you need to download for this one: Alpha-Displacement.
And UnFREEz is hardly more than 2MB. (I think ^^ might be 200 kb (10 times less))
-
Thanks Myrddin, but I've made the tutorial before your reply ^^
Anyway, thanks for you reply. (You could lock this question now)
-
the only problem is, that these plug-ins reflect the whole layer and that they reflect along a horizontal line on a specific height. And that's exactly what I was trying to avoid. And some of us prefer the hard way over plug-ins, because that way, one has much more possibilities. And one can make it turn out cleaner.
-
This tutorial is available as a PDF. Click here to view or download it
Reflection is a complex physical process, but an easy effect for Paint.NET.
Today, I will show you how to make realistic reflections with our beloved graphics-editing software
 .
.
For that, you will need MaDJik's Gravity plug-in.
However, due to the way this plug-in operates, you mustmake sure that whatever you are reflecting doesn't contain a single (semi-)transparent pixel! It should read the top, else also read the text in the tutorial marked with //*this*/.
How to get rid of transparency (If you know how that is done, don't bother reading that mini-tutorial. It's not too relevant for the rest of the tutorial):
Hidden Content:Extract whatever you want to reflect (make all around it transparent), duplicate the layer, make a new layer, position it on the bottom of the two we are talking about, fill it with whatever color you wish, merge this layer and the one above, go to the topmost layer (the other reflection), use the Magic Wand, set tolerance to 50% or less, click somewhere around the reflection (to select the transparent area around the reflection, go the layer below, hit Delete, and delete the layer above. Hope you understood
 How to sustain transparency will be explained throughout the tutorial.
We will be reflecting this mountain view I've drawn on the water below:
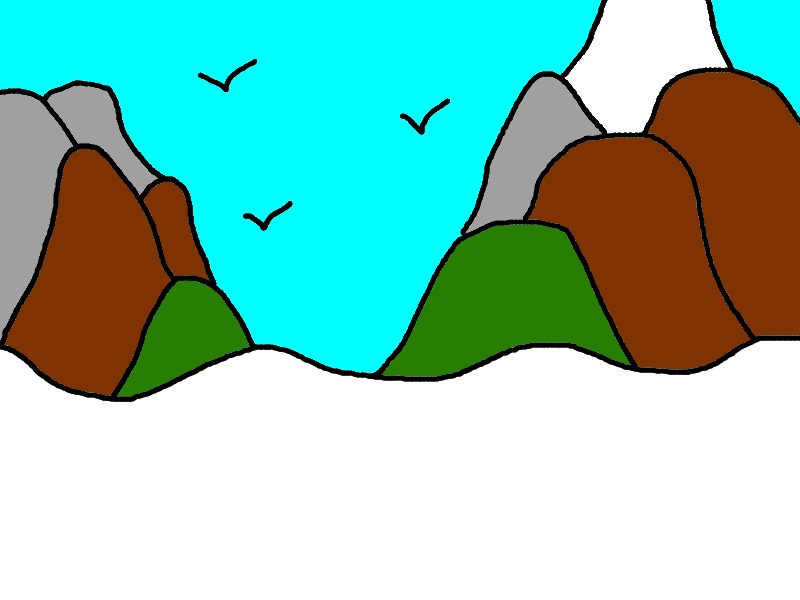
Well, as you see, this 800x600 image has a transparent area on the bottom. It can be seen best if you simply highlight the picture. It will be the water. But first, we need to reflect.
You may download the image, by the way. So you can practice.
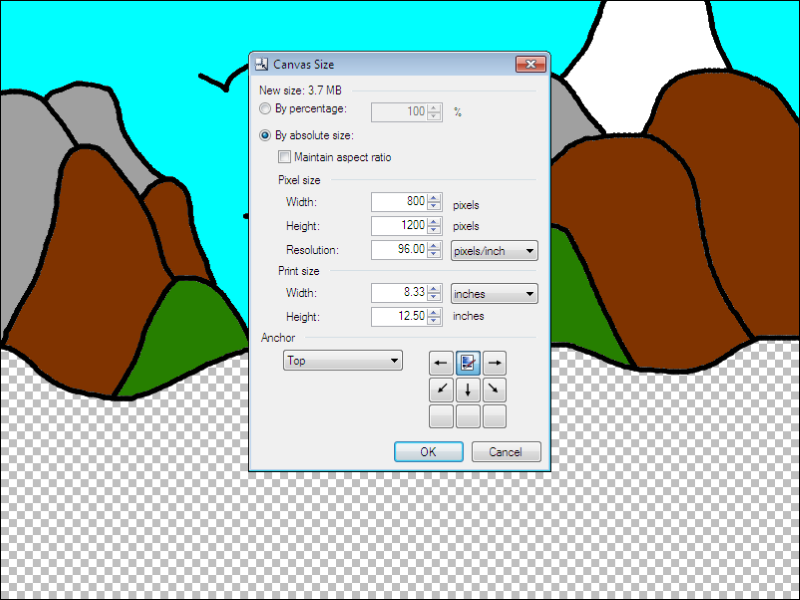
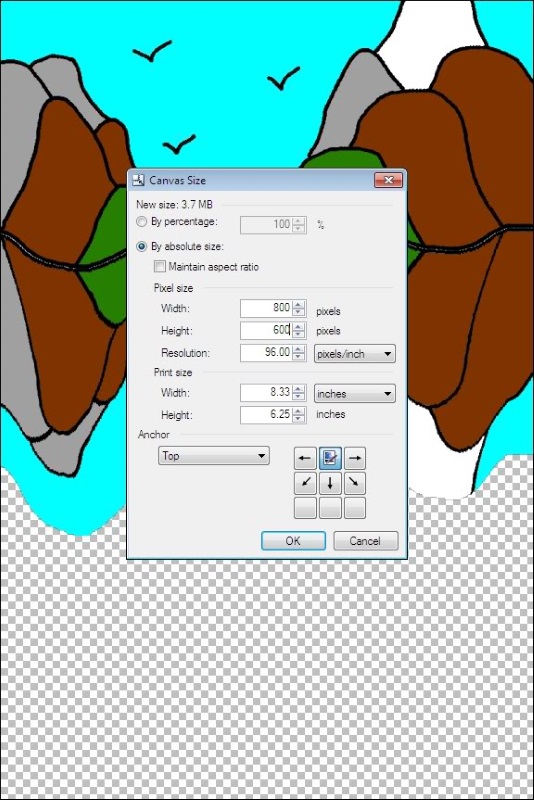
Let's :ExpandCanvas: expand the canvas of the image.
Uncheck "Maintain aspect ratio", double the hight, and set the Anchor to "Top".
Next, :DuplicateLayer: duplicate the layer twice. Name the layers from top to bottom:
-
[*:1666u6er]True
[*:1666u6er]ReflectionBase
[*:1666u6er]Reflection
Flip the Reflection layer vertically.
I recommend trying the "Adding Transparency gradients" part now, which is explained at the bottom of this post, then you can continue here. But do that part with human understanding, so if there's written duplicate a layer or making a layer you already have, use the existing layer instead.
//*If you have transparency, make a big colored box on the Reflection Base layer, and make sure it starts from the utmost top of the image (height = 0), that it has the same width or more as the object or reflection, and that it covers all transparent pixels above the object in ReflectionBase, I still haven't found a way to keep transparency within the object. Make sure that this box doesn not reach the bottom edges of the object.*
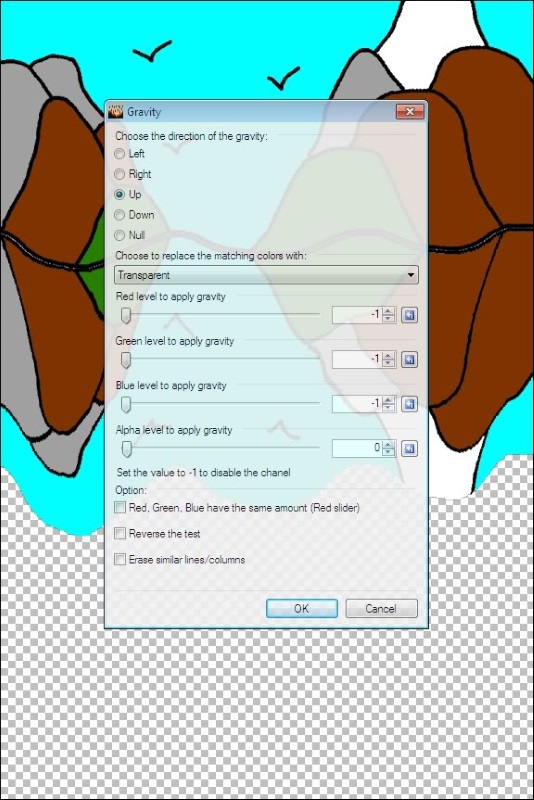
Merge the ReflectionBase layer in to the Reflection layer and run the gravity plugin:
All default, direction of the gravity up
Now, go to :ExpandCanvas: Canvas Size, make sure "Maintain aspect ratio" is unchecked, halve the hight, and set the Anchor to "Top".
Next, I recommend deleting the part that is no reflection from the reflection layer, do it by going to the True layer,
Magic Wand Tolerance < or = 50%, clicking on the transparent area, inverting the selection, going to the reflection layer, and hitting 'Delete'.
//* If you have transparency above the object, then simply delete the rest of the box*/
Now it is up to you how to do the tuning, only thing that matters is that you've done the reflection part. What I strongly recommend doing is moving the reflection up a bit, until you're satisfied, for the Gravity plug-in, however grateful I'm to MaDJik, has it's flaws
Here's what I have done:

Voila!
Try it out wherever you wish, but make sure there is no transparency it whatever you are reflecting.
In this tutorial the line along which we were reflecting was already given to ease the tutorial. But if it is some other line along which you need the reflection run, you must fill the distance between it and whatever else you want to reflect with a color other than (semi-)transparency, else it won't work!
It other words, I recommend reading the description of the Gravity plug-in before actively using this reflection tutorial.
Now comes an addendum.
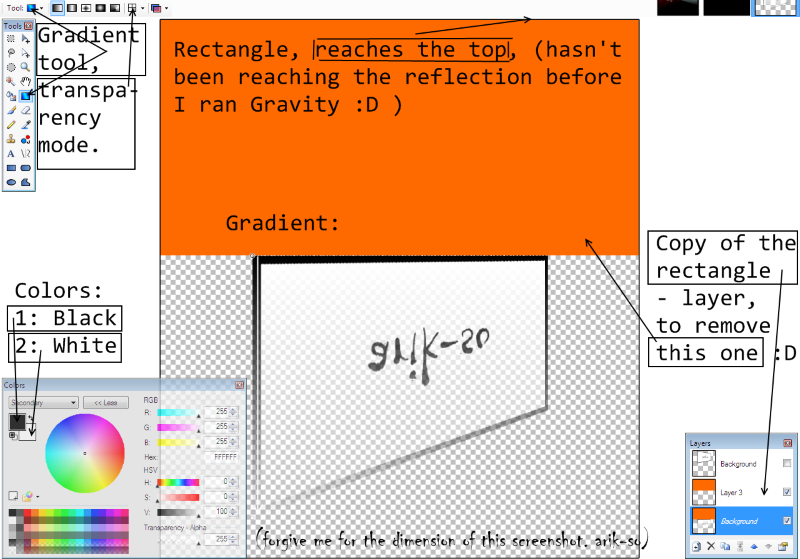
Adding Transparency gradients
Hidden Content:As you might now, reflections fade away with distance. However, the distance until the total "extinction" of the shadow depends from the "touching point", and it always remains the same.So if you want to add a realistic transparency gradient, here what I recommend doing:
After having flipped the to-be-reflection vertically (=Reflection layer), make a new layer above the t.-b.-r.-layer,name it "Gradient" draw a filled rectangle from above the upper border of the picture, but not reaching the to-be-reflection:
So if the layer of this rectangle is below the layer of the object you want reflected, and above the layer of the to-be-reflection (the object, but vertically flipped), the rectangle must start from the utmost top of the image (height 0), and end between the lowest point of the object and the highest point of the to-be-reflection.
Duplicate the layer, name the lower one "GradientBase", merge it into the t.-b.-r.-layer (Reflection layer), run the gravity distortion effect, set your primary color to black, and the secondary to white, adjust the transparency gradient, go to the Gradient layer, use the magic wand to select it, go to the layer below and hit delete, than delete the layer with the rectangle.
Here a screenshot:
-
[*:1666u6er]True
-
You want an apple?
I extracted one. It is slightly nicer.
-
I've edited my reply. It can be done using MaDJik's gravity plugin. I'll post a tutorial.
Hidden Content:Though this discussion breaks the Forum Replying Guidelines, I think

 ))
)) Magic Wand, set tolerance to 50% or less, click somewhere around the reflection (to select the transparent area around the reflection, go the layer below, hit Delete, and delete the layer above. Hope you understood
Creating an Animated Waving Flag!
in Tutorial Graveyard
Posted
WOW! That looks awesome