


Dr. Agon
-
Posts
25 -
Joined
-
Last visited
Posts posted by Dr. Agon
-
-
Anyways, at least you have a picture Dr. Agon..I know you wanted it so bad.
Yay!!!

That was good, but it needs more... pizazz. You nailed the effect, but there's no text or anything. The way you did it would probably work better for a buisness card anyway. I'm glad my tutorial is being used for kewl stuff like that

-
hey guys i was wondering if anyone could make me a logo... if so get back to my via email <snip> thanks guys

Um, sorry, but I don't think this is the place for it.
Phantom, that's cool, but it just looks like a human wearing a suit. I was trying to go for like an "abstract art" feel XD
Chaos, nice job, but the top of the picture is kinda cut off.
Other than that, good jobs! BTW, here's the first pic that started it all


-
Hello? Pictures? Oh, and btw Remi, does this mean I can join Artists of Robloxia?
I'm Secretplot45 :wink:
-
NO! Not Photobucket! Anything but that! Flickr! Just use Flickr!
Neat effect by the way.
*Ignores first comment* Thanks!
EER, I reuploaded my pics, they should work now!
NOW LET'S SEE SOME PICTURES!!!
-
Lol, sorry. I'm getting them on Photobucket now!
-
LOL, great! Glad to see some positive messages
-
Great, thanks EER!
-
This tutorial is available as a PDF. Click here to view or download it
Difficulty: 4/10
Plugins needed:
Optional Plugins:
Planet Kosmos (the font I used)
This is my first tutorial so please bear with me. My first few post on the forum have been noobish, so this is kinda my way of redeeming myself 😉
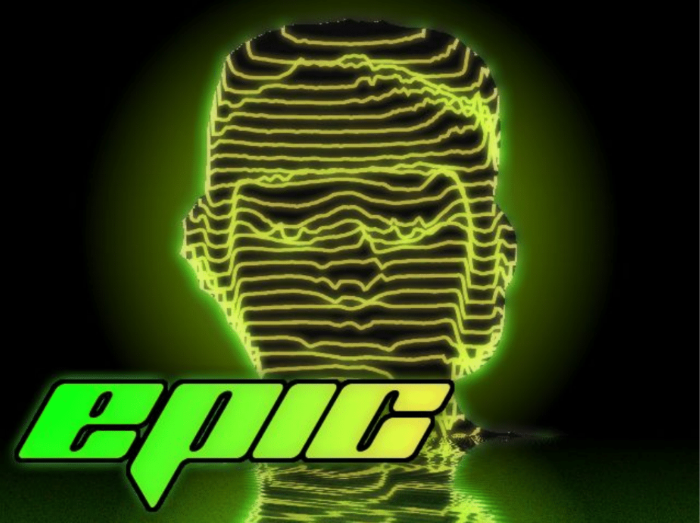
Hello! Today I’ll be showing you how transform a person into… THIS!
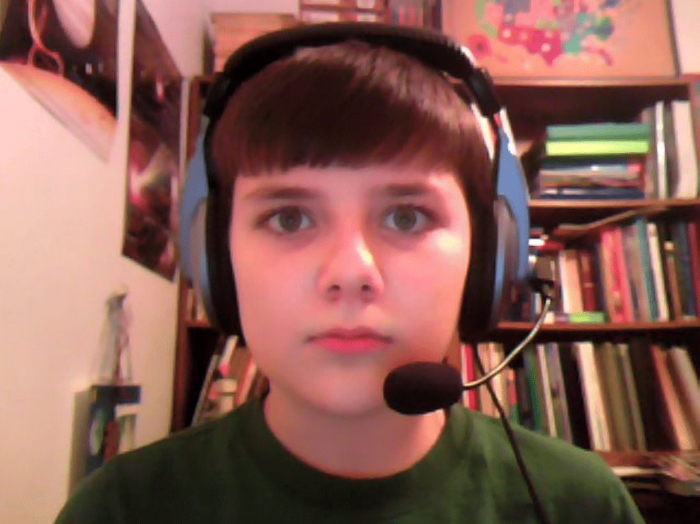
Start off with your photo, I’ll be using this:
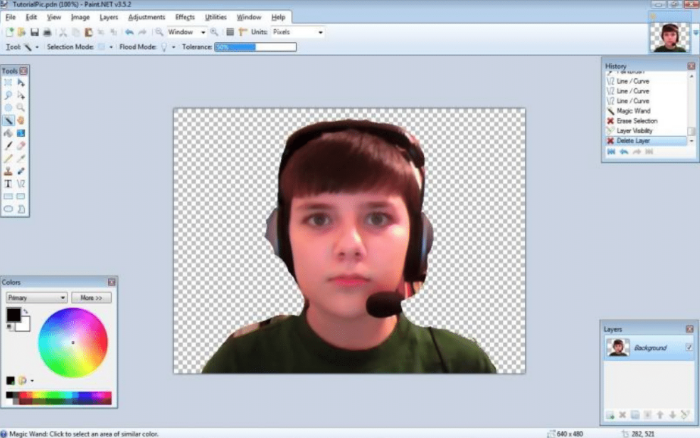
You can sharpen it or something, for good measure. BoltBait’s plugin works well. Just make it look good. This technuiqeworks to background around the image transparent. It doesn’t have to be exact. I used. Here’s what mine looked like.
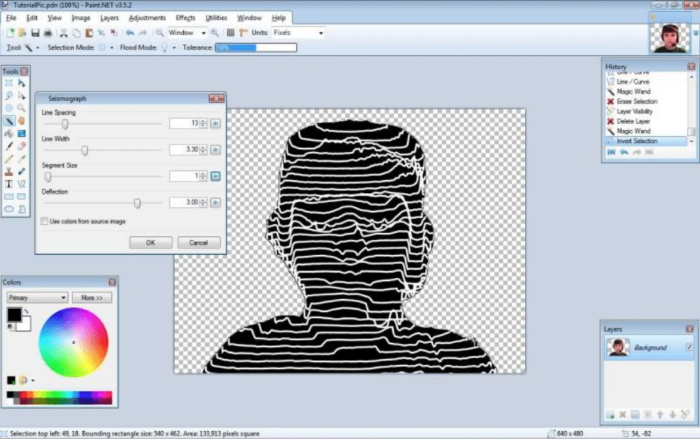
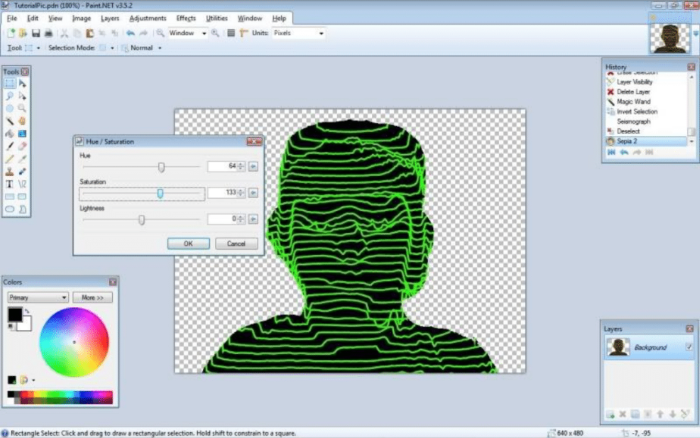
Now for the fun part. Use the magic wand to select the transparent part, then invert the selection (Cntrl + I). Use the effect Seismograph and deleselect “use colors from the source image.” Play with the options till it looks good. Here’s what mine looked like:
If you want to make the lines a different color, use Sepia (or Sepia 2 if you have it). Then, use Hue/Saturation to get a good color. Here’s what mine looked like now:
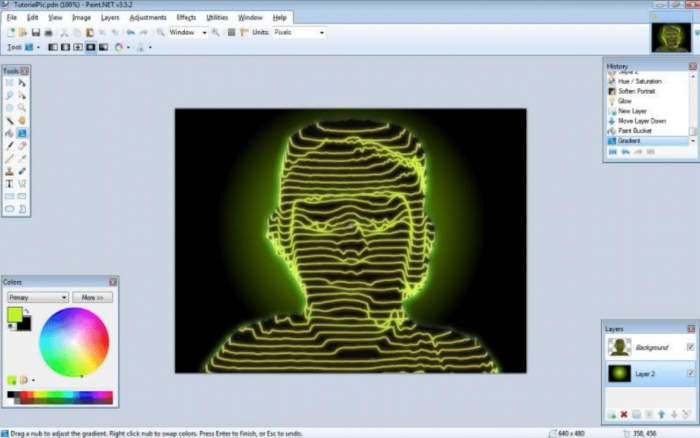
Then, use Soften Portrait and play with that ‘till you’re happy. If you think it’s a little dark, use glow. Here’s what mine looked like now:

Then, well, you can do what you want for the background here, but I usasually do a circle Gradiant with a different color, as shown:
Now for the text. Make a layer with a futuristic font, and text of your choice in the color you used for the gradiant. I’m using Planet Kosmos here. You can make the text look good (I used Outline Object and Soften Portrait.) Duplicate the layer. Now, use Hue/Saturation to make the text the color you made the Seismograph. Then, use a transparency gradiant to complete the effect, as shown.
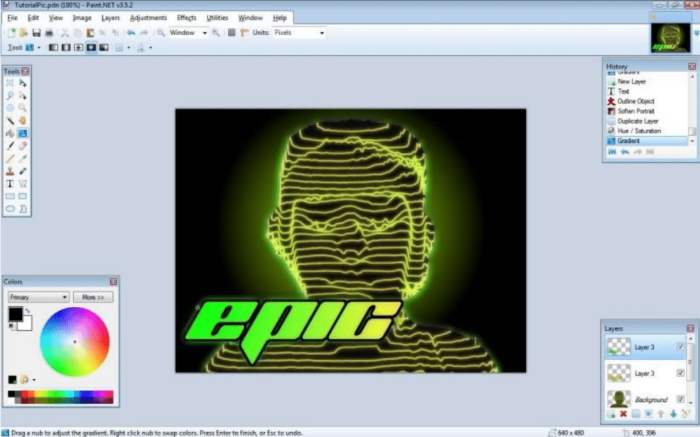
That’s it, you’re done! Feel free to add some other effects as you go (I used a water reflection thing.) Let your imagination run wild. You don’t have to do this on just humans! Please post results and feedback!
-
Oh oops. Here you go.

It looks good, but it doesn't look like its ON the wall. Just like.. Floating in front of it.
Yea... I can see whatcha mean. I'll fix it when I remember :wink:
-
Very nice! Here's my outcome. Crimsonine FTW.

pic link is broken =S
It says: The image or video has been moved or deleted
Oh oops. Here you go.
-
Very nice! Here's my outcome. Crimsonine FTW.
pic link is broken =S
No it's not, I can still see it

-
Veeery interesting! I don't think I could get mine THAT realistic.
Anyway, here's my Graffiti.
-
Very nice! Here's my outcome. Crimsonine FTW.
-
Sweet! I'll try it out later :wink:
-
That's awesome Dr. Agon, probably the best outcome I've seen!
And those are also really nice, Albertus. I think you should make the border thinner and...PERFECTION!
WOW, Thanks! I'm fairly new to PDN to
-
I'll try it out :wink:
-
Great tutorial! I'll post results later. But yeah, Outline Object is a GREAT plugin for text :wink:
-
Those rock, OneMoreLevel! You should make a tutorial for the Rubix Cube one.
-
I got this, I love it
-
Dude, those are awesome! I wish I was that good
-
My computer (or at least I THINK it's my computer) won't let me download these files. I followed your instructions on it, but unzip does not come up... why is that?

The Haxxor Effect!
in Beginner Tutorials
Posted
Wow guys, this is awesome, I just got on here after forever and found out all the cool stuff you made. Glad you liked the tutorial