


Lance McKnight
-
Posts
1,227 -
Joined
-
Last visited
Posts posted by Lance McKnight
-
-
Another tip is to create an alpha mask.
Make two layers. Make the bottom layers black, and then on the 2nd layer, draw a rectangular selection with desired dimension, and fill in the selection with white. Flatten the image and save it as a mask.png file. Now all you need to do "cropping" the picture is to run alpha mask and load the mask.png file. Hope this tip might help.
-
"Violet" added to 1st page, and added a link to a much larger version. It's a big 'un as well.
Software used - Apophysis 7X with random Foci as the only variation of the fractal, MyPaint to add color, lights, and shadow, and finally, PDN for the planet, layers blending, and some post production work.
Enjoy.
-
You have some real nice stuff going on. By the way, I added you to my dA watch list so I can see your fine works.
-
I believe something called Conditional Hue/Saturation might do the trick. Not sure as I have never done that way using the plug-in. Look for it in the Plug-in Index.
-
Well, the way I go about it is I add a layer and set the blend mode to either dodge or burn, then use a nearly transparent gray brush. (The transparency of the brush gives it the illusion of softness if you don't move the mouse too quickly)
Or just using two tone of grey (dark and light), and make two layers (Dodge and Burn) respectively, and use the paint brush. May have to use Gaussian blur a bit to soften up the edge.
-
Unfortunately, PDN doesn't have those tools available. Workaround is available here.
-
Actually, Goon, I found that using Highlight plug-in works. I think I didn't run the brightness/contrast to increase the brightness of the "flare." Thanks for the tips on the planet. Delpart was saying the same thing with the planet's scale. I'll be keeping those tips in mind.
Another thing, I did try to switch between GIMP and PDN, but no dice. Finally, I decided to kick GIMP off my computer permanently. I do have MyPaint, and I think I'll try to use the brush system in that software to do some work.
-
Good luck with the 12 step program later on.

Eh?
-
I forgot to mention I had a much larger work. I reduced the original size so I could have it hosted on Photobucket, but the much larger piece actually contained more details, and it's available at dA. However, being generous sort I am (I know some are snorting at that thought), I'm going to link to it - take a peek. WARNING: The size is 3500x1500. You have been warned.
The flare is actually created with the Highlight plug-in, it took me some tinkering with the setting and using a grey color (for some reason grey works the best) I think I got close to how the tutorial had it. No blending mode was used since the color took care of it. I also neglected to mention that there is a fractal inside the color of the nebula and it was created with Apophysis 7X.
I am actually inspired to create another space scene. It's starting to become addictive!
-
Very nice Lance. Personally I find the colours of the nebula a little too `rainbowish' though. It`s like a false colour image with realistic coloured planets. For me it does not seem to gel.I would tone down the colours a bit. I know what you are trying to do, I`ve looked at a few colourful nebulae myself. It`s just a bit too colourful.More pastel colours would look nice I think. Having said that,the texture of it is really great and I love those filaments coming up from the bottom and making their way through the clouds. Now that is realistic and really well done. I have seen plenty of nebula images with these in.
As for the planets,the lighting is much better. But I`m not sure about the bottom right hand edge of the larger one. There is no really bright sun in the image so I don`t think that area would be so brightly lit. The smaller moon is just right. That`s what I think this image needs - a sun. A really bright point of light so we can see why the shadows are where they are and it would also help to light up the nebula. I don`t think the nebula on its own is enough.
Hope you don`t mind me picking at your image like this. I know you said you were happy with it as it is. I just thought there is no point in commenting without pointing out a few things.

I forgot to mention that this tutorial was the inspiration behind this piece. I largely followed his tutorial until it got to the planet portion, and I just went off on a tangent and created my own. Thanks for your comments though. If PDN had better Flare I would be more than happy with it, but it is what it is.
-
I want to change standing text on this book cover with
my own text.
For some reason, red flag is waving in my mind, and I just have to ask this question - do you legally own this eBook you are attempting (or have attempted) to change?
-
Have you tried the Perspective plug-in from dpy's pack? Or you could use Layer>Rotate/Zoom command, and move the ball to the left. Warning: be careful not to tweak with the ball too much, or it'll make the picture look distorted.
-
thank you very much for your help lance!
 i will try the 2 plug in workarounds you mentioned for 1 and 3. and thanks bunchs for how to rotate a selection!! i tried a bunch of mouse/keyboard combos the other night when i was trying to do it, but i hadnt hit on that combo yet lol. as for your info on #4... eesshhh ok im an idiot lol, i somehow missed the paste info into new layer item in the edit menu the other night. :s i dont have much time to play with my art junk anymore, and i forget half the stuff i learned in the meantime it seems.
 (what i was picturing for my "promote selection to new layer " feature was a right click command, as thats what i was used to in paint shop pro. sorry i didnt specify that.)
your CTRL+ALT+V trick is a nice one and will be very useful, but it pastes the selection into a new image entirely, not into a new layer on the same image.
I had learned the same thing you did when I started out. That's why I passed on what I learned. Also, when you click on the Help menu, it'll take you to a Help section of the PDN website. That section have plently of useful information, including keyboard shortcut keys to master. By the way, the only right-click thing available in PDN is rotating selection, and that's it. I'm not sure if Rick is planning more right-clicking feature, I'll have to look around, but off the top of my head, that's the only right-click thing.
Best of luck in PDNing!
-
hello. i would like to ask for a program feature to be added or for a plug in for some selection tools.
1 - i could really use an "expand selection" and "contract selection". with a way to select how many pixels to expand or contract by. for me anyways, this would mainly be used with the magic wand, but would also be useful for any other selection formats.
2 - i need a way to rotate a selection itself. rotating in either direction would be nice to. as it is i have to rotate and pan a whole layer to do what i need now.
3 - im not sure what to call this one lol, "shrink selection area" maybe, but i need a way to select a single item thats sitting in a layer with other items and a lot of empty space.
example: say you have a cutout of a dog and a cutout of a cat on an otherwise empty layer, and you want to select only the dog, and not the cat or any of the transparent area around them.
i used to use paint shop pro years ago, and in that program you could use the rectangle selection tool to broadly select things like this, then click on the used pixels inside the selection area, and the selection would shrink down around that item only.
4 - it would be very nice if there was a "promote selection to new layer" feature. it would save a lot of time, as now you have to cut the selection, make a new layer, and paste it into the new layer.
thank you very much
1 - There was a workaround offered by an artist. I think if you used BoltBait's feather's tool (the selection feather one) it would work in theory.
2- Either rectangle or ellipse select your layer, and use the move tool. When the nubs appear, right-click on one of the handle, and drag it. It would rotate the selection. Holding down the shift key would rotate in 15 degree increments.
3 - dpy has a plug-in that will shrink the selection slightly and it's called AA Assistant. Look in his plug-in pack.
4- If you had bothered to look at the Edit menu, you'd see there's a command to paste info into new layer or learn the keyboard shortcut key CTRL+ALT+V.
-
@ Helen, Delpart, Goonfella, and Yellowman - thank you for all of your comment about the planet.
Goon, I have taken in consideration of how to add shadows and highlight to my planets, which I have applied to my space scene.
The space scene was created with the inspiration of a tutorial at dA, and I really like how it have turned out. Hope everyone who stopped by enjoyed it.
Cheers!
-
File is not found on the link anymore.

Can this be fixed?
-

I'll readily admit it's not the best work coming from me, it's tough to replicate the Photoshop tutorial, but I don't concede to Photoshop. I downloaded Google Earth and randomly picked a spot on the globe and luckily found a major metropolis that had a lot of road and highway. It took some tinkering for me to get this, but I made this.
I did this as a point that you can use PDN to create a city planet with just a bit of patience, sweat, and few choice words.
-
I tried it out, but since it's a photoshop tutorial, there are a few things I simply cannot do. I tried playing around with the city satellite images and pull the lighting from the picture, but it's still a far cry from what I'm shooting for, which is a planet that resembles Coruscant. I'll keep playing around with the effects, though.
I know what Coruscant is, I'm a Star Wars fan myself, and I believe that Photoshop tutorial is probably one of the best to do. Have you looked through the Creation tutorial sub-forum? There's a nifty planet tutorial created by Flip, and it teaches you how to create a planet texture from scratch, and then combine with a Photoshop-adapted tutorial, it can be done.
-
To find the EXIF data, right click the image file in Windows explorer or file browser, and click on Properties. In the Properties' window, click on Details tab.
Unfortunately, there's no way for Windows to tell you how many layers there are, especially if you are dealing with PDN's native file, ending with a .pdn extension. Best way is to actually open said .pdn file and the layers' information should be there.
-
To also make the line very thin, turn off the antialiasing option on the toolbar (the icon with a smooth line turned to choppy line).
-
 1
1
-
-
Try this tutorial at deviant Art City Lights Tutorial.
You may have to use Simon Brown's CustomBrush Mini plug-in to use some of the brush stroke in the tutorial. I'll help you if I can. Two other good space artists to ask for help are Commander Sozo and Goonfella, both of them are masters.
-
Appreciate the fix, Ed! Now I can take advantage of my 64-bit computer, unless it doesn't really matter here, and see how fast it whiz!
-
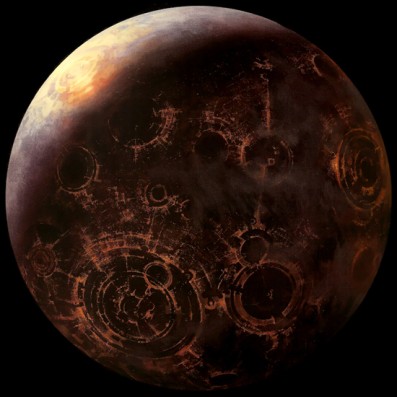
Planet texture practice. Tip of hat to the master, Goonfella, for his invaluable tips and feedback. Long way to go and 2012 just barely begun.
-
That's a pimped truck all right. All it needs is one of those florescent light underneath like in "Fast and Furious" and you are golden.
If there's anyone that actually did that to a rig like that, it's a disgrace to all thing truck, IMHO.


Gradient Plugin
in Plugin Developer's Central
Posted
Bolt, how is this different from the gradient plug-in from KrisVDM's pack?