


Code_Ember
-
Posts
132 -
Joined
-
Last visited
Posts posted by Code_Ember
-
-
Okie, I'm gonna work the next half then gloss it up.
-
Theory 1:
They probably took real models to pose for it then Photoshop/GIMP/PDN etc. did it's rest to turn it black and white etc. etc.
Theory 2:
The pictures were already black and white and they had to illustrate the mohawks.
I believe you won't be needing any plug-ins to do this. I'm gonna start experimenting to see if I can do this trick from scratch.
-
With a bit of patience, a few effects, and super micro 8 size brush smudge-smoothing, it can turn a rough picture into a smooth and light-toneish picture. EDIT: I used a soft brush XD
EDIT 2: It's gonna have to be a 8 to 11 sized soft brush with the strength of 1% to 6% to give it a nice edge smoothening
On those kind of images you can select around the edges using the :LassoTool: and once you select around the edges you can use a gaussian blur set two and it gives the same effect...
That is also good but the smudge 'n smooth trick will actually give somewhat harder and smooth edges and also saves a ton of time.
-
If you read my latest topic, I am gonna write a tutorial. A big tutorial on not a method but something more useful.
If you want to know whats it about, check my latest topic at
http://paintdotnet.forumer.com/viewtopic.php?f=12&t=26108
Instead of a short simple tutorial-in-a-topic format, I am gonna write a 13 page word document (estimated page, may change) discussing each and every detail of the 3 topics that will be found in the book.
At one point, I am gonna ask someone to read my work, fill up the nooks and crannies here and there. If you want to ask questions, contribute your work, PLEASE DO SO as I want to help the whole PDN community out there.
Teaser:

-
On how to set up inspirations, extract ideas from everyday things you'd see in life and the view of your work from the viewer's perspective. I'd like to know if this is allowed or at least not get victimized by the ultimate lock of doom?

-
If possible, we could add a proper Pen tool, you know.. the advanced complicated looking one we see in Photoshop? Although this should not replace the line tool at all or maybe at least the ability to add more "nubs" to the line for more precise adjusting?
-
Wow these are amazing. I love them, they're so clean and simple yet really effective. Great work 10/10

Did you do that third one with any brushes??
Great work too~ and also did you use brushes for the third one like what the quote said?
-
Woot! I always thought you made the design using a pen tool. Gonna try it out later. :wink:
-
You're ALL wrong.

*rubs hands together*
Prepare to get schooled.
When small to medium sized stars, such as our sun, run out of fuel, they near the end of their life. Then, the star rapidly cools and expands, turning into a Red Giant. After its fuel source is completely depleted, it gradually collapses on itself, turning into a white dwarf.
Large stars, on the other hand, prefer to go out with a bang. At the end of their life, they implode, and create a HUGE explosion, or a supernova. After the supernova, all that is left is an incredibly small point of EXTREME density, heat, and pressure. This small point, can either be a black hole, or a neutron star. If it is a revolving neutron star, it is called a pulsar.
[/geek]
Nice pic, by the way. Your own sun technique isn't very visible, although that might just be me. Keep up the good work!
*gets blown away*
-
Mental block XD *slams face into pencil*
-
Great picture! I like the crumbling part.
Although, when a star is dies, doesn't it shrinks into nothing or it creates a black hole depending on the size?
-
You can smoothen the inner yellow using the Smudge plug-in at a size 8 softbrush with 3% strength
-
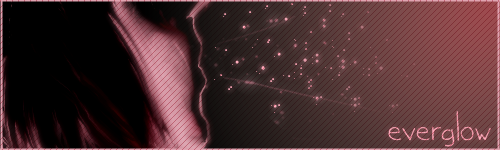
Poast : New signature
-
Due to things being unclear at Step 7, make sure the Black and White layer is on top and is selected for the layer options.
EDIT: Oopsies, the layer filter is supposed to be Multiply.

-
Thanks for the comment :shock:
EDIT: I seem to have a rip-off artwork. *Looks at the floating island*
-
...... o.o Flawless.
Here are mine :oops:


-
Great images! I like how you blend the stocks to match with the background color.
-
Emerge! The flames have been reborn from the ashes!
-
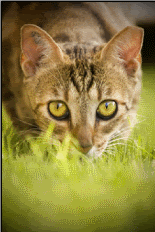
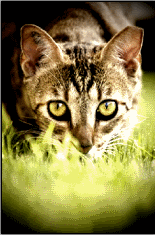
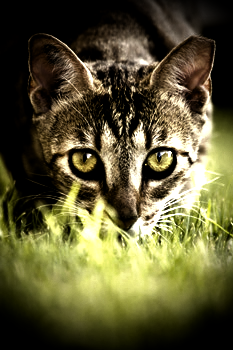
Simulate the effects of a Lomo camera. Photos taken with a Lomo camera have high contrast, twisted colors and a noticeable vignette. EDIT: Changed picture for Step 7, added picture to step 3
Step 1: Get a photo with a breath-taking scene or still-life. For this tutorial, we will use this photo of a feline preparing to pounce at it's prey.

Step 2: Now go to Effects > Photo > Vignette. Follow these steps on the layer:
-Vignette [0.73;1.00]
Step 3: Duplicate the layer.

Step 4: Select the first layer and apply the Black and White adjustment by pressing Ctrl+Shift+G
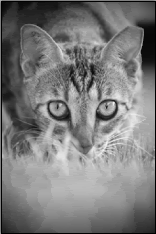
Step 5: With the first layer selected, apply the Brightness/Contrast adjustment by pressing Ctrl+Shift+C. Follow these steps on the selected layer:
-Brightness and Contrast [-5;53]
(You may want to adjust the brightness if it's too dark)
Step 6: Select the duplicated layer or the one that's not black and white. With the 2nd layer selected, apply the Brightness/Contrast adjustment by pressing Ctrl+Shift+C. Follow these steps on the duplicated layer:
-Brightness and Contrast [-5;53]
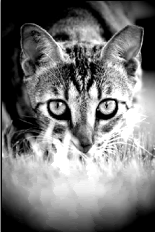
Step 7: Now select the 1st layer or the one that's in black and white. Double-click the 1st layer to open layer properties. Follow these steps on the selected layer:
EDIT: Cleaned up mistake.
Step 8: With the first layer or black and white layer selected, merge the 2 layers together. Voila! You have now simulated the effects of a Lomo camera.
-
I really like the Sig-Avy set and how you use purple to blend in with the picture! Great work!
-
That looks great, Code Ember. I believe that's WoW, I play it.
Thanks!
-
With a bit of patience, a few effects, and super micro 8 size brush smudge-smoothing, it can turn a rough picture into a smooth and light-toneish picture. EDIT: I used a soft brush XD
EDIT 2: It's gonna have to be a 8 to 11 sized soft brush with the strength of 1% to 6% to give it a nice edge smoothening
BEFORE:

AFTER:

-
PyroChild Scenes:
I am known as the smudge man for shouting "I'M SMUDGING! I'M SMUDGING!" at 2 am.
-
1 day. Read lots of tutorials.
Image Umbrella: Signatures, Avatars, Logos & Text
in The Pictorium
Posted
Really like your signature 007 Nab, but I think the diagonal lines are somewhat distorting the text or maybe it's just my eyes.