


ZizOiz
-
Posts
617 -
Joined
-
Last visited
Posts posted by ZizOiz
-
-
try getting the drop shadow plugin, and then instead of having the shadow below the e, try putting the shadow about 5 px above the original image, and about 3 px to the left.
If you do not have the drop shadow plugin, then you can find it by searching.
Does this help?
-
you have to use an external animated .gif maker, like Unfreez. But you can create the frames in PDN I believe there is a tutorial in the tutorials section.
-
as a matter of fact, your problem was you simply didn;t look under the right name. Here is the tutorial you want.
Hope this helps
-
it is. I'm not sure where I picked it up, though. 'Tis ever so much fun to type!

-
indeed it does.
You can use the lasso tool :LassoTool: to select around the person, and then feather('tis a plugin, search to find.) the border. Or you could follow this tutorial for a smoother edge.
Hope this helps.
EDIT: ninja'd!
-
that is indeed a good idea. Some plugin authors do put down the basics of their plugins when they post them, though.
As for clicking on thumbnails,
[url=your bigger picture's address here][img=your thumbnail's image address here][/url]
-
haHA! I solved the problem of having my computer deal with a large canvas by cutting out the part I wanted to smudge.
Without further ado, here it is.
I also did not delete the previous version, so comparisons can be made.
-
is this what you are talking about?
if so, then yes.
The text tool can be used atop photos, but cannot be edited later on. -
Smudging just may crash my dell dimension 4400, though. So I'll try it, then! :twisted:
I actually just deleted the older version and gave the newer version the same URL.
-
that is a bit unclear.
Here, let me try again.
make a new layer, and fill it with solid black. Put this layer on top of all of your other layers.
duplicate the layer where the shape of your button is. Also make sure that your shape is solid black, as well. Place this shape above all of the layers, including the one in the previous step.
draw your line that marks the edge of the shine while you still have the top shape layer selected, and fill the shape with white. It should not fill up the transparent corners of the shape as well. If it does, set to a lower tolerance.
merge the shape layer down on the black layer(the first layer you just made)
run curves+ on advanced with luminosity input and alpha output. Keep the line running from lower left corner to upper right corner.
run curves+again, this time on luminosity instead of advanced, and make the line in the dialogue box run from top left to top right corner. This should make all of your pixels white, whereas before the ones which originally had low luminosity kept their luminosity, they just became less opaque.
was I more clear this time?

-
there is your problem, 'tis part of a package! Here it is!
-
Indeed they are sort of like extra features. Users write them, and then post them to the forum. With plugins, you can do many more things with Paint.NET. The plugins will appear in either the effects or adjustments menu, in the same place as the effects and adjustments that come with the program.
You can find the plugins forums, where you can download plugins, by going to the index page, and going to the plugins-publishing only forum.
Hope this helps.
-
indeed there is a way to do both these things.
The text can be erased and replaced with different text simply by using the clone tool.
The color of the cross can also be changed. You will want to render it, and then look into either curves, hue/saturation, or conditional saturation.
Conditional saturation is a plugin that can be found by searching.
Hope this helps.
-
indeed. What you want is Pyrochild's outline object plugin, found here.
-
ReptiGuy: I don't know, something rounded and sans serif, most likely, to match the style. I'm not exactly the best candidate to give you a matching font, though. :?
MegaNight: look at the dropdown list under the downloader. I think your screen size should be there.

Perhaps the planet in the background could be either made brighter or darker, as right now it's at an uncomfortable middle that directs the eye to where the portal and the planet overlap.
-
Thanks! I had help, though.
Hmmm. dramatic lighting that really draws attention to the focal point, but the eye just stays there, doesn't really move, though. I'm not sure if this is good or a bad thing with sigs...
-
duplicate your bottom layer, and fill the bottom with white instead. Don't fill the top with anything.
Invert colors (control-shift-I)
use curves+, set on advanced with luminosity->alpha.
use curves+ again, this time set to luminosity, and set a straight line across the top of the box. This should make all of your pixels pure white.
Hope this helps.
-
-
You will want the lens plugin. Search for it under plugins, if you don't have it.
Open your picture, and select the line tool. with the line tool, draw from the top left corner to the bottom right corner on you image. While you are doing this, keep an eye on the left side of the status bar on the bottom of your window. This will tell you how ong your line is. Memorize or write this length down.
Press control-Z, to undo the line you just made. You don't want it in the middle of your picture.
go to Image>canvas size, or press control-shift-R. Set the image dimensions to the value you wrote down, for both height and width. Set the little image icon to the center of its grid.
Use the lens effect to get the amount of fisheye you want.
go back to Image>canvas size, and reset to your image's original dimensions.
Hope this helps.
-
the color and bright value of the buttons really attract the eye to them.
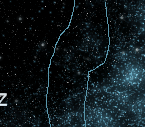
I didn't notice this before, and I don't know if I'm seeing things where there aren't any, but you can sort of see a blocky outline right next to the starfield, though, where the stars get closer together to form a suspiciously geometric pattern. :?
-
Yea you're right... I've kinda become attached to it. It's so pwetty...

it doesn't matter how much you use the fractal, your work still looks unique and original
I concur.
Perhaps the fractal will eventually become synonymous with your work. hmmmm...
-
-
the top one looks sort of like Mark Bagley's work to me. :?
I like the blurring and the unifying color scheme on both.
-
either go to window>layers at the top of your screen in the toolbar, or press F7.
F1 offers many handy tips like this. :wink:
Hope this helps.

Image Umbrella: Signatures, Avatars, Logos & Text
in The Pictorium
Posted
No stocks? :shock: