


kshotts
-
Posts
19 -
Joined
-
Last visited
Posts posted by kshotts
-
-
Is it just me or does this plugin lag all comps?
That's the way it is! Not only you...
New version 2.6 should help a bit. For one, you can stop any active operation... (at least it works for me!) and i stopped blending zero valued pixels - which for flares really improves things (not so much for spheres or diamonds).
I'd be curious to hear if it seems any faster to you guys.
-
Madjik - Yes! Thank you!!!!!!! Can't wait to get home and try this thing out. I was annoyed at the original Twist plugin too, but this looks AWESOME.
-
A new idea (only an idea!): Kshotts, you could merge all your glitter-related plugins into one, for example providing an UI with tabs. The reason is that I also like your first attemps, but I would like to see all of these glitter things together in one UI. Perhaps Madjik would be so kind and help you again, I know him for very professional UIs.
Coming - as additional shapes. A couple of the current shapes approximate the earlier attempts very closely, but not exactly, but I'll be happy to add the others in... I may name them "legacy glow" and "legacy flare" or something similar to make it obvious which ones they are.
And to provide a "preview" checkbox is a good idea. Maybe you should look for speed optimizations, sometimes it gets very slow.
Yeah..... I wish I knew of some speed optimizations. Unfortunately, the system, for every pixel it decides to process, has to then process ((size*2)+1)^2 pixels, which, say, for an image of 800 by 600 with an average size of 50 and, say, a few hundred flares... well... it adds up very quickly! (On the order of millions and millions of pixels... oy!) Plus, it is doing some floating point math behind the scenes: squaring, square-rooting, dividing, multiplying, etc., and that consumes more time than if i could do everything in integer world....
But still, maybe one day something will hit me over the head and point out how it could be made even faster in a simple way...
Oh -yes, the source is still coming, so maybe someone else will figure that part out! ;-)
-
On receiving kshotts explanation, I actually tried it out what you suggested and enjoyed the plugin tremendously.
Thanks! I'm glad you're having fun with it.
I can see myself creating a new black layer over the original picture, placing white spots to activate the plugin, doing a global select of all the black spots on this layer, and deleting all the black areas on this layer.
Then I will be able to move the stars around to wherever I like. Thanks to all for helping.
Just FYI too - I also want to add an option that restricts the flare to your existing selection so that you would have pinpoint control over where the flare was generated. I think it would source the color from the Primary color, and probably fade out with Alpha (so it could be on a different layer) rather than the current method... Some of the options become a little meaningless in that world (like min/max size and probability...) but I think it would be cool for that perfectionist nature in me.
I just have to figure out how to work the UI without making it even more messy/complicated than it is. And what to call these new options... So far the only appropriate label I can think of is "Select source material:" with options "Selection in current layer", "Ignore layer content and use selection with Primary color", and "Generate layer content" (which would generate the dots and such that sources the flares)... I just can't come up with simpler/shorter terms at the moment.
Something will pop in my head eventually, though... anyway, wanted to let you know something like that was coming! :-)
-
Just a thought, but can't you add a checkbox, like "Draw Background" and just run Add Noise (or better, Add Noise +) first in the background?
Well, it's true that the interface seems already quite complicated.
My 2 cents.
It'd be sort of like that... just need to figure out how I want the interface to work without making the interface more complicated...
-
Hi kshotts,
Will the plugin generate the stars and flares over a completely black background?
Tried it without success. Wonder if it's a setting that I should learn.
At the moment the plugin needs something in the image to "source" the flares and stars. A completely black background pretty much has a zero threshold value, which means the plugin will never find source material to work with.
Try it with some random points on the background - you can use either the Stars codelab plugin in this forum (soon to be enhanced... :-) ), or the Add Noise effect; both should work. Or load a picture that has some high contrast so that you can see the effect easily. In all cases, keep the probability low, and if it renders nothing, ramp it up slowly... the higher the probability the more likely you'll freeze your computer while it thinks for every pixel in the image. You can also do the same with "threshold" - ramp it down slowly (again, same caveat applies).
Eventually I'd like to give the plugin the ability to generate its own flares without the need for source material, and also give it the ability to render just one shape in the selection, which would allow pin-point control over size and location of the flare.
Until then, see if the above helps... :-)
-
Updated plugin to version 2.1, grab here: Sparkle_Glitter.dll (v2.1)

Changes:
* Added additional shapes, including a 45 degree rotated flare, an eight-spoke flare (45 + 0 degree rotated flare), and a flare combo which picks 0 degree rotated flare 50% of the time and 45 degree rotated flare the other 50% of the time
Modified GUI
* Instead of the previous trackbars, the GUI uses an interface similar to Paint Shop Pro: the bar underneath the text box is a slider. It can be clicked/dragged to select values just like a trackbar. Also added a "rnd" button to many of the options - click to get a random number for the given control. (The only control without rnd is the probability control; this is to prevent the number generated being so high that the computer goes nuts trying to create the glitter)
* Seed gets the new slider control too, so you can randomly pick a seed, as well as select a specific seed.
* Added version/date string on the GUI so you can tell which version you've got
* Changed "Brightness" to "Intensity"
Anyone got suggestions for more shapes? Or any other suggestions are always appreciated, too :-)
-
@kshotts, I've since used this plugin and it is extremely interesting. I'm really liking the output!
Here are a few points of corrective criticism:
First, the 'Brightness' option should be called 'Intensity'. Reason being, when the 'Blend Mode' is set to 'Subtract' the glitter isn't bright...
Second, would it be possible to make the 'Seed' option scrollable or maybe add a 'Random' button? I think that might be helpful.

Thanks :-) I've updated the plugin, including these suggestions. Brightness is renamed Intensity, and Seed has a random button :-)
-
Congratulations to your fast and impressive forward steps!!!
Lots of the credit goes to Madjik... His source code for his plugin helped immensely in building my own UI... Thanks Madjik! :-)
-

Sparkle_Glitter.dll (version 2, 09/19/07)
Found under Render --> Glitter (replaces my previous Glitter plugin, so if you prefer that version, make a backup before downloading!), this plugin lets you generate glowing spheres, diamonds, and flares, with lots and lots of parameters (as evidenced in the above screenshot).
Here's an example image using each of the shapes (though not nearly each different combination of options):

A short description of each option:
Shape: Determines the shape of the glitter. Available shapes are circle, diamond, and two kinds of flares.
Threshold: As always, specifies the minimum value of any pixel (in R,G, or B, or A overall) before further processing occurs.
Maximum Size: Maximum size of the glitter
Minimum Size: Minimum size of the glitter. NOTE: If these two values are different, the system will generate a glitter with a random size between the minimum and the maximum. The only way to generate glitter of a consistent size is to make the two values equal.
Probability: For each pixel that is going to be processed, this is the probability it will be processed. For images with LOTS of pixels that'll be processed, use a low probability (like .010); for an image with only a few pixels that will be processed, use a high probability (like 20).
Brightness: Adjusts the brightness of the glitter, up to four times.
Blend Mode: Determines the type of blending used when rendering the glitter. Available modes: Overwrite, Add, Subtract, Multiply, and Average. "ADD" produces some of the best results, though "Ovewrite" can generate very cool results when using Circle shapes and large sizes (resulting image is similar to molecules... very cool). Subtract works best on bright content (otherwise the glitter isn't very visible). Multiply doesn't do a whole lot at the moment... and average does an average between the area and the glitter, not sure what this can be used for.
Seed: Determines the random # seed. Assuming the probability and the threshold aren't changed, you can modify brightness and other options without changing the arrangement of glitter by keeping this number the same.
Process Center Pixel: if checked, the center pixel is processed. This means that it is blended with itself. If the blend mode is Add or Subtract or Multiply, then the pixel is modified (Add produces a brighter pixel). Sometimes desirable, sometimes not.
Vary Size Based On Value: This varies the size of the glitter based upon the value of the pixel being processed (i.e., a bright pixel produces a brighter piece of glitter). If not checked, the glitter varies between Minimum size and Maximum size irregardless of value.
Important Note: Since some options can consume significant CPU time (if lots of glitter ends up being drawn), this plugin comes with a safety: it only renders if "Preview" is checked, or when "OK" is pressed. While this won't stop the plugin from consuming a lot of CPU with bad settings, it does at least prevent just accessing the plugin for the first time on any image from nuking the CPU. For this reason, Preview does not save its state - it must be checked each time it is used to enable real-time updates.
Have fun! Source code is coming soon as soon as I package it up into something nice (Thanks to Madjik for such excellent source code in his plugin... :-) ). (This is also re-posted on the first post)
-
I really, really, really like this plugin! ^_^ I've found it really entertaining, and it makes shooting stars look cool!
But you know what I would love even more? The ability to change the color of the sparkles. That would be awesome!!
P.S. This plugin has GOT to be stickied.
I can only speak for my own plugins - the glitter version does vary in color depending upon the source pixel (esp. if the threshold is set low, but that also comes at a significant increase in CPU time depending on your other settings). But once I figure out how to build a nice UI, it would be cool to have a color filter one could apply... or maybe I could even use the primary/secondary colors... that wouldn't require a new UI at the moment...
-
First of all, the initial idea belongs to kshotts: scanning the picture to find out the little shinning stars to add them some sparkles.
(and second, some of my words could be wrong/non sense, forgive my english if so!)
@kshotts: could you please link this to your first topic. (Or should I restart a new topic for my plugin? Let me know.)
I'm calling flaRe the circle and flaKe the star.
...
I added a link and a copy of part of your post to the front page...
You can gaurantee I'm looking through your source code because I've been wanting to add more than three sliders to my UI too...! I think'd also be cool to be able to lump a lot of the options under one larger UI (i.e., one option could be: Glitter, Glow, Star, etc... that would determine the kind of effect... but maybe not... may be out of my league and time available!) I want to at least add a check box that can turn on/off the randomness, and maybe add additional options with regards to the shape of the sparkle.... lots of thoughts rolling around, not enough time to implement...
I do want to figure out how to make the firsttime indicator always reset to zero... if I could figure that out I've got a lot of other things I want to try, but until I get that right, I'm hesitant to build a lot of plugins that I'd have to go back and fix once I do figure out the solution..... Any one out there know a solution?
Beautiful examples, btw!
-
Stars doesn't work, it starts on the top maybe 10% of the image and renders the rest of the image black.
Really? What settings are you using? Size of image? Since I've only tested against a black background with white primary color, does it work with that?
-
A couple more goodies, just because my brain wouldn't let things go.... They aren't perfect, by any means, but they are a little more sane for large images (at least on my computer)...
Sparkle Stars: Located under Render -> Stars, is a lot like Add Noise, except that it is a little more suited to sparse starfields, IMO. The controls are a little wonky, yeah, but the default settings should give a pretty good example. I'd suggest having your primary color be white and fill the background black to see anything of interest... haven't tried it with other settings... should be interesting tho! "Star Probability" indicates how likely any pixel is to become a star; 1000 is equivalent to 10%. "Intensity" affects how bright the resulting stars are; the higher the number the lower the brightness; 1500 seems to do a decent job. "Saturation" indicates whether the stars can have color or not; 255 = lots of color, 0 = grayscale.
Sparkle Glitter: Located under Render -> Glitter, is a work in progress - pretty much like all the other things here :-) Be careful with it - the wrong setting can cause your computer to think a VERY long time...
Sparkle Glitter has three settings: "Brightness Threshold" (default 200) selects only pixels with a value (in R, G, or B channel) greater than the threshold. (It also expects Alpha to be greater than threshold). "Maximum Glitter Size" (default 100) indicates how large the glitter can become. However this doesn't mean every glitter placed on the image will be this size - there's a lot of randomness going on underneath so that the glitter can be anything from 0 (none) to the full size. "Glitter Possibility" is the change that any pixel that meets the threshold requirements will become a glitter pixel. Keep this low images with lots of pixels that would satisfy this requirement... and by low, I mean between 5 and 15. On smaller images with fewer pixels this can go up much higher, but the small values work best on large images. The default is 5.
Glitter takes a few seconds to compute the image before it renders it on-screen, and I'm certain I'm not really doing it the right way, but it was the best I could come up with at the moment to get around Paint.NET's pipelining of the image... Unfortunately this brings with it its own share of bugs... namely when anything less than the entire image(/selection) is on screen, well... it doesn't listen to your changes.... I will post code below and see if anyone else can think of a decent solution... (The problem is in determining when I'm rendering the very first time... I tried to do that by assuming the first thing rendered was the top left of the selection, but that isn't always true... :-( )
Just remember: for best performance of Glitter, keep the threshold high, the glitter size reasonable (especially if you intend to process a lot of pixels over the threshold) and keep the possibility low (within 5-15).
Anyway - here's a sample of Glitter:

And the code...
int Amount1=200; // [0,255]Select Brightness Threshold int Amount2=100; // [0,100]Maximum Glitter Size int Amount3=005; // [0,500]Glitter Possibility Random rNum = new Random(0); bool randomness = true; int FirstTime = 0; Surface tmp; void Render(Surface dst, Surface src, Rectangle rect) { int Threshold = Amount1; int MaxSize = Amount2; double Brightness = 1;//(double)Amount3/100; double Possibility = (double)Amount3/1000; // Delete any of these lines you don't need Rectangle selection = this.EnvironmentParameters.GetSelection(src.Bounds).GetBoundsInt(); ColorBgra CurrentPixel; ColorBgra OriginalPixel; int top = selection.Top; int left = selection.Left; int bottom = selection.Bottom; int right = selection.Right; int itop; int ileft; int ibottom; int iright; double val; int xdif; int ydif; double Weight = 0; int size = MaxSize; double Divi = 1; if (rect.Top == selection.Top && rect.Left ==selection.Left) { FirstTime = 0; } FirstTime = FirstTime + 1; if (FirstTime==1) { try { tmp.Dispose(); } catch { } tmp = new Surface( src.Width, src.Height ); for(int y = top; y < bottom; y++) { for (int x = left; x < right; x++) { tmp[x,y] = src[x,y]; } } for(int y = top; y < bottom; y++) { for (int x = left; x < right; x++) { CurrentPixel = src[x,y]; if ( ( CurrentPixel.A > Threshold ) && ( ( CurrentPixel.R > Threshold ) || ( CurrentPixel.G > Threshold ) || ( CurrentPixel.B > Threshold ) ) && ( rNum.Next(0,(selection.Width * selection.Height)) <((selection.Width*selection.Height)*Possibility) )) { if (randomness) { size = rNum.Next(0,(MaxSize * (((Math.Max(Math.Max(CurrentPixel.R,CurrentPixel.G),CurrentPixel.)) - Threshold)/(255-Threshold))); } if (size > 1) { itop = y-size; ileft = x-size; iright = x+size+1; ibottom = y+size+1; if (itop < top) { itop = top; } if (ileft < left) { ileft = left; } if (iright > right) { iright = right; } if (ibottom > bottom) { ibottom = bottom; } for (int y1 = itop; y1 < ibottom; y1++ ) { for (int x1 = ileft; x1< iright; x1++) { xdif = Math.Abs(x1-x); ydif = Math.Abs(y1-y); val = (((size^2)-(Math.Sqrt(size)))-(xdif * ydif)) /Brightness; if (x1==x || y1==y) { val = val - (Math.Max (xdif, ydif)/(Brightness*2)); } val = val * (255/size) ; if (val<0) { val=0; } if (val>255) { val=255; } OriginalPixel = tmp[x1,y1]; OriginalPixel.R = (byte)((double) Math.Min(255,((OriginalPixel.R + (CurrentPixel.R * (val/255)))))); OriginalPixel.G = (byte)((double) Math.Min(255,((OriginalPixel.G + (CurrentPixel.G * (val/255)))))); OriginalPixel.B = (byte)((double) Math.Min(255,((OriginalPixel.B + (CurrentPixel.B * (val/255)))))); tmp[x1,y1] = OriginalPixel; } } } } } } } for(int y = rect.Top; y < rect.Bottom; y++) { for (int x = rect.Left; x < rect.Right; x++) { dst[x,y] = tmp[x,y]; } } } -
Yeah... I want to. Maybe now that my brain is a little more turned on I'll be able to figure out how to make it the way I really wanted it to be... For now it doesn't like a lot of pixels close together... it works best on sparse images (like stars), but technically it should work... I've got something wrong with the averaging mechanism, I think...
Also, anything of Brightness > 1 will definitely give the effect, since the plugin only processes size by size pixels; Brightness > 2 tends to give marked boundaries between where the effect worked and where it didn't. Another thing I want to work on....
Maybe soon I'll have a fix :-)
-
Source code; the difference between glow and flare is simply an addition instead of multiplication on the line where the weight is calculated. A lot is no doubt wrong here... being sick will do that to you! ;-)
Not sure how to speed it up much more in its current incarnation, seeing that it has to sum the entire matrix of size^2 pixels (hence why it quickly slows down), although I'm sure there are more efficient and better ways to do what I'm doing! :-)
int Amount1=220;// [0,255] Select Brightness Threshold int Amount2=5;// [0,100] Maximum Flare Size int Amount3=1;// [0,100] Brightness void Render(Surface dst, Surface src, Rectangle rect) { int Threshold = Amount1; int MaxSize = Amount2; int Brightness = Amount3; /********************************************************************************** * * SPARKLE: Flare plugin for Paint.NET Codelab * * ********************************************************************************** This plugin "sparkles" the image by taking certain pixels above a threshold and then "blurring" them and brightening them across a random area of the image. Pixels below the threshold are left untouched, though they may be blended into the remaining result. Version 1.0 Author: Kerri Shotts Version 1.1 Changes: made it faster by removing the check if the pixel was visible. Still slow on high values, but much more tolerable! **********************************************************************************/ PdnRegion selectionRegion = EnvironmentParameters.GetSelection(src.Bounds); // Delete any of these lines you don't need Rectangle selection = this.EnvironmentParameters.GetSelection(src.Bounds).GetBoundsInt(); ColorBgra CurrentPixel; ColorBgra LookPixel; float R = 0; float G = 0; float B = 0; float A = 0; long AvgCount = 0; for(int y = rect.Top; y < rect.Bottom; y++) { for (int x = rect.Left; x < rect.Right; x++) { CurrentPixel = src[x,y]; int size = MaxSize; float mult = (int)(size*1.5); float Weight = 0; R = CurrentPixel.R; //0; G = CurrentPixel.G; //0; B = CurrentPixel.B; //0; A = CurrentPixel.A; //0; AvgCount = 1; for (int y1 = Math.Max(y-size,selection.Top); y1 <= Math.Min(y+size,selection.Bottom-1); y1++ ) { for (int x1 = Math.Max(x-size,selection.Left); x1<= Math.Min(x+size,selection.Right-1); x1++) { LookPixel = src[x1,y1]; if ( (LookPixel.A > Threshold) && ( (LookPixel.R > Threshold) || (LookPixel.G > Threshold) || (LookPixel.B > Threshold) ) ) { Weight = (mult / Math.Max(1,( Math.Abs(x-x1) * Math.Abs(y-y1) ))); R = R + ((LookPixel.R * (Weight) + CurrentPixel.R * (Weight))/mult); G = G + ((LookPixel.G * (Weight) + CurrentPixel.G * (Weight))/mult); B = B + ((LookPixel.B * (Weight) + CurrentPixel.B * (Weight))/mult); //A = A + (LookPixel.A * (Weight) + CurrentPixel.A * (Weight))/mult),0); AvgCount = AvgCount + 1; } } } if (AvgCount > 1) { CurrentPixel.R = (byte) (Math.Min(255,R*Brightness/AvgCount)); CurrentPixel.B = (byte) (Math.Min(255,B*Brightness/AvgCount)); CurrentPixel.G = (byte) (Math.Min(255,G*Brightness/AvgCount)); CurrentPixel.A = (byte) src[x,y].A; } dst[x,y] = CurrentPixel; } } } -
I figured out part of the slowness, so I've reposted. It should be MUCH faster now for small sizes. Larger sizes are still slow. Hopefully it'll work better for you now :-)
-
MODERATORS NOTE: This effect is incompatible with Paint.NET 4.0x
Plugin Downloads
The plugins are now attached to this post instead of downloading from my site... (I'm going through a redesign and nuked the links... sorry!)
Sparkle.zip
Madjik's Sparkle plugin
Update 10-31-2007
Happy Halloween!
Lots of Changes:
* As obvious above, revamped UI
* Added additional shape: Square (rotated diamond)
* Added "Rainbow Color" option (it's not perfectly what I wanted, but it works... based on the intensity of the pixel, a rainbow-colored hue is added; so the shape goes through red, green, blue, etc. depending on its intensity.)
* Added "Use Selection to Render Glitter" option that lets you specify exactly where you want an individual piece of glitter. If no selection, then the glitter fills the image. Along with this option comes the X/Y/Size adjustment parameters that let you adjust the position and size of this rendered glitter (it's really hard to get the selection exactly centered over the point desired). Note: this option uses the primary color - NOT the pixel in the center of the selection.
* Re-ordered sliders a bit; threshold/probability go together.
* Vary Size According to Pixel is now "Adjust Size According to Intensity"
* Enhanced shape selection list box - includes description and formulas
* Enhanced performance (depends on shape) by avoiding pixel blend operations on zero-value pixels. For flares this really helps the speed out (at least on my machine)
* For those moments where you really pooch things by picking bad settings, there is a progress bar and a STOP button that appears during rendering when previewing. You can click STOP and kill the current operation, or just watch the progress bar (if that helps). If you change any option while rendering the rendering will stop. Most importantly, it will NOT begin re-rendering with your new setting - it just halts the current operation. Change the value again, or uncheck/check Preview again to restart rendering. Even with that quirk at least you can get out of a forever operation without killing the process. (STOP does NOT work when rendering based on the selection; since there's only one flare being rendered, the operation is likely to be over quickly, so STOP is not supported in that configuration.)
* The effect is now a single-threaded effect due to the previous point - lots of hacks going on to allow the "panic" STOP button.
* Modified the Average blend operation to be more useful
* Added Weighted Average and Weighted Average (Alternate) blend operation
* Modified Multiply Blend operation a bit
* Enjoy & Have Fun!
Update 09-23-2007
Changes:
* Added additional shapes, including a 45 degree rotated flare, an eight-spoke flare (45 + 0 degree rotated flare), and a flare combo which picks 0 degree rotated flare 50% of the time and 45 degree rotated flare the other 50% of the time
Modified GUI
* Instead of the previous trackbars, the GUI uses an interface similar to Paint Shop Pro: the bar underneath the text box is a slider. It can be clicked/dragged to select values just like a trackbar. Also added a "rnd" button to many of the options - click to get a random number for the given control. (The only control without rnd is the probability control; this is to prevent the number generated being so high that the computer goes nuts trying to create the glitter)
* Seed gets the new slider control too, so you can randomly pick a seed, as well as select a specific seed.
* Added version/date string on the GUI so you can tell which version you've got
* Changed "Brightness" to "Intensity"
Update 09-19-2007
Found under Render --> Glitter (replaces my previous Glitter plugin, so if you prefer that version, make a backup before downloading!), this plugin lets you generate glowing spheres, diamonds, and flares, with lots and lots of parameters (as evidenced in the above screenshot).
A short description of each option:
Shape: Determines the shape of the glitter. Available shapes are circle, diamond, and two kinds of flares.
Threshold: As always, specifies the minimum value of any pixel (in R,G, or B, or A overall) before further processing occurs.
Maximum Size: Maximum size of the glitter
Minimum Size: Minimum size of the glitter. NOTE: If these two values are different, the system will generate a glitter with a random size between the minimum and the maximum. The only way to generate glitter of a consistent size is to make the two values equal.
Probability: For each pixel that is going to be processed, this is the probability it will be processed. For images with LOTS of pixels that'll be processed, use a low probability (like .010); for an image with only a few pixels that will be processed, use a high probability (like 20).
Brightness: Adjusts the brightness of the glitter, up to four times.
Blend Mode: Determines the type of blending used when rendering the glitter. Available modes: Overwrite, Add, Subtract, Multiply, and Average. "ADD" produces some of the best results, though "Ovewrite" can generate very cool results when using Circle shapes and large sizes (resulting image is similar to molecules... very cool). Subtract works best on bright content (otherwise the glitter isn't very visible). Multiply doesn't do a whole lot at the moment... and average does an average between the area and the glitter, not sure what this can be used for.
Seed: Determines the random # seed. Assuming the probability and the threshold aren't changed, you can modify brightness and other options without changing the arrangement of glitter by keeping this number the same.
Process Center Pixel: if checked, the center pixel is processed. This means that it is blended with itself. If the blend mode is Add or Subtract or Multiply, then the pixel is modified (Add produces a brighter pixel). Sometimes desirable, sometimes not.
Vary Size Based On Value: This varies the size of the glitter based upon the value of the pixel being processed (i.e., a bright pixel produces a brighter piece of glitter). If not checked, the glitter varies between Minimum size and Maximum size irregardless of value.
Important Note: Since some options can consume significant CPU time (if lots of glitter ends up being drawn), this plugin comes with a safety: it only renders if "Preview" is checked, or when "OK" is pressed. While this won't stop the plugin from consuming a lot of CPU with bad settings, it does at least prevent just accessing the plugin for the first time on any image from nuking the CPU. For this reason, Preview does not save its state - it must be checked each time it is used to enable real-time updates.
Update 09-17-2007
Madjik is AWESOME! Some very cool examples of his plugin based on the above is at http://paintdotnet.forumer.com/viewtopic.php?p=99688&sid=5311c042169fd8b9aaa3a0fcbc7dde25#p99688. To copy shamelessly from his post:
...
I'm calling flaRe the circle and flaKe the star.
The effect is in the submenu Distort.
From the codelab of kshotts
and another code I'm working on,
I've made this plugin :
==> Here is the DLL <==
==> Here is the source of the DLL <==
____________________________________________
To install:
Close Paint.net
Unzip and (re)place the DLL in your Effect folder usualy: C:/Program Files/Paint.NET/Effects
____________________________________________
The user interface: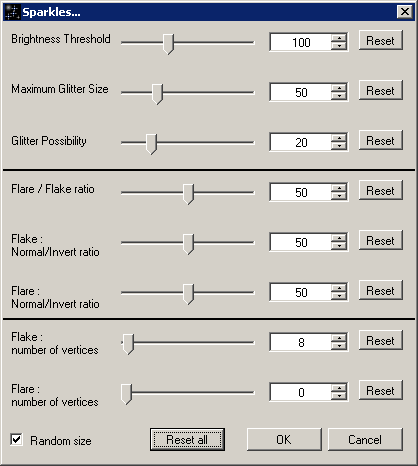
__Brightness Threshold (20,255, default=100) increase the value to select only the brightest pixels.
__Maximum Glitter Size (0,200, default=50) maximum (if random checked) radius.
__Glitter Possibility (0,100, default=20) Possibility (0=none, 100=all) for a bright pixel to receive a glitter.
__Flare/Flake ratio (0,100, default=50) 0=only flares, 100=only flakes, other=ratio between flares & flakes.
__Flake normal/invert ratio (0,100, default=50) 0=only normals, 100=only inverts. Normals are brighter in the center.
__Flare normal/invert ratio (0,100, default=50) 0=only normals, 100=only inverts. Normals are brighter in the center.
__Flake number of vertices (0,400, default=8) Quantity of vertices for the flake (star).
__Flare number of vertices (0,400, default=0) Quantity of rays to draw for the flare (0=perfect circle).
__Random size (default=checked) if checked all glitters have a random radius up to the selected maximum size. Else they all have the same size to the maximum.
____________________________________________
Some examples:
Original model: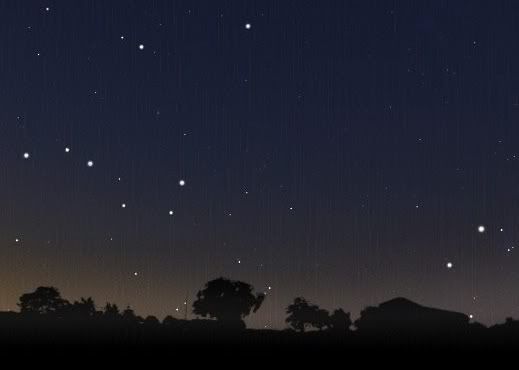
Only flakes: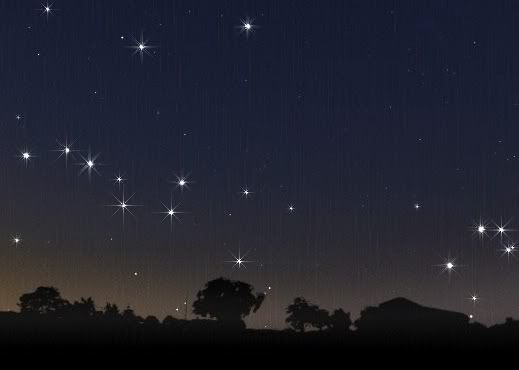
Only flares: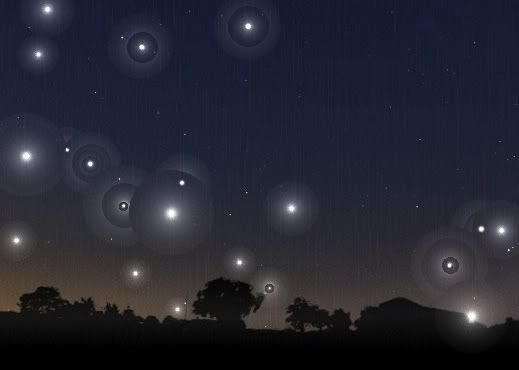
INFORMATION:
__The glitters are created from the top-left corner to the bottom-right corner. The last one overwrites the first one.
__A spot with a small radius is made with several pixels and each pixel of the spot could receive a glitter.
WARNING: Don't use this plugin with a white image or Brightness Threshold with a too small value:
each pixel is considered as bright the CPU will do tons of calculation!
So again, please save your work before trying any new plugin/setting...Update
Created two new plugins: Stars and Glitter.
Sparkle Stars: Located under Render -> Stars, is a lot like Add Noise, except that it is a little more suited to sparse starfields, IMO. The controls are a little wonky, yeah, but the default settings should give a pretty good example. I'd suggest having your primary color be white and fill the background black to see anything of interest... haven't tried it with other settings... should be interesting tho! "Star Probability" indicates how likely any pixel is to become a star; 1000 is equivalent to 10%. "Intensity" affects how bright the resulting stars are; the higher the number the lower the brightness; 1500 seems to do a decent job. "Saturation" indicates whether the stars can have color or not; 255 = lots of color, 0 = grayscale.
Sparkle Glitter: Located under Render -> Glitter, is a work in progress - pretty much like all the other things here :-) Be careful with it - the wrong setting can cause your computer to think a VERY long time...
Sparkle Glitter has three settings: "Brightness Threshold" (default 200) selects only pixels with a value (in R, G, or B channel) greater than the threshold. (It also expects Alpha to be greater than threshold). "Maximum Glitter Size" (default 100) indicates how large the glitter can become. However this doesn't mean every glitter placed on the image will be this size - there's a lot of randomness going on underneath so that the glitter can be anything from 0 (none) to the full size. "Glitter Possibility" is the change that any pixel that meets the threshold requirements will become a glitter pixel. Keep this low images with lots of pixels that would satisfy this requirement... and by low, I mean between 5 and 15. On smaller images with fewer pixels this can go up much higher, but the small values work best on large images. The default is 5.
Glitter takes a few seconds to compute the image before it renders it on-screen, and I'm certain I'm not really doing it the right way, but it was the best I could come up with at the moment to get around Paint.NET's pipelining of the image... Unfortunately this brings with it its own share of bugs... namely when anything less than the entire image(/selection) is on screen, well... it doesn't listen to your changes.... I will post code below and see if anyone else can think of a decent solution... (The problem is in determining when I'm rendering the very first time... I tried to do that by assuming the first thing rendered was the top left of the selection, but that isn't always true... :-( )
Just remember: for best performance of Glitter, keep the threshold high, the glitter size reasonable (especially if you intend to process a lot of pixels over the threshold) and keep the possibility low (within 5-15).
I've created a few quick & dirty plugins that add a "glow"/"flare" effect for use in generating things like starfields, etc. The image below shows both plugins in action:
I've also created a Glitter and Stars plugin; glitter is shown below:
There are three parameters for Flare/Glow that controls the strength of the effect:
Brightness Threshold (0-255): This parameter indicates what level of brightness should be used as the trigger to cause the effect. Pixels with a brightness (in any channel, in addition to requiring the Alpha channel to be at least this level) higher than the value indicated will be processed and those that are not will be left alone (although potentially blended into the glow/flare from another high-value pixel). Note that the lower this value, the more pixels will be picked up and blended, resulting in lower brightness overall.
Maximum Flare Size (0-100): This controls the size of the flare/glow. The larger this size, the slower the plugin runs... 5-10 are decent values, anything larger takes a LONG time. Also note that the number of high-level pixels within range of the current pixel will dictate the brightness of the flare (more means less bright).
Brightness (0-100): This is a simple multiplier; it multiples the final result by the value specified. A value of two doubles the brightness, etc. The brightness is capped at white, so there should not be any odd colored pixels if the brightness is pushed to far, only a very white image.
Neither is perfect, granted, and it's pretty slow. But it's version 1, and it worked for what I wanted it to do, which was give a little ambience to a starfield.MODERATORS NOTE: This effect is incompatible with Paint.NET 4.0x
Sparkle! Plugins (v2.6; Updated: 10/31/2007)
in Plugins - Publishing ONLY!
Posted
Woops! My bad. I'm going through a site redesign, and nuked the links. Doh!
I've attached the plugins previously on my site to the post in a zip file - just so this won't happen again :-)