


mustang maverick
-
Posts
141 -
Joined
-
Last visited
Posts posted by mustang maverick
-
-
Ahhhh sorry BoltBait that was a bit misleading. I suppose what I meant was that the 'Pop Out' isn't all the image consists of. Like this.
Yours contains other elements that make up the image. Where as my image consists of the girls face, and her face only.
Sorry about that. :oops:
*EDIT: For all those that care to look-
I posted an edited version of my Neurology piece on my DA account.
http://mustangmaverick.deviantart.com/art/Neurology-61996231
-
Nice BoltBait.
That is one of the nicest 'Pop Outs' I have seen.
I guess what I like about it is that it is incorporated into another image. The 'Pop Out' itself isn't the image.
Way to go!
:wink:
-
-
@Ash and maverick: Nice!
I am a bit late with my reply.
Thanks!
:wink:
-
Nice job Ash.

Everything is better FULL SIZE .
http://www.deviantart.com/deviation/61953309/
*Colorized in PDN.
-
Yata you said that very well!
-
To move a selection you can use this tool
 , it does a pretty fair job. It can be found in the Tools window.
In the bottom left corner of your Layers window there is a button, Add a New Layer. It will add a new layer on top of all the others. The blue up and down arrows will move the selected layers either up or down. Use them to move your background to the background of your image. Use them to move the middel ground to the middle ground of and image. And use them to move the foreground to the foreground of the image. If they are all contained in seperate layers that is.
Hope that helps.
:wink:
-
Very well put Sozo.
CMD yours wasn't too Shabby either.
:wink:
-
That would be cool.
VERY

-
Nodds head in agreement. 8)
-
[bB's Band-Aid] Nice orb. I can see a soccer ball being product of the same technique. [/bB's Band-Aid]
:wink:
-
This is, after all a tut on making the textures, not "how to draw a tiger"
Everyone should try making something different with the texture, not everyone drawing a tiger.
This, in my opinion, goes for all tutorials. Don't just follow the tutorial to learn how to make the fire, or to make the tiger. Follow it to learn the techniques used to make the fire or tiger.

-
It is a great tutorial to say the least.
Just thought I would be generous.
TakeMangaka's CG Painting tutorial
:wink:
-
Nice.
-to say the least.
:wink:
-
Beggers can't be choosers bub.
You asked and got an answer, thus putting you better off than before.
-
Great job Janettsue
:wink:
-
@Timbo
Curves works good
So does color filter
They both work well when coloring an image.
Good luck.
:wink:
-
I used Ash's latest tutorial to render the grass.
It's a good one by the way.
EDITED: w/ Suggestions from Spike 121, and adhanberry.

@Spike
With the elongated stars, it looks like a long exposure photograph.
:wink:
-
I believe it is:
[url=URL of page you wish to link to][img=URL of sig. image][/url]
-
Looks great Ash!
Another great tutorial!
Thanks for the credit. I appreciate that.
:wink:
EDIT:
My first rendering using this technique.
I wanted the point of view to be from laying down in a field.
That was the intention at least.

Ash I used a minute amount of motion blur on the grass. It seemed to give the grass a bit more 'direction'.
(Just a suggestion.)
:wink:
-
I have done this before I usually use various blurs. Not on the whole image but on the select area. Curves helps too. Also try playing with opacity.
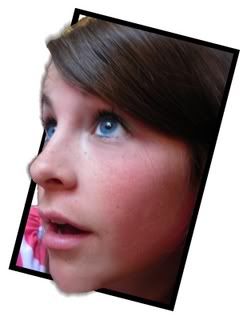
This image is made of two images. Both of the same girl. But I took one part from another picture and added it to the original picture. To get what you see below.

Good luck.
Hope this helped.
-
@thanks mustang I've still to do your tut but it looks real good
try it when I get back from holidays.
ps for all those who just hate polar inversion (take a look at her hair) loads of cutting and pasting various portions but its still there
I'll hold you to that Oma. :wink:
To address polar inversion; You have what I like to call a good understanding of the effect. You use it well. Polar inversion in the right hands is a wonderful tool. Oma I believe you are one who has these said hands.
:wink:
-
Nice job Oma!
Have a good trip!
:wink:
-
haha
If you are still going to do it- Good Luck!
:wink:

 , it does a pretty fair job. It can be found in the Tools window.
The Pictorium! Post your created or edited images here!
in The Pictorium
Posted
Sorry guys....
Its been a while since I have posted. School has sort of put a damper on things.
Although I have been playing with fractals.
This is the best I have come up with since my last post.
Full Size on my DA.
http://mustangmaverick.deviantart.com/art/Trailing-62583739
Check it out.